Phanteks P500A Case Review: New Best in Noise-Normalized Thermals
Posted on July 10, 2020
The Phanteks P400A Digital was our winner for best overall case in 2019, but our feelings were mixed about the less-expensive P300A because of its single stock fan. Today, we’re reviewing the latest addition to the family, the Phanteks Eclipse P500A Digital, to see whether Phanteks is back on track.
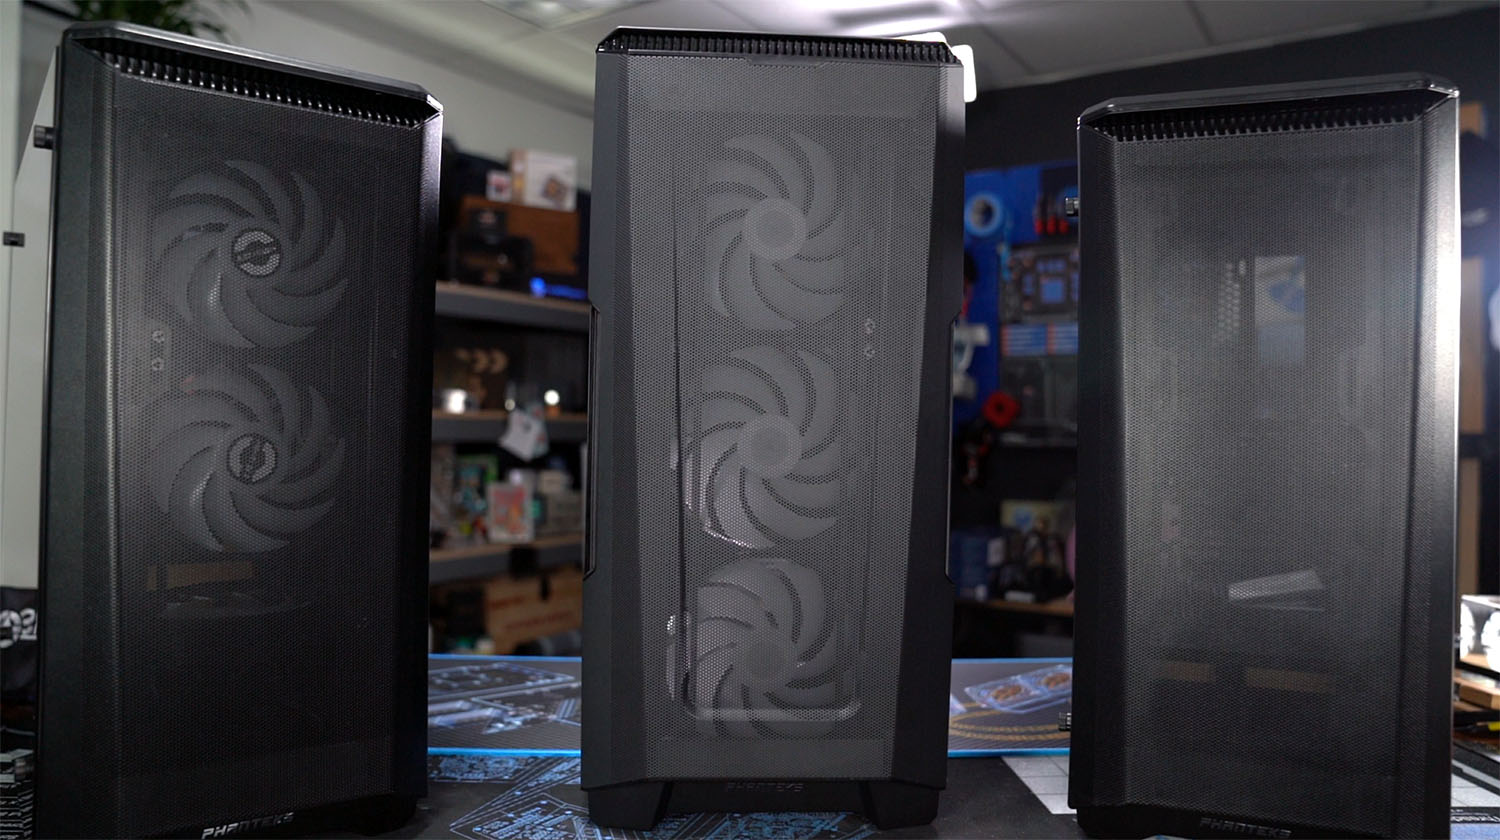
Like the P400A, the P500A comes in both normal and “digital” variants. The base model comes with two 140mm non-RGB fans, the digital version comes with case lighting effects and three 140mm “D-RGB” fans, which is how Phanteks refers to addressable RGB. Listed specs for the fans are identical other than the LEDs. The lighting is compatible with the 3-pin 5V headers used by ASUS, MSI, ASRock, etc. Other than the fans, thin strips at the top of the front panel and along the edge of the PSU shroud are lit. The base model has a reset button, the D-RGB model replaces this with color and mode buttons. The built-in controller has baked-in lighting profiles for those that can’t or don’t want to use control software.
The Build
Case Dimension (WxHxD) | 240 mm x 510 mm x 505 mm / 9.45 in x 20.1 in x 20.0 in |
Form Factor | Mid Tower |
Materials | Steel Chassis |
Motherboard Support | E-ATX*, ATX, micro-ATX, mini-ITX (E-ATX up to 280mm wide) |
Front IO | USB-C GEN 2 2x USB 3.0 Microphone/Headphone Reset Button Power Button LED Mode Button LED Color Button |
Connectors | Power Switch Reset Switch HD-audio D-RGB Power-LED HDD-LED USB 3.0 USB 3.1 GEN 2 D-RGB Expansion D-RGB MB Adapter |
Side Window | Tempered Glass Window |
PCI Slots | 7+3 vertical |
Vertical GPU | Yes 3-slots, with optional Riser Cable |
Internal 3.5”bay | 10 (2x included, also supports 2.5” drives) |
Internal 2.5”bay | 3 (3x included) |
Total Fan Mounts | 7 x 120 mm / 6 x 140 mm |
Front Fan | 3 x 120 mm / 3 x140 mm (3 x 140 mm D-RGB included) |
Top Fan | 3 x 120 mm / 2 x 140 mm |
Rear Fan | 1 x 120 mm / 1x 140 mm |
Dust Filters | Front / Top / Bottom PSU |
Front Radiator | Up to 360 / 420* mm |
Top Radiator | Up to 360 / 280 mm |
Rear Radiator | 120/140 mm |
GPU Length | 435 mm / 17.2 in |
CPU Cooler Height | 190 mm / 7.5 in |
Motherboard Width | 280 mm / 11.0 in |
PSU Length | 195/250 mm (4 HDD bottom brackets used/ 2 HDD brackets used) |
Cable Management | Velcro Strips / Slidable Cable Covers / Zip Tie Mounts |
Package Dimension | 325 x 610 x 610 mm / 12.8 x 24 x 24 in |
Net Weight | 8 kg / 17.6 lbs |
Gross Weight | 10 kg / 22.0 lbs |
*Spec sheet taken from reviewer’s guide, we don’t necessarily agree with all claims
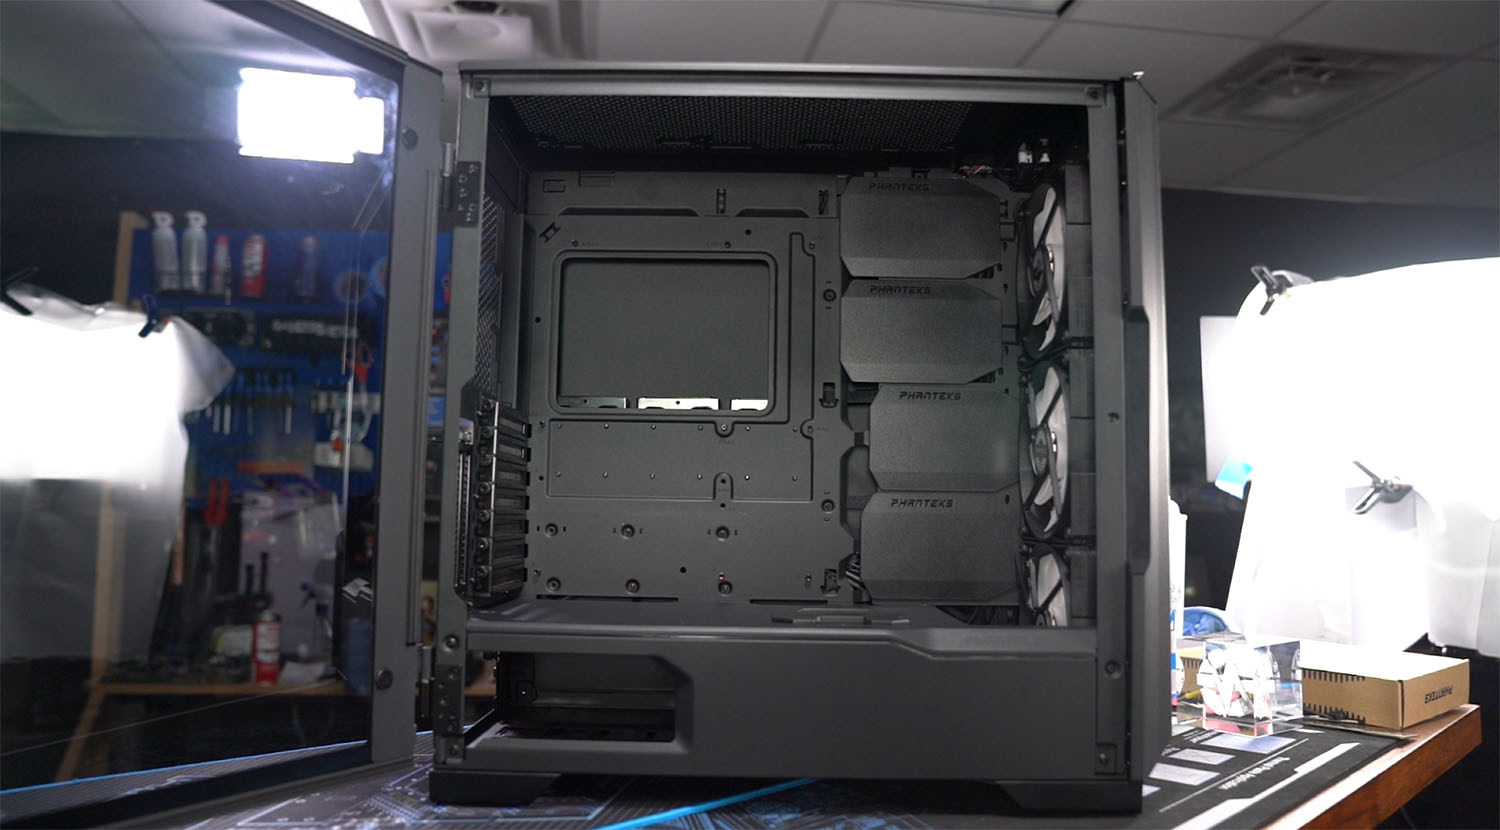
An unusual amount of effort has gone into the cable management system behind the motherboard tray. Towards the front of the case, the wide cable management channel is covered with extremely long velcro straps that are screwed into the case. This channel has 3cm of clearance for cables, while other areas behind the motherboard tray have just over 2cm. The screws divide each strap into two halves, each of which loops around a hook built into the chassis. Critically, these hooks are open, so the straps can be slipped on and off without having to painstakingly thread them through tiny holes, one of the most frustrating aspects of normal cable tie points. The straps are placed both at the front of the case and the top edge of the PSU chamber, which covers almost every location that power cables must be routed. Credit is due for a really exceptional job here. The power supply shroud is also extremely roomy since the HDD cages aren’t installed out-of-the-box, but even when they are installed they can be positioned forward to leave plenty of cable room.
A recurring theme with Phanteks’ cases, especially the more expensive ones, is that they’re feature-rich to a fault. Much like their Evolv X, the P500A has a slot in the rear for an ITX bracket, purchased separately, that allows dual system support when combined with a compatible PSU, purchased separately. Reinforcing this feature is a vertical GPU mount with a riser cable, purchased separately, that can be used to hold a discrete GPU for the secondary system while the primary system uses the normal horizontal brackets. We can’t be too harsh here since these are optional add-ons, but hardly anyone will actually install a secondary system in this case, so we’d caution against reading too far into this bullet point unless you’re actually a legitimate user of such a configuration. A lot of people like the idea of the feature, but will never use it -- but the case is plenty good on its own. As for dual system testing, we generally advise against it in these more cramped enclosures, and you can read our Evolv X review for more thoughts and dual-system testing.
We can be harsh about another returning feature from the Evolv X, though: the sliding cable covers at the front of the case and on the top of the PSU shroud. We brushed them off with the line “these aren’t especially useful” in the Evolv X review, and they still aren’t. They’re overcomplicated, probably expensive, and as covers their function is literally to get in the way. In addition, the way the stock fan and LED cables are routed means that they can be guillotined by the cable covers if they’re slightly out of place. If Phanteks is ever looking for a way to cut costs, this is the place to start.

The HDD brackets that Phanteks includes with the case are a better investment. The brackets latch onto each other without screws and can be stacked two high at three different locations under the PSU shroud; as many as four could be installed simultaneously, although only two are included with the case. There are also mounting locations for six more brackets behind the cable covers.
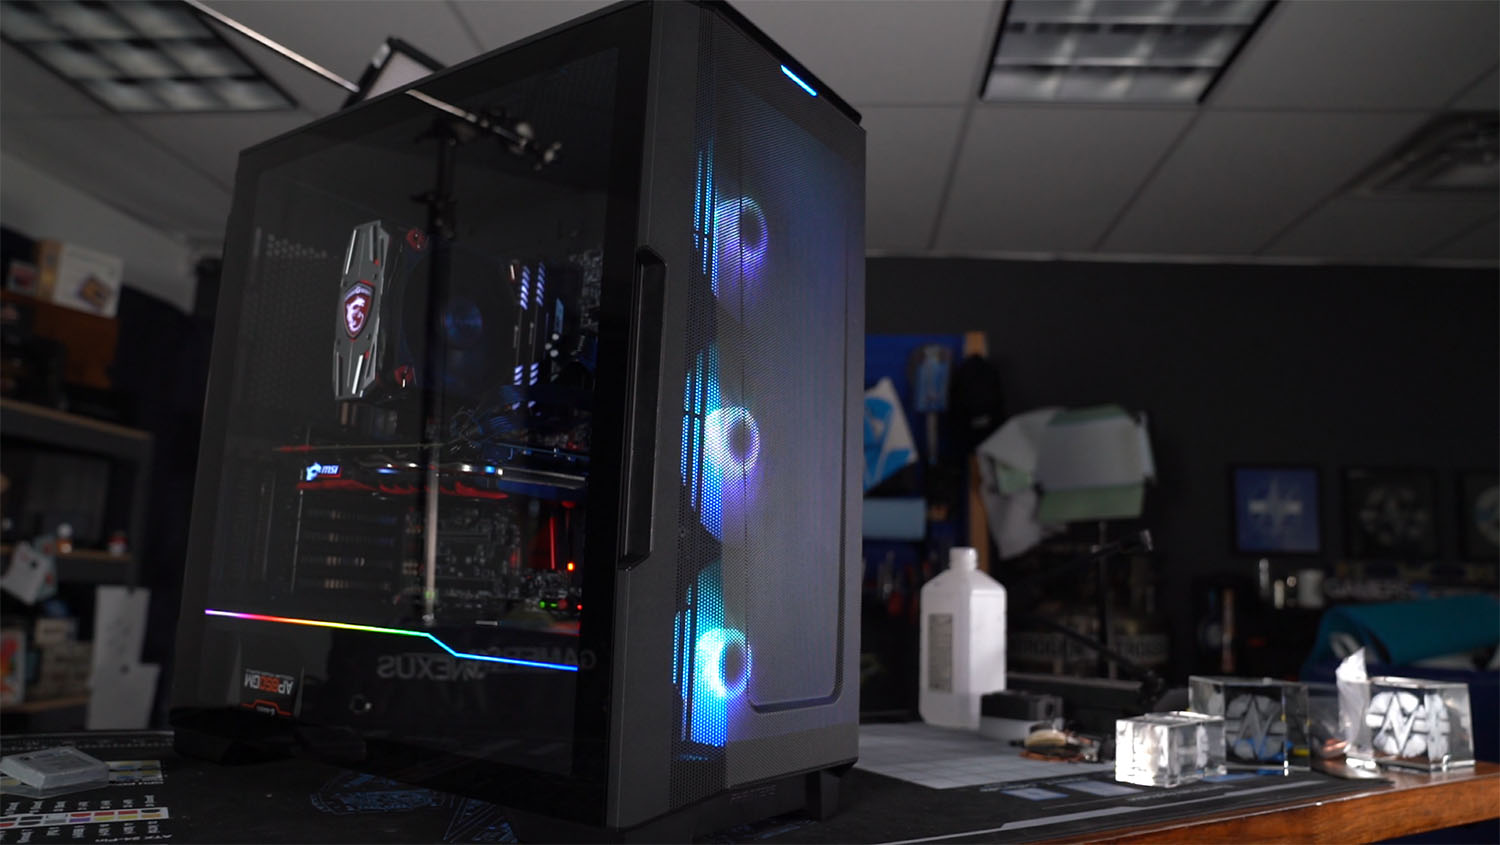
The glass panel uses one of the best attachment mechanisms: a hinge with magnets to hold it closed. The door lifts right off of the hinges, the hingepins are of unequal length so that the panel is easy to line up and reinstall, and there are rubber strips around the edge of the glass for cushioning and sealing. Phanteks has done almost everything right here, with some minor exceptions. First, there’s not really any handle to pull on, although there is a thin cutout on the front panel that allows some grip. Second, the panel isn’t supported at the bottom edge and can “droop” slightly, leaving gaps. Finally, we’d like to see a way to screw the glass panel down securely while moving the case, rather than just relying on the magnets. Taking the glass panel off before picking up the P500A is prudent, just to avoid any swinging door mistakes.
The other side is a great example of how to make a panel out of a sheet of steel without having it be a complete pain in the ass. The sheet metal is thick, the tabs that hook into the case are short and therefore sturdy, the holes they insert into are large and hard to miss, and there are only tabs on two sides of the panel: three at the front and two on top. This may not sound exciting, but it’s innovation in an area that matters: this is a real improvement over the P400A. The front panel has a U-shaped design stamped into it, which may be reinforcement to prevent flexing of the extra-wide mesh panel. The panel attaches to the chassis with ball-and-cup snaps like other cases in the series, but using plastic posts molded into the frame of the panel. Previously these were metal posts tacked onto the edge of the metal mesh. The new method is probably cheaper, but seems just as sturdy in our short-term testing. As with the P400A and P300A, Phanteks uses a fine metal mesh with no additional filter behind it, which allows for better airflow.
As they’ve done in the past with some other premium cases, Phanteks ships the screws for the P500A sorted into an organizing tray. It’s just a plastic box, but without hyperbole, this is one of our all-time favorite case accessories. We have drawers and drawers full of extra screws, but most users buy cases infrequently and will need to keep track of the original hardware for years. NZXT did this way back in the day with the Phantom 820 and similar cases, but in what’s probably a painful note for NZXT, Phanteks seems to have clued-in to the idea. The plastic case is great for this, and it can be kept and reused even after the P500A is long gone.
The rear-ejecting power supply frame is good, the rear-ejecting power supply filter, not so much. Because the filter is relatively short, it’s not a big deal, but having filters that are easily accessible encourages regular cleaning.
As for the form factor support, the usual statement about so-called “EATX” cases applies: this case will support motherboards that line-up with the CEB form factor, but not SSI-EEB, so it’s not really appropriate to say it supports “E-ATX,” since that’s a made-up form factor that doesn’t mean anything. SSI-CEB is the motherboard support.
One strange aspect of the P500A, in contrast to other cases with triple RGB front fans we’ve reviewed (including Phanteks’ own P400A Digital), is that the stock fans are installed inside the chassis, behind the fan mounts. Typically, manufacturers choose to put their fans out in front of the fan mounts to avoid obstructing the lighting effects. We knew there must have been a reason to choose the layout that they did, maybe thermals or noise problems with a certain airflow pattern. Moving the fans to the outside of the chassis revealed the real issue: they don’t fit. The panel is just deep enough to fit standard 25mm thick case fans at the top and widens towards the bottom, so there are no issues there, but the usable area for fans inside the panel is only about 37.5cm tall. This is about 3.5cm shy of the height of all three fans stacked on top of each other. We suspect there may have been an oversight or a change in plans late in development; many of the images Phanteks sent in their reviewer guide depict the case with three fans installed on the front of the chassis. This isn’t an accurate representation of what the case looks like. The real case still looks good, but keep this in mind when looking at a product listing.
Phanteks advertises 420mm radiator support in the front of this case, but users should be aware that both the fans and the radiator must be mounted inside the chassis. As usual, we wouldn’t recommend mounting 420mm or 360mm CLCs in the front of this case anyway, since they’ll only easily fit tubes-up. The sliding cable covers may also conflict with radiator clearance, but they can be removed. The top radiator and fan mounts are offset away from the front mounts by about 6.5cm, so there should be enough room to use the front and top mounts simultaneously without conflict. Usually top mounts are offset to one side to help clear the motherboard and RAM, but Phanteks hasn’t bothered here, since there is more than 7cm of clearance between the top edge of the motherboard and the top of the case. The entire top panel is removable, which isn’t really necessary given how much room there is to work in, but it may make it easier to install liquid cooling or a secondary system. Removable fan/radiator mounts are always a good thing, we just wish the PSU shroud was removable as well.
GN Case Testing Bench
| Component | Courtesy Of | |
| Video Card | MSI GTX 1080 Gaming X (OC Mode) | MSI |
| CPU | Intel i7-6700K @ 4.4GHz | GamersNexus |
| CPU Cooler | MSI Core Frozr L | MSI |
| Motherboard | MSI Z170A Gaming M7 | MSI |
| Memory | Corsair Vengeance LED 32GB 3200MHz | Corsair |
| SSD | Samsung 850 EVO 120GB | Samsung |
| PSU | Gigabyte 800W PSU | Gigabyte |
| Cables | CableMod Pro Mesh Cables | CableMod |
| Case | This is what we're testing! | - |
The video card is configured to run at 55% fan speed at all times.
Prior to load testing, we collect idle temperature results for ten minutes to determine the unloaded cooling performance of a case's fans and air channels. Thermal benchmarking is conducted for 1400 seconds (23 minutes), a period we've determined sufficient for achieving equilibrium. The over-time data is aggregated and will occasionally be compiled into charts, if interesting or relevant. The equilibrium performance is averaged to create the below charts.
Load testing is conducted using Prime95 LFFTs and Kombustor “FurMark” stress testing simultaneously. Testing is completely automated using in-house scripting, and executes with perfect accuracy on every run.
Find our noise normalized & fan normalized testing methodology here: https://www.gamersnexus.net/guides/3477-case-fan-standardization-tests-noise-normalized-thermals
Thermals & Noise
We stuck mostly to the usual test suite for this case. We had plans to do an additional test with the stock fans mounted to the front of the chassis to find out why Phanteks didn’t use this configuration, but as we said earlier, we answered our own question when the fans didn’t fit. Instead, we did a test with an extra 120mm exhaust fan tossed in and a test with just two of the 140mm stock fans arranged in an attempt to emulate the stock P500A non-Digital. To do this, we left the center intake fan alone, moved one fan to the rear exhaust slot, and removed the last one entirely.
CPU Torture

We’ll start with just the P500A and P400A on the charts, then add the rest. Baseline CPU temperature was 50 degrees Celsius over ambient under a torture workload, which was lowered to 47 degrees over ambient by removing the front panel. This is a mesh-fronted case, so it’s to be expected that the front panel isn’t obstructive, but a difference of three degrees between a front panel and open air is an achievement for Phanteks. Adding an exhaust fan behind the CPU cooler had a similar effect to removing the front panel, with an average of 47 degrees, while emulating the P500A non-Digital’s fan configuration resulted in an average torture CPU temperature of 51 degrees. The single intake fan used for this configuration was positioned directly in front of the GPU, so that it would hopefully push cool air both above and below and cool the CPU and GPU equally. Normally this is an unpleasant compromise, and cases like the Meshify C suffer from mediocre stock thermals with too few case fans trying to do too much. Here, the result we measured with two fans was almost as good as the result with one. The P400A stock case is within 2 degrees of the P500A Digital stock result, while the test without a front panel comes down a few more degrees -- this is benefited by a shorter distance in front-to-back.

Comparatively, 50C over ambient for the CPU is good against to the rest of the cases we’re currently displaying on this truncated chart, but it is not the equal of the stock P400A, which averaged 48C dT. The Cooler Master TD500 was one degree warmer, and so was almost every other stock-configured case, for that matter. Being beaten by the P400A is a regular occurrence, and if this were any other case we wouldn’t sweat it, but the P500A needs to compete with its sibling. Fortunately, they’re basically within variance or error -- or very close to it, anyway. The differences can largely be attributed to some changes of distance and slight changes in the front panel.
GPU Torture
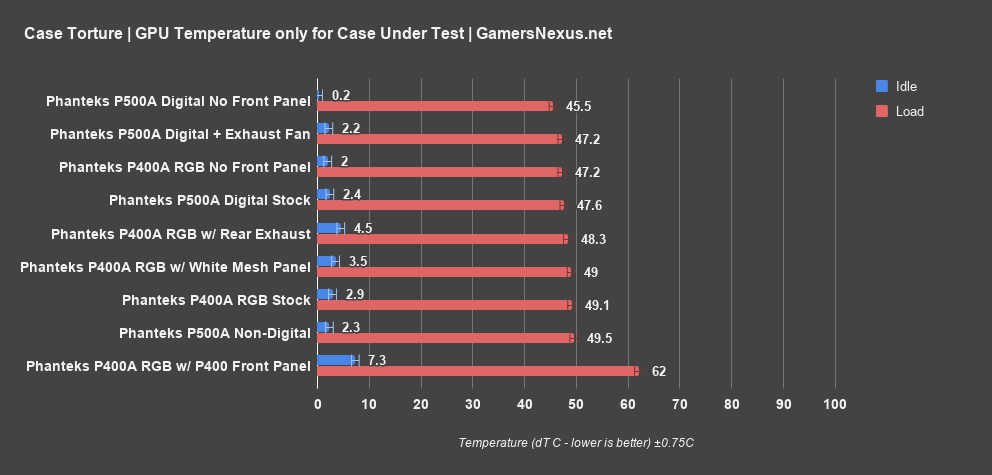
The GPU temperature was 48 degrees Celsius over ambient baseline, down to 46 degrees with the front panel removed, another sign that the Phanteks single-layer front panel design is working. Adding the exhaust fan behind the CPU got GPU temperature rounding down to 47 degrees, but the temperature reduction was less than one degree, well within error. The average for the non-Digital layout was still just 49 degrees, although GPU frequency does fluctuate a bit more. It’s proven to be difficult to make the thermals bad in this case at all, even with one of the fans taken out.
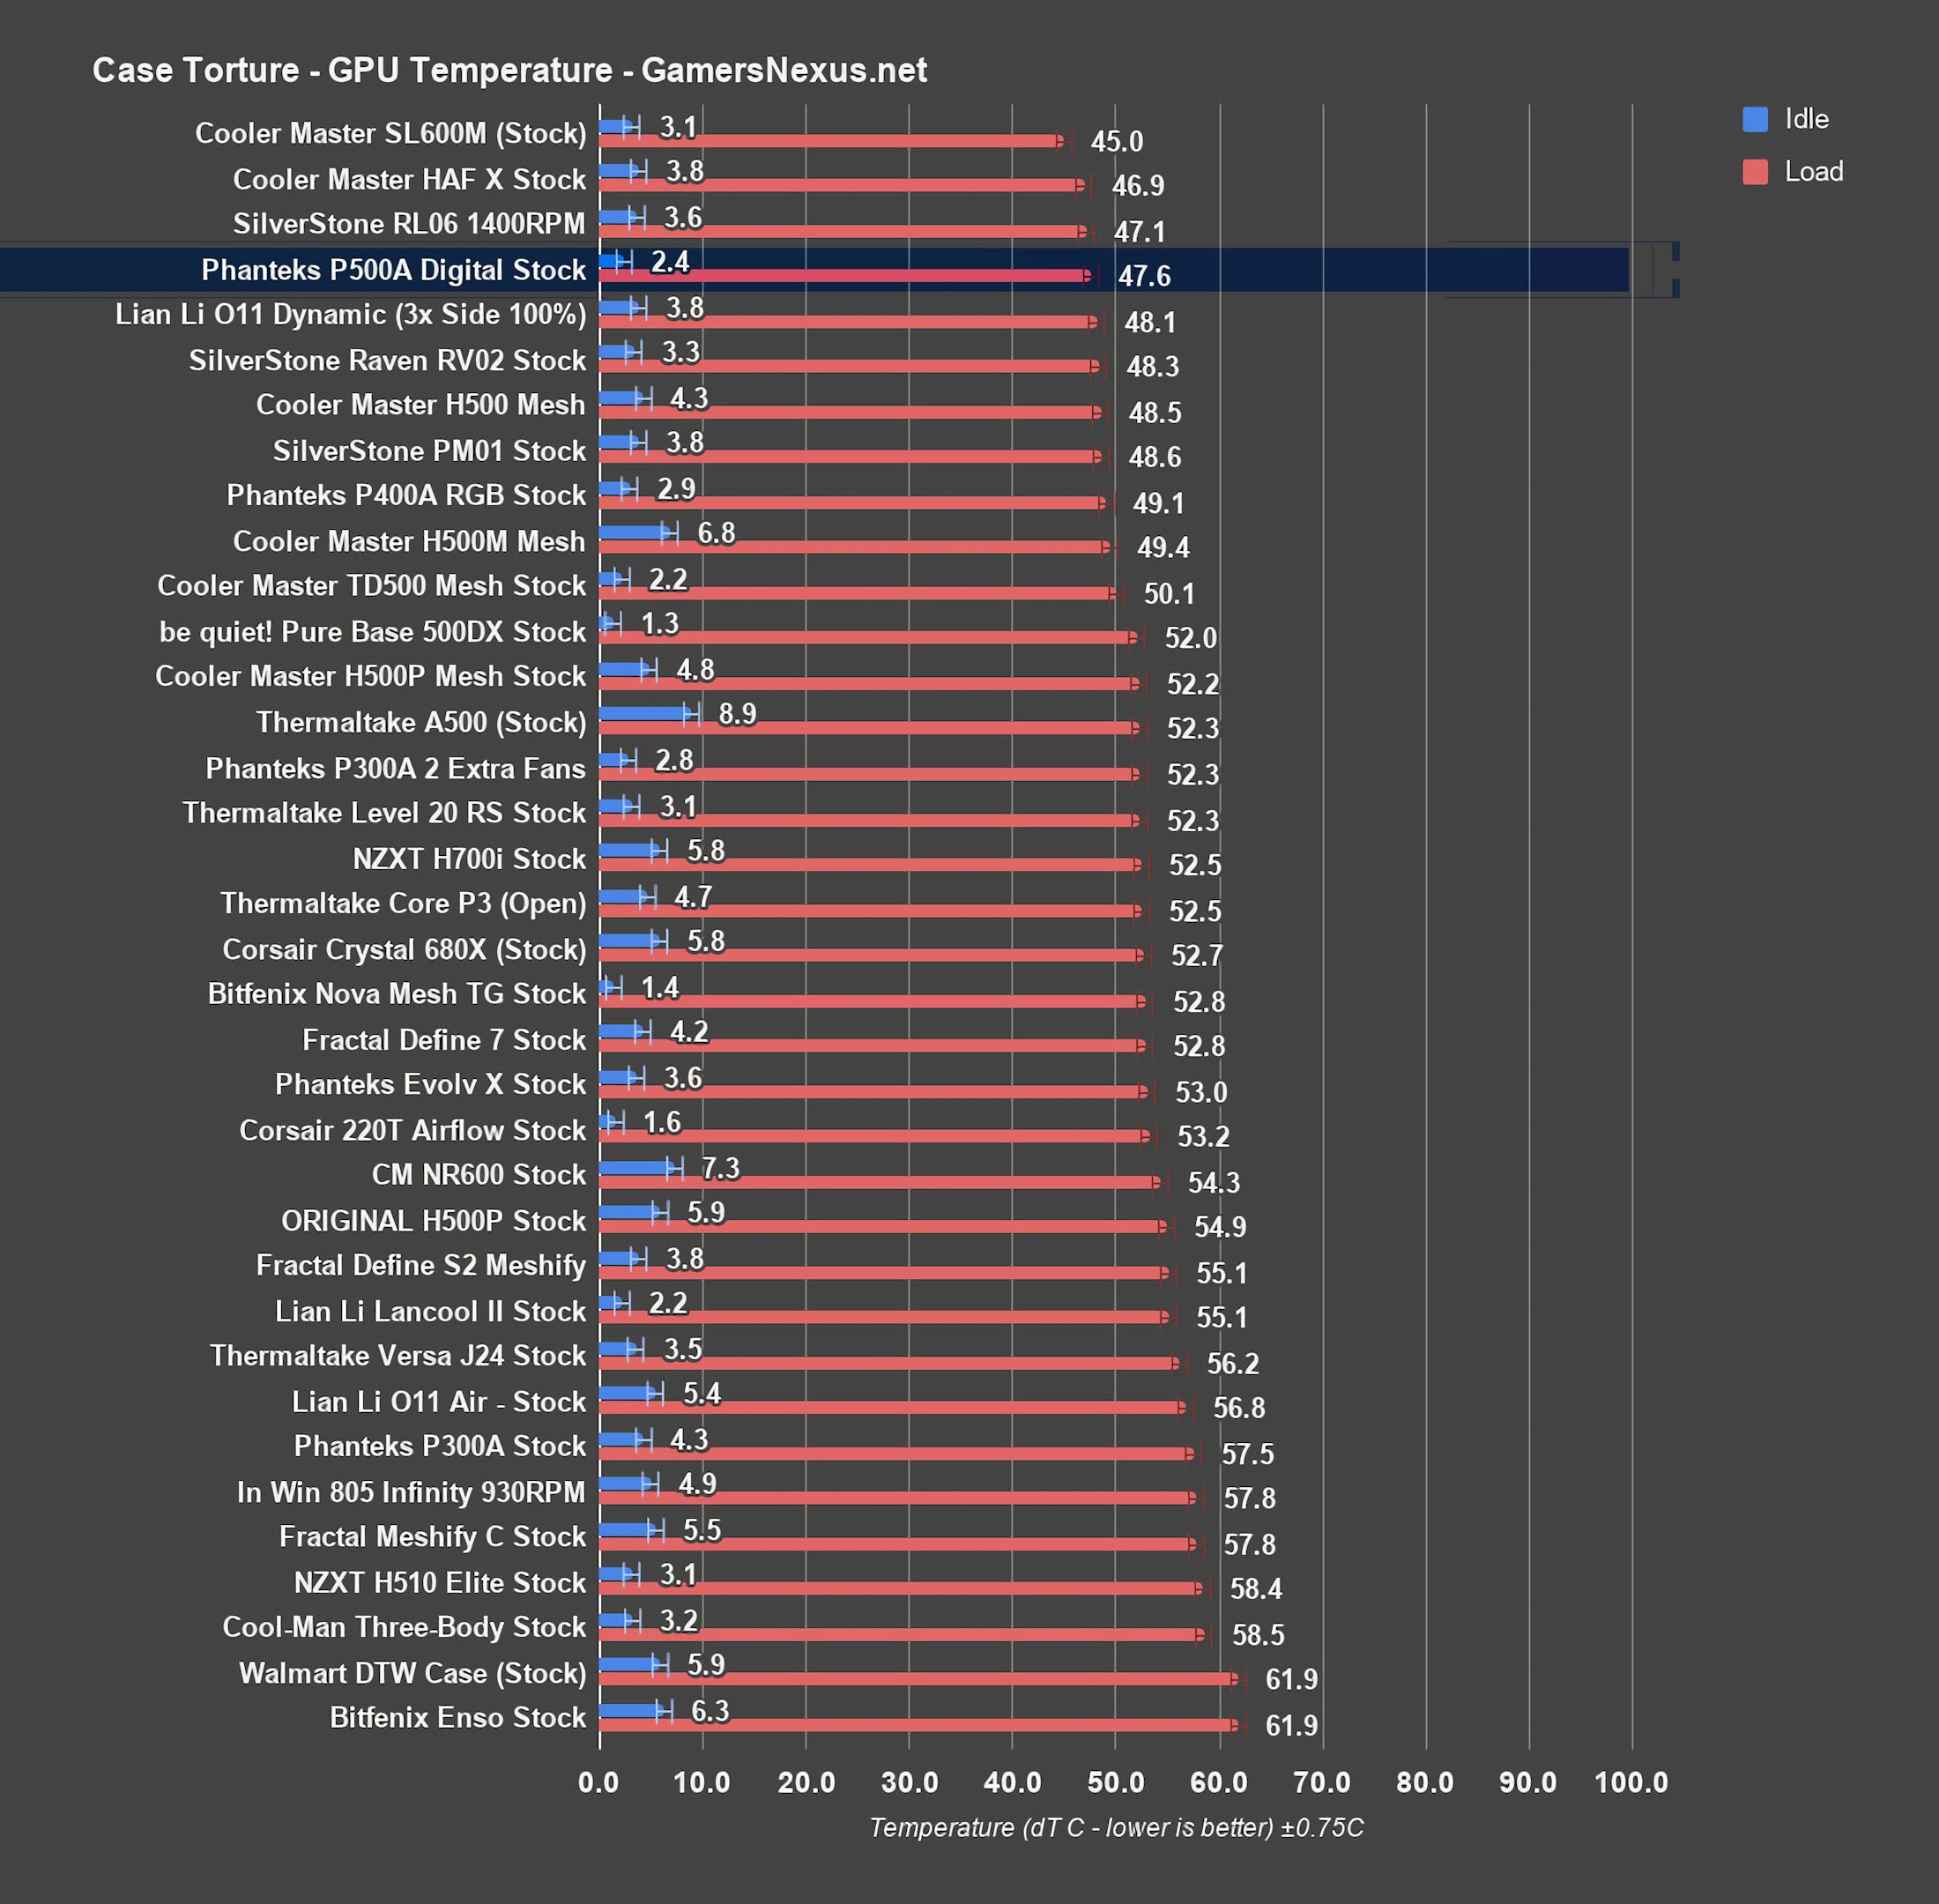
Compared to the other cases, 48C is excellent, beating the P400A slightly and landing among the best GPU thermals we’ve measured in this test, tied with the likes of the RV02. Competition is tight here, with the TD500 only a couple degrees warmer at 50C dT, but the P500A is ahead.
Noise + Noise Normalized
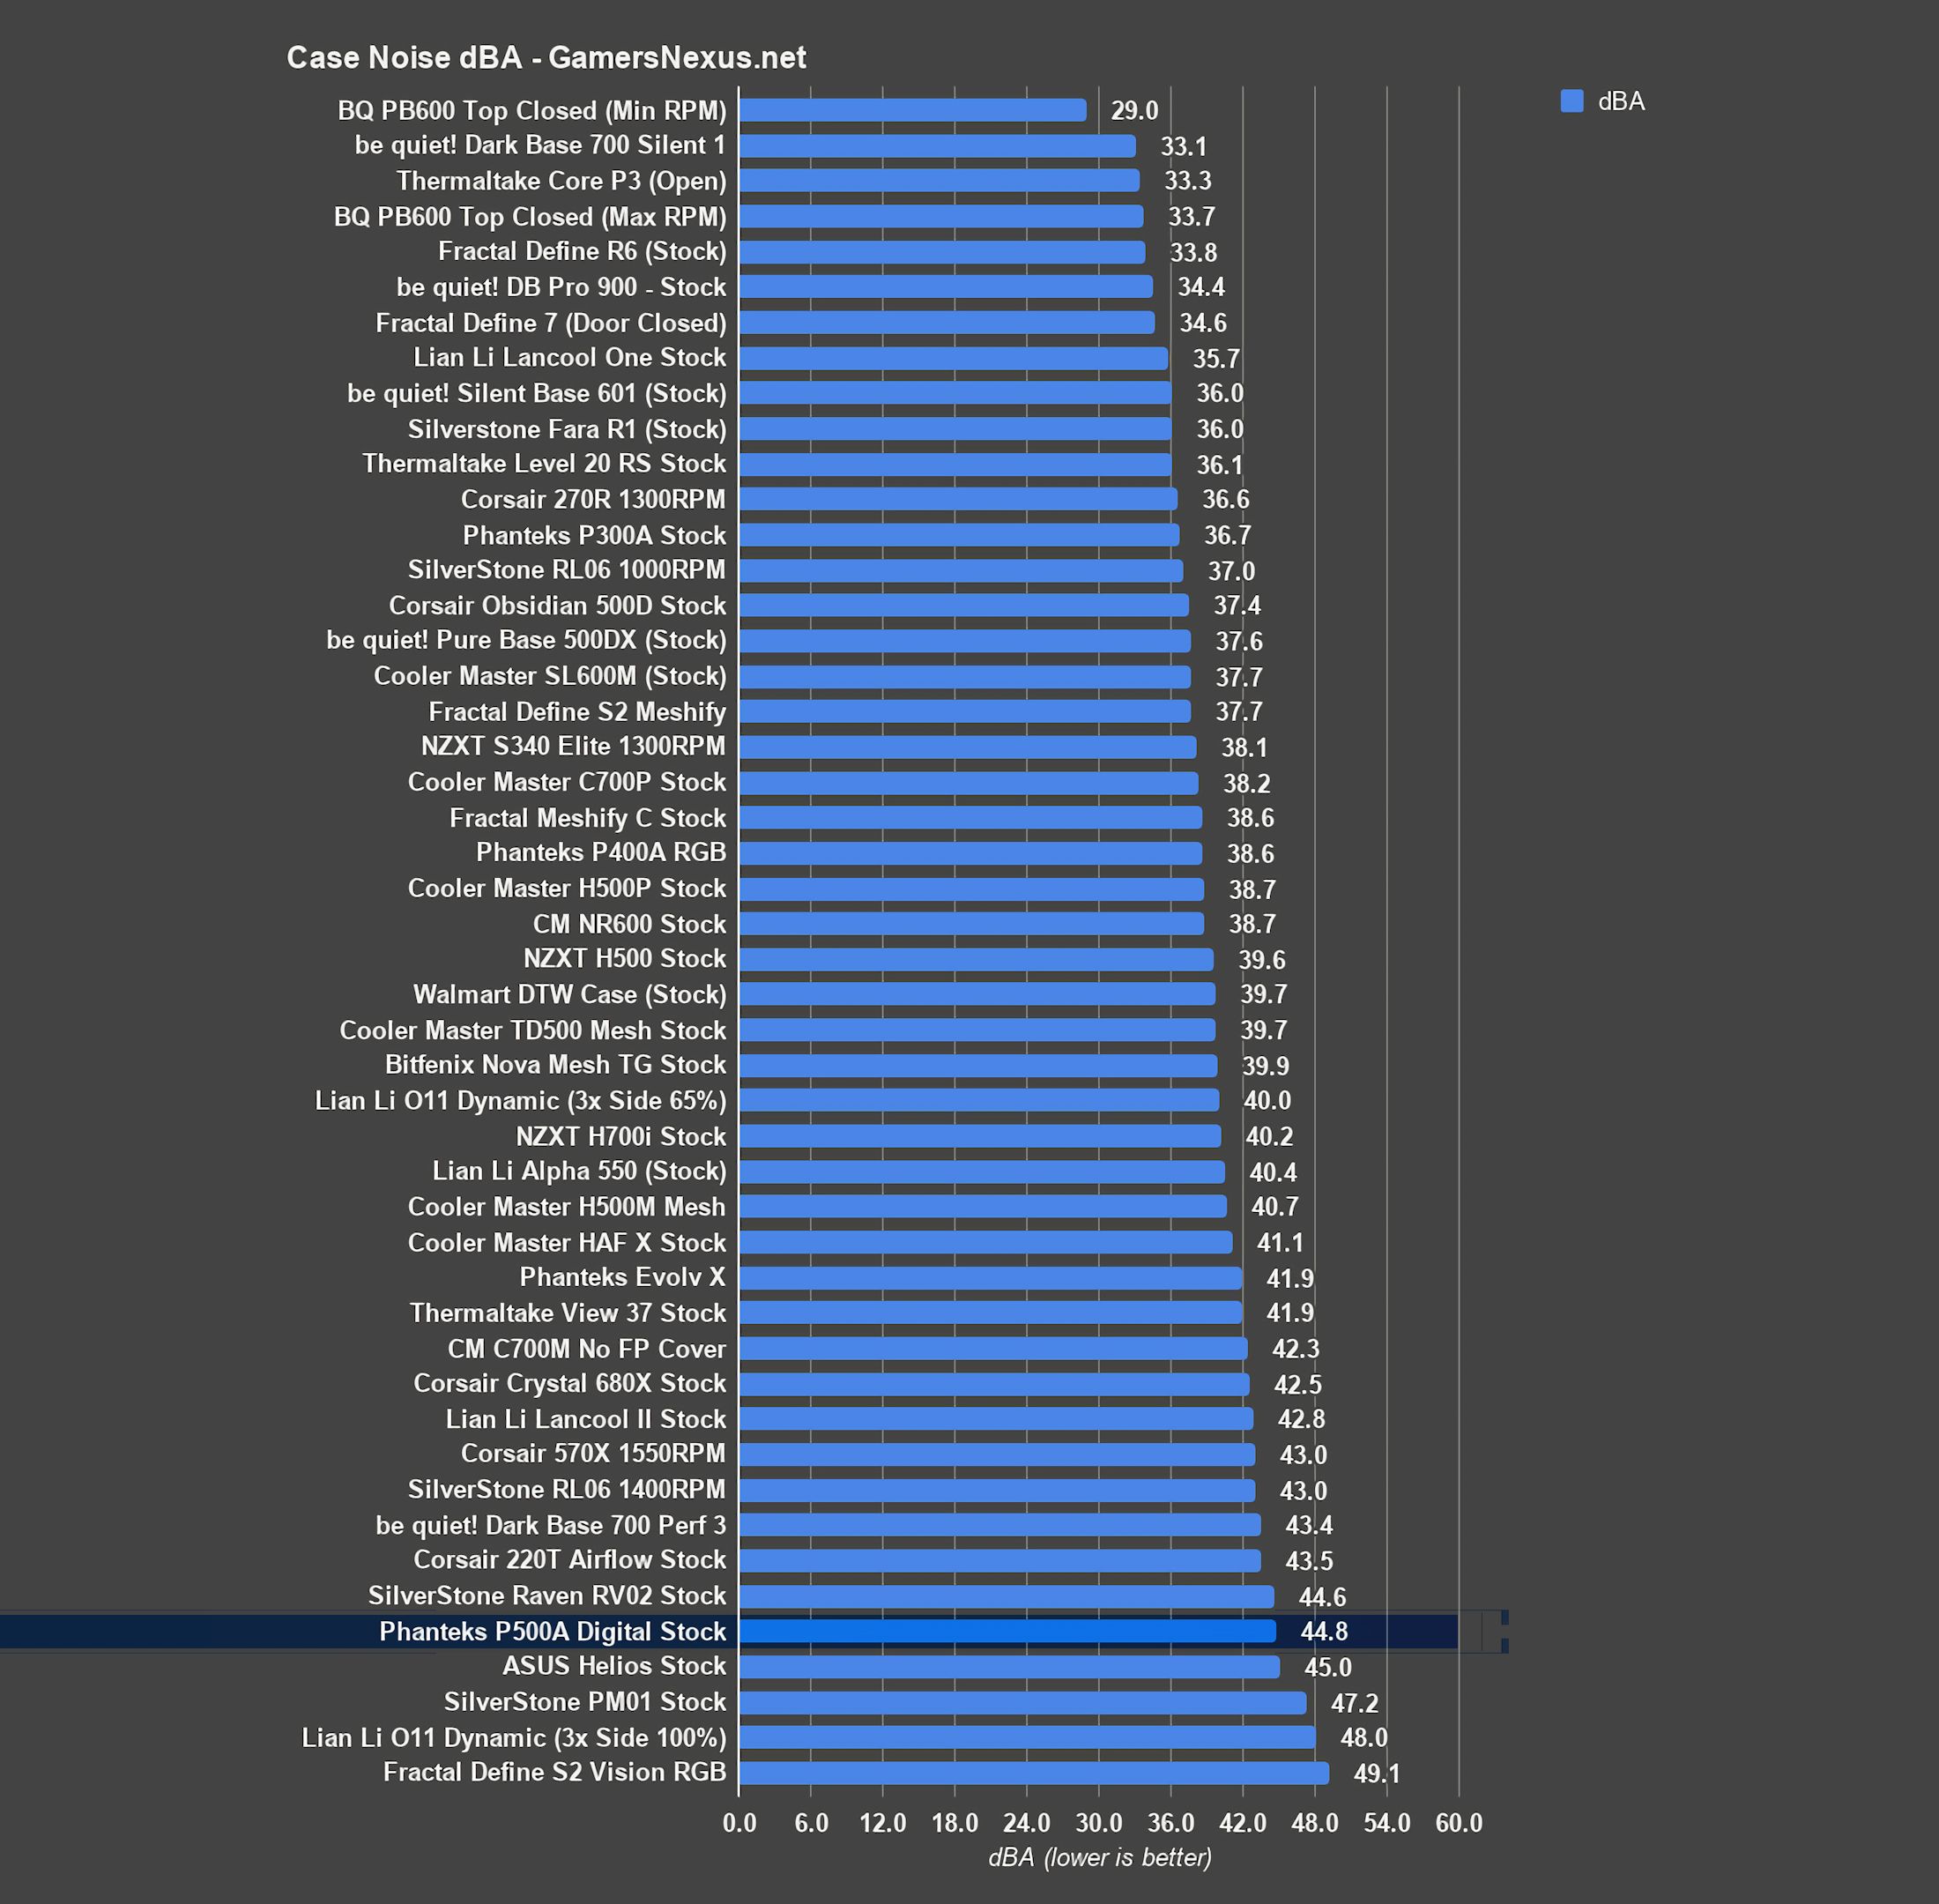
We measured the noise level to be 44.8dBA at our standardized 20” distance, measured at 26dB for the noise floor, with all three case fans at max speed. That’s loud. Phanteks’ stock 140mm fans are listed as 1500RPM +/-10%, and even though we only saw them hitting about 1300RPM in our testing (1320 measured with a physical tachometer), that’s still a full set of large fans moving very fast right against the front of a case with nothing to block them but a rectangle of mesh. This is comparable to the noise generated by a Silverstone RV02 at full speed. In order to bring them down to the 36dBA threshold we use for noise normalization, we had to set their speed to about 50%, or about 870RPM as reported by software. These aren’t PWM fans, so 50% doesn’t mean a literal 50% decrease in rotations per minute. While we’re on the subject of fans, the P500A’s fan motors seemed to get warm under load, even without the LEDs activated--this is, however, anecdotal, since we don’t ever measure fan temperature, but it’s something to keep an eye on if the case fans are run at full speed 24/7.
Next up is noise-normalized testing, where we equate the combined case fan + fixed cooler fan noise levels to the same 36dBA at 20” number. This allows us to look at case efficiency with fewer variables. We moved this section forward from its usual place because of how impressive the P500A’s performance was here. We don’t want to bury the lede by leaving this for later. CPU temperature at the lower noise level was 50 degrees over ambient, not significantly higher than the baseline torture result. We can assume a one-degree margin of error, but no matter what, that’s a huge achievement. The P500A was already competitive at 50 degrees on the normal CPU torture chart against other cases with their fans at full speed; on the noise-normalized chart, it’s at the absolute top. The previous champion was the P400A RGB, rounded to 51 degrees CPU dT but within one degree of the P500A’s average.
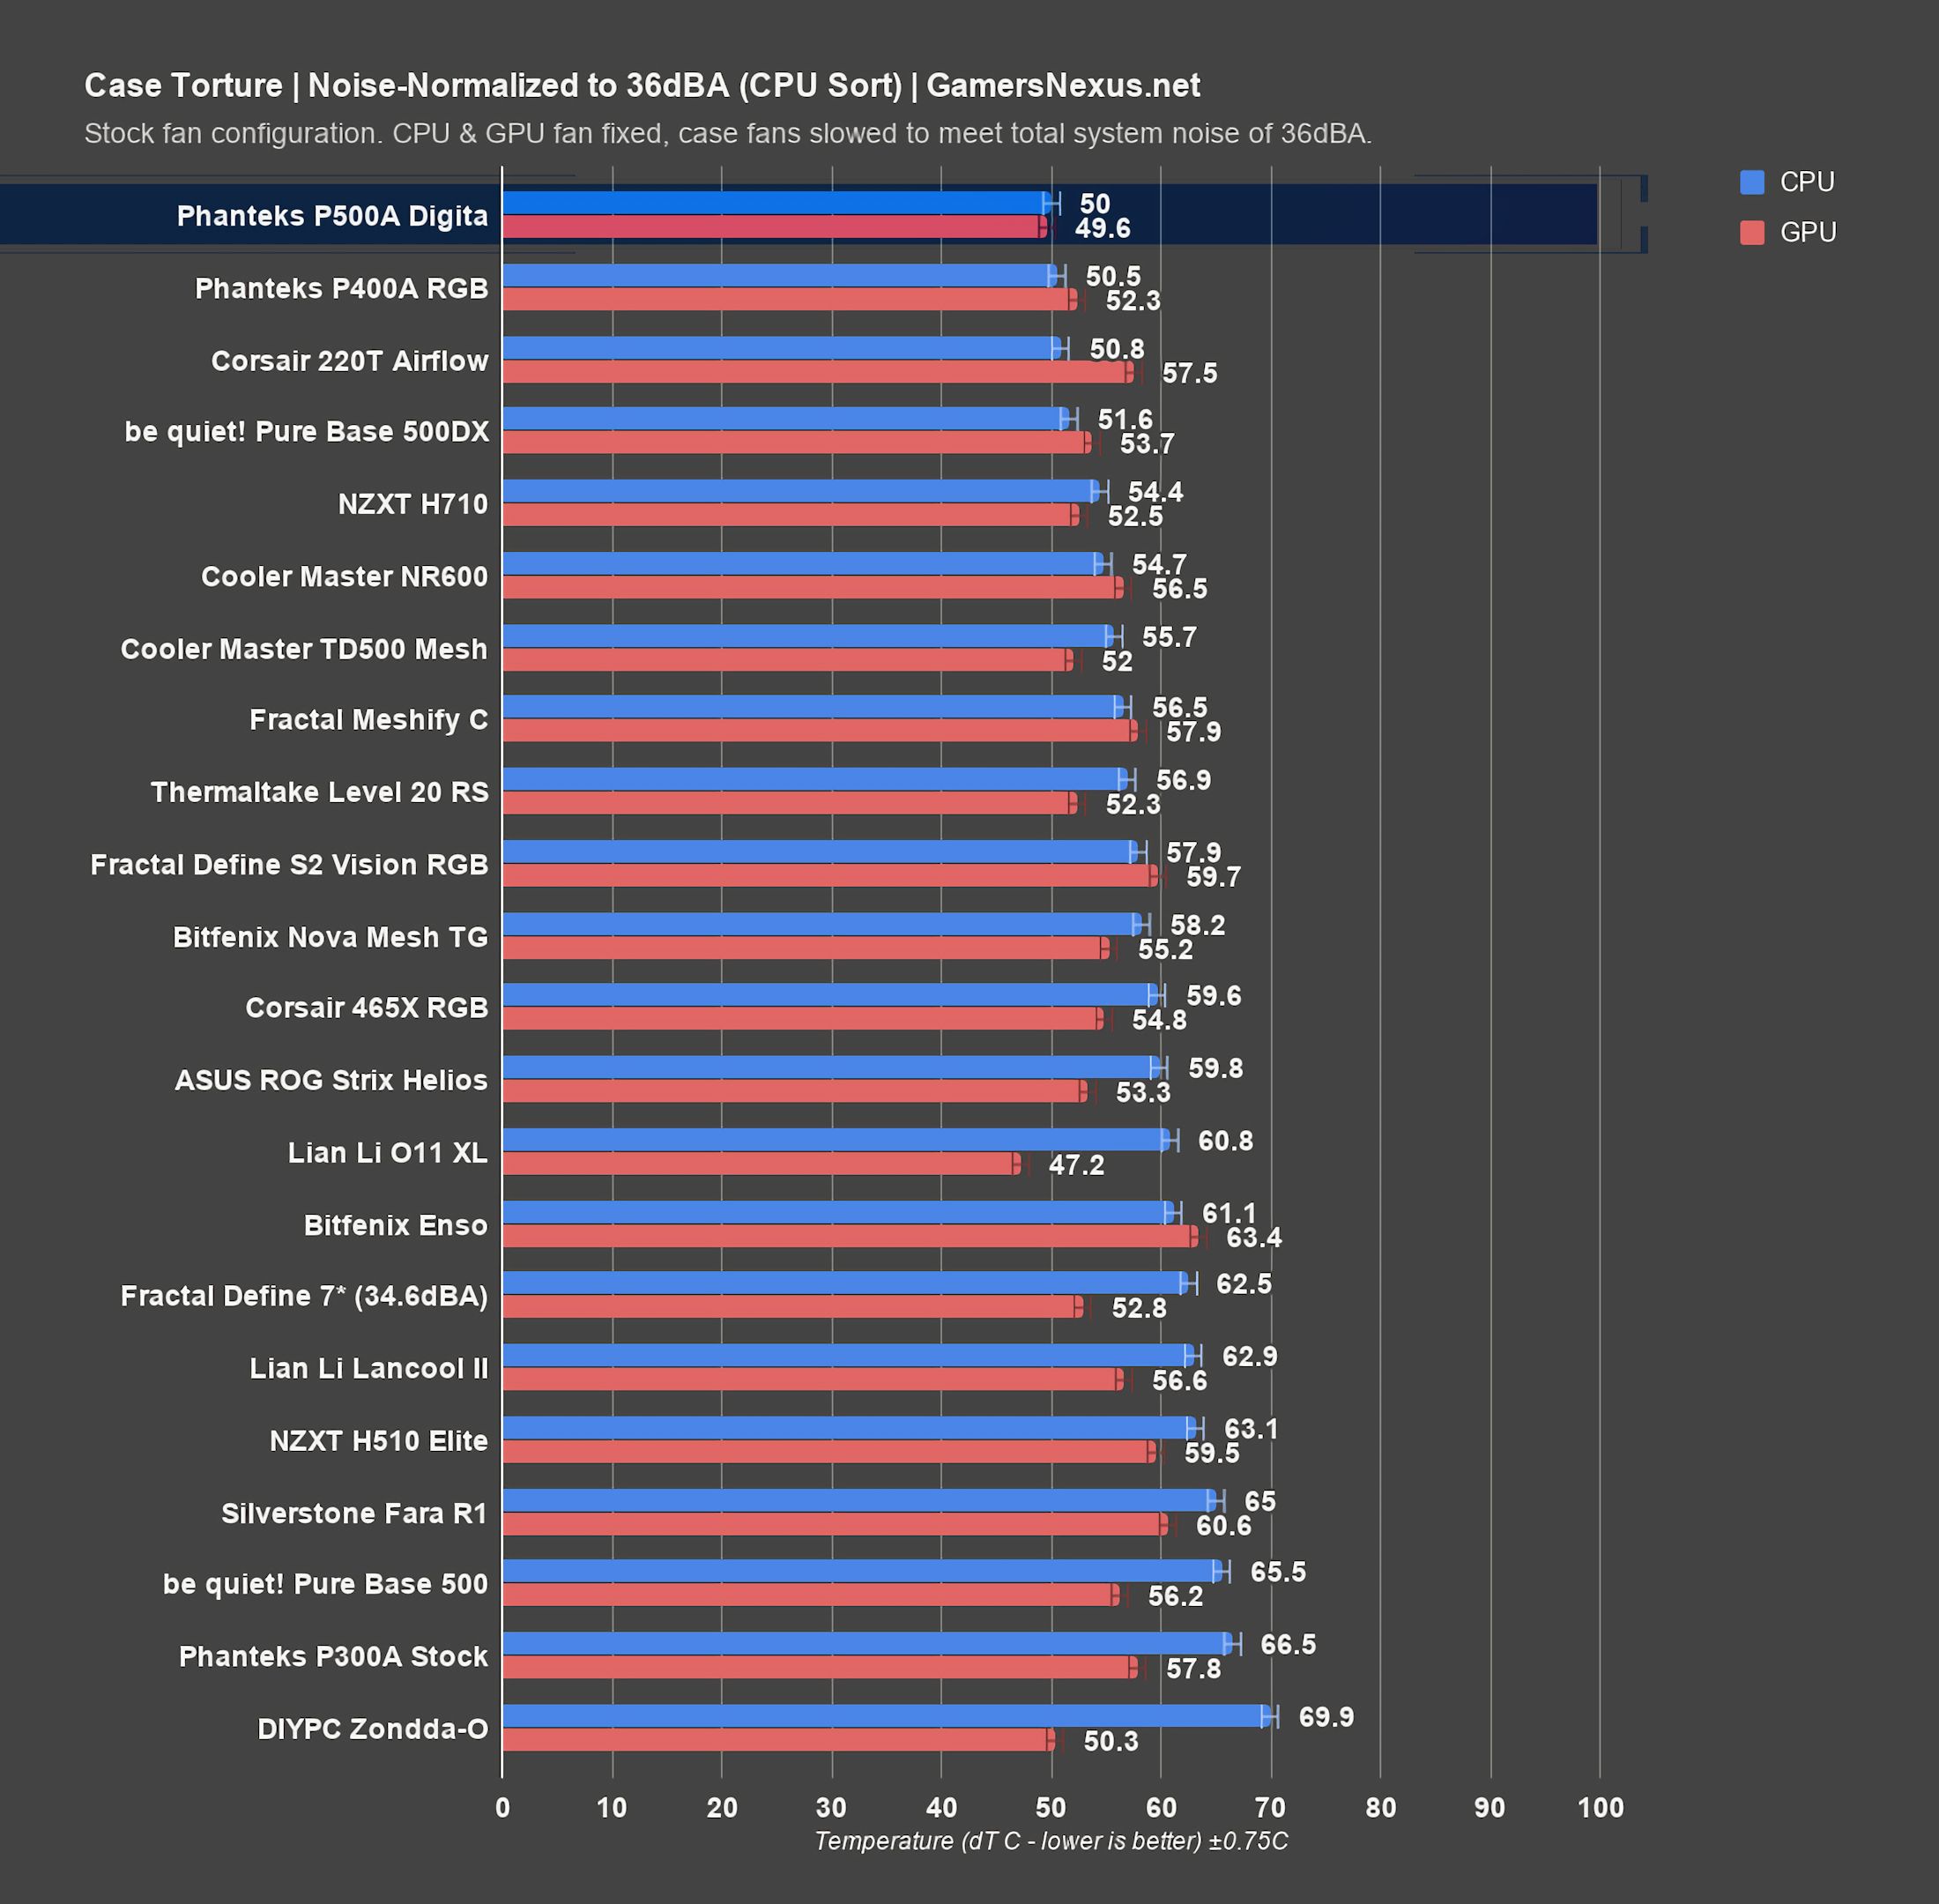
On the same chart, the GPU delta was also 50 degrees, a couple degrees warmer than the torture test baseline but still impressively close. Again, this is one of the best GPU temperatures on the chart, and out of the cases configured with only stock fans it’s the best--tied with the $35 Zondda-O, which has a fan pointed straight at the GPU. Someday manufacturers will remember that they can put fans on the sides of cases. The P500A beat both the P400A and the TD500 Mesh by two degrees and some change in this test. This amount of cooling at this noise level is incredible, and nearly all the cases that do well in this test are high airflow. Open cases can afford to run their fans at much lower speeds, and they therefore often end up quieter than sealed-off cases.
Blender
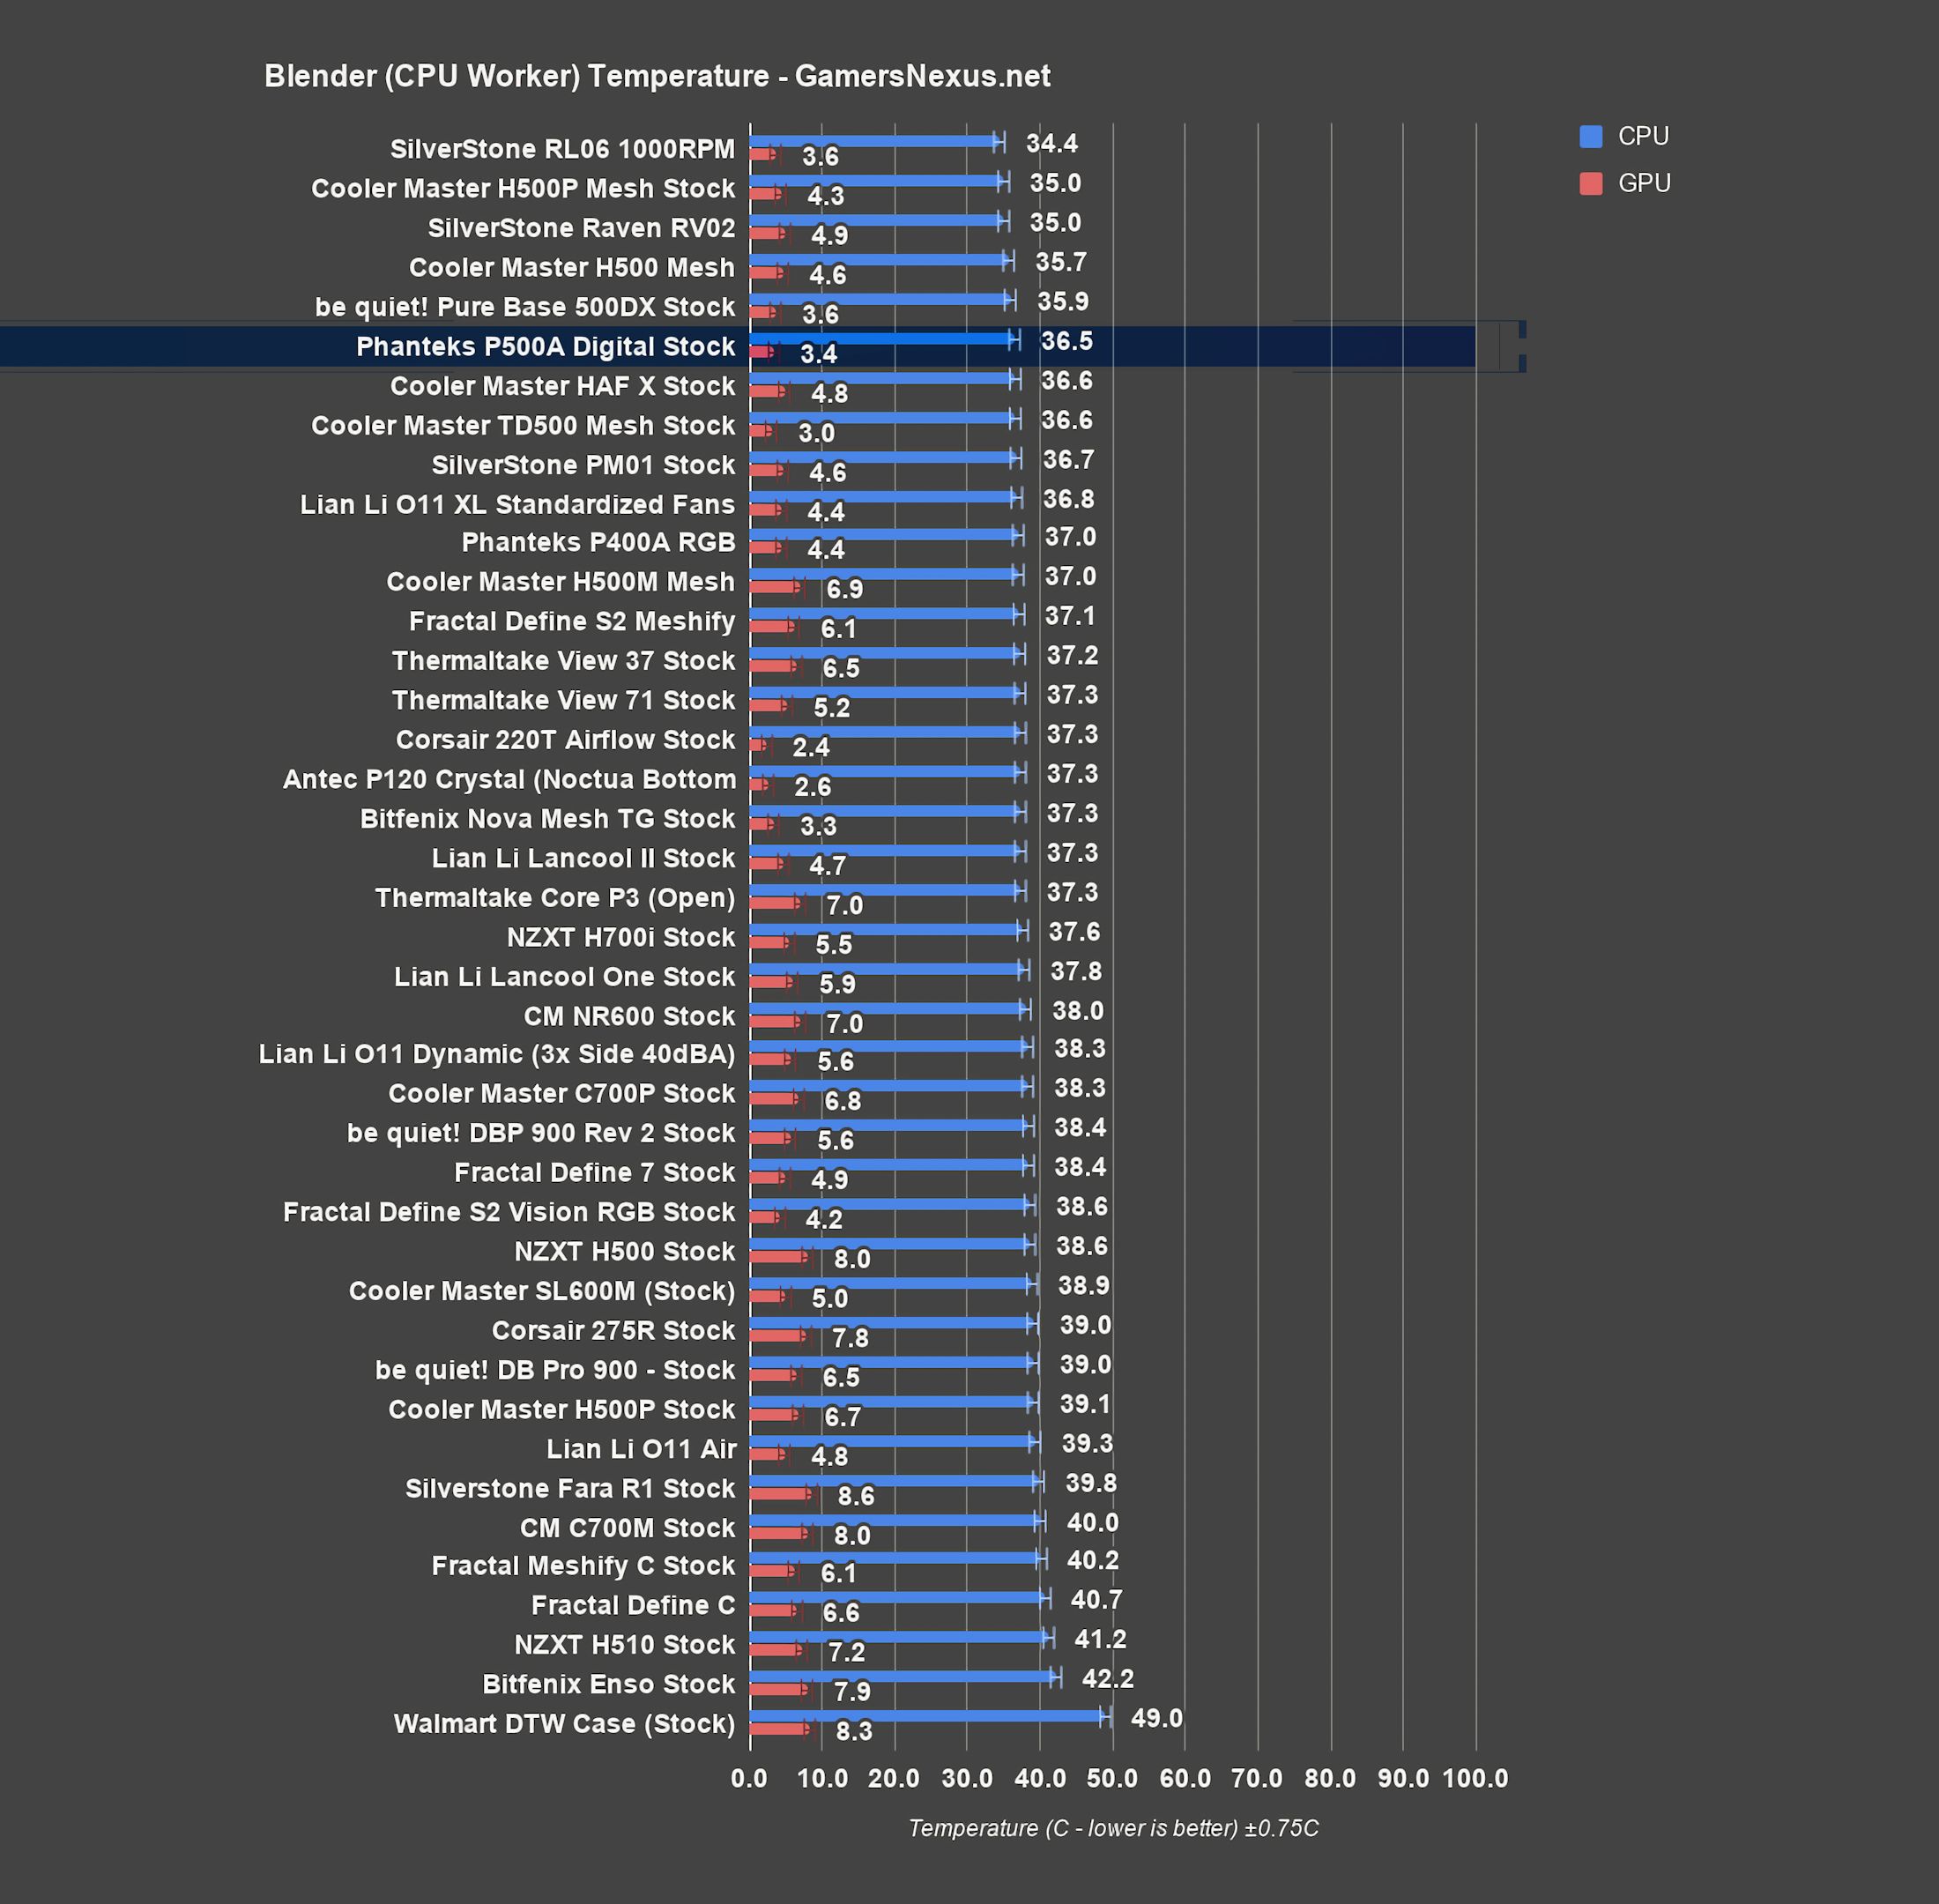
CPU temperature for the Blender CPU-exclusive render was 36 degrees over ambient, tied with the high-performance be quiet! 500DX and Cooler Master H500 Mesh. The TD500 Mesh and P400A were slightly warmer, even though the P400A was ahead in the original torture test; this may indicate the CPU’s temperature being more affected by GPU heat in the P500A’s torture testing, which isn’t an issue with this lighter workload.
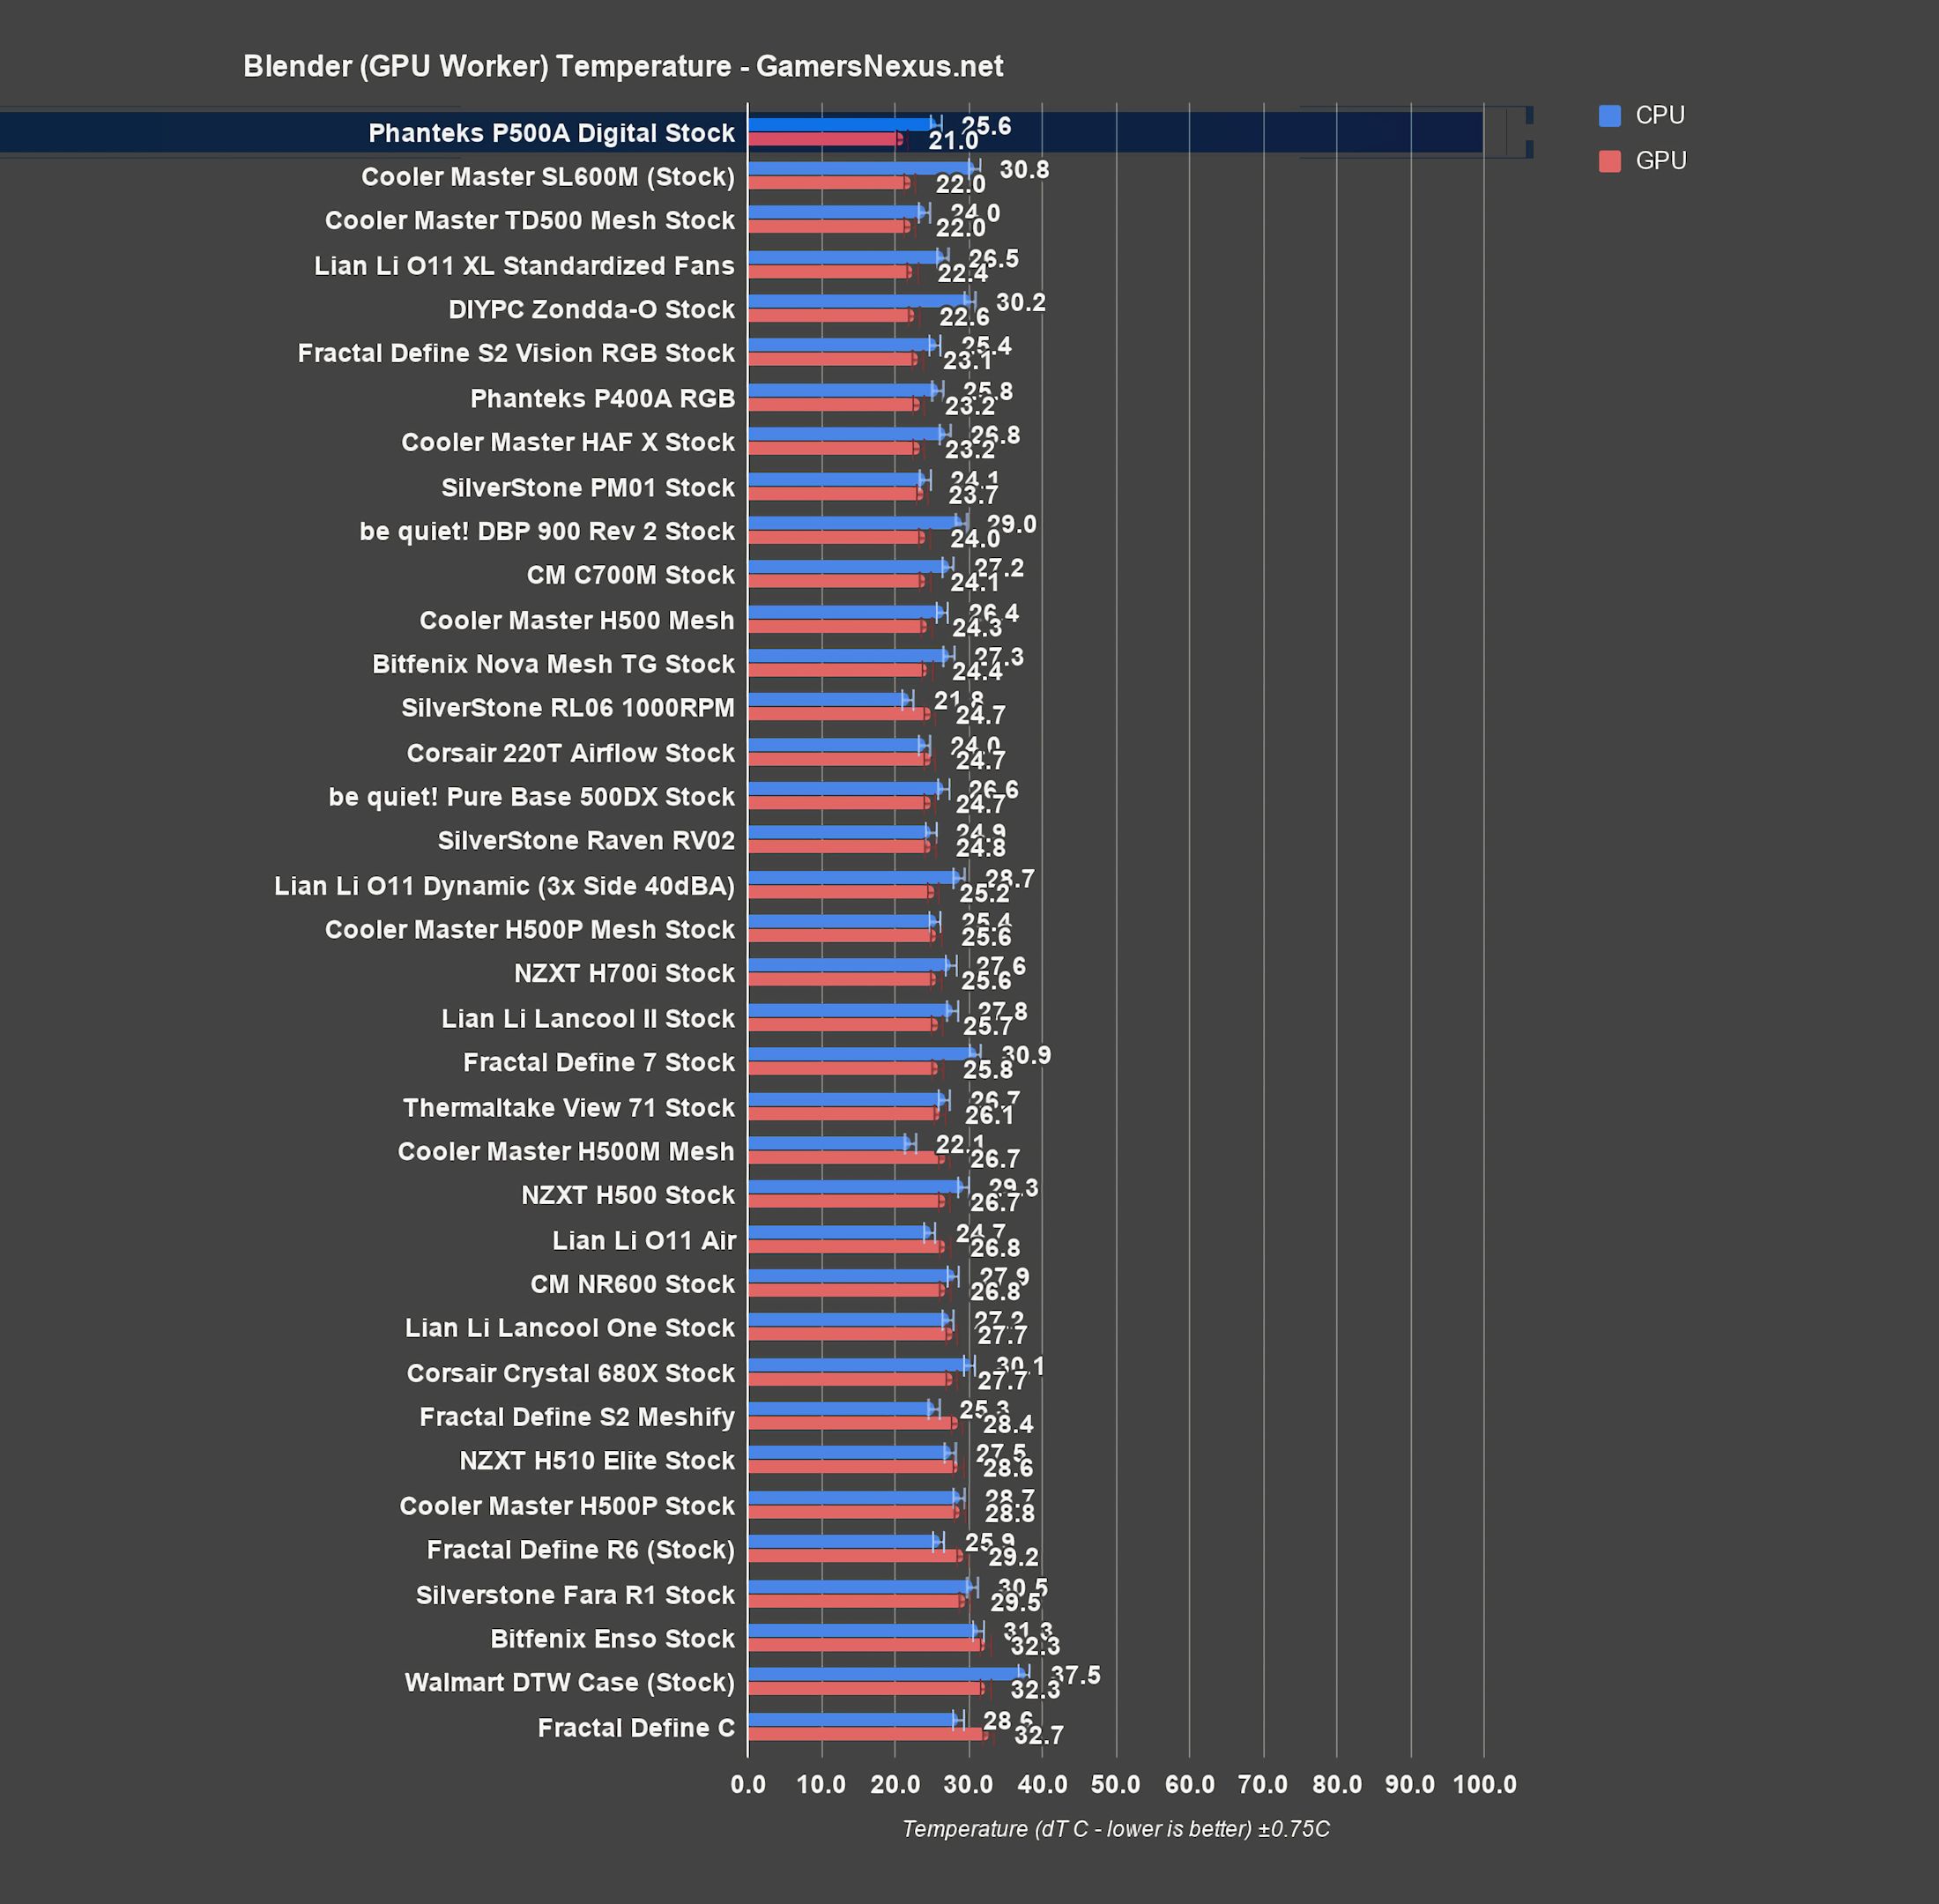
Using the GPU to render raised GPU temperature to 21 degrees Celsius over ambient, the lowest result on the chart so far, ahead even of cases with direct GPU cooling like the SL600M. The P400A was two degrees warmer in this test; the CPU temperature here was also cooler than the P400A’s, although the TD500 Mesh has them both beaten in that category.
Firestrike
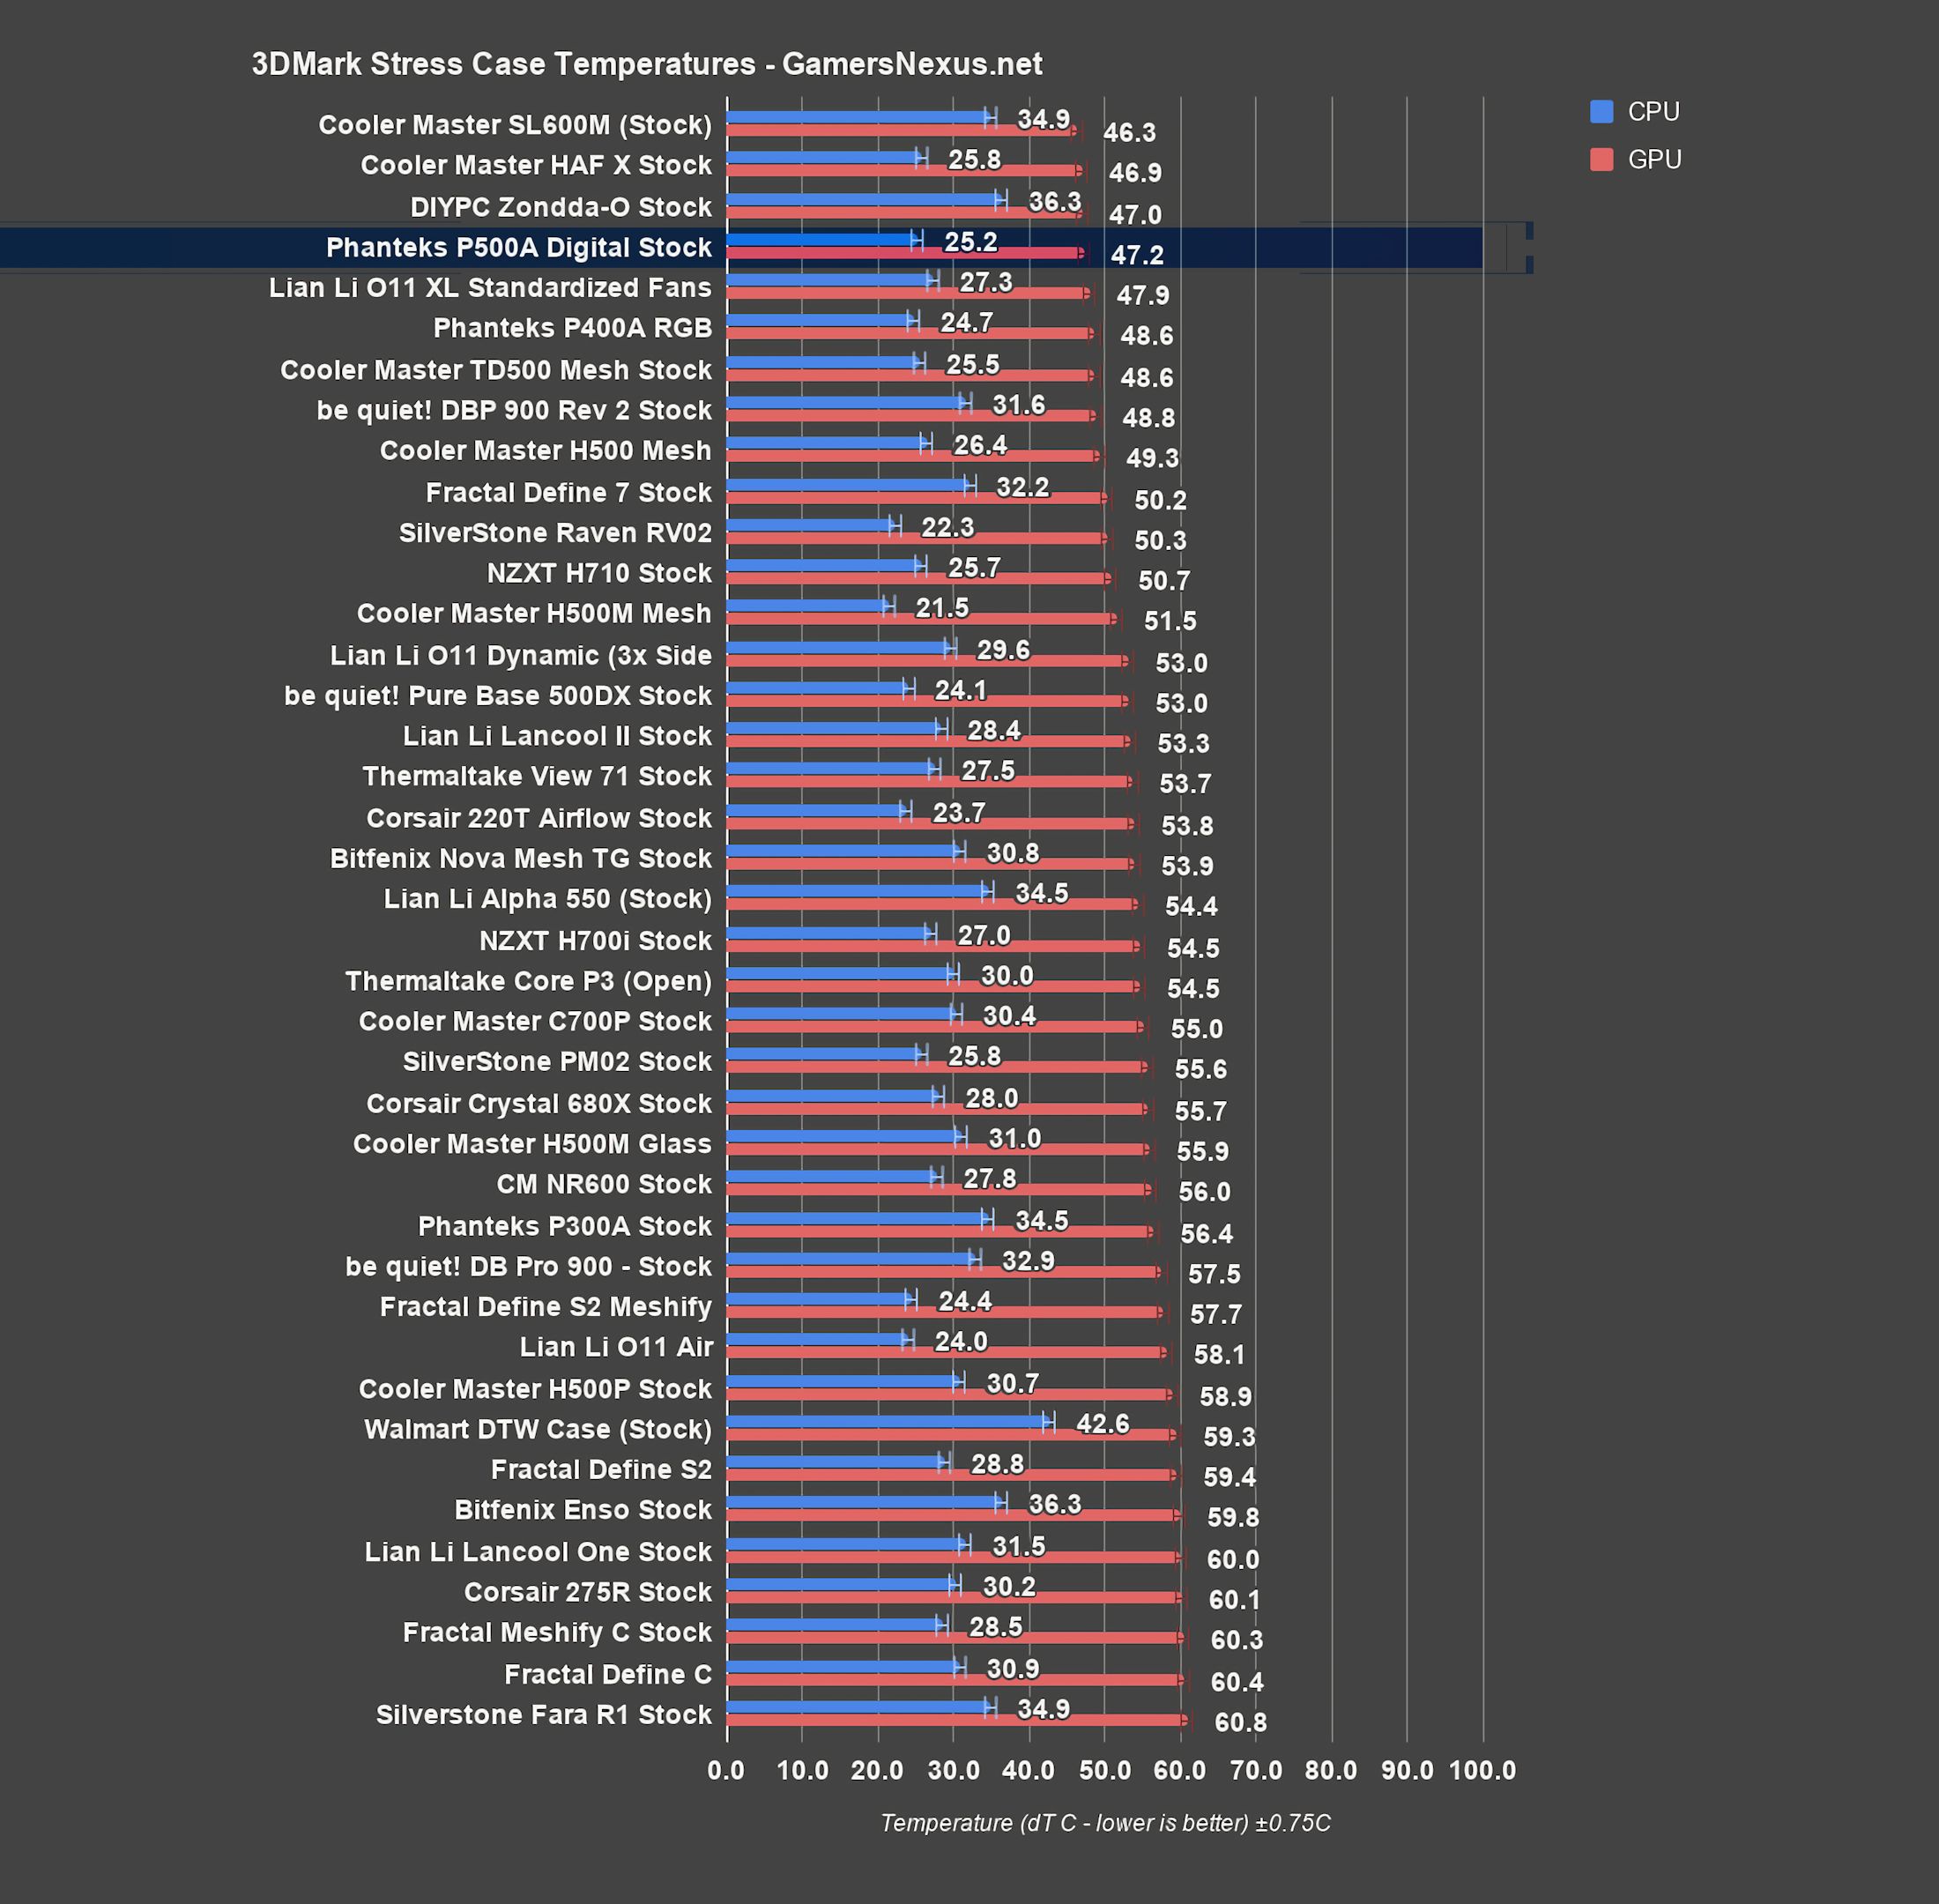
The 3DMark Firestrike Extreme stress test resulted in an average GPU temperature within error of the baseline result of 47 degrees. That result is just as impressive in this test, again nearly equalling the performance of the SL600M, which has two 200mm fans at the bottom pointed directly into the GPU cooler. The TD500 Mesh and P400A tied here at 49C. The P500A is great at both CPU and GPU cooling, but GPU cooling is where it pulls ahead of Phanteks’ own older case.
Standardized Fans
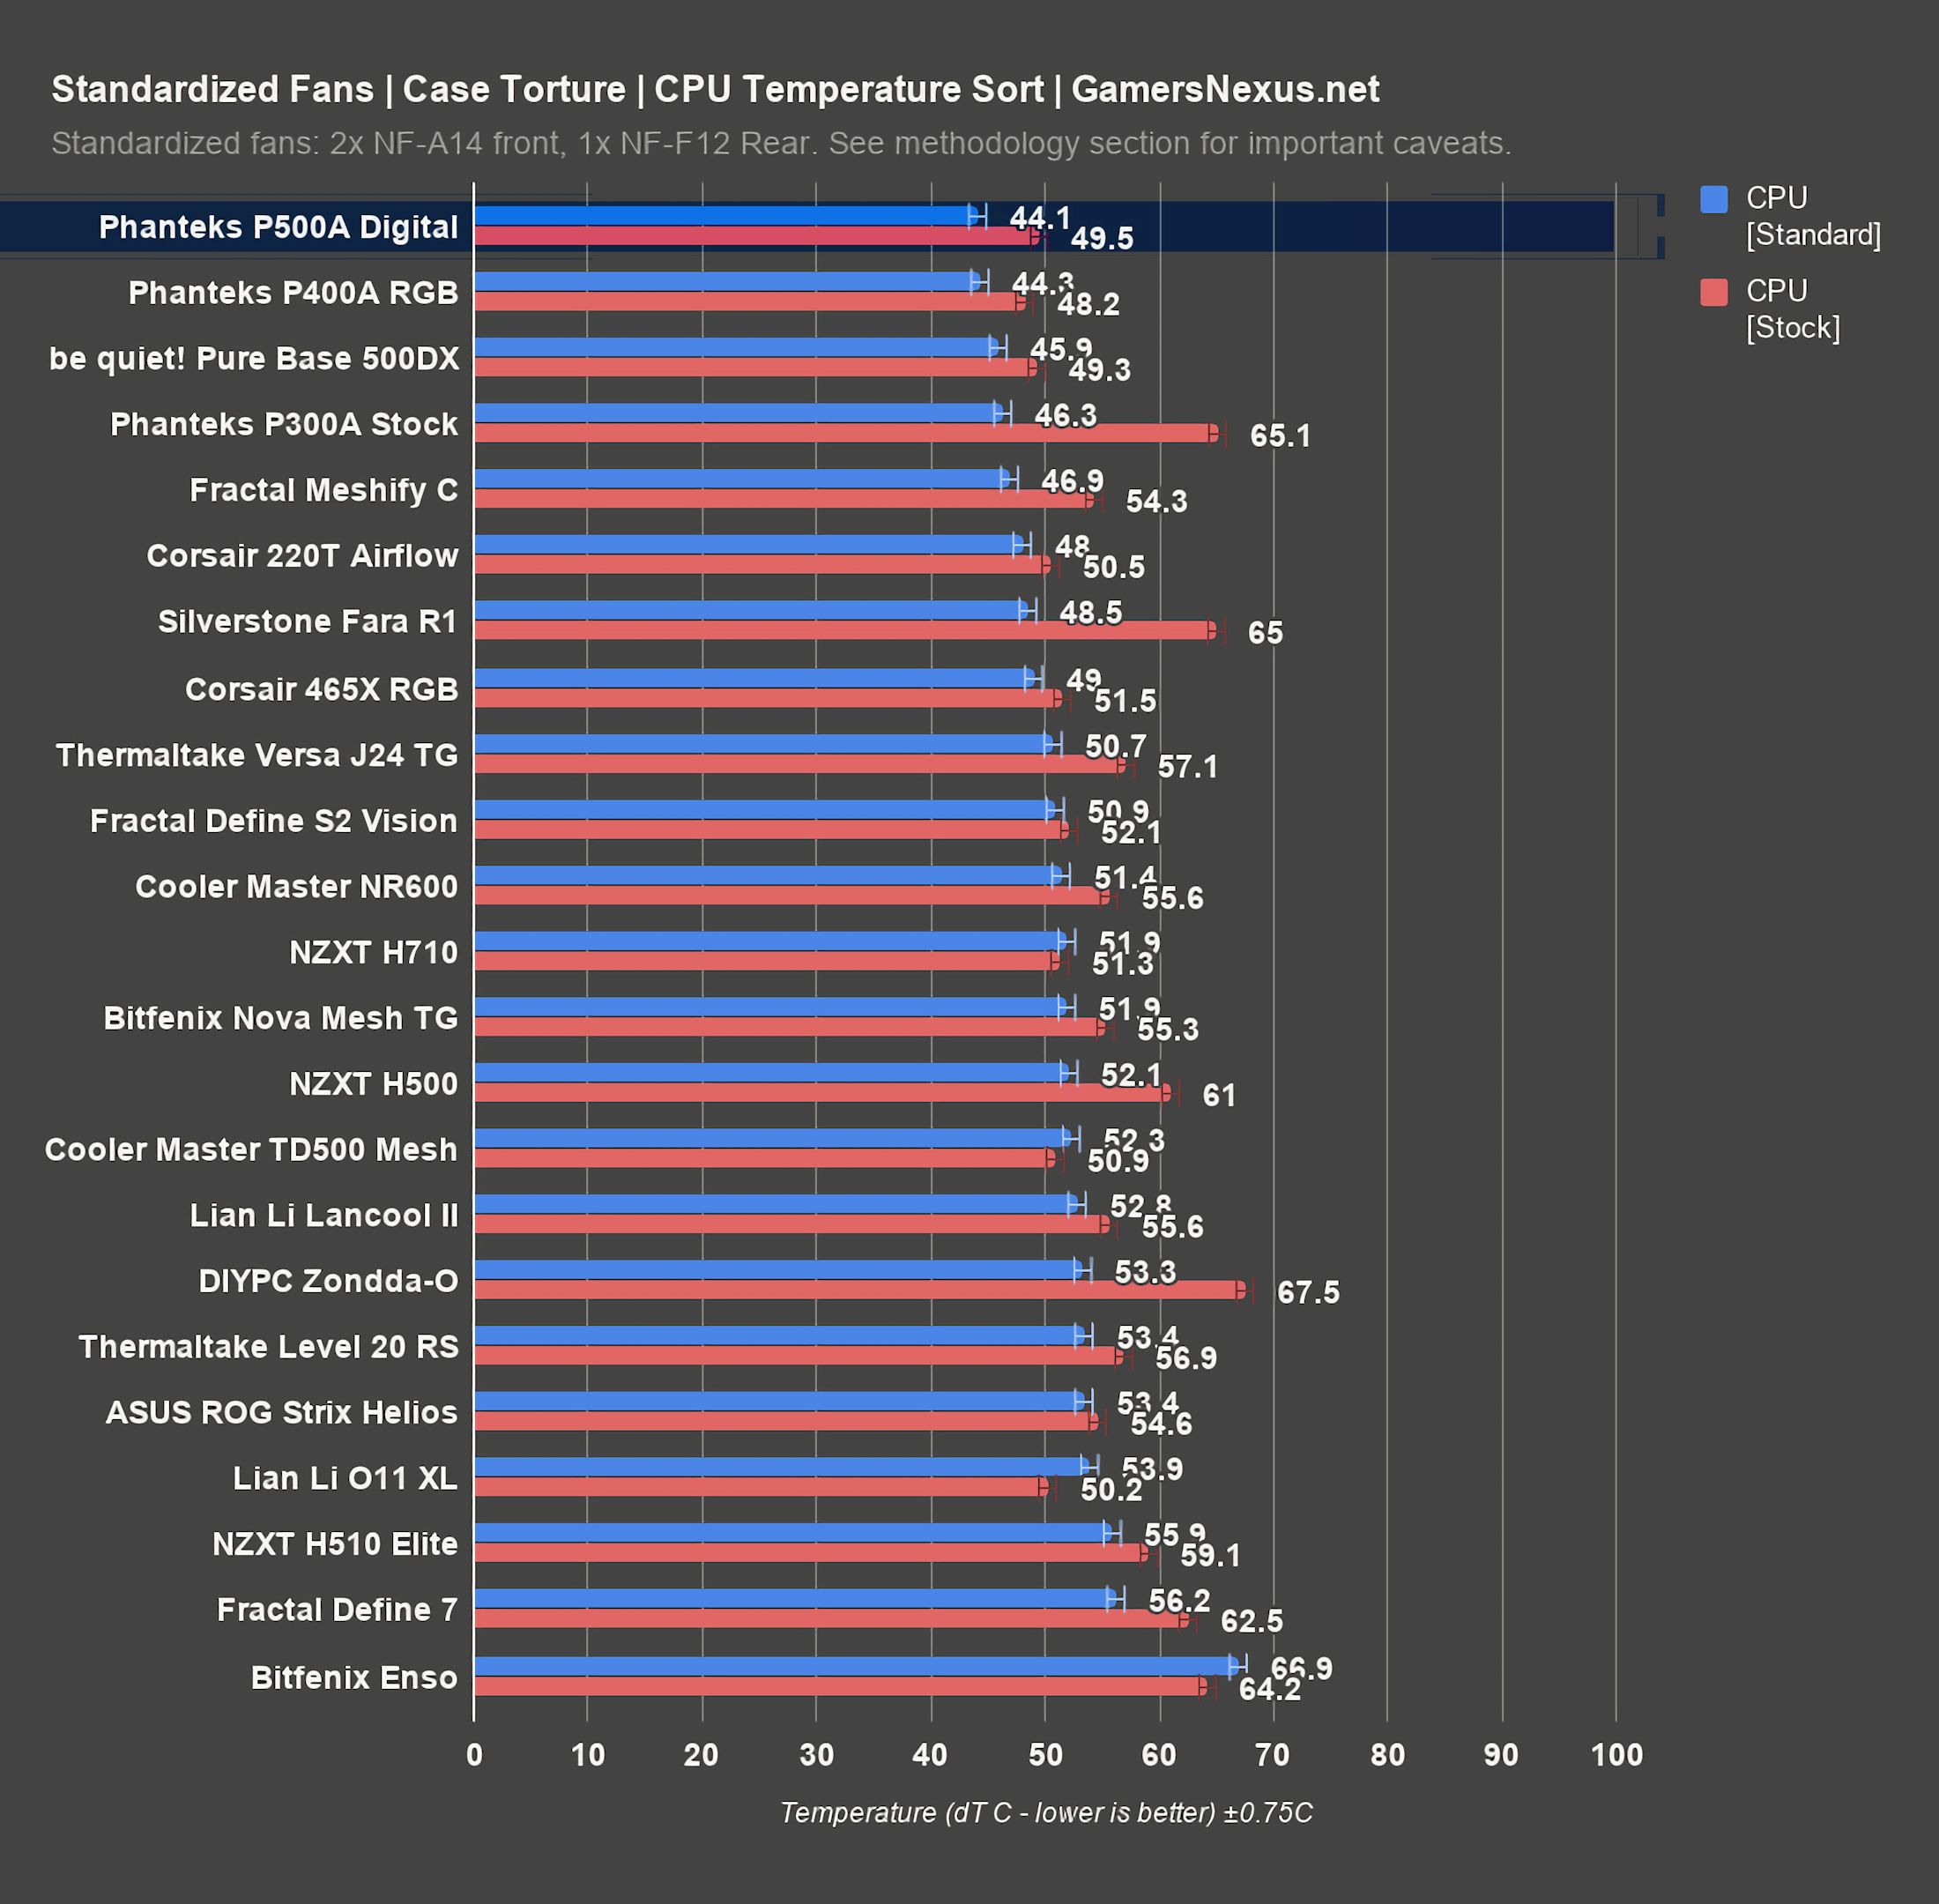
Our next testing is with standardized fans in all cases, which has a number of important caveats and shortcomings methodologically that we’ve pointed out in the past. This was highly viewer requested, so we added it, but please educate yourself on the limitations of this test by clicking the link to our research piece below.
These standardized fan results are more useful if they’re treated as results for the P500A non-Digital--nobody should be buying the Digital variant with the intention of swapping out the ARGB fans when they could just buy the P500A non-D for $30 less. CPU temperature with the standardized fans was 44 degrees over ambient, even better than baseline. This hasn’t always been true in our tests of similar cases, but the P500A is large enough that an exhaust fan can be beneficial by focusing cooling where it’s needed. 44 degrees ties it with the P400A for the best result on the chart so far, which makes sense--identical fans, similar front panel design.
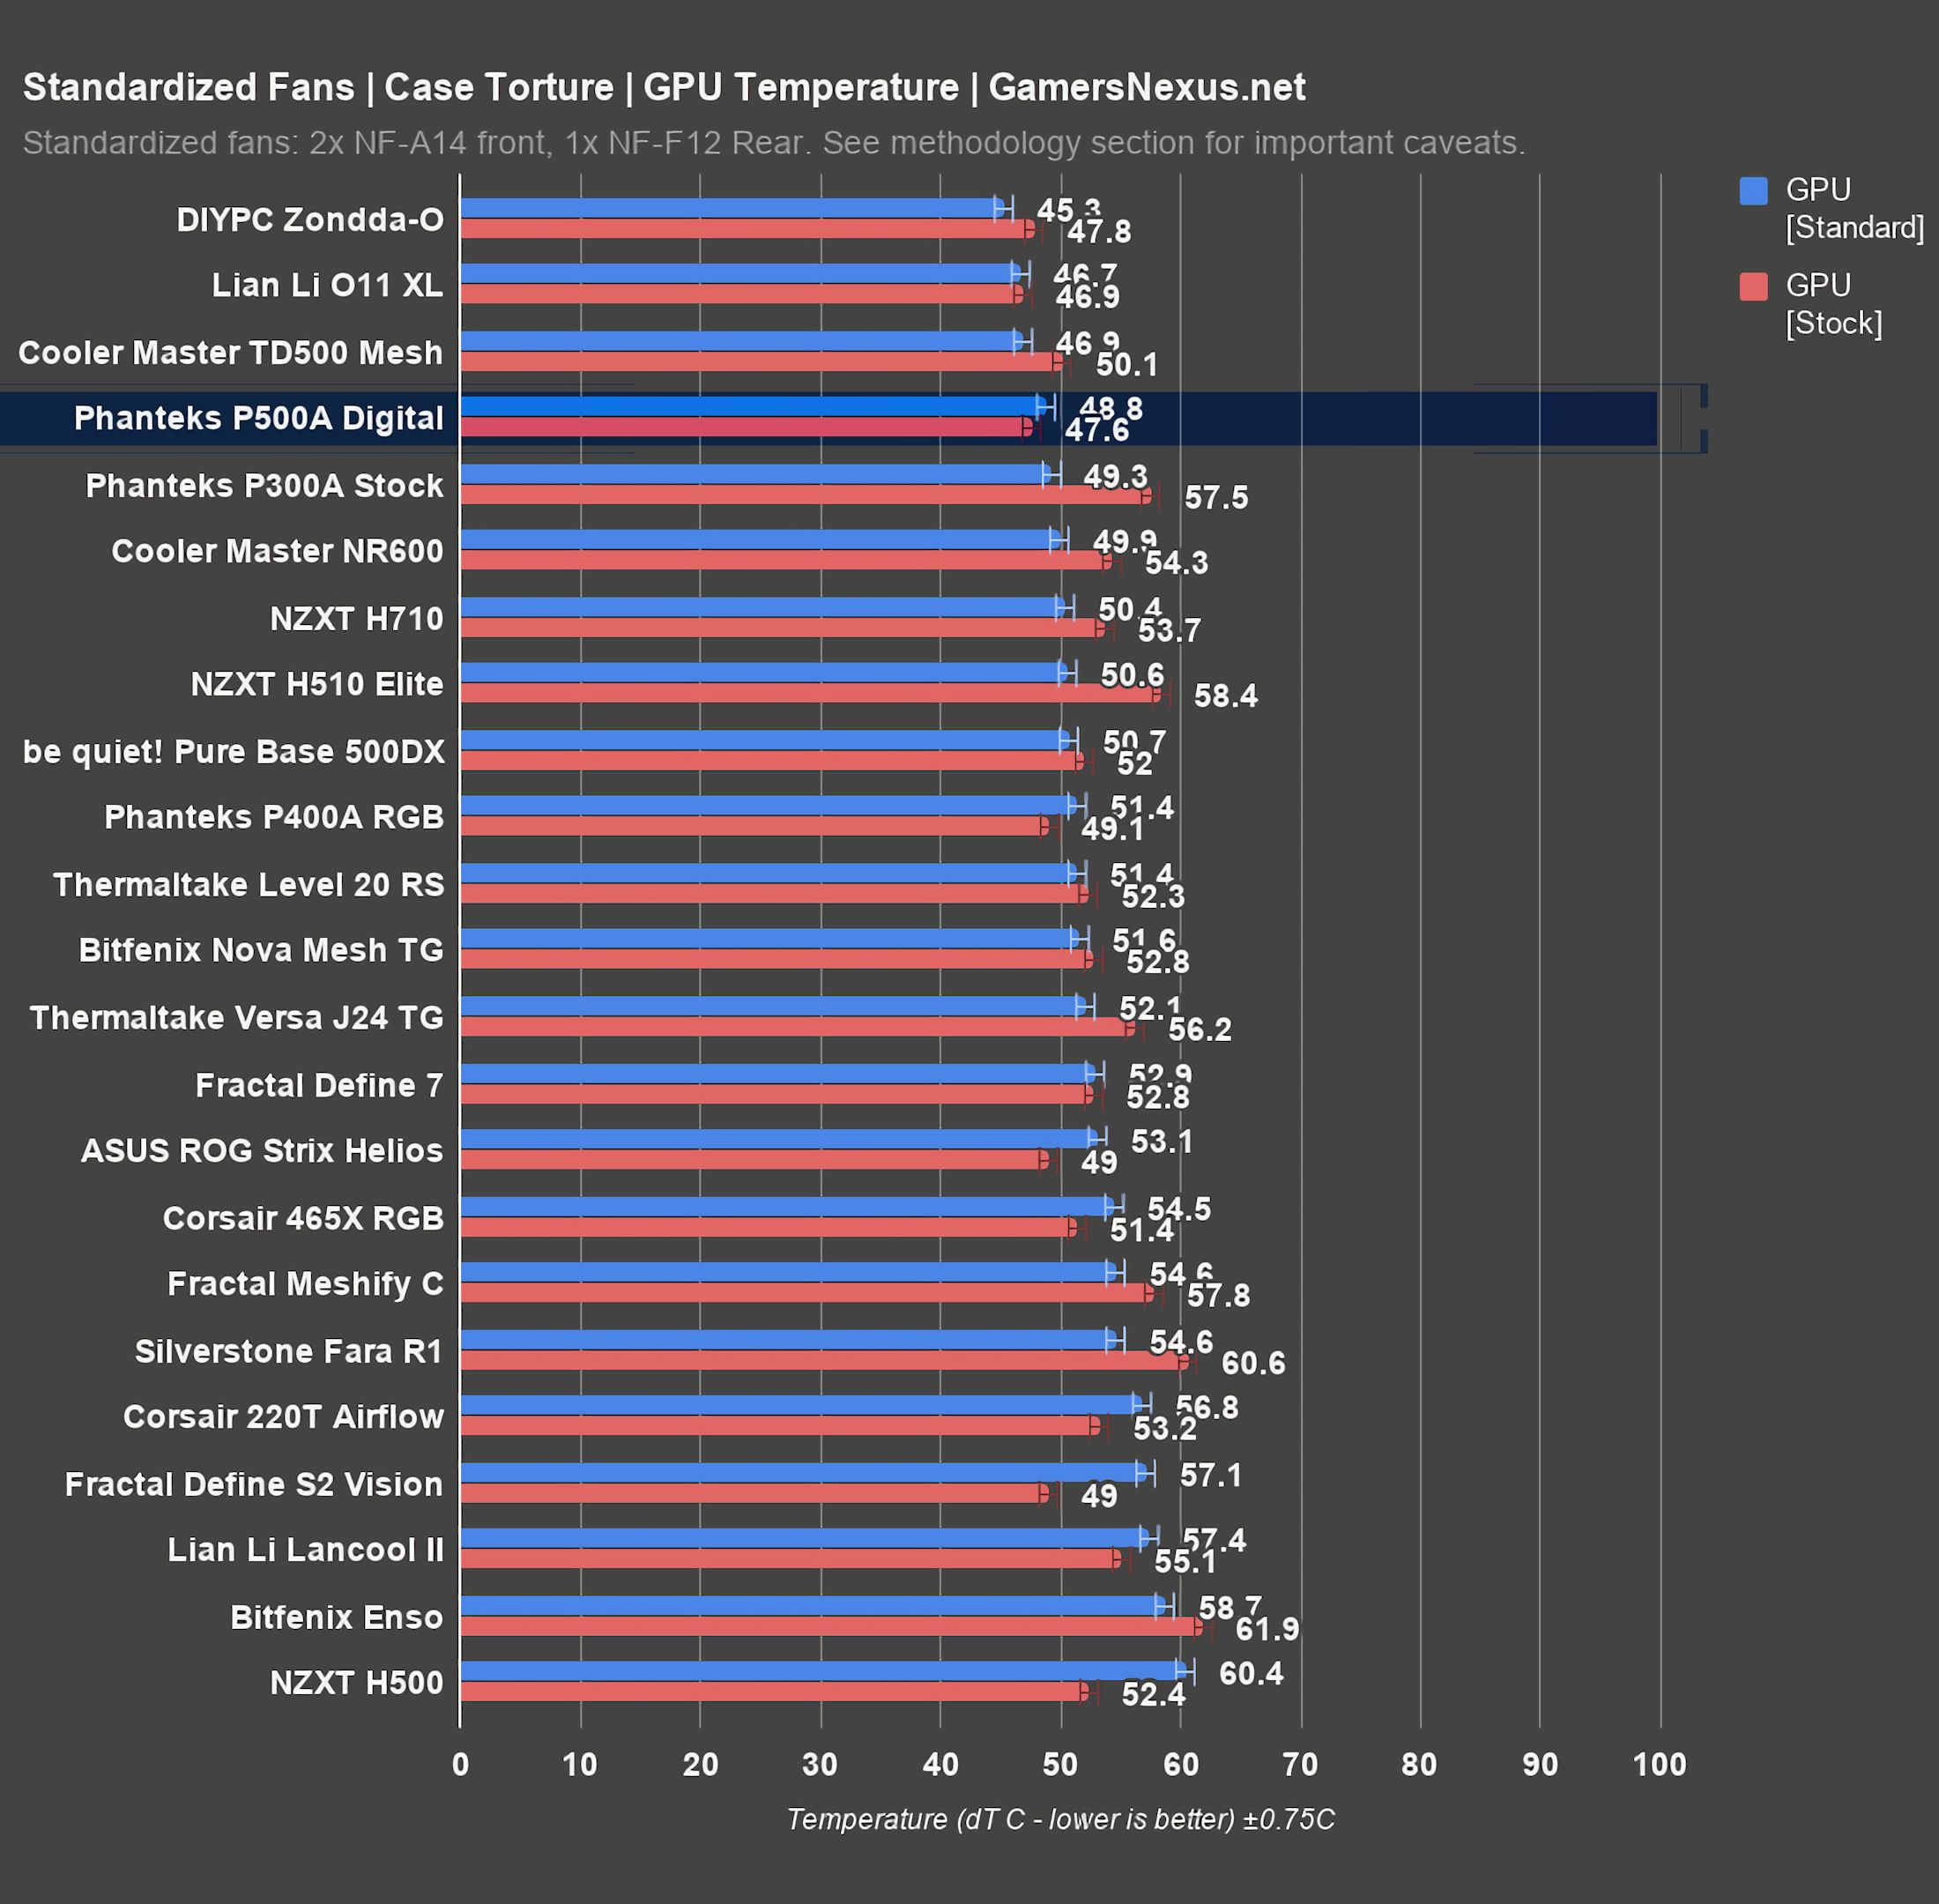
GPU temperature averaged 47 degrees in this test, rounding to one degree lower than baseline but in reality almost exactly the same. That ties it with the Cooler Master TD500 Mesh and is beaten only by the cases with direct GPU cooling. We placed the two 140mm intake fans as low as possible without going below the level of the PSU shroud to effectively balance CPU and GPU cooling, and the result is overall slightly better than baseline, but not enough to really matter. The results show that the cooling potential of the P500A matches some of the best we’ve tested, and then on top of that the stock fans are good enough to take advantage of that potential.
Conclusion
The build quality on the Phanteks P500A case is good, and it’s bigger than the P400A, which is a simple advantage. A bigger case means more room to work and more room to install parts; the downside is in finding a place to put it. Phanteks has sprinkled in some features that we previously saw in the Evolv X to make this a premium case, some of which we like and some of which we don’t, but they’re toppings on a solid base. Thermal performance is just as good or better than the P400A Digital’s, which was already at the top of most of our charts.
This is a good case with a reasonable MSRP of $130, and for once the version with fewer fans may be a good deal as well. We recommended the P400A Digital over the base-model P400A because it had more stock fans. As a rule of thumb, case manufacturers can get a better deal on fans than consumers can, so including a decent set is a huge value add for cases at or below the $100 range. Our testing with the P500A revealed that even with two 140mm fans, performance is still good, and MSRP for the P500A non-digital is just $100. For those that can live without RGB, that’s a good bargain.
If you’re interested in learning more about alternatives to this case, we’ve also reviewed (and can recommend considering) these competitors: the Cooler Master TD500 (review), Cooler Master H500 ‘blank’ (review), Phanteks’ own P400A (linked above), the Lian Li O11 Dynamic (review), and plenty of others, but these are the main ones we’d look at next.
Editorial, Testing: Patrick Lathan
Host, Test Lead: Steve Burke
Video: Keegan Gallick, Andrew Coleman