Our performance optimization & graphics guide for Starfield finds the balance between visuals & FPS
The Highlights
- Multiple settings can be tweaked without much loss
- At least one setting appears to be bugged
- Modding is critical for the best experience
- Release Date: September 6, 2023
Those who have been with us since at least 2015 may remember that some of our original success came from optimization guides and benchmarking for the PC releases of GTA 5 and The Witcher 3: Wild Hunt. Eight years later, we're back with Starfield.
This massive graphics guide looks at the mod packs that are out now, including DLSS and an optimizer mod. We'll also be looking at graphics comparisons A-to-B, doing a ton of benchmarks across different graphics settings presets, and explaining a deeper level of optimization you can do beyond the presets. This is the final installation of our Starfield coverage for now, but as more mods and patches to the game come out, we'll revisit. You can find our prior GPU benchmarks for Starfield here. We also ran CPU benchmarks for the game in a video.
We're going to look at each setting individually, comparing them not only visually but with a number of benchmarks across different platforms, including both CPU- and GPU-bound setups. We'll be testing the graphics settings and tuning them from two directions: firstly from a baseline of 1080p Low, meaning adjusting the setting under test upwards, and secondly from a baseline 1080p High, meaning adjusting the setting under test downwards.
We'll also be looking at some mods. Optimizing Starfield's graphics can go a lot deeper than just configuring the in-game menu. You can get into fine tuning parameters like maximum decals, the draw distance per item category, mesh culling, the radius of things such as ambient occlusion, the shadow map count, the particle count, and more. These individual settings have already been tuned by one of the mods we'll be testing. In addition, we'll test two DLSS mods, as well as a quick test with an FOV tweak.
Credits
Host, Writing, Testing
Steve Burke
Testing, Writing, Research, Web Editing
Patrick Lathan
Testing, Writing, Research
Jeremy Clayton
Video Production
Vitalii Makhnovets
Starfield Optimization Overview
One quick thing right at the top: as we were finalizing this piece, Bethesda posted a note that said it’s working on official DLSS integration, an FOV slider, HDR support, and gamma adjustments. These are not integrated yet. It did post a small patch (1.7.29), but none of these features were included. The patch claimed improvement to performance without being specific.


We ran two quick validation tests and found that the RX 7600 had no change to performance when tested at 1080p High or 1080p Low in our conditions. The RTX 4060 saw a 6% performance uplift in one test, but upon running NVIDIA Profile Inspector, we found that this is because NVIDIA pushed a patch (not a driver update) that flagged Starfield as resizable bar compatible. The 6% uplift could be a mix of ReBar with whatever Bethesda changed, or just from ReBar. Either way, as of right now, there are no major changes from the patch—it’s mostly to fix a few quest-breaking bugs. Patches won’t affect most of the graphics comparison or relative performance values anyway.
Starfield Graphics Performance vs. Visual Impact Summary
We created a summary chart of our findings. Some of these matters are subjective, like our opinions on visual impact. Please note that this chart is for your quick reference, as the content here today is in-depth and aims to provide a detailed understanding of the settings and of how to tweak Starfield for better performance. These types of summary charts strip all nuance from what they contain, so we ask that you read on for context.
| Visual Impact (Subjective, GN Team) | Performance Impact | |
| Motion Blur | Subjective (Recommend "off") | None |
| Particle Quality | Low | None |
| Grass Quality | High | Low (City/Indoors) / Critical (Field) |
| Crowd Density | Critical | Low (GPU-Bound) / Moderate (CPU-Bound) |
| Reflections | High | High |
| Volumetric Lighting | Moderate | Critical |
| Contact Shadows | Low | Moderate |
| GTAO Quality | Moderate | Moderate |
| Indirect Lighting | Critical (at Low, no VRS) / Otherwise Low | Moderate |
| Shadow Quality | Moderate | Critical |
| Visual impact criteria: More severe rankings suggest higher quality settings are recommended where possible | Scale: For sake of simplicity, the scale is for maximum impact. This rates it as the highest - lowest setting % cost in performance. Remember that settings in between can reduce performance impact significantly. None - Within error (0-1%) Low - Less than 3% Moderate - Less than 3%-6% High - 6%-10% Critical - 10%+ |
The scale ranks from "None" to "Critical." Performance impact is defined objectively and from our GPU-bound test scenario; however, CPU-bound scenarios are explored later. The performance impact rankings are objectively defined by the ranges below. Some have caveats, like grass and crowd density. Indirect Lighting is also a particularly interesting one for visual impact: Most of the time, it’s not too noticeable, but there is one specific condition that really ruins the visuals for us.
We’re providing this summary chart because we don’t want to offer flat recommended settings. That’s because it changes based on the hardware, so rather than recommending a safe configuration that everyone can probably run, we’re giving you the tools so that you can tune it for your system. A higher-end machine might only focus on critical performance items for extra framerate, while a low-end one might focus on moderate to critical.
The testing we're doing today is relative scaling from impact of settings, which means that this will remain a permanent reference unless Bethesda makes very specific tweaks to how some of these settings behave.
A lot of our testing was done with an RX 7600; we have 4090 results in here as well, but that comprises the bulk of the numbers we're looking at today. Driver updates aren't going to change the relative scaling of individual settings, although absolute framerate numbers will change.
Enough of the summary. Time to show our work.
Starfield GPU-Bound Graphics Benchmarks

For this, we’re looking for any change greater than a couple percent to investigate an individual option. We’ll start with our New Atlantis testing, then move to other regions based on setting.
Important: All screenshots shown here have been cropped from 4K originals as a practical matter for web hosting; we highly recommend that you at least scrub through the accompanying video for full-frame comparisons of the clips in motion. All capture was done on an RTX 4090 at 4K in borderless windowed mode, which is the closest thing to fullscreen that's available in the (unmodded) game as of now. Our baseline capture was done with all settings manually maxed out, with the exception of v-sync, all forms of upscaling, variable rate shading, film grain, dynamic resolution, and sharpening, each of which were turned off (motion blur and depth of field were left on). This only applies to the capture done for visual comparison, not the performance tests, which we'll cover later. All capture and commentary was done on the launch version of the game, which (as of this writing, post launch) has not yet received any patches.
GPU-Bound Optimization Tests
Moving to GPU-bound benchmarks with the AMD RX 7600, we’ll start with baseline Low testing and adjust each setting up individually. We’re starting in our New Atlantis test location.
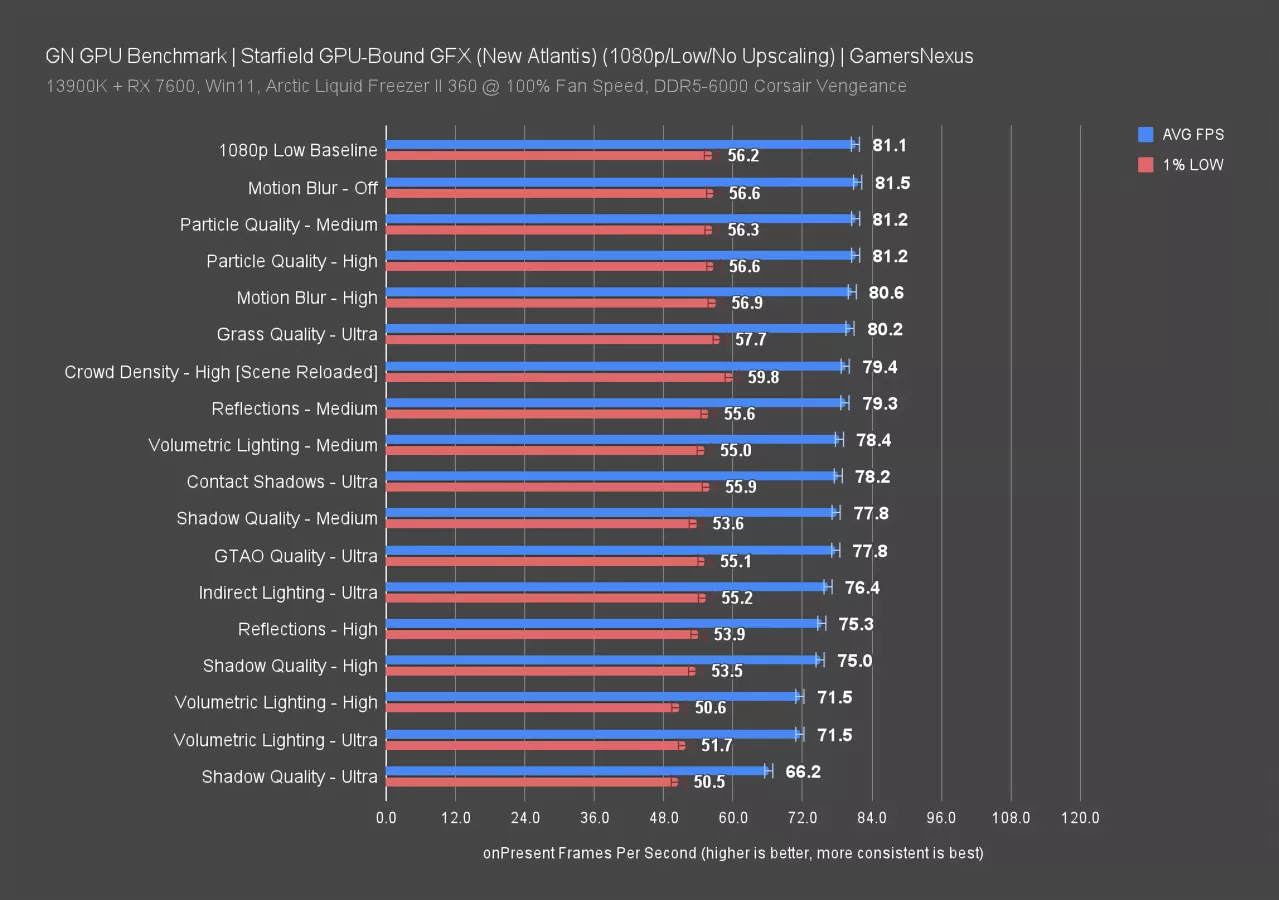
First, we’ll just dump all the tests on a chart, then split them up accordingly. Look at this graph like a shopping cart: Each item you add costs performance, and we’re looking at that cost on a per-item basis.
Some settings, like grass quality, don’t have any impact in this test area—but they will later. We’ll split them out separately for testing in a field. Others, like motion blur, don’t affect performance in any meaningful way in any location. We saw the biggest impact from shadow quality, where changing literally only that setting to Ultra cost us a staggering 18% of our total possible performance with this setup. This is the first setting to adjust if you’re GPU-bound. Volumetric lighting would be next, then reflections and indirect lighting, the latter of which also has a potentially large impact on visuals when using Low and no variable rate shading. We’ll come back to that.
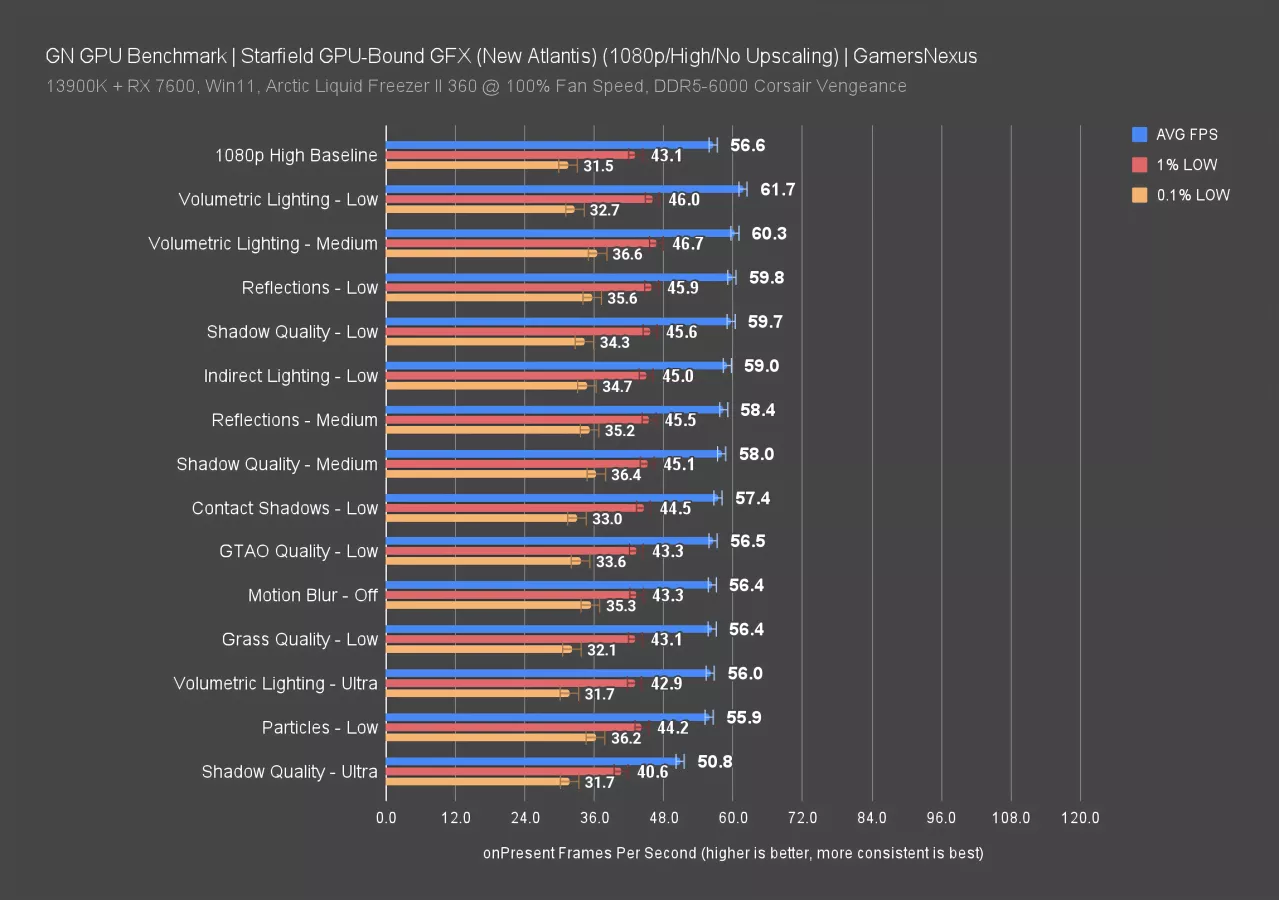
Jumping quickly to the GPU bind from the other direction, with a 1080p High baseline, we get this chart. We’ve intentionally sorted this chart with baseline at the top, despite it not being the best setting. This is the opposite direction: we start at High settings—not Ultra—and then reduce them as we go. That restricts the maximum top-to-bottom swing, but attempts to look at this more holistically. Reducing volumetric lighting had the largest improvement going from High to Low (when ignoring Ultra settings), with Medium volumetric getting most of the performance without as much sacrifice. Reflections and shadow quality were also high on the list, as was indirect lighting.
Note that several items, like everything in the 55-56FPS range, are within error of baseline. In other words, changing them had no impact on performance in this test scenario. We can see some changes in other areas, but not always. Let’s move to the individual charts.
Shadow Quality
Shadow Quality - Performance
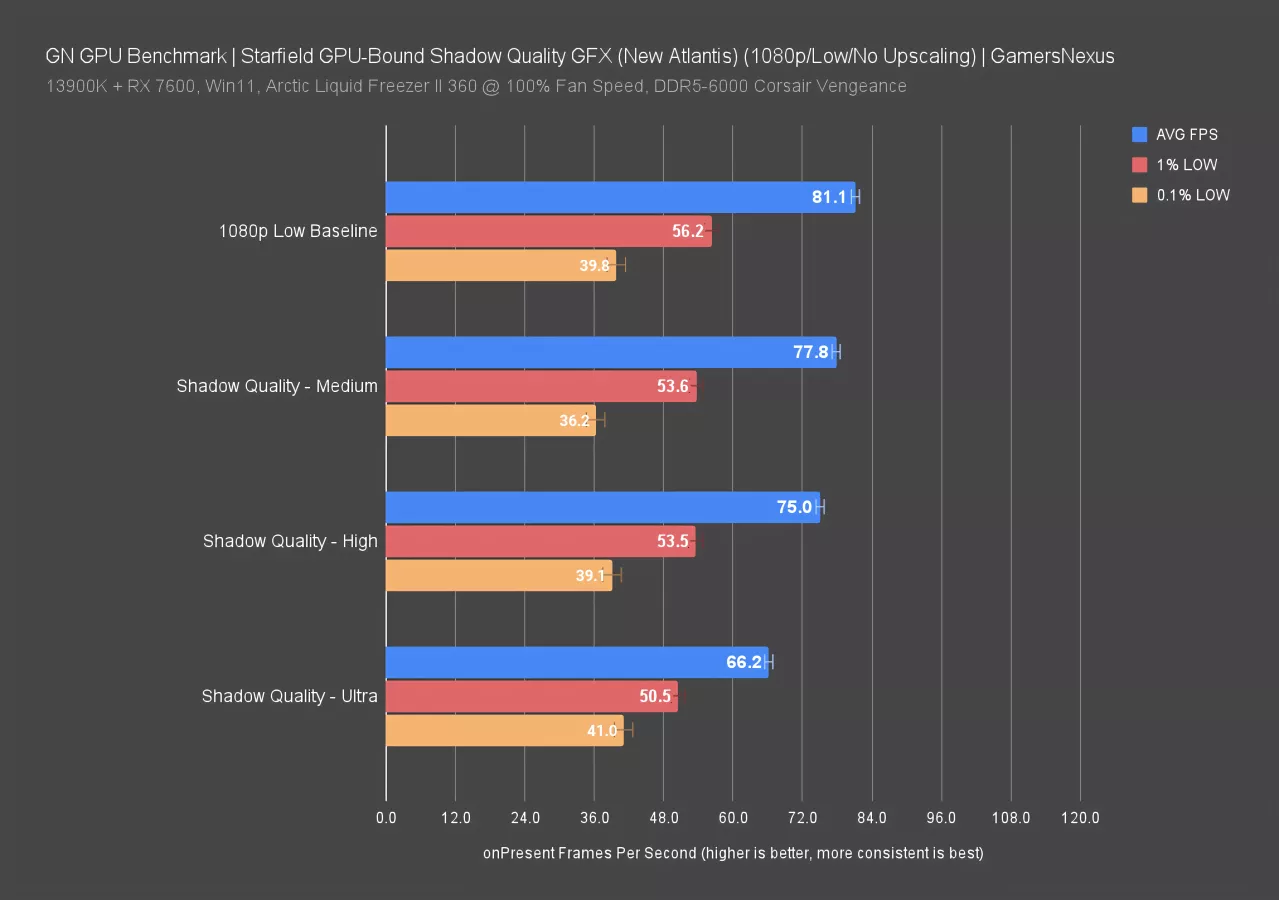
Shadow quality has a particularly high cost at Ultra when tested with our GPU-bound configuration. Medium and High are barely differentiated, respectively costing 4% and 7.5% of the baseline performance. 4% is still a relatively large change considering it’s just one setting, but Ultra remains the obvious choice to avoid for most setups. If you’re on higher-end hardware that can almost handle the Ultra preset, you could drop shadow quality and likely boost it to more satisfactory performance.
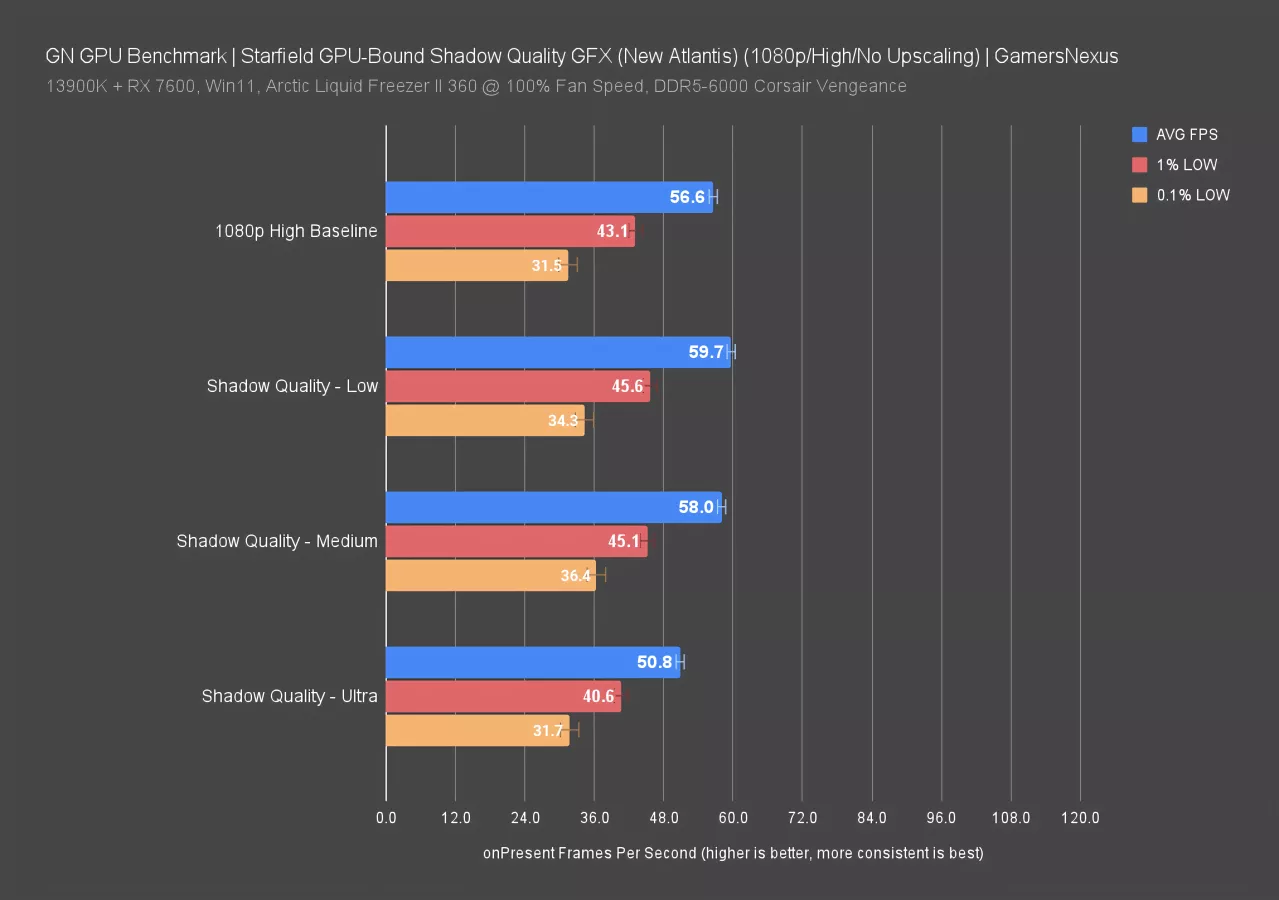
Looking at shadow quality from a High baseline rather than Low, we saw a 5.5% improvement by switching to Low shadow quality, which materializes as about 3FPS AVG. Moving to Medium gave us a 2.5% uplift. Ultra obviously was more expensive. Let’s take a look at what shadow quality actually does.
Using the Image Quality Comparison Tool
These comparisons will use an embedded side-by-side image comparison tool from the software ICAT, which is a vendor-agnostic software solution to make it easier to compare images. We have inspected the ICAT code and have found it to be neutral, despite being made by NVIDIA. We have modified the ICAT javascript to work better in web format. Our video comparisons (for the YouTube upload) were made entirely in Adobe Premiere and show the same results.
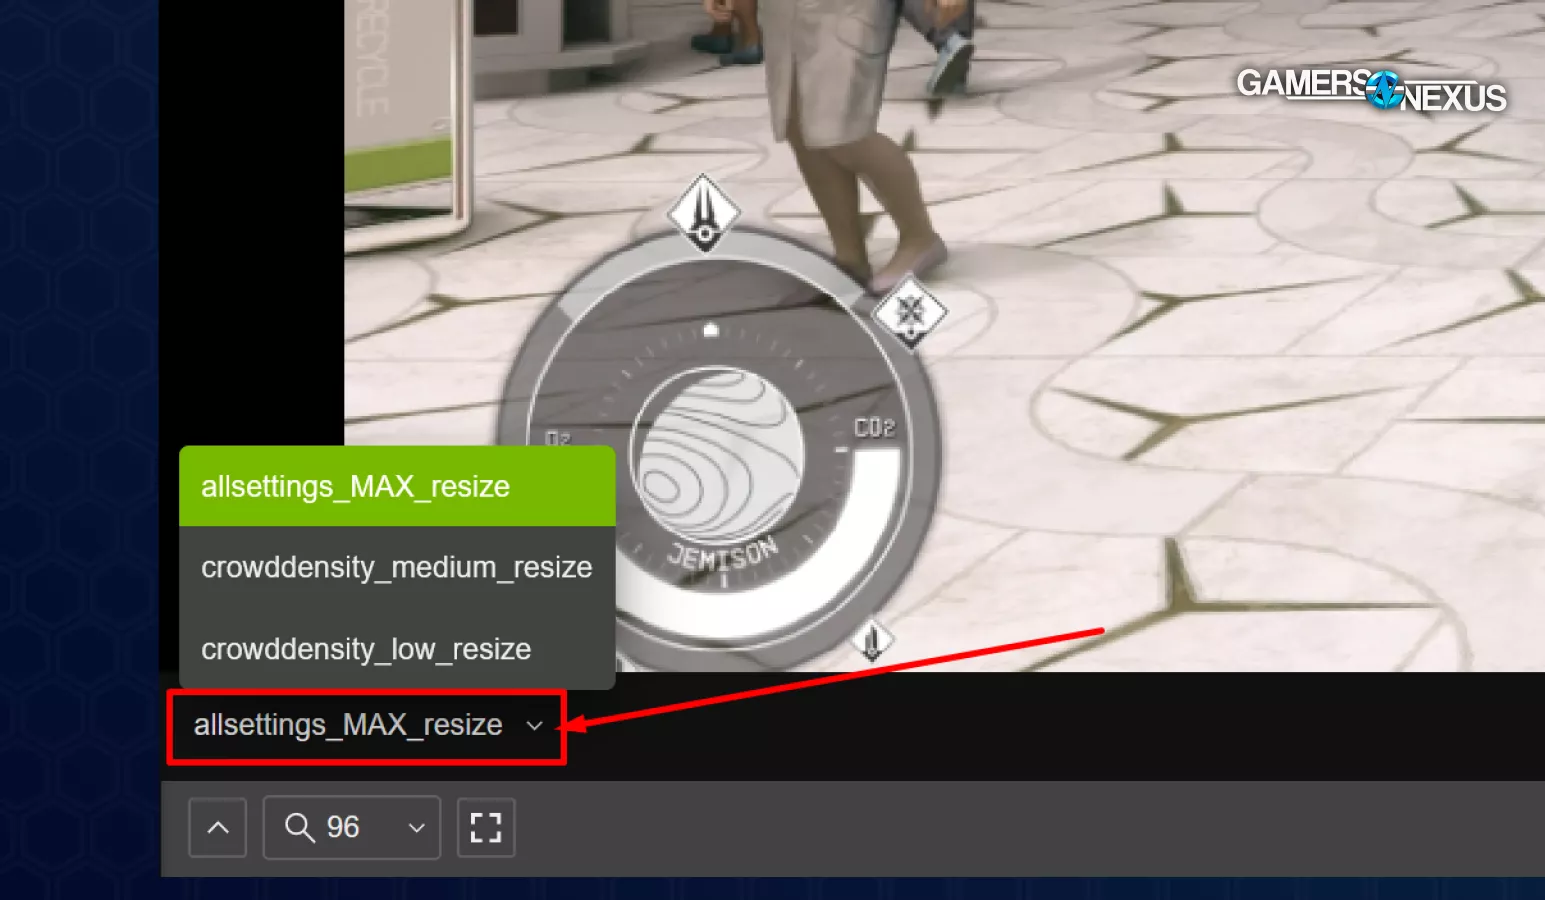
The interface for the below comparisons includes an image selection drop-down in the bottom of the viewer. You can change the images there. The top-left contains a side-by-side comparison or split-screen comparison. You can also zoom or drag the slider.
Shadow Quality - Visual
Below, in order of LEFT to RIGHT: (1) All settings max (Baseline), (2) shadow quality high, (3) shadow quality medium, (4) shadow quality low. All images are cropped for web. View the video for full resolution.
Shadow draw distance also scales with quality. Even just going from Ultra to High in this scene eliminates many shadows within the tree canopy in the background, and each step down in quality brings the edge of that draw distance closer, until at Low even the shadows within the trees closest to the camera are almost gone.
Indirect Lighting
Indirect Lighting - Performance
Indirect lighting doesn't have as large of a performance impact as some other settings, but it does have a gigantic impact on visuals depending on which setting you use. Low (with VRS off) produces some of the worst looking blurring in the game, so older GPUs that don’t support variable rate shading will look particularly bad at Low.

For performance, though, we’re seeing about a 5.8% performance loss by going from baseline Low to Ultra indirect lighting when GPU-bound.
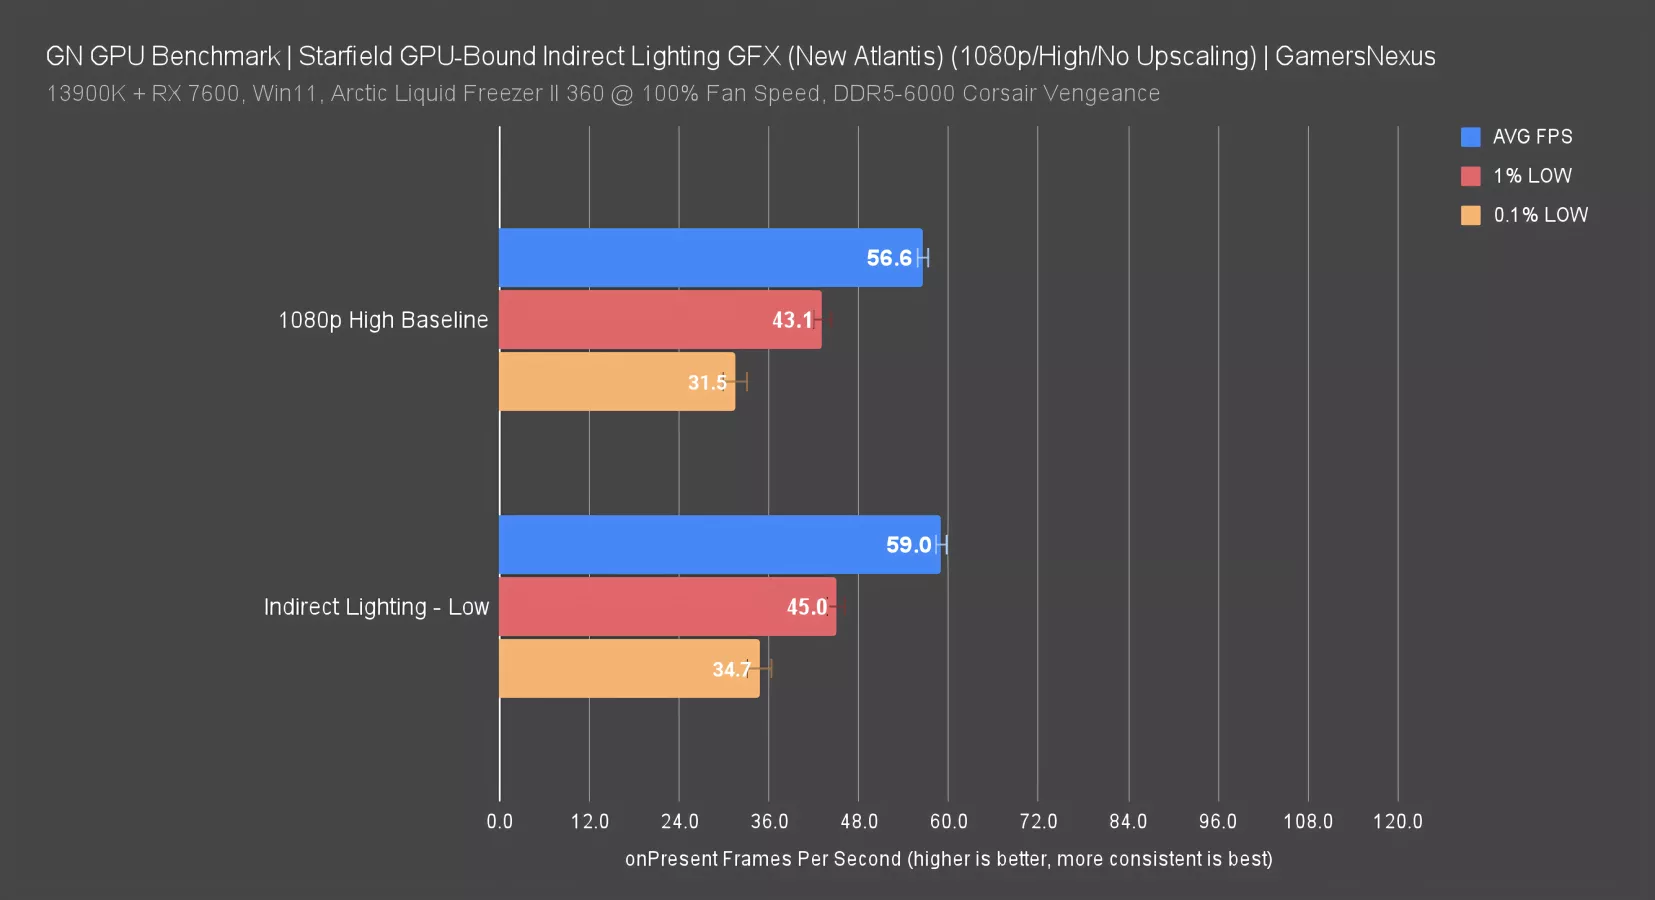
Switching to baseline High and still GPU-bound, moving from High indirect lighting to Low gave us 4.2% more performance. It does have a big visual impact, so let’s look at that.
Indirect Lighting - Visual
Below, LEFT is all settings max (baseline) and RIGHT is with indirect lighting on high. Use the drop-down in the bottom corner to add other settings (if present).
We did notice that in some scenes, for example this club, the visual impact isn't clearly visible. There’s still some difference specifically at the lowest setting, though: notice the flickery noise in the reflections on the text encircling the stage. Again, moving to Medium makes the scene appear effectively identical to Ultra.
Grass Quality
Grass Quality - Performance
Time to get into grass quality. Our previous summary charts showed nearly zero impact from grass quality, but that’s because there’s not much grass in the New Atlantis scene. Looking at grass quality tested specifically in a field, we see the differences emerge more meaningfully.
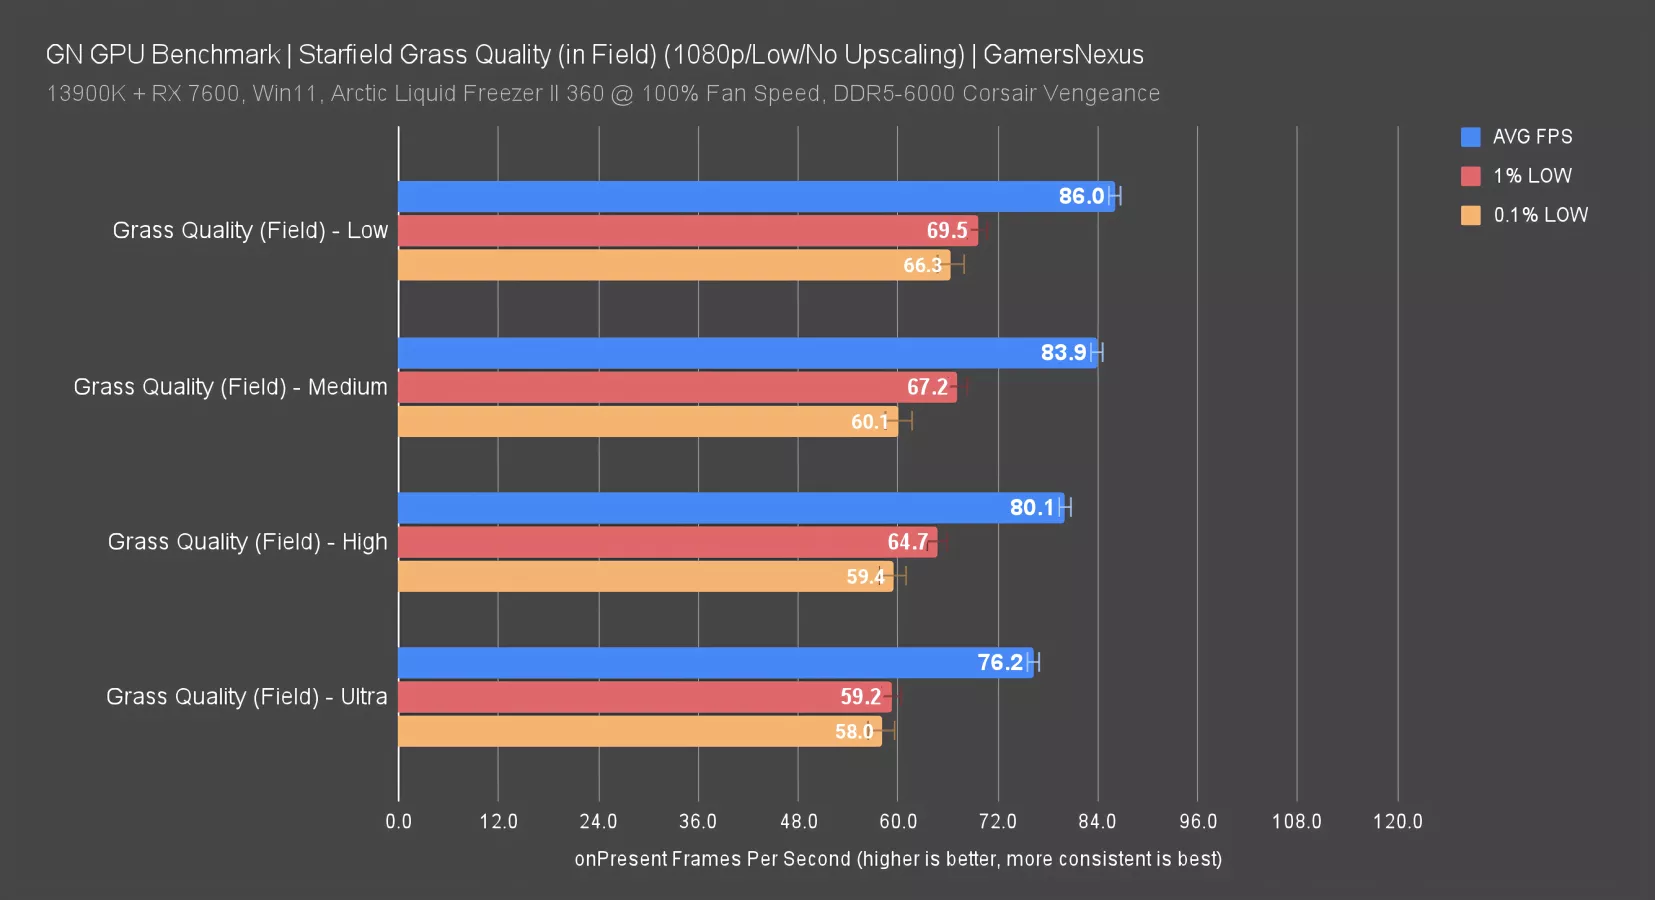
Tested from all Low settings at 1080p and only adjusting grass, without upscaling, the baseline result was 86FPS AVG with good lows. This field doesn’t put load on the GPU in the same way that the city does, but the grass quality clearly shows impact overall: increasing quality to Medium results in a loss of 2.4% performance, while increasing to High costs us a total (from low) of 6.9%, with Ultra costing 11% from baseline Low. That’s a massive swing considering this is just one quality setting. If you’re in a GPU-bound scenario and you particularly notice issues in grassy areas, this would be the setting to adjust: just know that it won’t help performance issues in areas without much literal grass, like cities.
Grass Quality - Visual
Below, in order of LEFT to RIGHT: (1) All settings on max (baseline), (2) grass quality on high, (3) grass quality at medium, (4) grass quality at low
This extends to the mossy growth in New Atlantis–it isn't grass, so there's no difference between the minimum and maximum settings other than the (possibly random) change in some far-away trees behind the silver statue.
Crowd Density
Crowd Density - Performance
Crowd density is our next setting to test. This setting has a high and observable visual impact, but a low impact on performance. We’d strongly recommend keeping this as high as you can to keep the game feeling more alive.
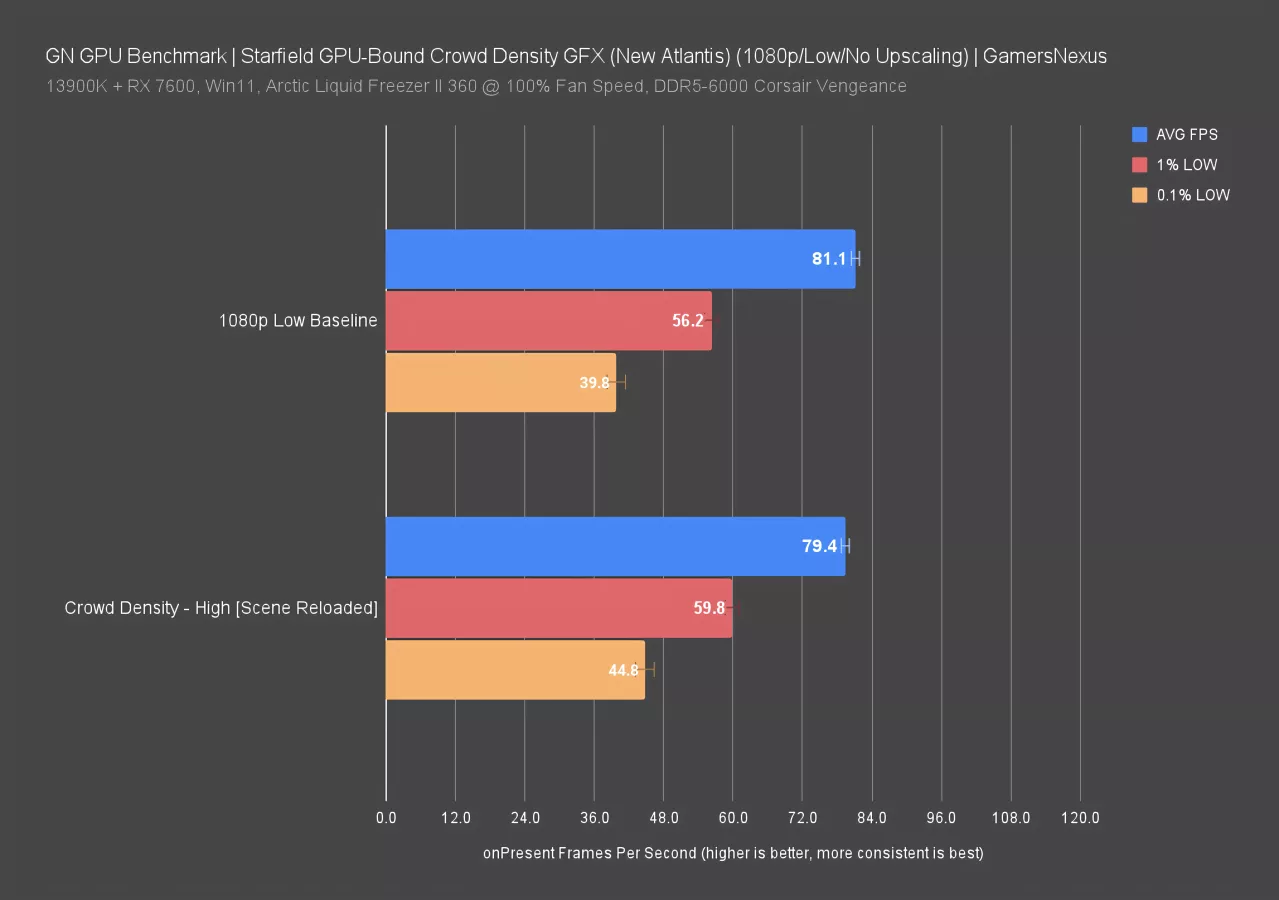
In a GPU-bound setting from a Low baseline, we saw a cost of around 2% to increase crowd density to High. It wasn’t worth testing anything in between since, obviously, it’d be less than a 2% swing. Let’s look at the visuals.
Crowd Density - Visual
Below: Left is max crowd size, right is medium. Use the drop-down in the bottom corner to add other settings (if present).
By loading into the MAST district we can get an extremely rough picture of crowd density. We captured a couple passes at each setting, then synced them up, paused, and counted the visible NPCs in that single frame. With that small sample size, we saw 22 NPCs on average at High, 17 at Medium, and 13 at Low. Again, those are averages; the select screenshots above don't match those numbers. We can't base any performance calculations on those numbers, but it's enough to confirm that the setting does do something.
Reflections
Reflections - Performance
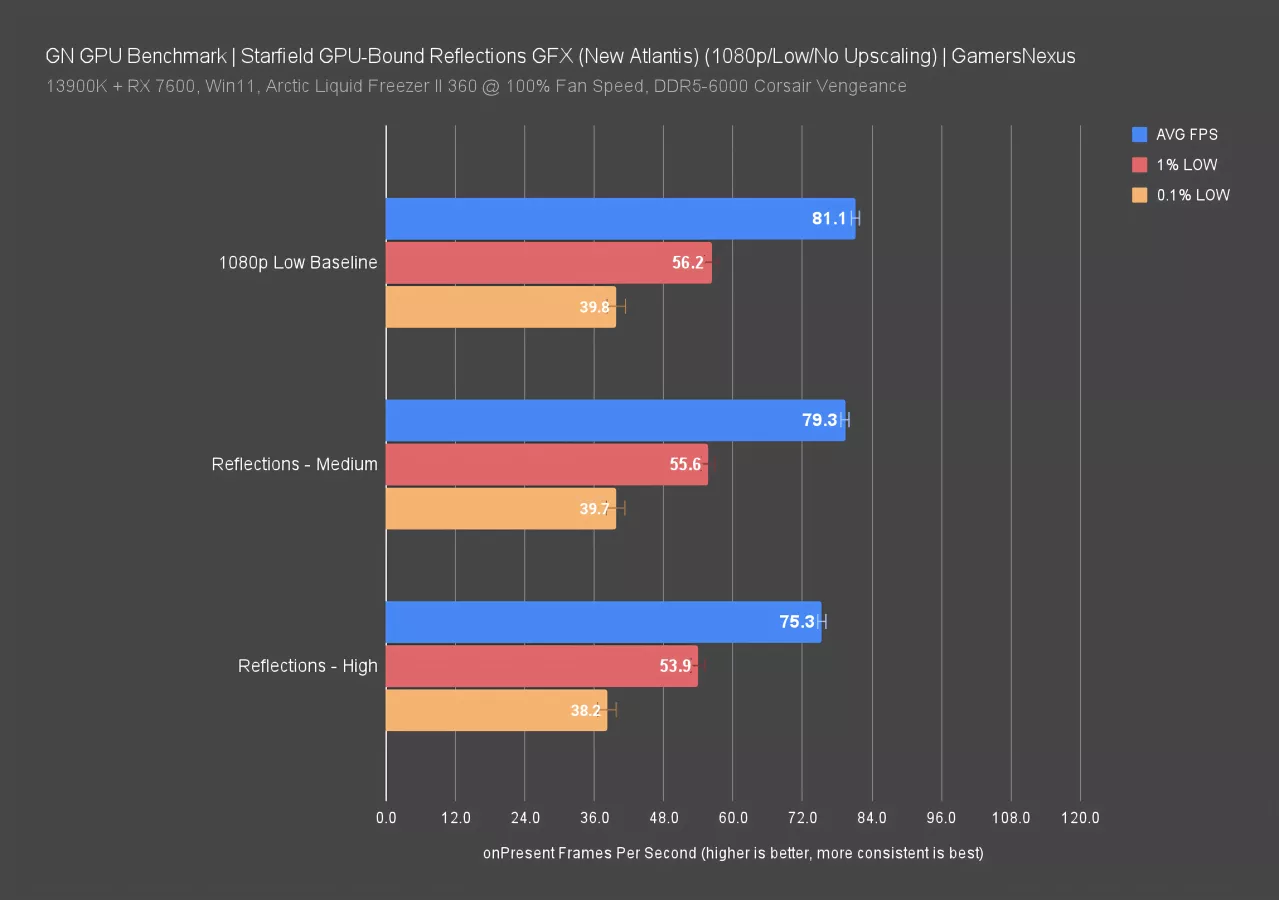
Now for reflections. This is another one with a relatively high performance cost for a singular setting, depending on how bound you are on the GPU. Starting with the Low baseline numbers on the 7600, we saw a maximum cost of 7.2% moving to High reflections, or about 2.2% with Medium.
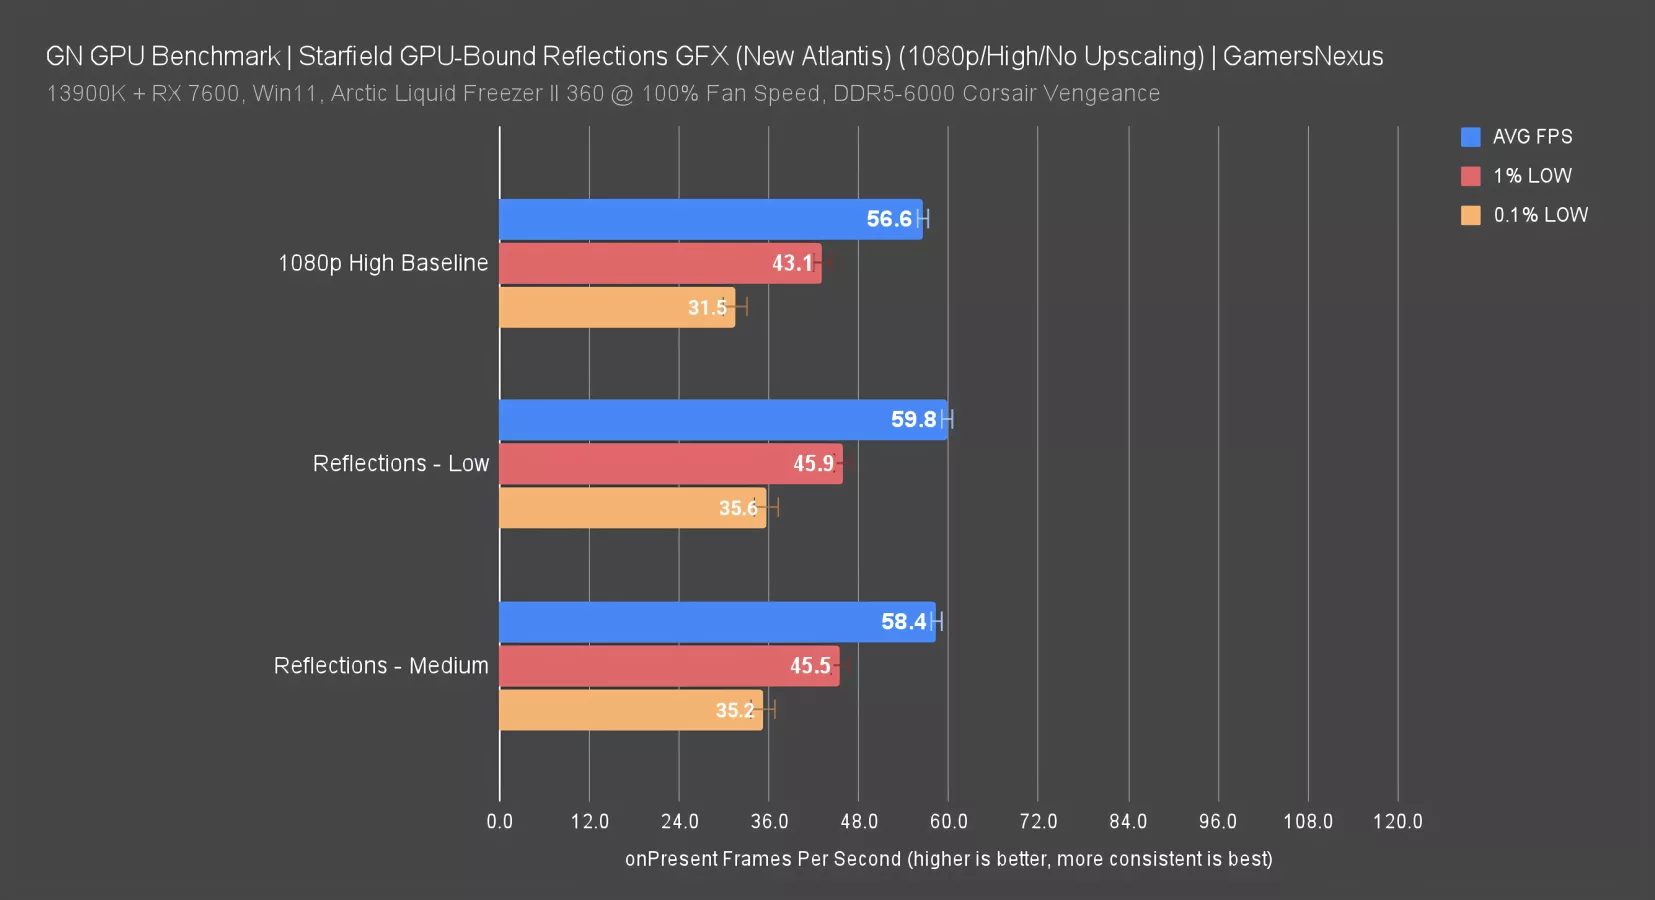
From the other direction, tested at a High baseline, we saw an improvement of 5.7% by dropping reflections to Low, or about 3% dropping it to Medium. Even with everything else loading the GPU heavily, reflections is still one of the first settings you could go to for a performance uplift.
Reflections - Visual
This outdoor lake scene illustrates the same point: the surface of the lake and the exterior of the curved building are brighter with reflections at High, but Medium and Low are effectively identical, even when considering the reflections of scenery on the water's surface. Like some of the other settings in the game, it appears as if the biggest visual change is at the highest quality option.
Volumetric Lighting
Volumetric Lighting - Performance
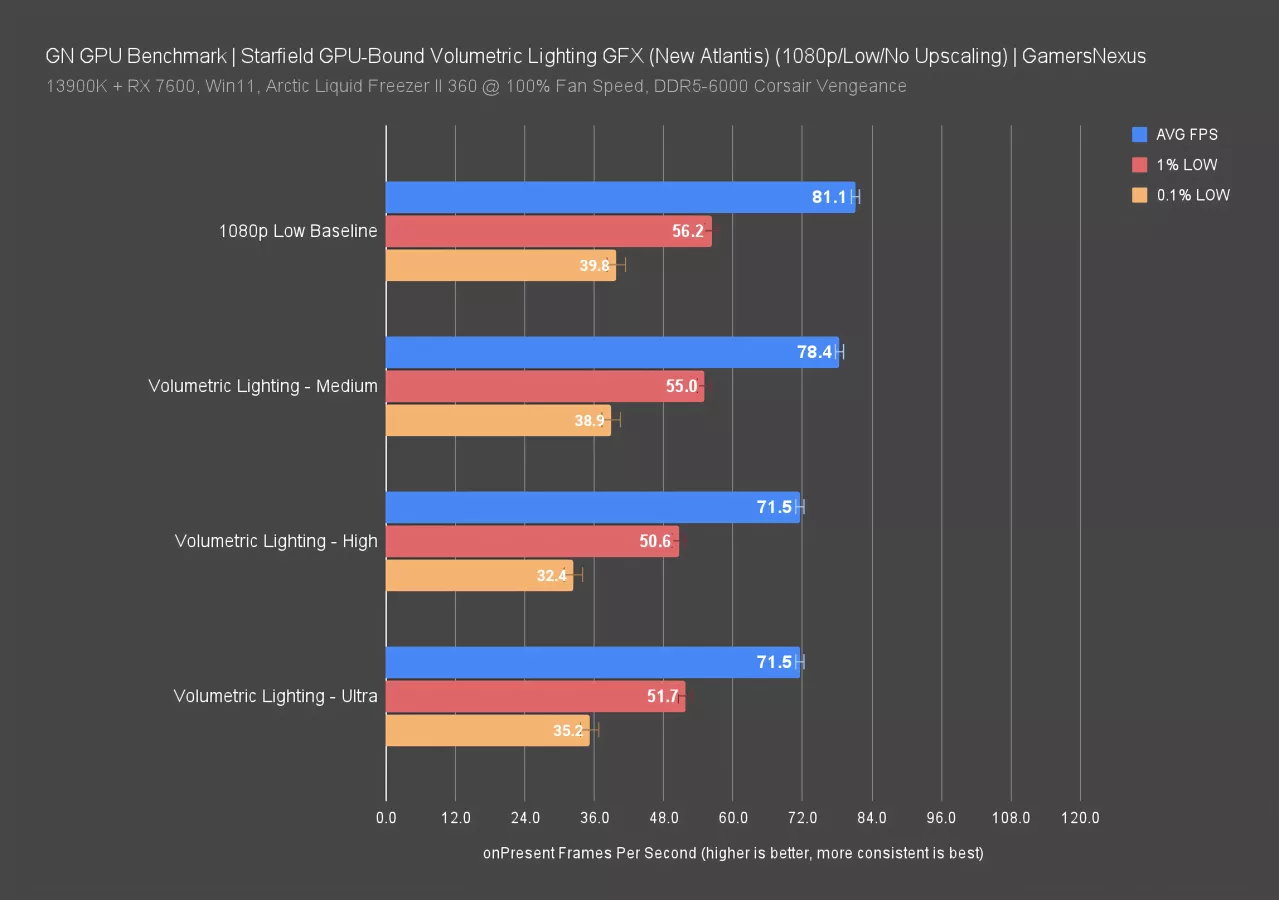
Volumetric lighting benchmarks are next. When GPU-bound and from baseline Low settings, we see a performance loss maximally of 12%. This setting has a large impact on performance. High and Ultra cost about the same. Medium costs about 3.3% of baseline performance.
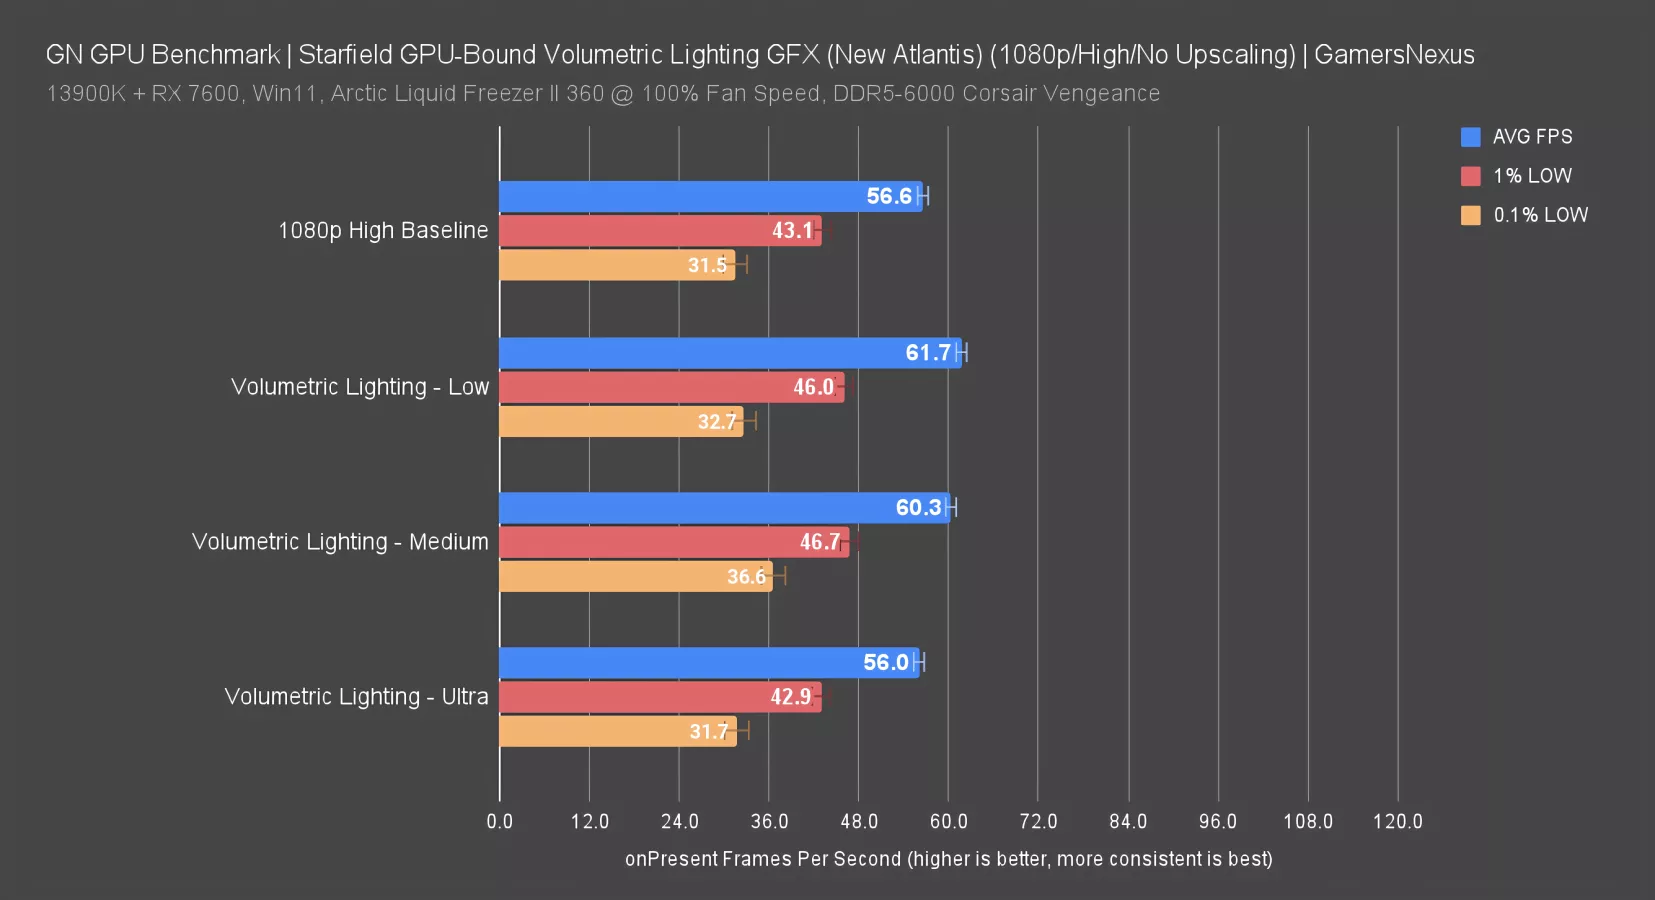
Tested from a High baseline instead, we saw a 9% performance uplift by moving from High to Low, about a 6.6% uplift going to Medium, and a slight loss going to Ultra. Even when more heavily constrained in general, this setting still has a large performance cost.
Volumetric Lighting - Visual
The smoky streets of Neon seemed like the ideal place to check for volumetric lighting, but they weren't: it's not the right kind of smoke. We'll use that scene to check some other settings.
Instead, let's look at a facility on Mars. Ultra and High look similar, bringing up the brightness and sharpness of the fog-shrouded lights at center screen, but dropping to Medium and Low progressively softens the effect, with Low eliminating some of the individual bright points altogether. There are flickering artifacts around one of the lights at all settings.
GTAO Quality
GTAO Quality - Performance
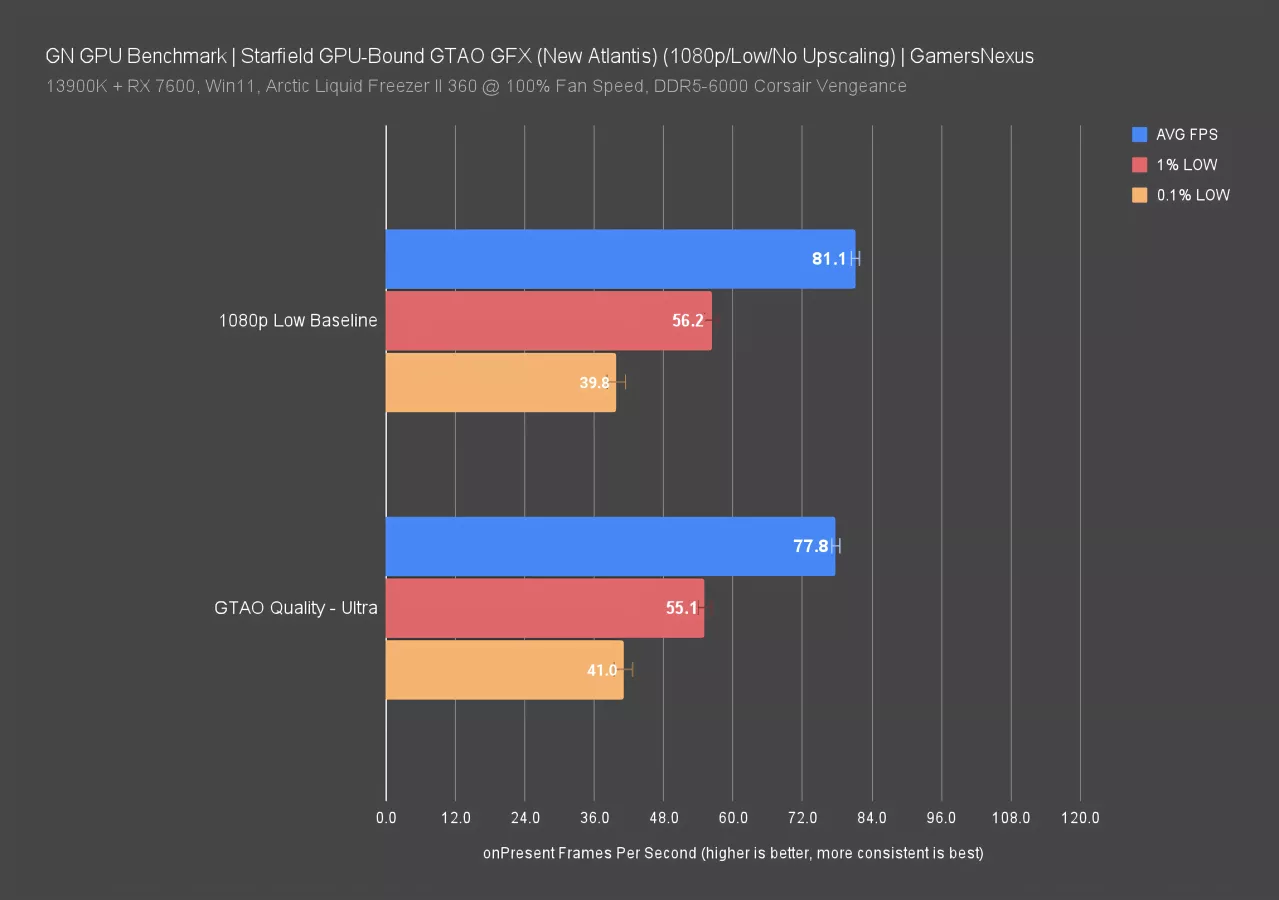
GTAO testing is next. For this ambient occlusion testing, we found that a GPU constraint from 1080p Low baseline resulted in a 4% performance loss by changing to Ultra for the setting. The range for this one is overall low, considering the relatively low maximum cost.
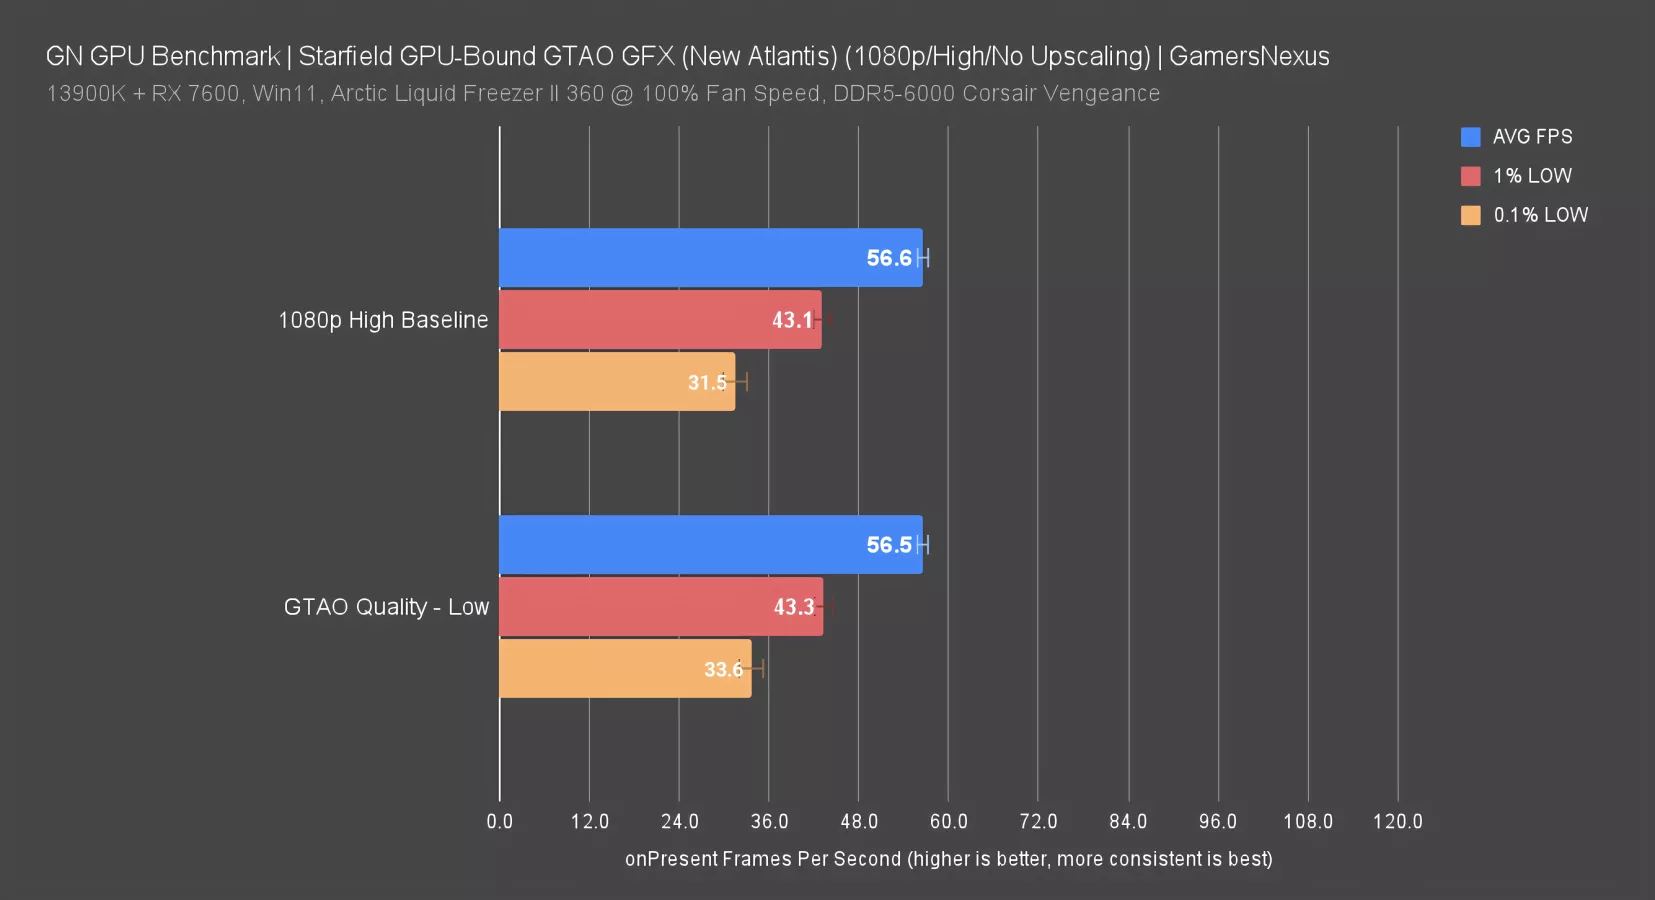
From High baseline, we found no change going to Low. The performance was within error.
GTAO Quality - Visual
The effects aren't always so pronounced, though. Although the setting is still working as intended, this brightly lit office on Titan mostly shows ambient occlusion around the base of the desk. The complicated geometry of the office chair also benefits, with higher settings significantly darkening the areas underneath and inside the chair.
Contact Shadows
Contact Shadows - Performance
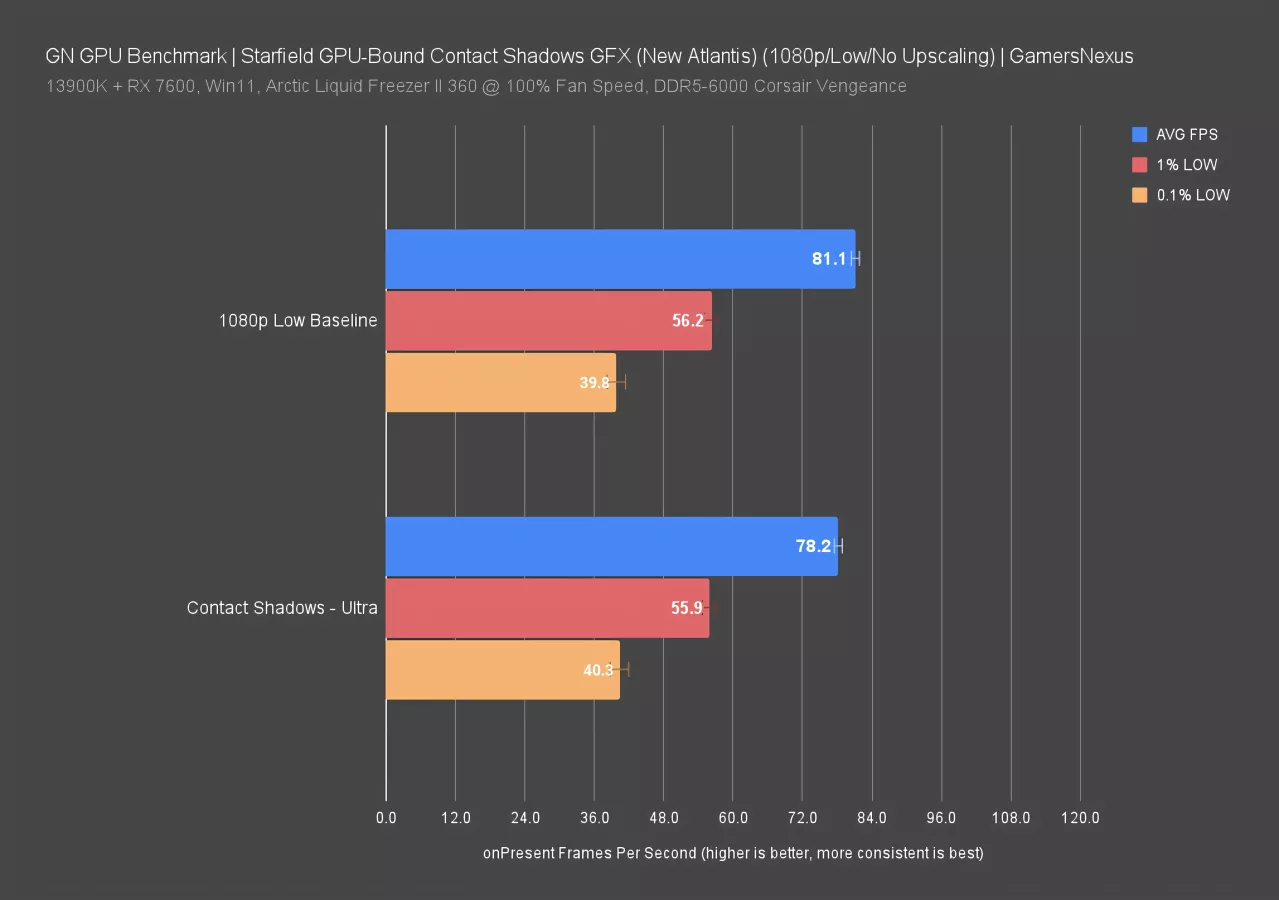
On to contact shadows. From 1080p Low baseline, we observed a 3.6% performance cost hiking to Ultra. That’s not a big range, and settling in between would yield most of the visual benefits.

From baseline High settings, reducing contact shadows to its lowest setting gained us 1.4%. It's not much worth considering when other options give far more range.
Contact Shadows - Visual
Elsewhere, the differences are even harder to notice. In this outdoor scene, the joints in the honeycomb roof structure become darker when the setting is raised above Low, but changes beyond that are minor. Most of the NPCs are standing in shadow, so even ones that pass close to the camera (like the security guard) are unaffected by the setting, and the ones in the distance are too far away to see clearly anyway.
Particle Quality
Particle Quality - Performance
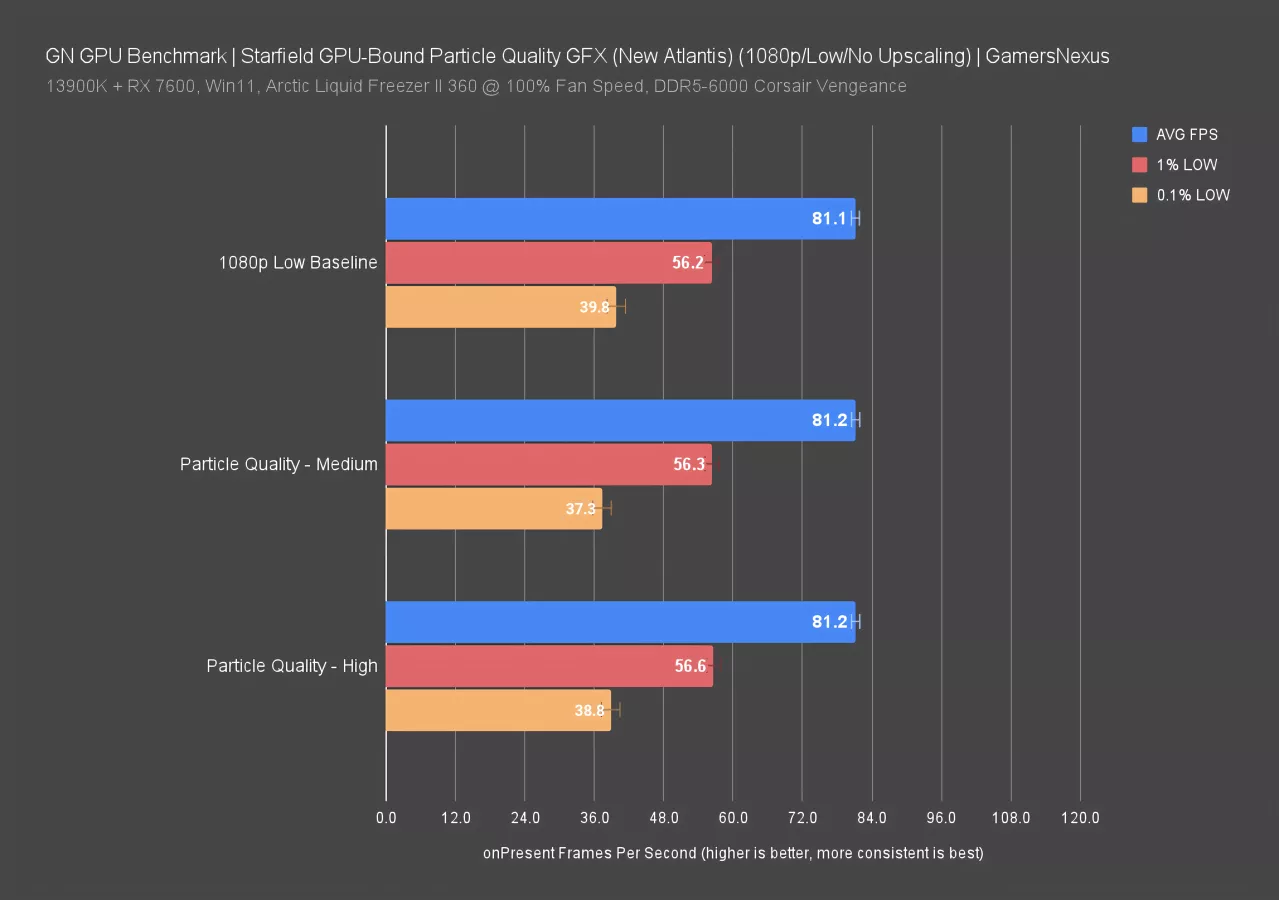
For particle quality benchmarking, we found no differences from our baseline Low settings by increasing this setting. We even checked in some areas that seemed to more explicitly show particles, but found no differences.
Particle Quality - Visual
The setting is described as setting "the quality of particle lighting," so we tried examining three specific things closely: sparks from a mining laser, smoke backlit by neon signs, and sparkle effects on the artifact in a scripted sequence.
Finally, in the animated sequence that starts after bringing the artifact to the lodge, there are visible differences in lighting and shadows between recordings, but flickering and intensity of the light appears to be randomized. We can't make a conclusion based on this scene.
Starfield CPU Bottlenecked Graphics Benchmarks
We’ll briefly look at benchmarks from the CPU-limited angle now (or a CPU bottleneck as opposed to our earlier GPU bottleneck in Starfield). For this, we chose an R5 3600 with an RTX 4090 to create a CPU-limited scenario.
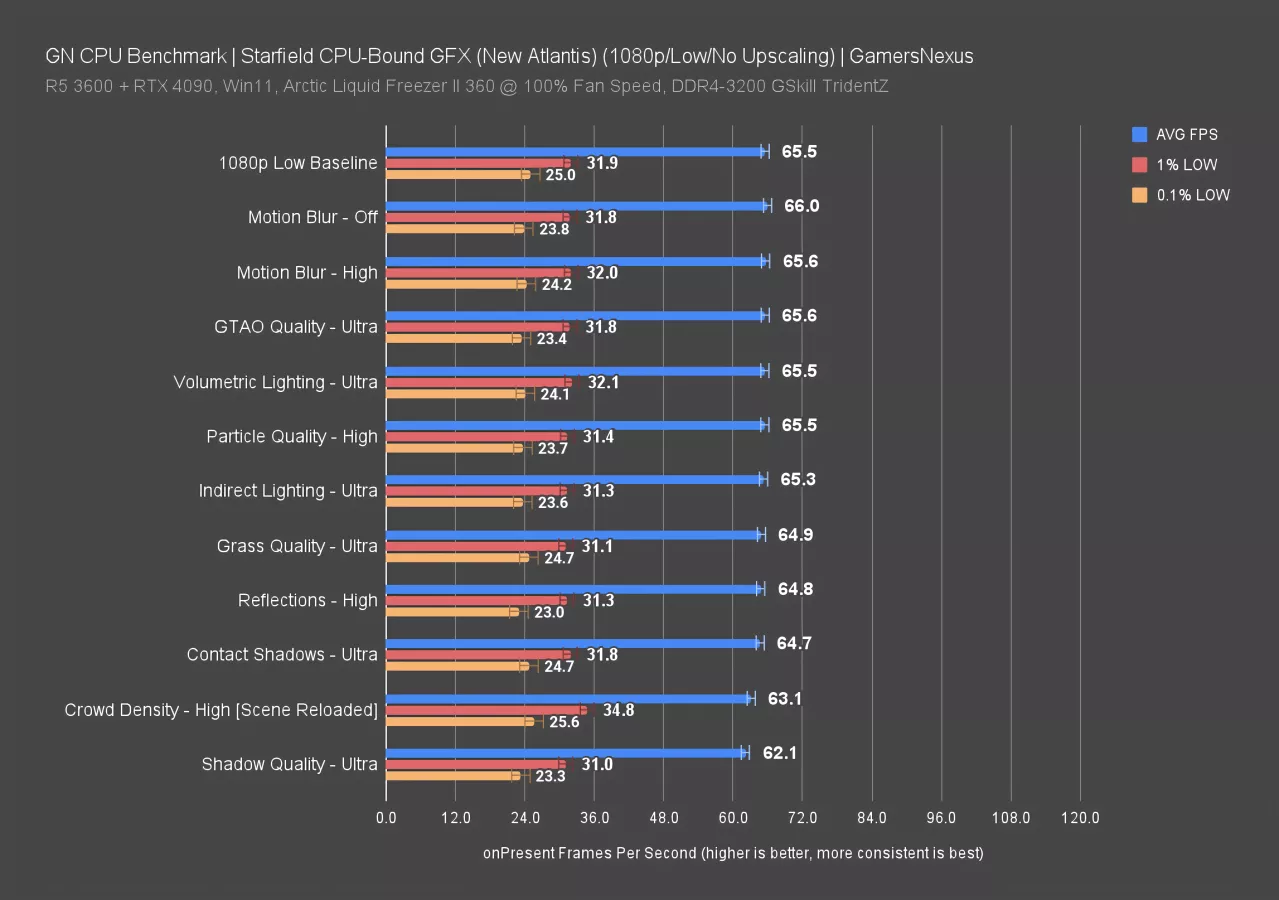
Overall, we found most settings were unable to affect the performance. The best shot was shadow quality again. Even though it’s a GPU-heavy setting, it’s still affecting performance when mostly CPU-bound. Bottlenecks are rarely so simple as being one component or the other. crowd density also affected performance, but not much. We saw a 3.6% performance loss from baseline by going to High crowd density.
Otherwise, everything was within 1% change, or 1.2-1.3% for reflections and contact shadows. We tested these from baseline High also, but stopped because we saw no change.
Mods
Time to talk about mods. A couple weeks into launch and Nexus Mods, unaffiliated with us, is already filled with tons of options. We downloaded and tested a couple, each independent from the other. The mods we tested include:
- Starfield Performance Optimizations by E3roKK
- Starfield Upscaler for DLSS by PureDark
- Starfield Frame Generation by LukeFZ564
- Manual FOV adjustment in the .ini files
Default FOV 
150 FOV
We’ll do the simplest benchmark first. Field of view, or FOV, has been a common complaint since the game launched. It can be changed without modifying the game other than creating a custom .ini file, similar to Skyrim. Increasing FOV widens the peripheral vision of the player’s camera. We ran some quick tests from the default FOV up to 150.
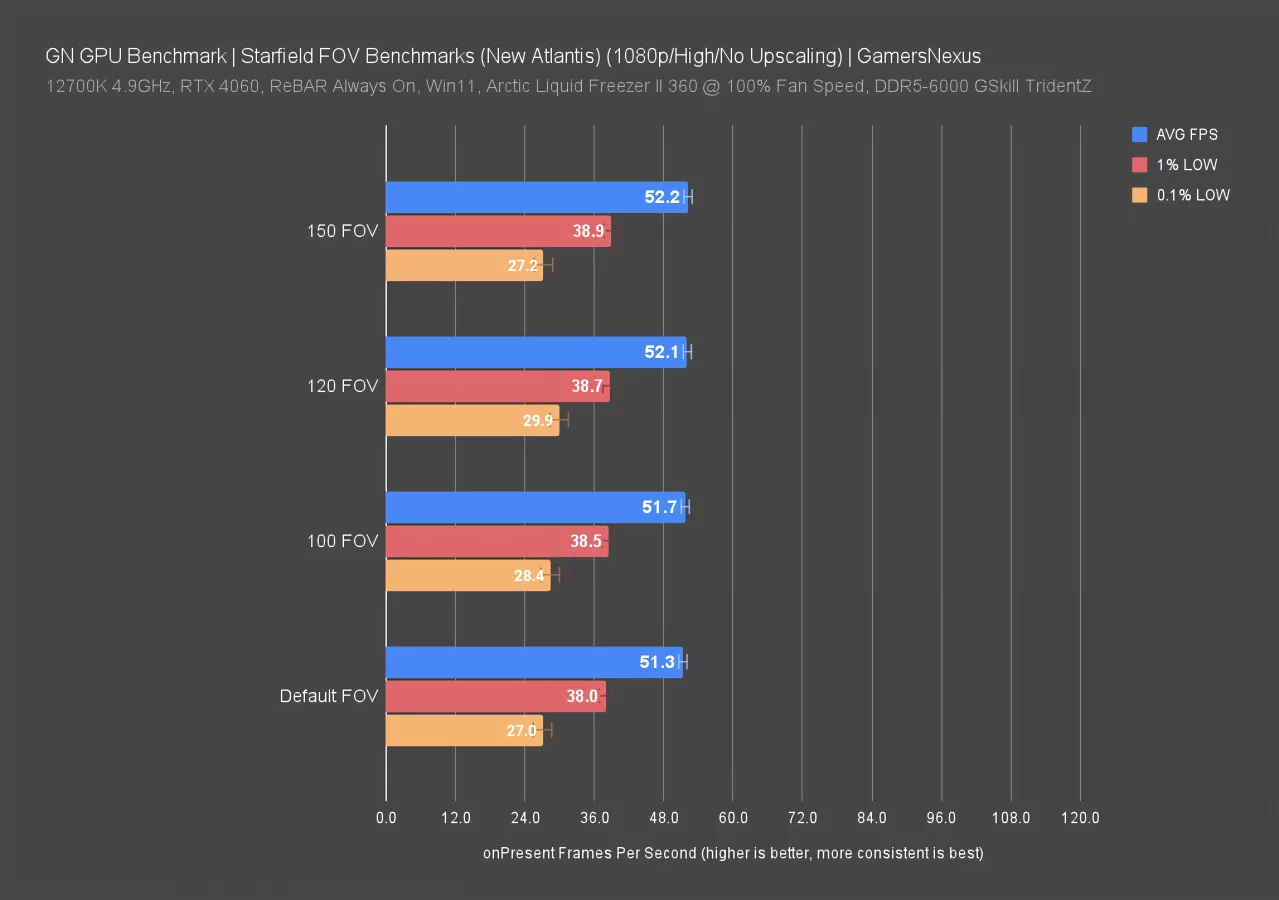
Between all of them, performance was the same. 150 looked awful, but it was just there for a test. We tried up to 360, but predictably, that didn’t work very well. Most people might adjust to 90-110, and in those cases, we found no performance loss.
DLSS Mods
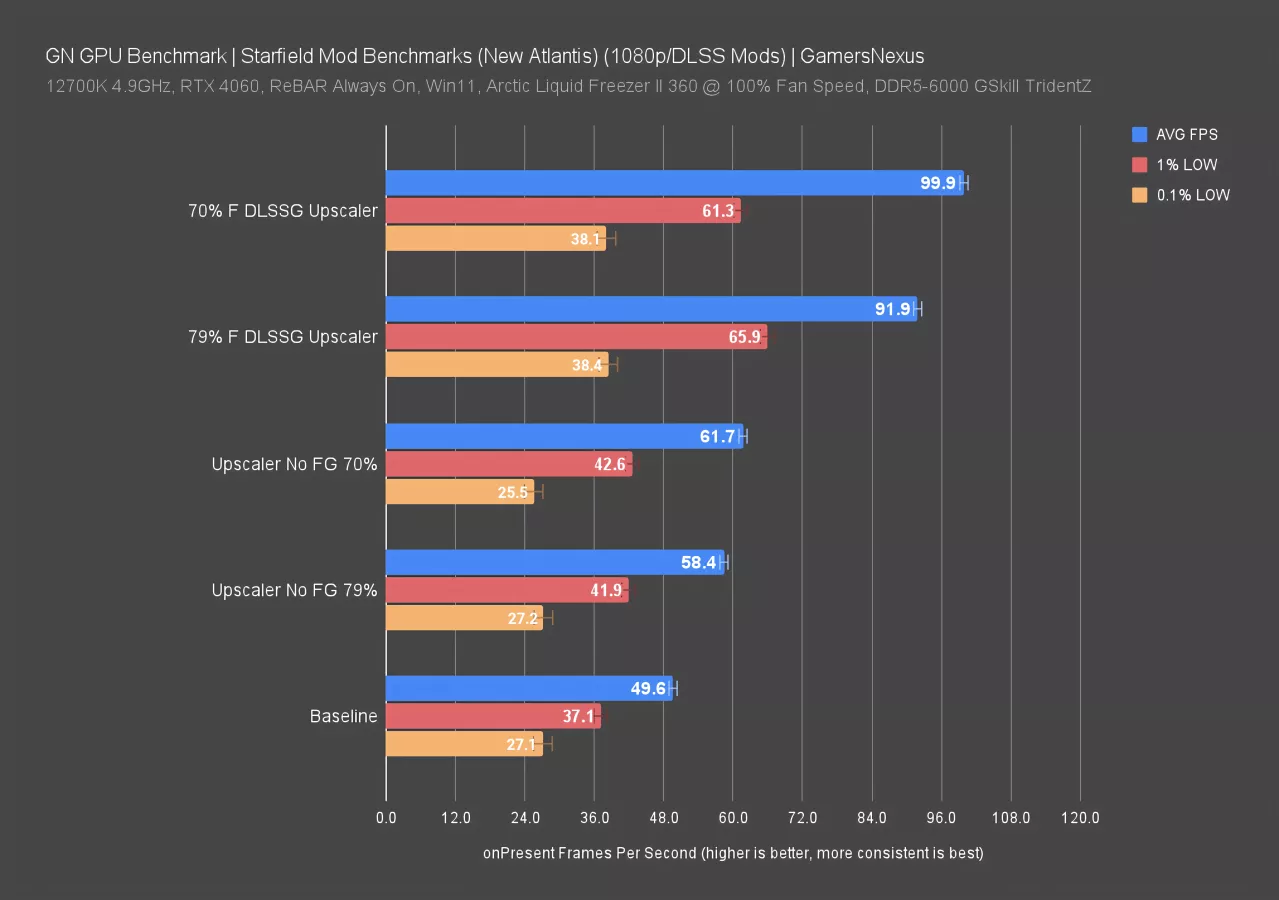
Up next, we tested two different DLSS mods. We tested with up to DLSS 3.5, at least according to the DLLs, and used frame generation with the DLSS-G mod. Our baseline performance for this test was about 50FPS AVG on the test platform with an RTX 4060. Upscaling obviously improves performance since it’s reducing the base render resolution, so it’s no surprise that 79% render scale brought us up by 18%. 0.1% lows didn’t move here. Dropping to 70% improved us further, now to 62FPS AVG and an increase over baseline of 24%. Removing that mod and switching instead to the DLSSG Mod with frame generation, we saw an immediate increase of about 30-40FPS AVG. The 70% scale’s 100 FPS AVG is around our CPU limit on this test platform. Judging against the 79% increase, we saw an improvement of 57% over the test without frame generation, at 58 FPS AVG, or 85% over baseline at 100% scale.
If you’re using an NVIDIA card, these mods may be worth a look.
Optimization Mod
Up next is the Optimization mod. This one changes the actual implications of the named graphics settings, so Ultra/High/Medium/Low now carry a different set of parameters. That means the words themselves aren’t like-for-like, but that’s the point of this quick test.
The mod author noted that “it slightly tweaks some of the graphical settings like shadows, reflections, grass, npc spawning, non baked light counts, and VRS settings.”
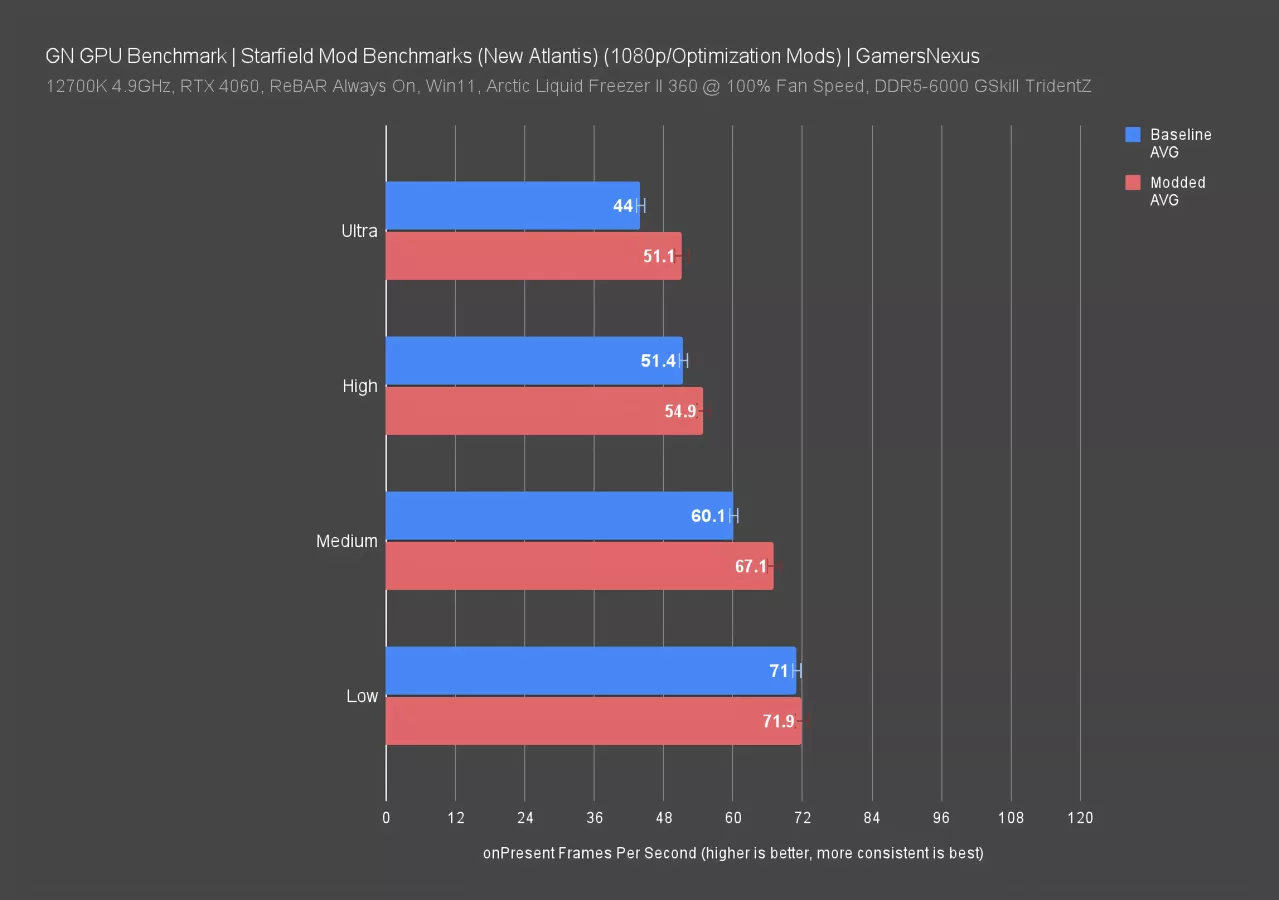
The blue bar is the baseline, the red bar is the modded result. This is just for AVG FPS. As for the results, we found that Ultra improved the most: It moved from 44 FPS to 51, an increase of 16%. The Medium results posted a 12% improvement. Low barely moved.
It’s likely that this approach will get more refined as modders have time to really figure out the game. If you need more performance than you can get from the settings natively or want finer tuning between “Ultra” and “High” or other settings, this would be a good starting place. You can then tune it further for what you want.
There are also variations of this ini modding approach that increase graphics quality of Ultra.
Conclusion

A couple of these settings are particularly impactful in terms of performance, namely shadow quality and volumetric lighting. For the full picture, be sure to check our Starfield GPU benchmarks. The major takeaways from our day one benchmarking were that the RX 7900 XTX was unusually competitive with the RTX 4090, while further down the stack the RX 7600 and RTX 4060 each offered a decent price-to-(playable)-performance balance (especially the RX 7600).
In terms of visuals, indirect lighting is an interesting exception: in most cases it doesn't appear to do much, but at Low with VRS off it looks awful to the extent of ruining visuals. Fortunately, most people will use VRS, at least on newer cards. If you're on a card that doesn't support VRS or you don't want to use it, make sure you're not on low indirect lighting. Again, the setting may just be broken currently—that wouldn't surprise us with a Bethesda launch.
Contact shadows and volumetric lighting aren't broken, but they don't show serious improvement in quality above High for volumetrics and Medium for contact shadows. With volumetrics, it's a matter of opinion whether the higher settings look better.
GTAO, shadow quality, and reflections all show clear differences at each quality level, and they all look their best when maxed out, so these are settings to focus on when balancing visuals and performance (especially shadow quality).
We struggled to find any differences with particle quality. We found a couple of examples, one of which we showed earlier, but it doesn't impact performance in our test areas.
Crowd density should definitely be maxed out if possible; it doesn't have the biggest impact on performance, and it really influences how alive the game feels. Grass quality also directly affects the quantities of grass and the view distance of it, so if you're doing a lot of exploring we'd recommend setting that one higher, but it does have a relatively high performance impact on the GPU in grassy areas.
This article is built to be a long-term reference for Starfield graphics settings. If you want more detail, watch the accompanying video for in-motion comparisons of the various clips that were screencapped for this article. We're not experts in tuning the Starfield config file for more granular options like shadow maps or draw distances, but there are a lot of experts out there and we highly recommend you check out Nexus mods as they develop. For now, though, this article should give you the knowledge you need to get the game running as well as it can.