A large portion of the enthusiast market caters to overclocking: Intel sells unlocked CPUs at a premium, Asus, Asrock, and MSI all market their motherboards as “overclocking ready” and guaranteed to OC higher, and GPU manufacturers market their graphics cards as having better cooling, a bigger VRM, and binned chips. All this, and monitor overclocking is rarely -- if ever -- advertised or discussed. This may change with the recent popularity of Korean off-brand monitors, like the QNIX 2710.
![]()
We recently posted a hands-on experience about the QNIX 2710, and now we’ll cover how to overclock a monitor’s refresh rate to exceed the stock 60Hz. Most monitors can overclock slightly, but due to having scalers they generally won't get above 80Hz; it is fairly common to achieve 96Hz on the QNIX displays with thanks to their exclusion of a scaler. Monitor overclocking still involves multiple different alterations to AMD/nVidia drivers and windows, and for that reason, we do suggest to proceed with caution and fully read any instructions. You are taking risks with any sort of overclocking -- those risks could involve killing the hardware involved. It’s a fairly safe process if you follow the steps carefully, though.
First of all, the basics of monitor overclocking are not quite like GPU or CPU overclocking, although they do share some similarities. One similarity is that an unstable overclock will produce artifacts or no picture at all. Another similarity is that system components will impact overclocking; for example, different GPUs and DVI-D cables have been reported by some users to affect the maximum overclock. Those similarities stated, the processes do differ in some key ways. A monitor can appear to be stable when overclocked, but in (hidden) reality is simply skipping frames. Luckily, it’s pretty easy and we will be going into detail in this guide.
Before overclocking a display, it should be noted that this darkens the screen, can cause artifacts, lowers gamma, and oftentimes voids warranty. The result is a higher refresh rate (frequency), which can be worth the downsides for some users.
How to overclock a monitor:
Note: Be sure to completely read instructions, requirements, and warnings. Not all monitors are compatible with overclocking.
Monitor overclocking is slightly challenging; it is fairly easy as long as the instructions, warnings, and requirements are read, though.
In order for DVI-D cables have enough bandwidth to support 1440p screens at 120Hz, raising the pixel clock of DVI-D cables is required. ToastyX has made patches for AMD and an nVidia GPU control panels; installing these patches will add an option in the control panel / catalyst to increase the refresh rate (thank you, ToastyX). Simply run the patcher and then download and use the Custom Resolution Utility (made by ToastyX) to create multiple profiles at different Hz settings.
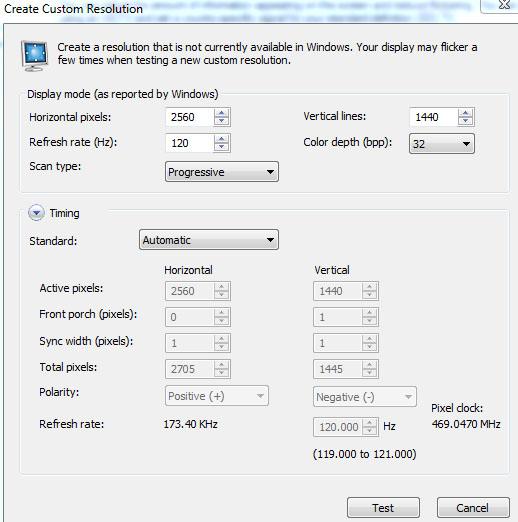
Ensure that the right monitor is selected on the drop down box. Be sure that “Include extension block” is unchecked. Next, add multiple “Detailed Resolution” slots. Ignore most of the settings, and only change refresh rate under frequency (note that EVGA Precision and MSI Afterburner will also both allow frequency overclocking). Changing LCD timing modes can result in higher overclocks, but I generally suggest not messing with them. “Automatic - LCD Standard” uses standard timings for LCD monitors and HDTVs, “Automatic LCD Reduced” uses timings to reduce pixel clock which can help when trying overclock, and “Automatic CRT Reduced” is meant to be compatible with CRTs.
Repeat this step with multiple profiles that go up to the highest desired overclock; do this in 24Hz increments -- 60Hz excluded. The reason for 24Hz increments is that media such as movies and TV shows are often is filmed at 24FPS, so using increments of 24Hz will allow for smoother playback. 60Hz doesn’t follow this trend. Once all the configurations are entered, press okay and restart the system.
When booted back into windows, go to the display section in Catalyst Control Center (or nVidia Control Panel for nVidia users), choose the screen being overclocked, and change the refresh rate. If any artifacts appear on screen or the monitor goes blank, the overclock is too high and should be reduced. Repeat this process until no artifacts are found. Some screens will overclock significantly higher than others.
Finally, to ensure that the overclock is valid, check for frame skipping with this tool by Blur Busters. If everything works, then congratulations -- your monitor is successfully overclocked! If not, decrease the overclock and try again.
Since color is changed when overclocking, many choose to download programs such as Color Sustainer to help mitigate color change, although in my experience the color change is fairly insignificant for regular browsing and gaming use. It might be more noticeable for artists who rely upon highly accurate colors for an income.
Monitor overclocking may not be as noticeable as GPU or CPU overclocking, but it allows for a higher refresh rates at the cost of worse colors. Most monitors will overclock insignificant amounts, but certain monitors -- ones lacking scalers, like the QNIX 2710 DVI-D model overclock quite well. As with GPU or CPU overclocking, when overclocking a monitor it must be done carefully or else it may damage the component. OC in small increments.
- Michael "The Bear" Kerns.