The AMD RX 480 “Hybrid” quest we embarked upon revealed some additional overclocking headroom, but also prompted a good opportunity to demonstrate live RX 480 overclocking. We've returned to showcase that today, alongside a top-level explanation of GPU core voltage, core frequency, fan RPM, power % target, and stability.
Note that there are a few disclaimers to be made with any type of overclocking: First, it's likely that any such endeavor voids the warranty, at least if exiting a range permissible by the AIB partner or OEM. That's because overvolting and power increases can potentially cause damage to chips long-term (or even immediately, if no restrictions are in place), and that's especially true on cards where cooling may not adequately cool critical components governing overclocking – like the MOSFETs and other VRM components. That's not to scare anyone away, though; overclocking is fairly safe if following basic rules of small, incremental stepping and using guides (and using OEM-provided software, which often has restrictions for safety). It's just that overclocking is always an “at your own risk” venture, and it doesn't hurt to remind everyone.
This guide explains how to use WattMan to overclock the AMD Radeon RX 480 GPU, showcases voltage (for overvoltage or undervoltage), power target, and some performance metrics.
RX 480 Overclocking with WattMan Walkthrough
The above video details overclocking progression using AMD's new WattMan software. We were using a press version of the drivers for this utility, so some small changes may be present between time of posting and the newest drivers (e.g. those released with the power updates). Still, the step-by-step remains the same.
This guide will work for the AMD RX 480, RX 470, and RX 460 overclocking endeavors. The latter two cards aren't out yet, but will be soon – mid-July and end of July, respectively.
Recommended Software Tools
WattMan or aftermarket RX 480 OC software (none exists at time of writing)
Bechmarking application (3DMark FireStrike recommended; real-world game OK)
Notepad or spreadsheet software for notes
Controls Available through WattMan
WattMan is located under AMD Radeon Settings (right-click desktop, select AMD Radeon Settings) -> Gaming -> Global Profiles -> Global WattMan. WattMan can also be configured on a per-game basis, for users who prefer to OC only for intensive titles.
Basic controls offered through AMD's in-house solution include:
Volt-frequency curve: The pre-configured means to adjust frequency and voltage, modified by a percent offset for the entire curve. This dictates performance on a state level for the GPU, so lower power states will better accommodate idle/desktop usage, whereas higher performance states (higher frequency, ergo higher voltage to stabilize) will allow high-end gaming use cases. This can be left intact to minimize power consumption and heat during times of low load, or toggled to a manual voltage/frequency configuration.
Frequency: Plotted per state or across the board, frequency offsets from base (check your card specs for this, as AIB partners are different) will increase the clock-rate of the GPU only.
Voltage / vCore: GPU core voltage can be modified independently of memory voltage with AMD's WattMan tool. Core voltage can be set to “auto” or manual, the latter allowing overvoltage up to 1150mV. Increasing voltage will help resolve stability issues, though undervolting can be utilized on the RX 480 to improve per-state power efficiency and clock-rate stability.
Memory Frequency: Clock-rate of the memory. Our 8GB models are stock clocked to 2000MHz, but AIB partner cards may differ. The memory clock-rate can be overclocked to 2250MHz with the original card.
Memory Voltage: As with vCore, this is used to stabilize VRAM as frequency increases. WattMan allows auto or manual tuning.
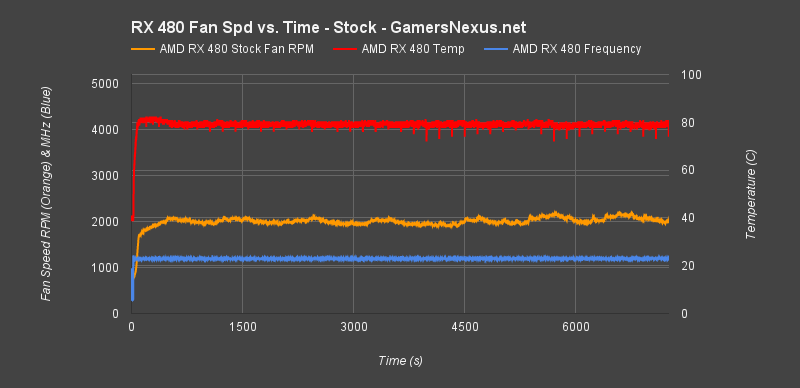
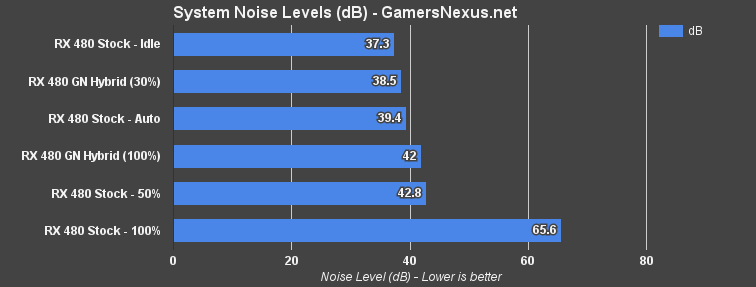
Fan RPM: Shown in our RX 480 review, fan RPM of the reference card maxes out at 5200RPM and is in the range of 60dB when maxed. Modulate the fan RPM manually to accommodate increased clock-rates, as temperature increases will threaten clock stability. The card will go up to 90-91C before throwing a “card has exceeded spec” thermal warning. We'd recommend staying below that range, anyway. Our liquid cooling resolved this concern and provided additional OC headroom, and with significantly lower noise levels. AIB partner cards will also help.
Power % Target: Additional power provided over the board's default design. WattMan allows up to an additional 50% power on the reference cards, but not all AIB partner boards will be the same. Increasing power % target is critical to stabilizing overclocks – as shown in our video above, where a 1300MHz OC is not even achievable without higher PWR % – but also increases total board power, which may prove to be an issue.
As you begin applying this knowledge (and the above video will show the precise process for stepping), we'd recommend keeping a notepad or spreadsheet file with the stepping information. Here's an example of our table, from the RX 480 Hybrid article:
| Core Clock (MHz) | Mem CLK (MHz) | Mem Offset (MHz) | Power Target (%) | Voltage | vCore Offset | 5m Test | 60m Endurance | Fan target |
| 1266 | 2000 | 0 | 100 | 1.05 | 0 | P | P | Auto |
| 1280 | 2000 | 0 | 150 | 1.075 | 1100 | P | - | 3500 |
| 1300 | 2000 | 0 | 150 | 1.0813 | 1110 | P | - | 3500 |
| 1320 | 2000 | 0 | 150 | 1.0875 | 1110 | P | - | 3500 |
| 1350 | 2000 | 0 | 150 | 1.0875 | 1110 | F | - | 3500 |
| 1340 | 2000 | 0 | 150 | 1.1 | 1130 | F | - | 3500 |
| 1340 | 2000 | 0 | 150 | 1.1 | 1130 | F | - | 3800 |
| 1340 | 2000 | 0 | 150 | 1.1 | 1130 | F | - | 3800 |
| 1340 | 2000 | 0 | 150 | 1.1187 | 1140 | F | - | 3800 |
| 1340 | 2000 | 0 | 150 | 1.125 | 1150 Max | P | - | 3800 |
| 1340 | 2100 | 100 | 150 | 1.125 | 1150 | P | P | 4100 |
| 1350 Max | 2100 | 100 | 150 | 1.125 | 1150 | P | F | 4100 |
| 1340 | 2150 | 150 | 150 | 1.125 | 1150 | P | P | 4100 |
| 1340 | 2200 | 200 | 150 | 1.125 | 1150 | P | P | 4100 |
| 1340 | 2250 | 250 | 150 | 1.125 | 1150 | F Flickering | - | 4100 |
We hit 1340MHz core and 2200MHz memory, and could not progress further.
New DIY RX 480 'Hybrid' Overclocking
And here's the progression for the new RX 480 GN Hybrid:
| Core Clock (MHz) | Mem CLK (MHz) | Mem Offset (MHz) | Power Target (%) | Voltage | Max Voltage | 5m Test | 60m Endurance | Power Draw |
| 1340 | 2200 | 200 | 150 | 1.125 | 1.313 | P | P | 183.1 |
| 1350 | 2200 | 200 | 150 | 1.125 | 1.313 | P | - | 190.9 |
| 1360 | 2200 | 200 | 150 | 1.125 | 1.313 | P | - | 190.9 |
| 1370 | 2200 | 200 | 150 | 1.125 | 1.313 | P | - | 190.9 |
| 1380 | 2200 | 200 | 150 | 1.125 | 1.15 | P | - | 190.9 |
| 1390 | 2200 | 200 | 150 | 1.125 | 1.15 | - | 190.9 | |
| 1400 | 2200 | 200 | 150 | 1.125 | 1.15 | P | F | 190.9 |
| (switch VRM fan to go to PSU) | ||||||||
| 1400 | 2200 | 200 | 150 | 1.125 | 1.15 | P | F | 192.2 |
| 1400 | 2000 | 0 | 150 | 1.125 | 1.15 | P | F | 192.2 |
| 1395 | 2000 | 0 | 150 | 1.125 | 1.15 | P | F | 192.2 |
| 1390 | 2200 | 200 | 150 | 1.125 | 1.15 | P | P | 192.2 |
| 1390 | 2250 | 200 | 150 | 1.125 | 1.15 | F | - | 192.2 |
And, just to remind everyone, here's a look at fan RPM vs. frequency vs. temperature:
Check the video for more practical application examples and a walkthrough of how and when to use synthetic vs. real-world benchmarking applications.
Editorial: Steve “Lelldorianx” Burke
Video: Andrew “ColossalCake” Coleman