Liquid-cooling the AMD Vega: Frontier Edition card has proven an educational experience for us, yielding new information about power leakage and solidifying beliefs of a power wall. We also learned that overclocking without thermal barriers (or thermal-induced power barriers) grants significant performance uplift in some scenarios, including gaming and production, though is done at the cost of ~33A from the PSU over 12V PSU power.
Our results for the AMD Vega: Frontier Edition liquid-cooling hybrid mod are in, and this review covers the overclocking scalability, power limits, thermal change, and more.
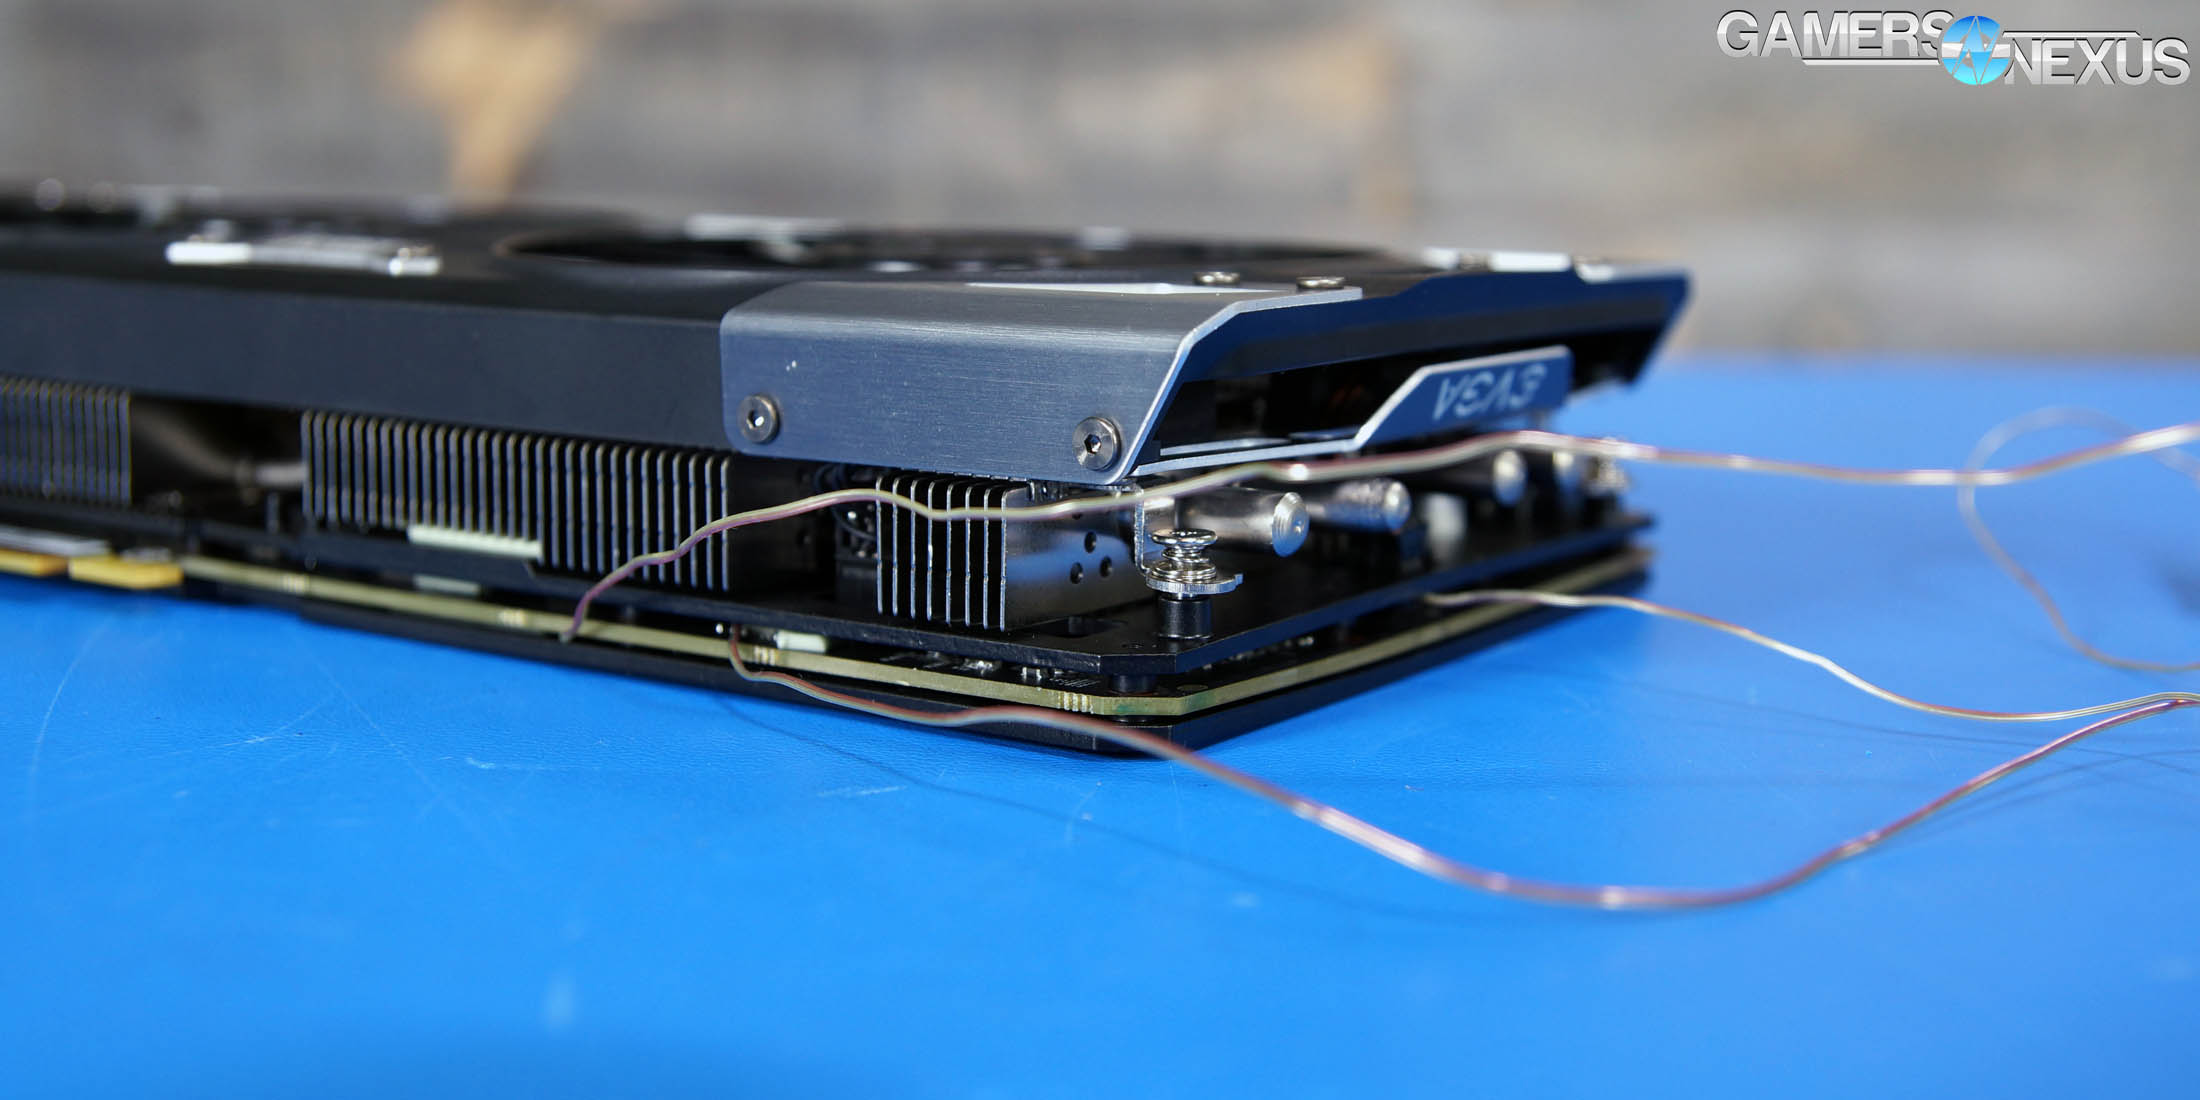
The Hybrid mod was detailed in build log form over in part 1 of the endeavor. This mod wasn’t as straight-forward as most, seeing as we didn’t have any 64x64mm brackets for securing the liquid cooler to the card. Drilling through an Intel mounting plate for an Asetek cooler, we were ultimately able to get an Asetek 570LC onto the card, which we later equipped with a Gentle Typhoon 120mm fan. VRM FET cooling was handled by aluminum finstacks secured by thermal adhesive, cooled with 1-2x Corsair ML120 fans. That said, this VRM cooling solution also wasn’t necessary – we could have operated with just the fans, and did at one point operate with just the heatsinks (and indirect airflow).
A Reminder on Scope & Focus
Keep in mind that this is largely about thermal and acoustics, not just raw performance. The hybrid mods don’t necessarily provide a whole lot of raw performance headroom, but they do operate significantly quieter and cooler. Although we ultimately achieved additional OC headroom, the actual performance gain (from the previous overclock max) isn’t represented purely in FPS or points. It’s represented best in noise levels, where we see reductions from ~65-70dBA down to ~43dBA, and manage to achieve this reduction in noise alongside a significant, performance-impacting reduction in thermals. We’ll talk about how the thermal headroom improvement benefits clocks on the next page.
GPU Testing Methodology
For our benchmarks today, we’re using a fully rebuilt GPU test bench for 2017. This is our first full set of GPUs for the year, giving us an opportunity to move to an i7-7700K platform that’s clocked higher than our old GPU test bed. For all the excitement that comes with a new GPU test bench and a clean slate to work with, we also lose some information: Our old GPU tests are completely incomparable to these results due to a new set of numbers, completely new testing methodology, new game settings, and new games being tested with. DOOM, for instance, now has a new test methodology behind it. We’ve moved to Ultra graphics settings with 0xAA and async enabled, also dropping OpenGL entirely in favor of Vulkan + more Dx12 tests.
We’ve also automated a significant portion of our testing at this point, reducing manual workload in favor of greater focus on analytics.
Driver version 382.53 was used for all nVidia devices. AMD Vega drivers version 17.6 were used for Vega. Version 17.10.1030-B8 was used for AMD RX series cards.
A separate bench is used for game performance and for thermal performance.
Thermal Test Bench
Our test methodology for the is largely parallel to our EVGA VRM final torture test that we published late last year. We use logging software to monitor the NTCs on EVGA’s ICX card, with our own calibrated thermocouples mounted to power components for non-ICX monitoring. Our thermocouples use an adhesive pad that is 1/100th of an inch thick, and does not interfere in any meaningful way with thermal transfer. The pad is a combination of polyimide and polymethylphenylsiloxane, and the thermocouple is a K-type hooked up to a logging meter. Calibration offsets are applied as necessary, with the exact same thermocouples used in the same spots for each test.
Torture testing used Kombustor's 'Furry Donut' testing, 3DMark, and a few games (to determine auto fan speeds under 'real' usage conditions, used later for noise level testing).
Our tests apply self-adhesive, 1/100th-inch thick (read: laser thin, does not cause "air gaps") K-type thermocouples directly to the rear-side of the PCB and to hotspot MOSFETs numbers 2 and 7 when counting from the bottom of the PCB. The thermocouples used are flat and are self-adhesive (from Omega), as recommended by thermal engineers in the industry -- including Bobby Kinstle of Corsair, whom we previously interviewed.
K-type thermocouples have a known range of approximately 2.2C. We calibrated our thermocouples by providing them an "ice bath," then providing them a boiling water bath. This provided us the information required to understand and adjust results appropriately.
Because we have concerns pertaining to thermal conductivity and impact of the thermocouple pad in its placement area, we selected the pads discussed above for uninterrupted performance of the cooler by the test equipment. Electrical conductivity is also a concern, as you don't want bare wire to cause an electrical short on the PCB. Fortunately, these thermocouples are not electrically conductive along the wire or placement pad, with the wire using a PTFE coating with a 30 AWG (~0.0100"⌀). The thermocouples are 914mm long and connect into our dual logging thermocouple readers, which then take second by second measurements of temperature. We also log ambient, and apply an ambient modifier where necessary to adjust test passes so that they are fair.
The response time of our thermocouples is 0.15s, with an accompanying resolution of 0.1C. The laminates arae fiberglass-reinforced polymer layers, with junction insulation comprised of polyimide and fiberglass. The thermocouples are rated for just under 200C, which is enough for any VRM testing (and if we go over that, something will probably blow, anyway).
To avoid EMI, we mostly guess-and-check placement of the thermocouples. EMI is caused by power plane PCBs and inductors. We were able to avoid electromagnetic interference by routing the thermocouple wiring right, toward the less populated half of the board, and then down. The cables exit the board near the PCI-e slot and avoid crossing inductors. This resulted in no observable/measurable EMI with regard to temperature readings.
We decided to deploy AIDA64 and GPU-Z to measure direct temperatures of the GPU and the CPU (becomes relevant during torture testing, when we dump the CPU radiator's heat straight into the VRM fan). In addition to this, logging of fan speeds, VID, vCore, and other aspects of power management were logged. We then use EVGA's custom Precision build to log the thermistor readings second by second, matched against and validated between our own thermocouples.
The primary thermal test platform is detailed below:
| GN Thermal Bench 2015 | Name | Courtesy Of | Cost |
| Video Card | This is what we're testing | - | - |
| CPU | Intel i7-5930K CPU 3.8GHz | iBUYPOWER | $580 |
| Memory | Corsair Dominator 32GB 3200MHz | Corsair | $210 |
| Motherboard | EVGA X99 Classified | GamersNexus | $365 |
| Power Supply | NZXT 1200W HALE90 V2 | NZXT | $300 |
| SSD | OCZ ARC100 Crucial 1TB | Kingston Tech. | $130 |
| Case | Top Deck Tech Station | GamersNexus | $250 |
| CPU Cooler | Asetek 570LC | Asetek | - |
Note also that we swap test benches for the GPU thermal testing, using instead our "red" bench with three case fans -- only one is connected (directed at CPU area) -- and an elevated standoff for the 120mm fat radiator cooler from Asetek (for the CPU) with Gentle Typhoon fan at max RPM. This is elevated out of airflow pathways for the GPU, and is irrelevant to testing -- but we're detailing it for our own notes in the future.
Game Bench
| GN Test Bench 2017 | Name | Courtesy Of | Cost |
| Video Card | This is what we're testing | - | - |
| CPU | Intel i7-7700K 4.5GHz locked | GamersNexus | $330 |
| Memory | GSkill Trident Z 3200MHz C14 | Gskill | - |
| Motherboard | Gigabyte Aorus Gaming 7 Z270X | Gigabyte | $240 |
| Power Supply | NZXT 1200W HALE90 V2 | NZXT | $300 |
| SSD | Plextor M7V Crucial 1TB | GamersNexus | - |
| Case | Top Deck Tech Station | GamersNexus | $250 |
| CPU Cooler | Asetek 570LC | Asetek | - |
BIOS settings include C-states completely disabled with the CPU locked to 4.5GHz at 1.32 vCore. Memory is at XMP1.
We communicated with both AMD and nVidia about the new titles on the bench, and gave each company the opportunity to ‘vote’ for a title they’d like to see us add. We figure this will help even out some of the game biases that exist. AMD doesn’t make a big showing today, but will soon. We are testing:
- Ghost Recon: Wildlands (built-in bench, Very High; recommended by nVidia)
- Sniper Elite 4 (High, Async, Dx12; recommended by AMD)
- For Honor (Extreme, manual bench as built-in is unrealistically abusive)
- Ashes of the Singularity (GPU-focused, High, Dx12)
- DOOM (Vulkan, Ultra, 0xAA, Async)
Synthetics:
- 3DMark FireStrike
- 3DMark FireStrike Extreme
- 3DMark FireStrike Ultra
- 3DMark TimeSpy
For measurement tools, we’re using PresentMon for Dx12/Vulkan titles and FRAPS for Dx11 titles. OnPresent is the preferred output for us, which is then fed through our own script to calculate 1% low and 0.1% low metrics (defined here).
Power testing is taken at the wall. One case fan is connected, both SSDs, and the system is otherwise left in the "Game Bench" configuration.
For production testing, we are using an i9-7900X & ASUS X299 Prime Deluxe motherboard with 4x8GB GSkill Trident Z Black memory at 3600MHz with an Enermax Platimax 1350W PSU.
Continue to the next page for Vega overclocking & power leakage.
AMD Vega Liquid Cooling Overclocking
The Vega FE Hybrid mod posted reasonable gains in overclocking over the air-cooled counterpart, something we originally thought was due to more aggressive clock scaling at lower temperatures – similar to what’s seen on Pascal. We later learned it was to do with power leakage and power limitations on the GPU, as we’ll dig into momentarily.
We were able to max-out our stock card overclock at around 1660MHz with an 1100MHz HBM2 OC, which we ultimately found to govern performance gains most heavily.
Here’s a look at the overclock stepping for the stock card:
| Vega FE Stock OC | |||||||||
| Peak Clock (MHz) | AVG Clock (MHz) | Target CLK | Core Offset (MHz) | MEM CLK (MHz) | MEM Offset (MHz) | Power Target % | Fan | GPU TMP (C) | Pass/Fail |
| 1600 | 1348 | 1600 | 0 | 945 | 0 | 150% | 38% | 85 | P |
| 1680 | - | - | 80 | 945 | 0 | 150% | 42% | 79 | F - Hang |
| 1670 | 1600~1670 | 1670 | 70 | 945 | 0 | 150% | 50% | 79 | F - Crash |
| 1660 | 1600~1660 | 1660 | 60 | 1000 | 55 | 150% | 50% | 82 | P |
| 1660 | 1600~1660 | 1660 | 60 | 1100 | 155 | 150% | 50% | 82 | P |
And here’s the overclock stepping with our Vega FE Hybrid mod:
| GamersNexus Vega FE Hybrid Mod | ||||||||||||||
| Peak Clock (MHz) | AVG Clock (MHz) | Target CLK | Core Offset (MHz) | MEM CLK (MHz) | MEM Offset (MHz) | Power Target % | Radiator Fan | GPU TMP (C) | Pass/Fail | Current (A) | FET Upper (C) | FET Lower | Ambient | Logged |
| 1675 | 1675 | 1675 | 75 | 1050MHz | 105 | 150 | 100% | 47 | P | 30~32 | 62 | 52.9 | 23.3 | 10:06 |
| 1685 | 1685 | 1685 | 85 | 1050MHz | 105 | 150 | 100% | 49 | P | 31~33 | 62.8 | 53 | 23.4 | 10:11 |
| 1695 | 1695 | 1695 | 95 | 1050MHz | 105 | 150 | 100% | 49 | P | 31~33.3 | 63.6 | 54.1 | 23.7 | 10:18 |
| 1700 | 1700 | 1700 | 100 | 1050MHz | 105 | 150 | 100% | 49 | P | 31~33.3 | 63.6 | 54.1 | 23.7 | 10:23 |
| 1715 | 1715 | 1715 | 115 | 1050MHz | 105 | 150% | 100% | 49 | F - System Crash | 31~33.3 | 63.6 | 54.1 | 24 | 10:27 |
| 1710 | 1710 | 1710 | 110 | 1050MHz | 105 | 150% | 100% | 49 | F- System Crash | |||||
| Crash / Restart | ||||||||||||||
| 1700 | 1700 | 1700 | 100 | 1100MHz | 155 | 150% | 100% | 40 | P | 31~33.3 | 56 | 46 | 23.8 | 10:39 |
| 1700 | 1700 | 1700 | 100 | 1100MHz | 155 | 150% | 100% | 49 | P | 31~33.3 | 65.3 | 55.4 | 24.1 | 10:46 |
| 1700 | 1700 | 1700 | 100 | 1125MHz | 180 | 150% | 100% | 49 | F - System Crash | 31~33.3 | 65.3 | 55.4 | 24.1 | 10:46 |
| 1705 | 1705 | 1705 | 105 | 1105MHz | 160 | 150% | 100% | 49 | P | 31~33.3 | 65.3 | 55.4 | 24.1 | 11:00 |
The Hybrid card, with the help of some fans pointed at the VRM components, was able to overclock to 1705MHz completely stable, with an 1105MHz HBM2 OC. We ended up running all our tests at 1700/1100 for now, but will be revisiting with slightly higher clocks later. The VRM fans proved unnecessary after more testing, but we’ll get to that momentarily.
Pushing to 1710MHz resulted in a near-instant crash, and measuring at the PCIe cables shows that this is when power throttling begins to occur with greater frequency (causing the instability and subsequent crash). We’re hoping to attempt some BIOS mods – no promises – to increase TDP. Just depends on what tools are made available to us, or what we can figure out through external tools.
AMD Vega FE Hybrid Power Consumption at the Rails
Speaking of power consumption, the OC stepping table above shows some of that: Our overclocked Vega FE Hybrid mod had us around 33.3A at the rails, not counting PCIe power, for a GPU power consumption of 400W. That’s GPU power, not total system power (which is new for our tests, hence italics to emphasize). This is the limit for Vega, and is the reason we can’t OC higher.
We can’t yet measure at the PCIe interface, but we’re working on it. For now, we know that 33.3A * 12V = ~400W through the cables, plus whatever’s going through PCIe (up to 75W, by spec).
The VRM can definitely handle more current, it’s just a matter of getting Vega: FE to accept it.
Either way, the most notable element here is what’s not shown in temperature plots: noise output.
AMD Vega Air vs. Liquid Mod Noise Levels
The Hybrid mod outputs a constant noise level of 43dBA with the radiator fan only, or 50-53dBA with the maglev fan setup (+1 to +2 Corsair ML120 fans). Meanwhile, in order to sustain its lower overclock, the air-cooled card was whining at about 67dBA output. The perceived noise difference is significant, at more than a 2x perceived reduction with the Hybrid mod.

The ML120 additions proved nice to have, but ultimately were unnecessary. We could keep the FETs down without them.
Power Leakage Testing: AMD Vega FE Air vs. Liquid
This next test is new. We’re looking at power leakage here, using a current clamp to measure power consumption at the 12V rails from the PSU (+/-2% error). We’re not measuring PCIe power yet, but maybe in the future.
This test requires the card to operate at a fixed, reliable speed without the fluctuations observed in the stock air-cooled card, which can never really attain 1600MHz fixed anyway. As such, we’re running the core clock at 1300MHz – since that can be sustained without change – and a memory clock of 1000MHz, with the power offset at +50%.
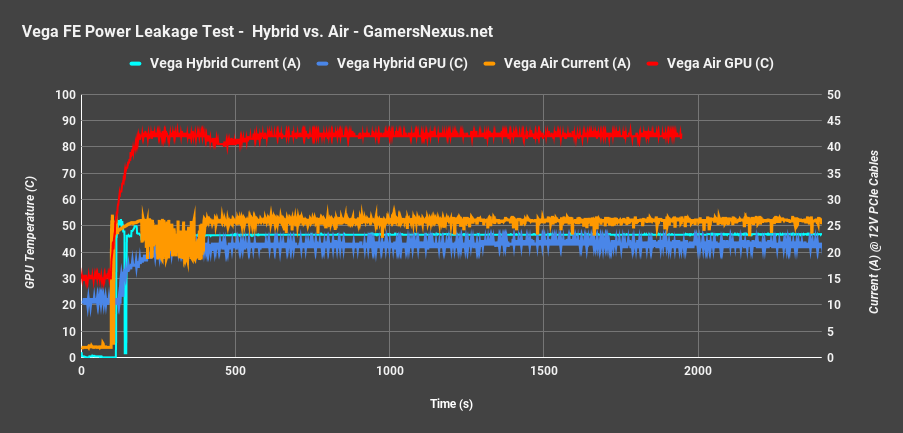
The result is above. With the air-cooled card, we started encountering power throttling that had us bouncing between 18A and 25A once the GPU hit 85C, and so we were forced to increase the fan RPM manually from its auto configuration. This fluctuation is indicative of small throttling occurring at a level that doesn’t always show up in clock measuring software. There is performance loss from the high thermals.
Increasing the fan RPM to 51dBA and sustaining about 80-83C on the core, we see that power consumption is around 26A from the PSU, whereas the Hybrid card’s power consumption – with temperatures around 43C – sits closer to the 23.4A mark. This is also largely unchanging from the start of the test to the end, while the air-cooled card scales from about 22A to 26A over the period of the test. After the relatively short burn-in period, the air-cooled card is drawing an additional 2.6A over the hybrid mod, resulting in a power leakage of 31W due to heat.
Keep in mind again that this is with intentionally lower clocks for a leakage test, not with the high clocks we OC to.
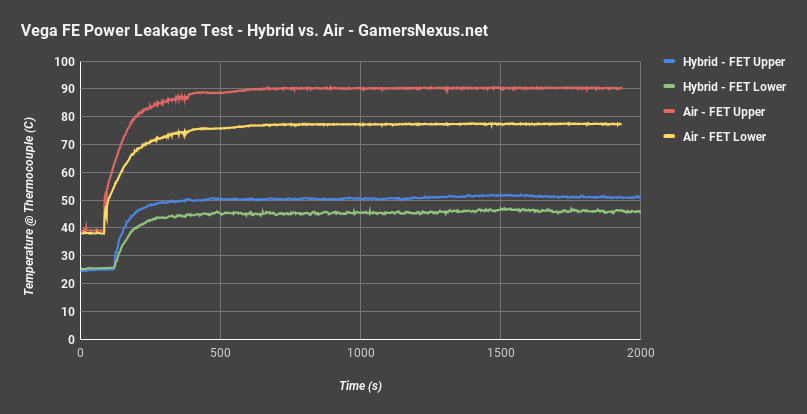
One more note: Here’s a look at the FET temperatures under this particular load. Our Hybrid mod is able to keep the MOSFETs around or below 50C for the entire test. The stock card is hitting the upper 80s and 90s in this particular load & fan configuration. Note that these numbers are not comparable to the initial review tests due to a completely different test methodology and software benchmark. This is within spec, but is certainly contributing to the power leakage and boosted temperature of the GPU core, given that they ultimately share the cooling solution.
Bumping Into the Power Limit
This is really cool data, and isn’t something we knew how to do back when the Fury X launched. If we had, we’d be able to show more specifically why there’s a reason for liquid cooling – or at least more intense air cooling – on these power-hungry cards. In the previous test, we showed that we achieved an additional 40MHz OC on the core with the liquid mod. The reason for that, we think, is the additional power headroom; by reducing power leakage and improving efficiency from the hybrid mod, we’re able to gain an additional 31W of power to send through the core. This number scales differently at higher loads, of course.
This also verifies what we already learned: Vega is limited on power, not on thermals. There’s some cross-over in power leakage, clearly, but after we solve for the thermal limitation, we bump against the power limit of about 400W at the PCIe cables (drawing ~33A with overclocks). Our next goal is to increase the power limit in BIOS. We might try this with a Raspberry Pi mod, as ATIFlash doesn’t yet work with Vega: FE.
AMD Vega FE Air vs. Hybrid Clock Stability Testing
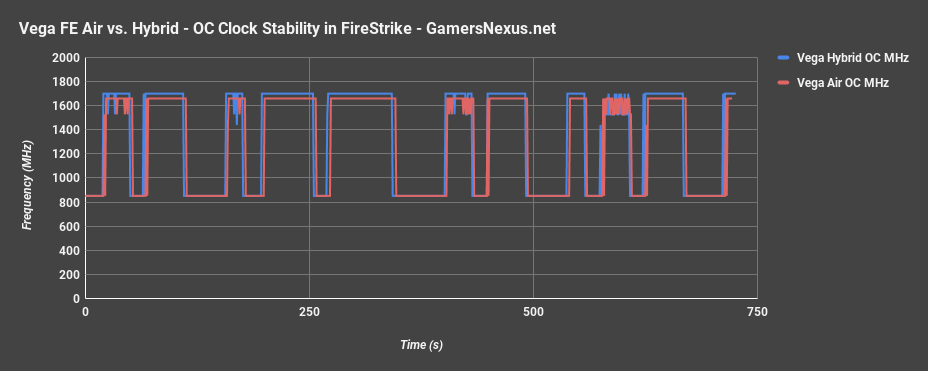
Just to illustrate the clock-rate stability with these overclocks, here’s a look at frequency versus time as our test bench trudges through an automated series of 3DMark benchmarks, scaling from Ultra down to Extreme and Normal, followed-up with TimeSpy. Both clocks are fairly stable in this particular run, but that’s because we’ve boosted the fan speed on the air-cooled card to prevent throttling.
If we plot the stock air-cooled card with no OC and auto fan speeds, this next line is what shows up:
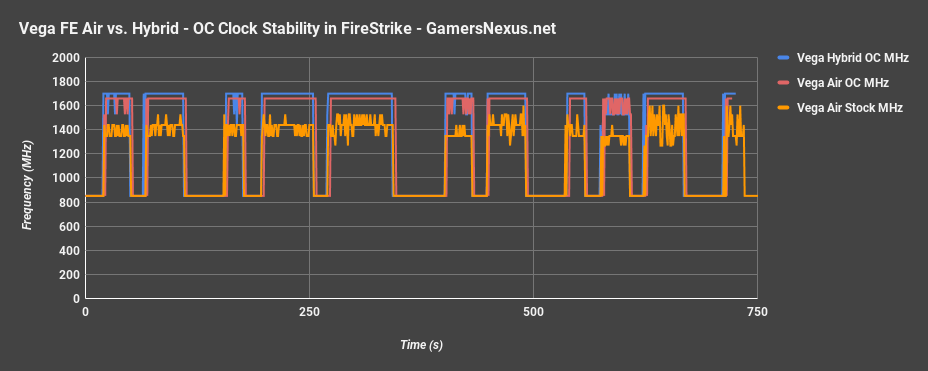
More throttling is apparent in the stock configuration, including auto fan speeds, as the clock fluctuates to try and keep up with thermal demand.
Vega Overclocking Power Consumption – SPECviewperf (Air vs. Hybrid FE)
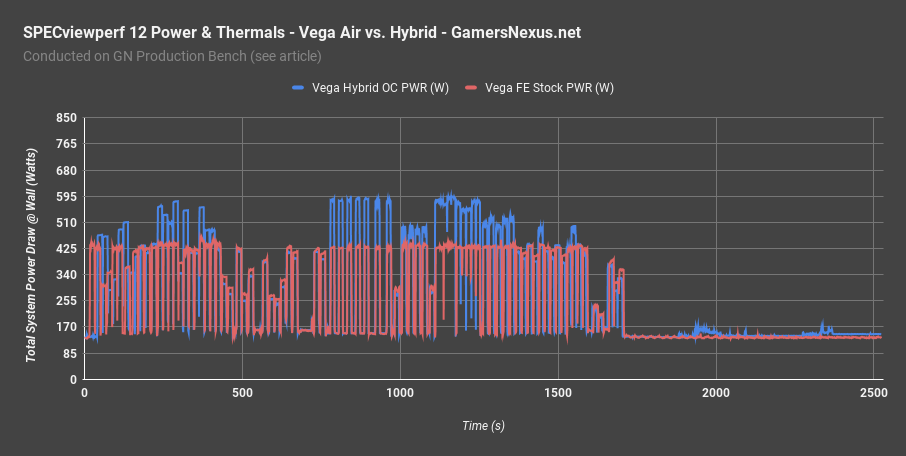
Moving on to power versus thermals in a SPECviewperf workload, which cycles load as the test executes, we see the overclocked Hybrid configuration drawing about 600W from the wall during the heaviest load. To compare versus the stock card, this is an increase from around 440W load from the wall. Again, that’s from the wall, not the rails, as we started taking these measurements before we got our current clamp.
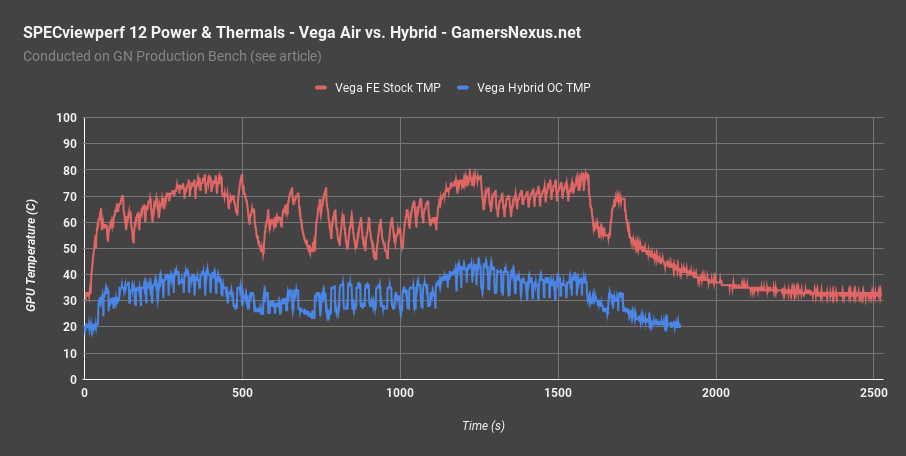
Despite the increased power draw of the Hybrid overclock, we’re actually way down in thermals from the air-cooled card. The liquid cooler also soaks thermal changes and high thermal load spikes with greater finesse, ultimately topping out at around 47C, where the stock card was hitting 81C.
Vega Hybrid Mod vs. Vega FE Air Component Thermals
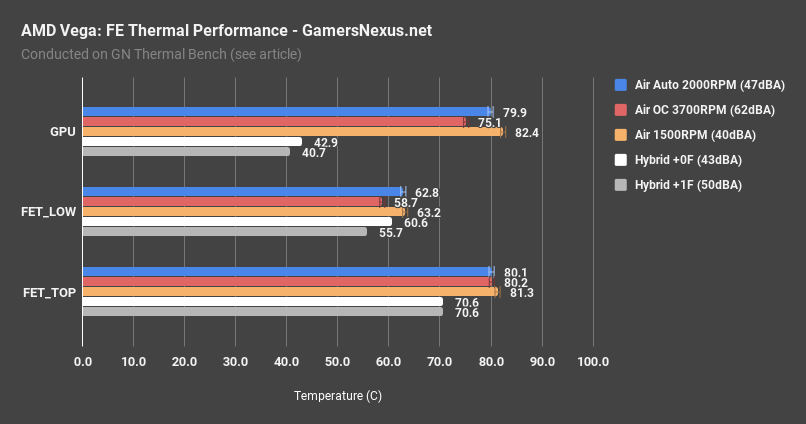
Finally, here’s a quick steady state thermal chart to show the temperature performance of various board components when the card is put through a power virus scenario. We see significant improvement not only on the GPU temperature, but the two hotspots on the VRM. Even without the additional fans providing direct airflow to the VRM components, our Hybrid mod is well within any component heat specifications – most of which are 125C. We’re only showing Vega on this chart. For comparative thermals and noise-normalized thermals, check our initial Vega: FE review.
Continue to the next page for production & gaming performance results.
If you skipped the previous page to come straight here, please go back. It contains important information about this mod.
Vega: Frontier Edition Overclocking in SPECviewperf
Getting into benchmark numbers, this next chart shows the SPECviewperf performance improvement in various workloads with our stock Hybrid and overclocked Hybrid mods. Again, the point isn’t comparison against the Titan Xp – the point is just to look at Vega air vs. water.
3DSMax posts a performance improvement of about 6% when overclocked with the hybrid mod, with equal performance for the stock air and hybrid Vega FE cards. Catia posts an 11% performance gain from the overclock and liquid, with Creo at a 5% gain, followed by the Energy test at a 15% gain, and then the Maya test with a 6.8% gain. The medical benchmark is responsive to the overclock, posting nearly a 19% improvement, with Showcase at 13%, SNX-02 at 9.5%, and SW-03 at an 8% gain from the overclock.
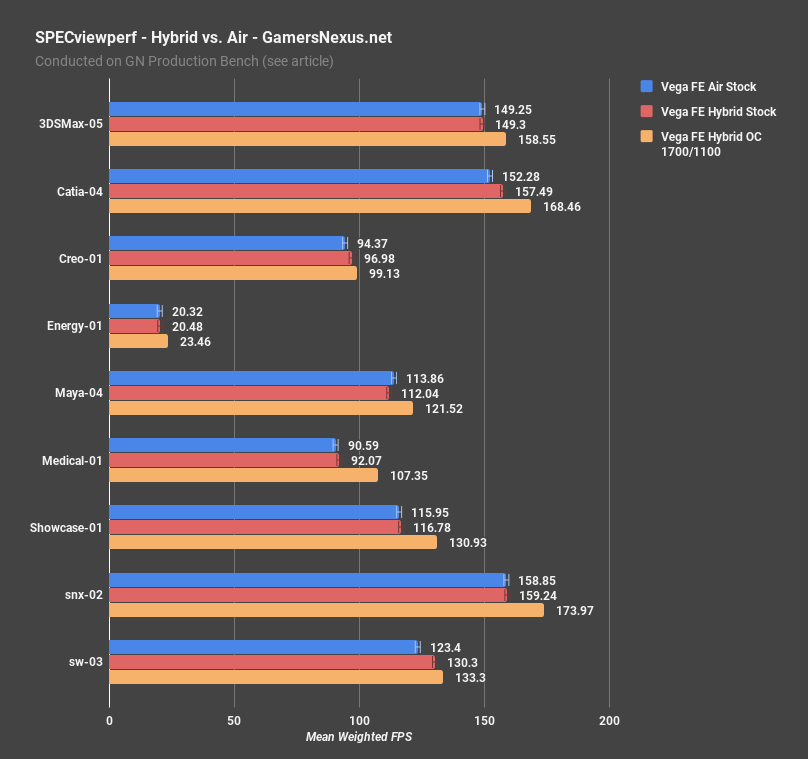
Only a few of these are particularly exciting, with the rest feeling more like a lot of effort for not a lot of gains. What this does do, though, is set the stage for potential growth from a 100MHz clock boost. The impact on gaming and synthetic tests is more pronounced, despite this card clearly not being gaming-ready at launch – and again, that’s indicative of a rushed launch on AMD’s part. The drivers were not ready, features are rumored to be left disabled, and yet the card was shipped. Even still, despite this being “not a gaming card” and having shipped with incomplete features, we can observe clock scaling headroom in an A/B test versus the air-cooled Vega: FE card ($1000).
We’re not yet talking RX Vega performance and suggest that you refrain from attempting to speculate or extract numbers; just wait for our review to see how RX Vega does in these games.
All that said, let’s move to the final round of tests.
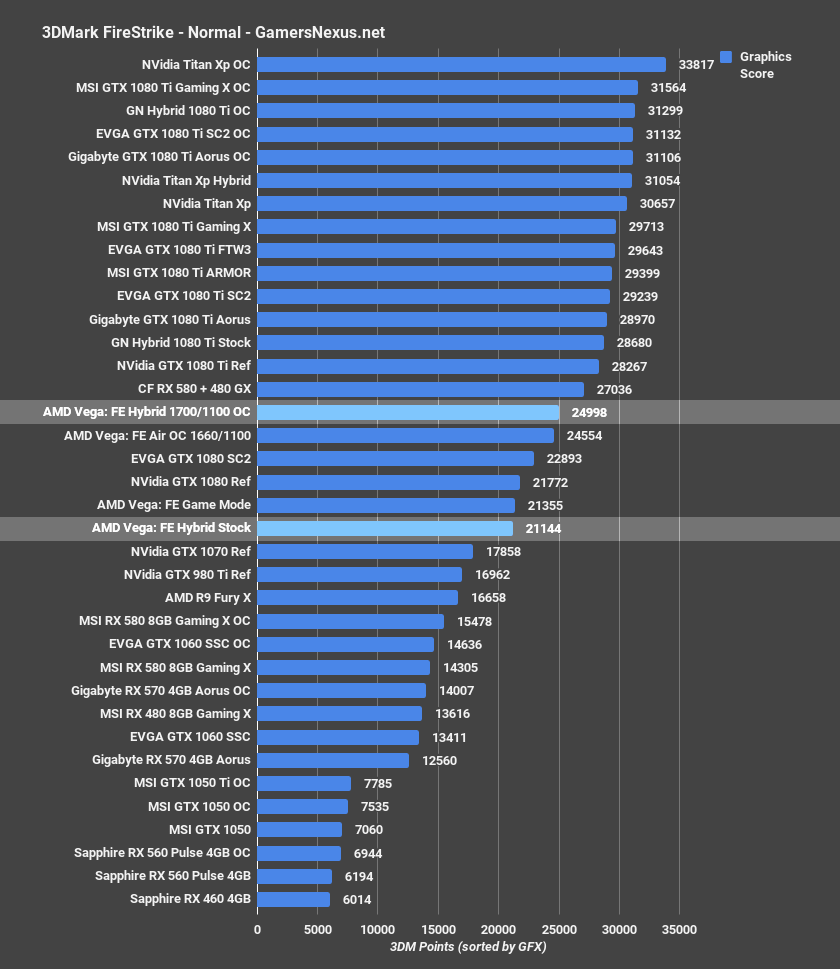
Vega Hybrid Mod – 3DMark
With the 1080p FireStrike test, our graphics score on the Hybrid mod posted an overclocked score of 24,998, versus the 21,355 score of the stock air-cooled card – that’s a gain of 17% with the overclocked Hybrid card. With the overclocked air card, we were at 24,554, or a gain of 15% over the stock card. The boost strictly from our extra 40MHz on liquid isn’t tremendous – only a couple percent – but again, this is about thermal and noise performance more than anything.
Here’s a look at 1440p (Extreme) scaling:

And 4K (Ultra):
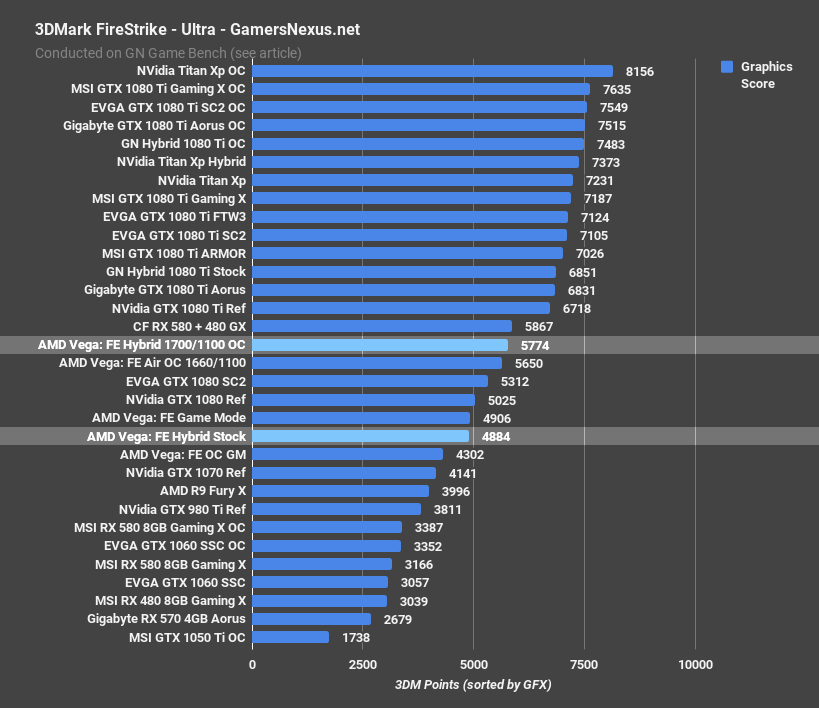
FireStrike Ultra has our overclocked versus stock air gain at around 17.7%, once again, providing some consistency between 4K and 1080p.
And here’s TimeSpy, just to round it out:
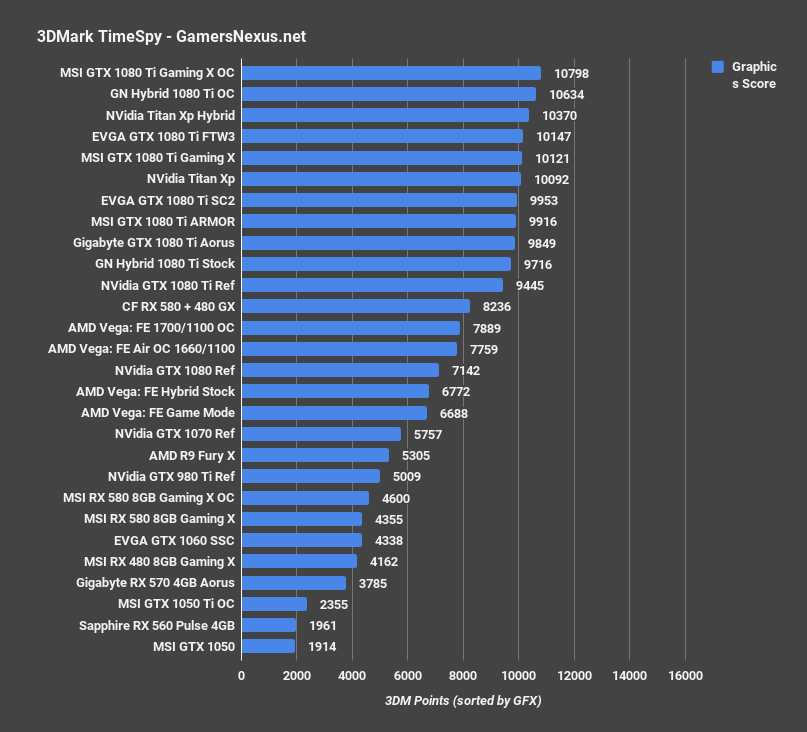
More of the same type of scaling behavior as FireStrike.
Vega Liquid Cooling Benchmark – DOOM, 4K, Vulkan, Async
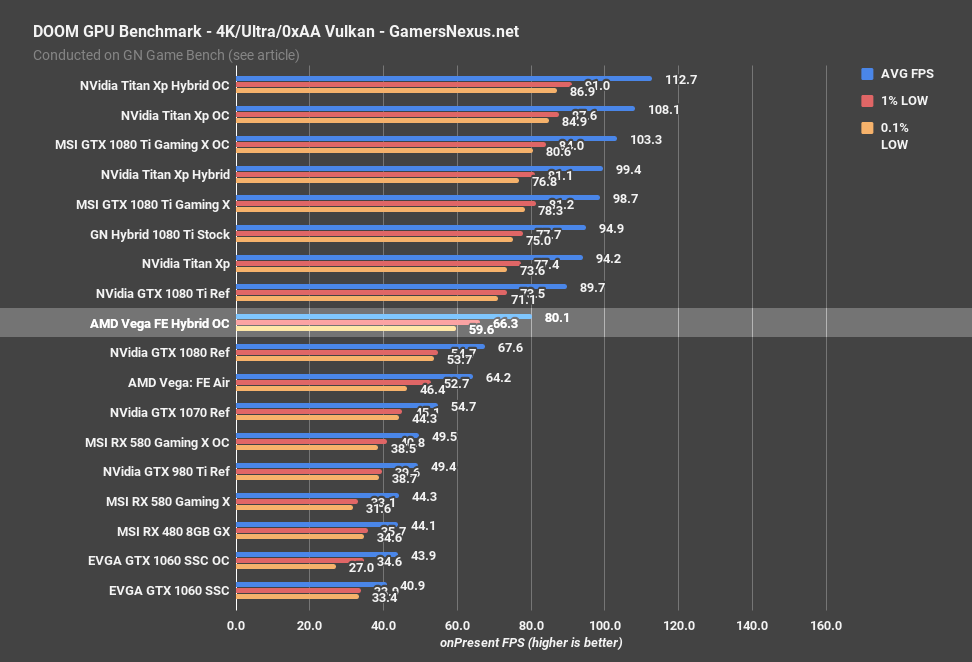
Starting with DOOM at 4K with Vulkan and Asynchronous compute – and yes, disabling anti-aliasing does still enable asynchronous compute, as this was changed with more recent patches to the game – we see the overclocked Vega card operating an AVG FPS of 80, with lows at 66 and 60. This is a staggering performance gain of 25% in DOOM from the overclock, and is the title in which we saw the biggest swing. Note that DOOM and Sniper Elite both tend to favor AMD, so this is something of a best-case scenario for the overclocking results. You cannot and should not extrapolate this 25% number to all games, as we’ll show momentarily.
Regardless, that’s an impressive boost, and we’re not trying to minimize its impact. The Vega: FE card on liquid and overclocked is now performing in between a GTX 1080 reference and GTX 1080 Ti reference card, sitting about 11% behind the 1080 Ti FE card, or about 19% behind the 1080 Ti Gaming X model. Now, big note here: This chart doesn’t contain overclocked numbers for the GTX 1080 – simply because we haven’t rerun them on this suite yet – so you’d see some performance uplift there. Regardless, Vega FE’s gains are noteworthy in DOOM.
Vega Overclocked vs. Stock - Ghost Recon: Wildlands
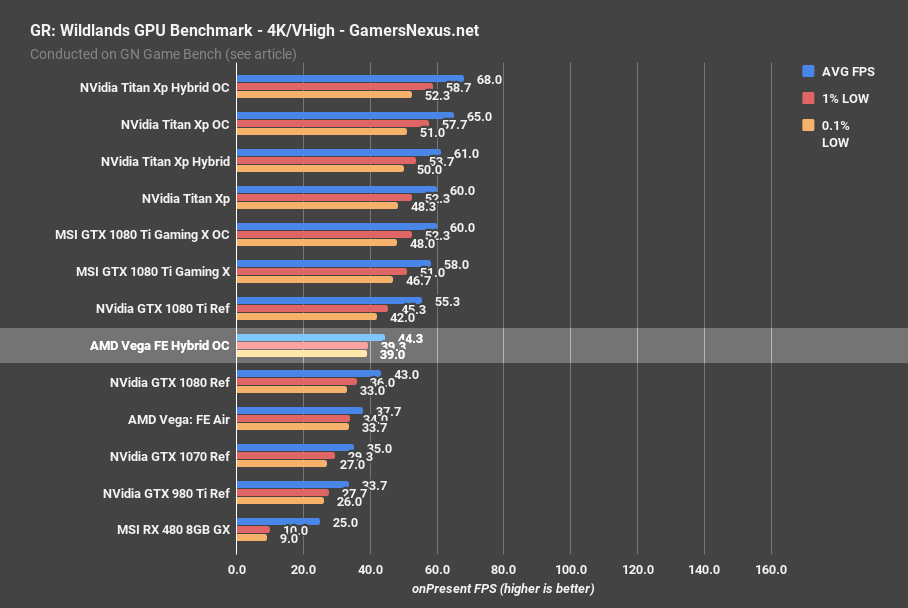
We’re next moving to Ghost Recon: Wildlands with Dx11 and Very High settings with 4K resolution. In this title, the Hybrid overclocked configuration outperforms the stock air configuration by 17.5% -- certainly not as impressive as in DOOM, but still a boost. Granted, that boost is at the cost of 400W of power consumption from the 12V rails. The Hybrid OC card is now effectively tied with the 1080 FE card under stock clocks, with the difference between them within our test variance. The Hybrid OC is behind the 1080 Ti FE stock card by about 20%, or behind the 1080 Ti Gaming X card by 24%.
Here are the 1440p and 1080p charts for GRW:
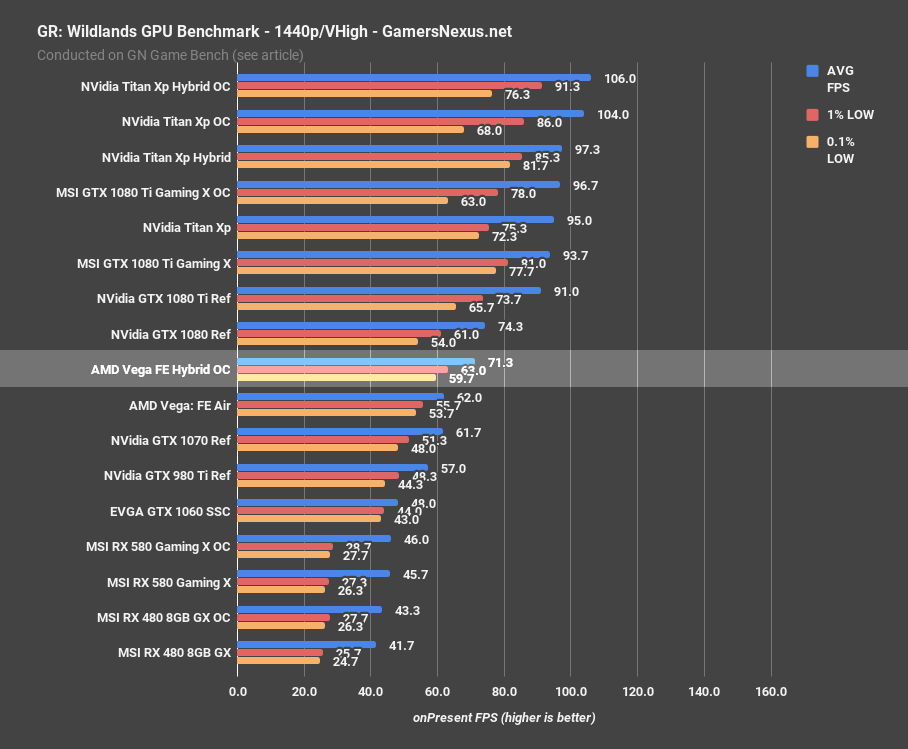

We’re seeing a 15% uplift with overclocking at 1440p, though again, only an additional +40MHz of that is caused by the hybrid mod – it’s mostly just a lot quieter and cooler.
Vega Hybrid Benchmark: Sniper Elite 4 (Dx12, Async)
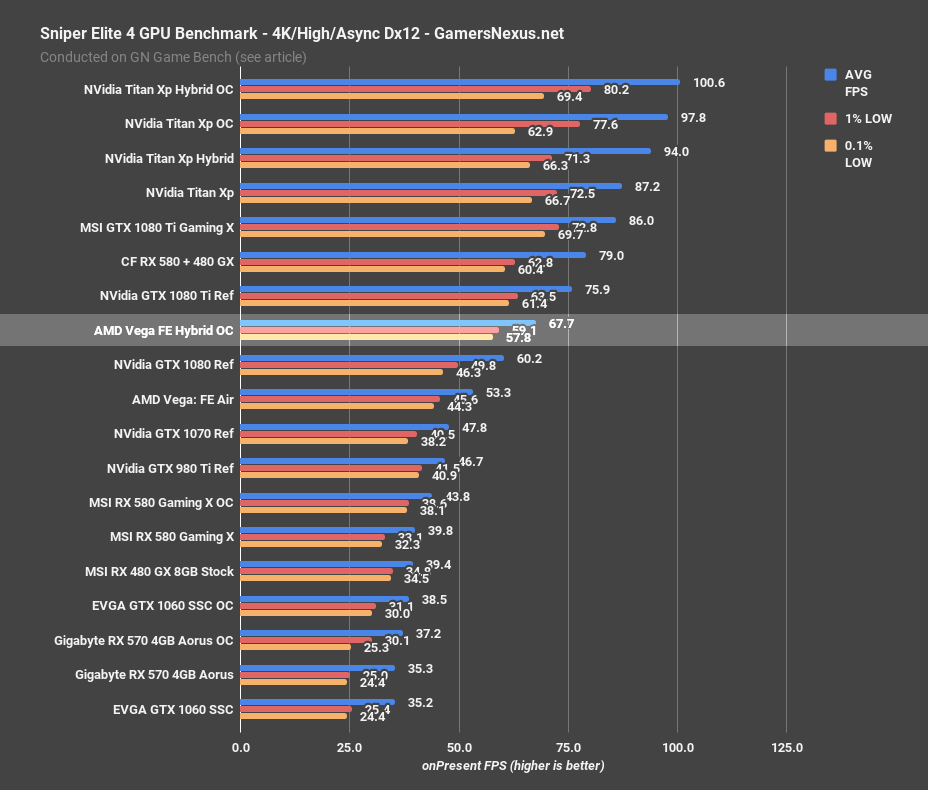
Sniper Elite 4 brings us back into territory where AMD tends to perform well, and that’s reflected once again in our performance scaling. Mirroring what we saw in DOOM, overclocking in Sniper (and removing the power/thermal throttle, to some extent) boosts the Vega: FE card by 27%, which sets it perfectly between the 1080 Ti Reference card (Vega Hybrid is behind by 11%) and the 1080 Reference card (1080 is behind Vega by 11%).
Vega Hybrid Benchmark: For Honor
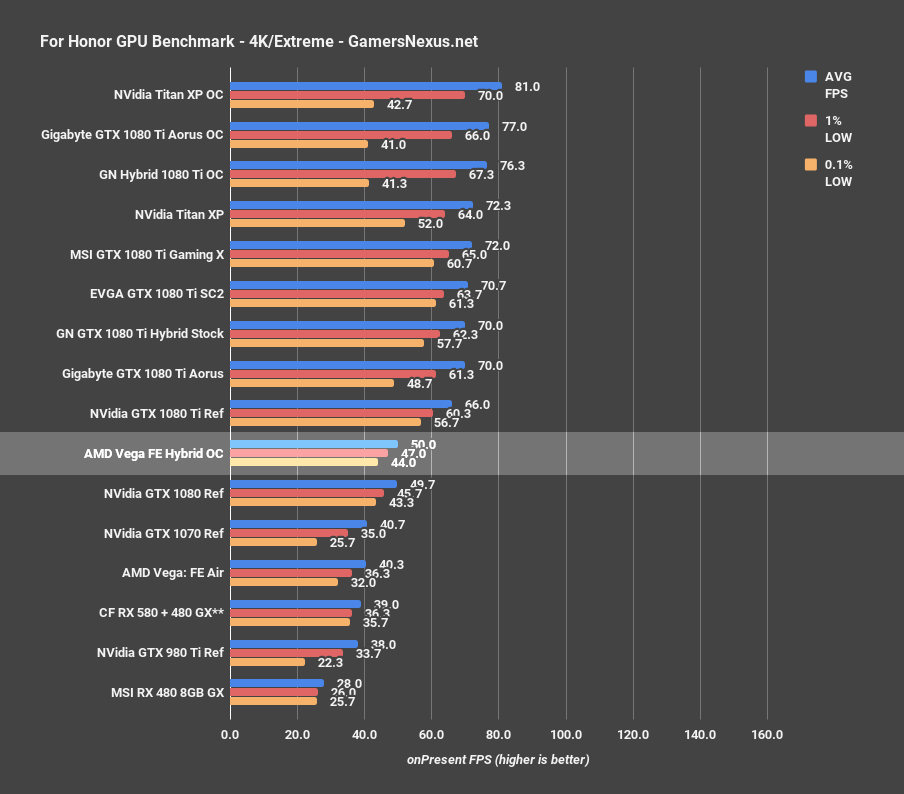
For Honor continues our trade between benchmarks, and positions the Vega: FE Hybrid card effectively tied with the GTX 1080 (difference is within variance), and about 24% behind the 1080 Ti Reference card (stock).
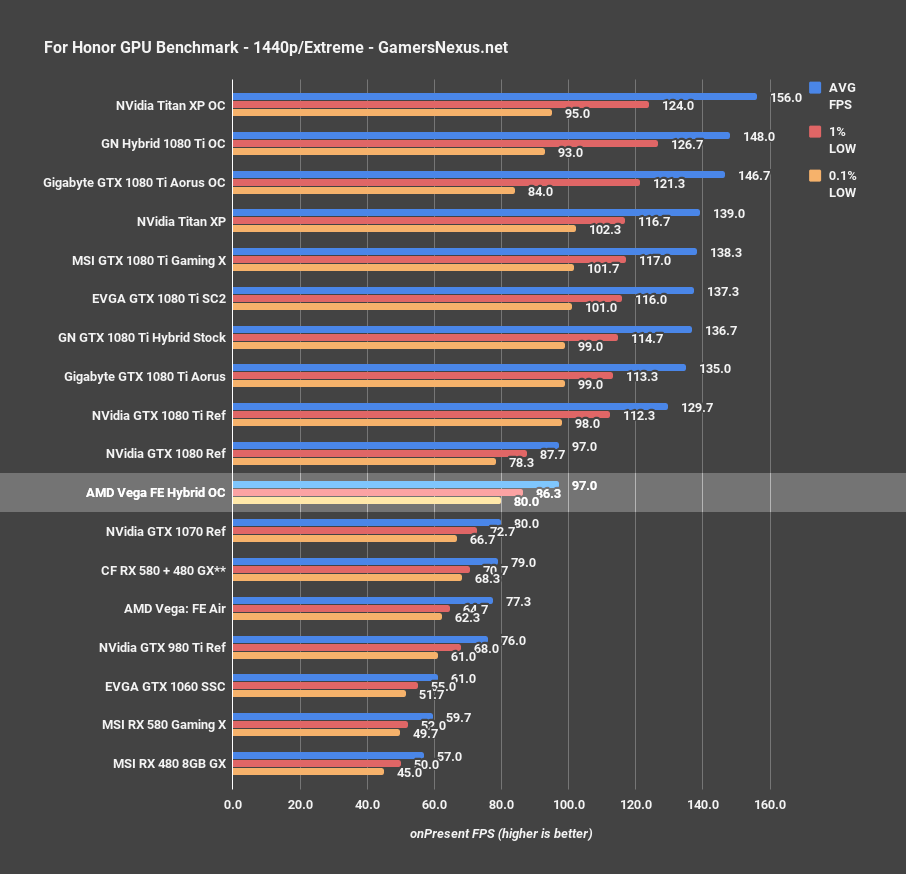
1440p shows a boost of our Vega Hybrid mod to GTX 1080 levels as well, where it was previously below a GTX 1070 Reference card.
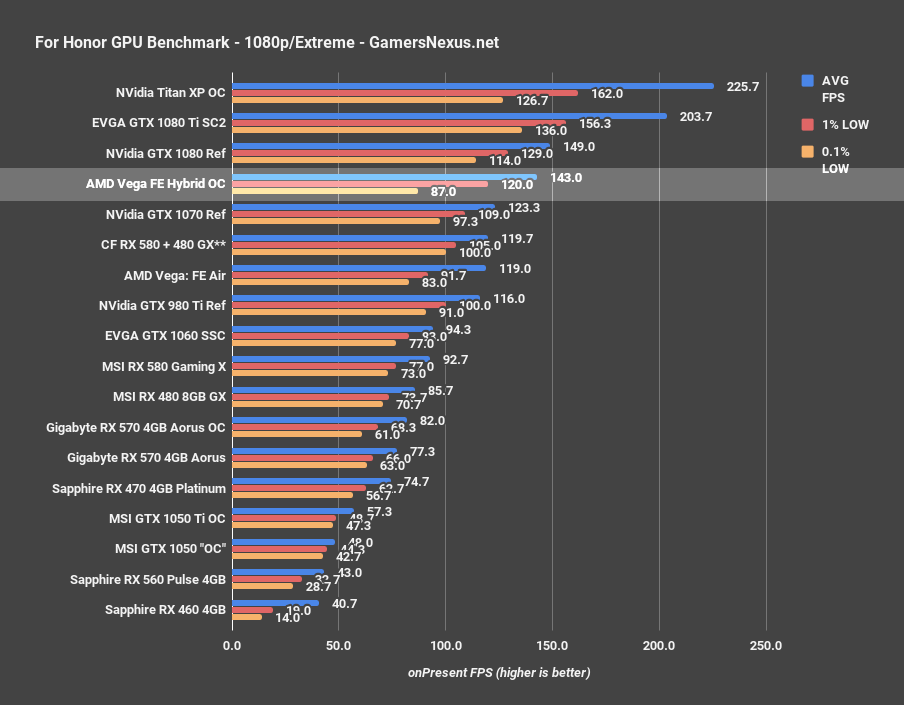
And with 1080p, we the Vega Hybrid card slip behind the 1080 a bit, though it does finally exit the gravitational pull of the 1070.
Vega Hybrid Benchmark: Ashes of the Singularity (Dx12)
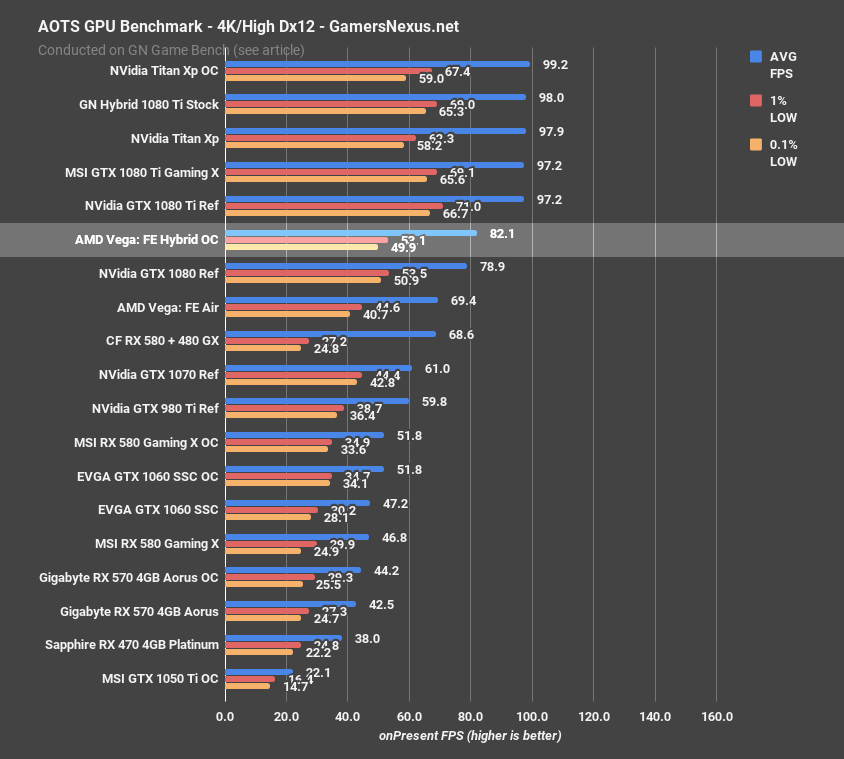
And the final test is above. Ashes positions the Vega: FE Hybrid mod (overclocked) just ahead of the GTX 1080 (the 1080 is behind Vega: FE Hybrid by 4.6%), and behind the 1080 Ti Reference card by 15.5% (though the 1080 Ti retains better frametime consistency).
Conclusion: Vega Limited by Cooling, then Max Power
For anyone who skipped the thermals & power page because it’s less “exciting” than gaming, we’d advise going back and reading that page prior to commenting or reading the conclusion. That’s really the bulk of this coverage, and is far more important than the gaming benchmarks; that said, the gaming benchmarks do provide some insight as to clock scalability of Vega in different applications.
This card still should not be bought for gaming, and the card and its drivers still should get polish from AMD before it’s bought in general, really, but the gaming results are interesting. The clock behavior is the most deserving of attention, just be careful of how far you take those numbers, and remember to wait for RX Vega-specific numbers rather than speculate.
All that cleared away, the power leakage reduction under liquid was non-trivial, and granted us our additional ~40MHz of OC headroom on the core (by way of granting ~30W more to the core). Under max consumption and overclock, we measured current at the PSU cables to be ~33.3A at 12V, or just under 400W (+/-2% error). Given that there’s also power going through the PCIe slot, this is one of the most power-hungry overclocks we’ve managed without modding BIOS to increase the power limit. The gains in thermals were tremendous, ultimately affording the reduction in power leakage (and overall increased power available to the core).
Noise is also down, falling to ~43dBA without the VRM direct airflow, or ~50dBA with it (as opposed to 90% GPU fan speeds with our air-cooled overclock). Performance gains range from 6% to 27%, depending on application and how the GPU is used. We noted that HBM2 overclocks, like with the Fury cards, offer an important boost to performance.
Uplift looks good in some titles, but is also at the expense of major power consumption and a lot of effort. As brackets become available for these new cards, it’ll be easier to justify the mod. We’re curious as to what AMD’s liquid-cooled variant offers beyond the CLC, given its ~+$600 price hike. Kind of steep.
Regardless, the big take-away is clock behavior and performance scaling with increased clock-rates on Vega: FE. It’ll be interesting to see how RX Vega manages and if its clock is boosted, but we’ll wait until RX Vega’s launch for more coverage of that aspect.
Editorial: Steve Burke
Video: Andrew Coleman