Our review of Cooler Master’s H500P primarily highlighted the distinct cooling limitation of a case which has been both implicitly and explicitly marketed as “High Airflow.” The case offered decidedly low airflow, a byproduct of covering the vast majority of the fan – the selling point of the case – with an easily removed piece of clear plastic. In initial testing, we removed the case’s front panel for a closer look at thermals without obstructions, finding a reduction in CPU temperature of ~12~13 degrees Celsius. That gave a better idea for where the H500P could have performed, had the case not been suffocated by design, and started giving us ideas for mesh mods.
The mod is shown start-to-finish in the below video, but it’s all fairly trivial: Time to build was less than 30 minutes, with the next few hours spent on testing. The acrylic top and front panels are held in by double-sided tape, but that tape’s not strong enough to resist a light, sheer force. The panel separates mostly instantly when pressed on, with the rest of the tape removed by opposing presses down the paneling.
We did this for both the top and the front, with the front also requiring removal of two footing screws. For the front panel, we used a spare magnetic dust filter that was lying around, orphaned from some case review (we think it’s from the Define C, Meshify, or G21), and applied electrical tape for blended-in support. Removing the top panel was even easier. We replaced the top panel’s acrylic with mesh paneling from the Cooler Master C700P (a proper mesh panel, not just a filter), again using electrical tape for a blacked-out proof of concept.
During testing, we ultimately found that the limited pressure of the front 200mm fans meant more air escaped out the top mesh than desired, and so we eventually reverted the top panel to its solid acrylic. The mesh front panel worked well when coupled with a solid top panel, and resulted in the best thermal results.
Please note: These results are not comparable to our initial review, because we are using different testing methods and data averaging methods. We changed our test methods for the H500P radiator placement guide to improve data resolution and averaging accuracy for high-performance systems. This minimizes our variance / uncertainty. Since this test, we have also modified a few other conditions of testing, which means that the previous metrics (including the 12-13C front panel removal metric) are not comparable. We retested that, too, just to establish a new baseline.
Case Testing Methodology
We tested using our new Skylake case test bench, detailed in the table below. This particular configuration is brand new with the launch of the 570X & 270R. Results on this test platform cannot be compared to previous case benchmark results, as the platform has completely changed.
Conducting thermal tests requires careful measurement of temperatures in the surrounding environment. We control for ambient by constantly measuring temperatures with thermocouples and laser readers. We then produce charts using a Delta T(emperature) over Ambient value. This value subtracts the thermo-logged ambient value from the measured diode temperatures, producing a delta report of thermals. AIDA64 is used for logging thermals of silicon components, including the GPU diode.
All case fans are manually configured to their maximum throughput using BIOS, then we configure to an RPM closer to 1050 for a universal "quiet" testing. If a fan controller is present, we opt-in and test on multiple settings. This forces testing of case fan performance in addition to the case's air channeling and airstream design. This also ensures minimal variance when testing, as automatically controlled fan speeds can reduce reliability of benchmarking. The CPU fan is set to 1100RPM (constant) for consistency, and the CPU is overclocked to 4.4GHz with a vCore of 1.272V (constant). C-States and power saving states are disabled.
| Component | Courtesy Of | Price | |
| Video Card | MSI GTX 1080 Gaming X (OC Mode) | MSI | $640 |
| CPU | Intel i7-6700K @ 4.4GHz | GamersNexus | $300 |
| CPU Cooler | MSI Core Frozr L | MSI | TBD |
| Motherboard | MSI Z170A Gaming M7 | MSI | $180 |
| Memory | Corsair Vengeance LED 32GB 3200MHz | Corsair | $200 |
| SSD | Samsung 850 EVO 120GB | Samsung | N/A |
| PSU | Corsair RM650x | Corsair | $100 |
| Case | This is what we're testing! | - | - |
The video card is configured to run at 55% fan speed at all times.
Prior to load testing, we collect idle temperature results for ten minutes to determine the unloaded cooling performance of a case's fans and air channels. Thermal benchmarking is conducted for 1400 seconds (23 minutes), a period we've determined sufficient for achieving equilibrium. The over-time data is aggregated and will occasionally be compiled into charts, if interesting or relevant. The equilibrium performance is averaged to create the below charts.
Load testing is conducted using Prime95 LFFTs and Kombustor “FurMark” stress testing simultaneously. Testing is completely automated using in-house scripting, and executes with perfect accuracy on every run.
We recently validated our test methodology using a thermal chamber, finding our approach to be nearly perfectly accurate. Learn more here.
Noise Difference: H500P vs. Mesh Mod

Stock-to-stock, we only measured a ~1.3-1.5dBA difference between the panels. The stock H500P measured at 38.7dBA with our test system, with the mesh mod measuring at ~40dBA under the same conditions. There is not really an appreciable noise increase with this mod.
Thermals: H500P vs. Mesh Mod
Before showing the chart, note that the data is not comparable to the previous data, as we decided to switch-over to a different test setup, averaging solution, and monitoring tool. For this reason, we retested the case in both stock and stock w/o front setups, just to re-establish bounding boxes.
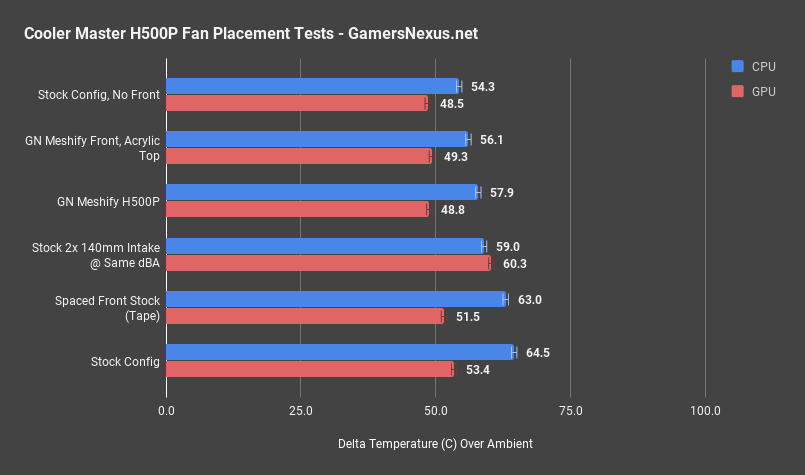
Our thermal chart is flanked by stock configurations, defining our bounding boxes for the mesh mod: In the worst case -- the stock configuration -- we're at 64.5C over ambient for CPU load temperature, or 53.4C for GPU load temperature. Removing the front panel gets us down to 54.3C for the CPU and 48.5C for the GPU. This marks a maximum improvement of about 10 degrees on the CPU, or about 5 degrees on the GPU. If we can get close to this with our mesh mod, we're doing pretty well.
For the completely meshified H500P, with both the front and top panel converted to mesh, we end up at 57.9 degrees on the CPU and 48.8 on the GPU. This isn't particularly exciting, marking only a 6.6-degree improvement in CPU thermals, or 4.6 degrees on the GPU.
Waving a hand over the top mesh revealed that much of the cool air was escaping, because it doesn't have enough pressure to make it into the CPU fan. We restored the top panel back to its original acrylic configuration, then re-ran the test.
The result was noteworthy: Our CPU is now at 56.1 degrees, for about a 2-degree reduction. GPU thermals are roughly the same, at 49.3 versus 48.8 -- this is within our test resolution. We are now within a couple degrees of completely removing the front panel, but have a solution for dust and visuals. Not a bad trade.
Conclusion

Overall, we’re happy with this mod. It’s what the H500P should have been. When building marketing around 200mm fans, it’s probably a good idea to expose more than 10% of the blade to air. This mod accomplishes that. A Cooler Master representative did hint that the company intends to listen to the wants of consumers, and we take that to mean potentially mesh versions of the H500P – or mesh panels sold separately.
That said, you could do this mod now and have it finished in 20 minutes. Just grab a magnetic dust filter and some tape. The case is on Newegg here, if interested. For further reading and our review, check this way.
Editorial, Testing: Steve Burke
Video: Andrew Coleman