For most of you out there, the primary goal of building a custom gaming PC is related to performance: benchmarking, overclocking, gaming, and hardware enthusiasm are all aspects of this. As we discussed in our recent post about how CPU coolers work, more performance generates more heat, requiring hardware manufacturers to invest in better cooling technology.
The major downside to high-end, no-limits cooling is increased noise, but you can overcome loud fans and get the same, if not better cooling performance by considering incremental and optimized upgrades to your cooling setup. Given the right tools, it's not too hard to reduce the noise of your screaming rig to a low hum that you won't even hear when gaming.
This silent gaming PC guide will cover quiet case fans, bearing types, quiet CPU coolers, GPU cooling upgrades, and tips on how to make your PC less noisy. We will not be covering open loop liquid cooling (custom liquid loops) in this article due to its complexity -- that's best left for a future guide.
Defining an Example Gaming PC
We'll start by defining a mainstream gaming system which will altogether serve as the basis for our quiet cooling upgrades. Here's a summary of parts that we suspect most GamersNexus community members would be running:
- Video Card: XFX Radeon 7850 (~$180)
- CPU: Intel Core i5-3570k (~$215)
- Memory: Corsair Vengeance 8GB 1866MHz (~$60)
- Motherboard: ASUS P8Z77-V LE (~$140)
- Power Supply: Corsair CX600 (~$70)
- Hard Drive: Seagate Barracude 1.5TB HDD (~$100)
- Optical Drive: ASUS DRW-24 ($20)
- Case: Rosewill R5 (~$80)
- SSD: Optional.
- Total: ~$865
In short, this system will easily be able to run most of today's games on high performance settings. Semiconductors suffer from shorter usable life when under constant load and high temperatures, so to ensure longevity, let's hook them up with some proven cooling solutions.
In this same vein: You may find our preventative maintenance system sustaining guide useful for a "healthier" rig.
What are the Best Case Fan Upgrades?
Most gaming cases come with two or three pre-installed, if not better; the most common sizes are 120 and 140mm, but other sizes (like 180mm, 200mm, and even 250mm) will show up occasionally. The majority of the time, these fans operate at a single, fixed speed -- one that will either generate adequate airflow but significant noise, or a modest amount of airflow at a slightly less audible noise level.
Our Rosewill R5 comes with a rear 120mm fan and two front 120mm fans, both of which are controllable with the stock fan controller. Despite a fair out-of-the-box setup, the fans aren't the best on the market. We want to increase airflow to our internals without having to hear it, so let's consider a case fan upgrade.
Features to look for in a case fan:
- Blade design: How does the fan scoop in air? What is its directionality?
- Frame design: We want to maximize the airflow for the fan's frame.
- Grommets/washers: These reduce vibration inside the case (and therefore noise).
- Bearing type: Sleeve, double ball, hydro-dynamic, magnetic/fluid-dynamic, etc. will greatly impact fan MTBF and noise.
- Fan size: The larger the hole, the more air that can be pushed through it. Bigger fans spin slower due to this basic principle, and as a result, are quieter. Take advantage of those big fan slots.
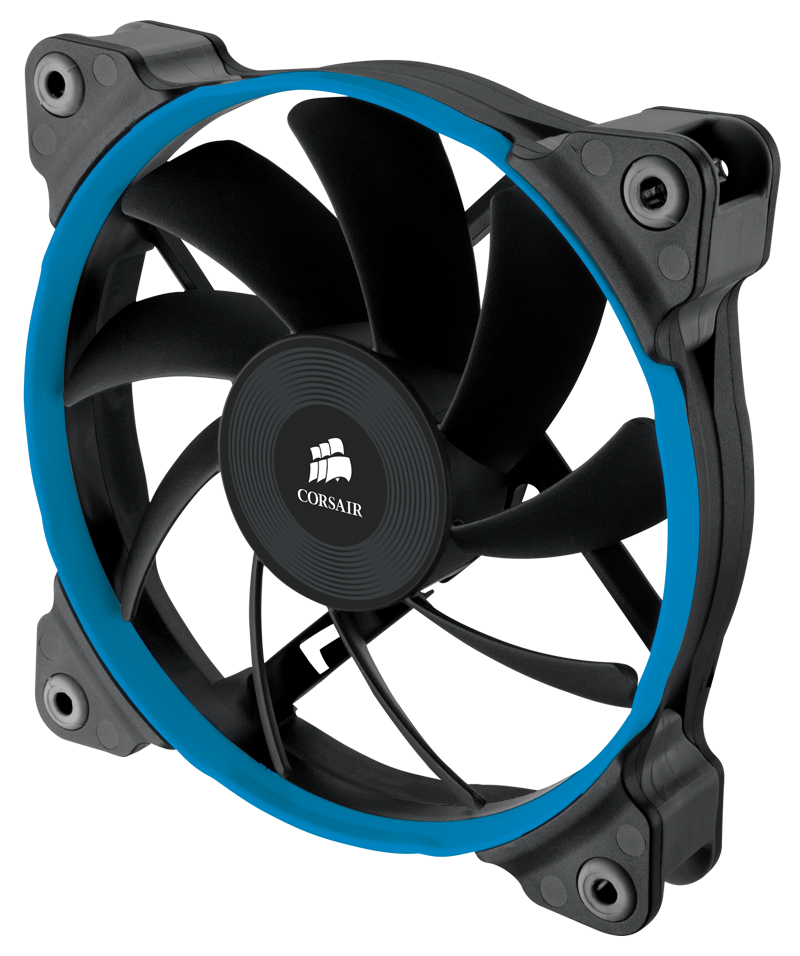
Let's dive deeper into one of the principal, but oft overlooked features: frame design. Most fans today still have 1) a frame surrounding the blades of the fan which is encased by 2) a mounting bracket / overall frame which you use to mount your fan to your case. This means that there's a few square inches of unused space and, although this isn't major, it's an area for improvement. Case fan design has evolved to support more airflow within the same form factor by fusing the two frames in a newer, unified design. To maintain the integrity of the frame, manufacturers have installed rubber or silicone mounting points, thus reducing the vibration of your fan within your system and therefore reduces noise, but also minimizing installation effort (it's tough to cram a screwdriver in some fan mounts) and maximizing spatial efficiency.
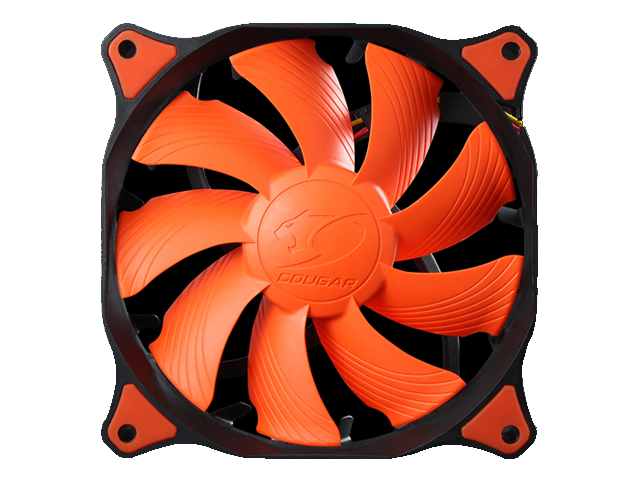
There are a few companies that have adopted this design, to include Cougar (CF-V12 and CF-V14 series), Zalman (SF3 series), and Corsair, which offers an AF120 Performance fan pictured below. Corsair's AF120 is a good example to build on - they've had one of the more impressive radial designs we've seen: The AF120 performance fan operates at 30dBA and pushes as much air as 63.47CFM, which will be more than enough for mid-range and upper-end gaming builds out there; its CPU cooler compatibility makes it a great choice for noise-to-cooling efficiency on coolers, too. We spotted a two-pack for $30, which is a good price for what we're looking to achieve. If the price seems high to you, it's due to a mix of the costly design and hydraulic bearings (read about case fan bearings here), which dramatically reduce noise and vibration generated by friction.
Some fans are controlled through a 4-pin connection to the motherboard, advantageous for its implementation of a process known as Pulse Width Modulation, or PWM. PWM allows the motherboard to signal to the fan so that the fan's rotational output (RPM) is a direct function of the system's performance demands. So if you're just browsing (low resource load), it's likely your fan will be barely audible, but when you boot up Far Cry 3, you'll hear a little more noise from your system. Using a program like HWMonitor (which we use in our benchmarks) will read-out RPMs as they relate to performance, so grab the free version of that for a good idea of how much PWM accomplishes.
For an affordable PWM fan, consider the Cougar Vortex PWM 120mm. The Vortex PWM 120mm option pushes 70.5 / 119.8CFM (800 / 1500RPM) but, upon low-performance situations, cools as quietly as 17.7 dBA (~800RPM). You can pick one up for as low as $10, too.
Even if you replace your stock case fans, you now have additional fans to work with once your system demands more cooling; for example, you can use a leftover 120mm fan for most all-in-one liquid coolers or stick it on a dual-fan compatible air cooler.
Affordable Aftermarket Air CPU Coolers
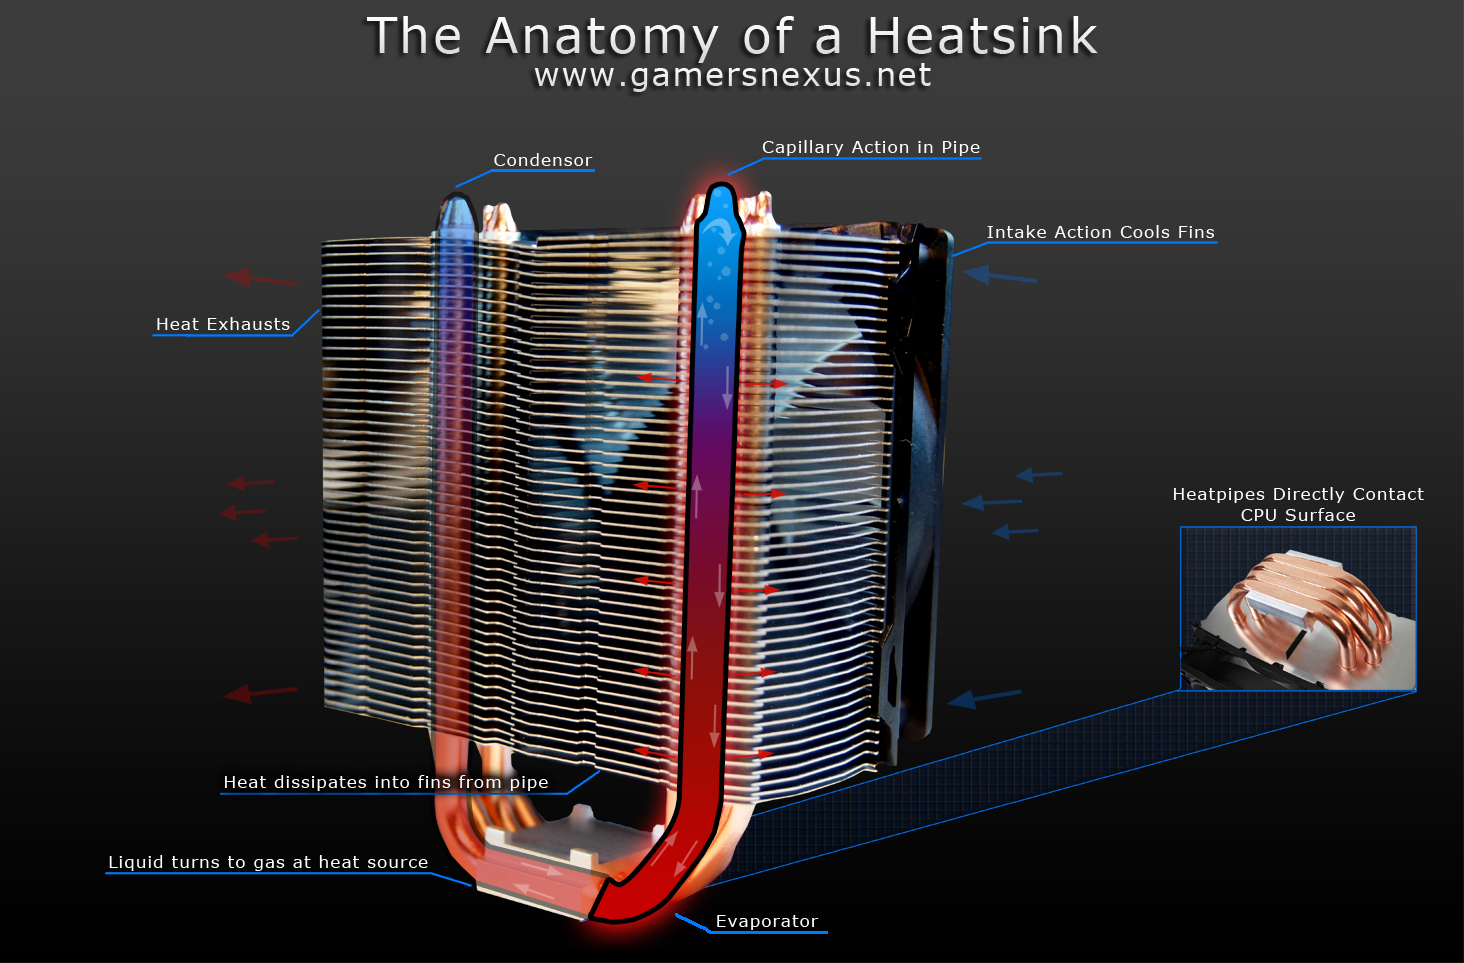
The stock heatsinks that come with your CPU might be small, but they're loud and unbelievably inefficient. More importantly, they do little for cooling when overclocking, and a while silicon does like heat, it doesn't like constant, high-Celsius temperatures that provoke volatility and threaten longevity. Investing in an aftermarket air or closed-loop liquid CPU cooler is one of the best tips I mention to anyone who builds a new PC, regardless of which CPU that person chooses or how he plans to use his computer. Protecting your CPU for long-term use is vital if you're the type to hang onto systems for several years. If you'd like to learn more about heatsink design and functionality, I recommend checking out Steve's Understanding CPU Heatsinks article.
Features to look for:
- CPU socket compatibility (LGA1155, AM3+, etc.).
- Surface area: The larger the heatsink, the more readily it can dissipate heat.
- Surface smoothness: Smoother contact plates mean better conduction potential.
- Heatsink material: Aluminum, copper, or aluminum + copper.
- Number of heatpipes and their diameter.
- Fan positioning and number of fans: Most likely 1 for less noise.
- Provided thermal compound (or purchase your own).
It's important to have a heatsink that can quickly and efficiently conduct heat from your CPU's surface. The more demanding applications you're running, the more heat your CPU will generate. That's one reason why we recommend looking into products with copper heatpipes as a bare minimum and, if possible, a copper cold plate -- where heat is initially absorbed. When compared to aluminum (~200W/mK @ 25C), copper (~400W/mK @ 25C) heatsinks will allow the CPU's heat to be conducted more efficiently into the condenser, though will exhibit higher prices than their aluminum-made counterparts. Most of the products out there use a combination of nickel-plated aluminum (plating is mostly for looks) and copper heatpipes.
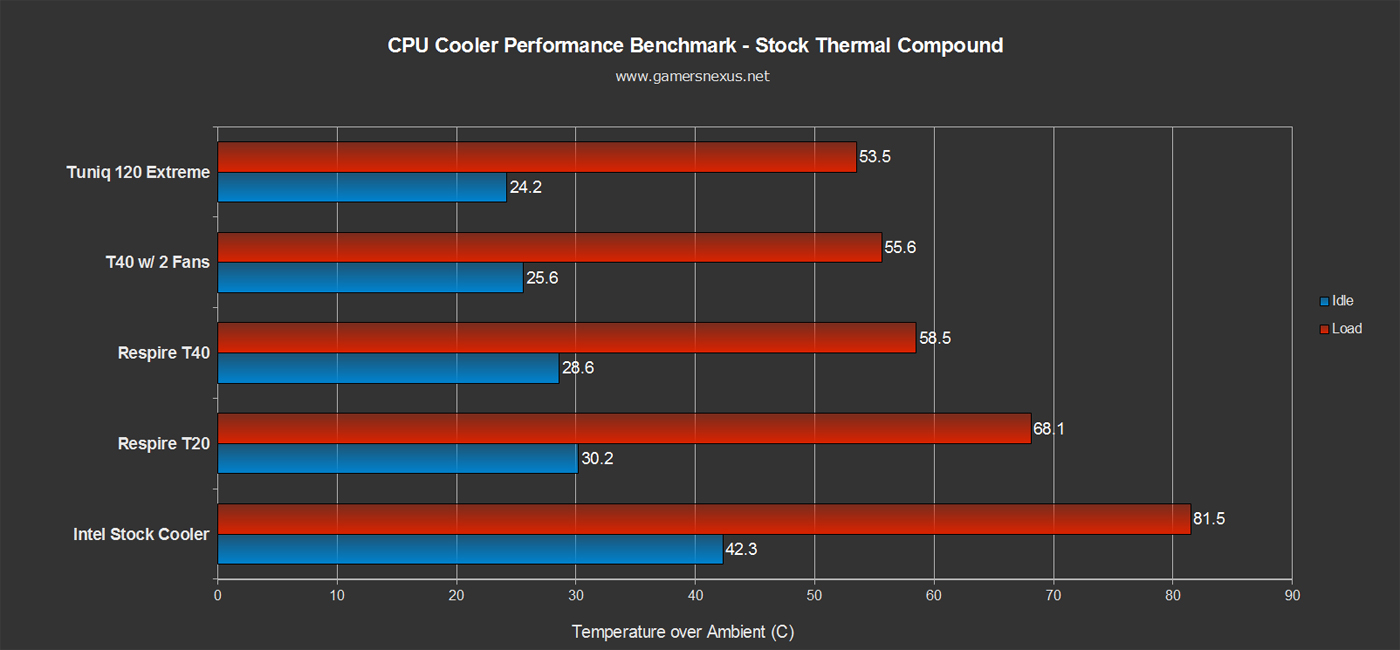
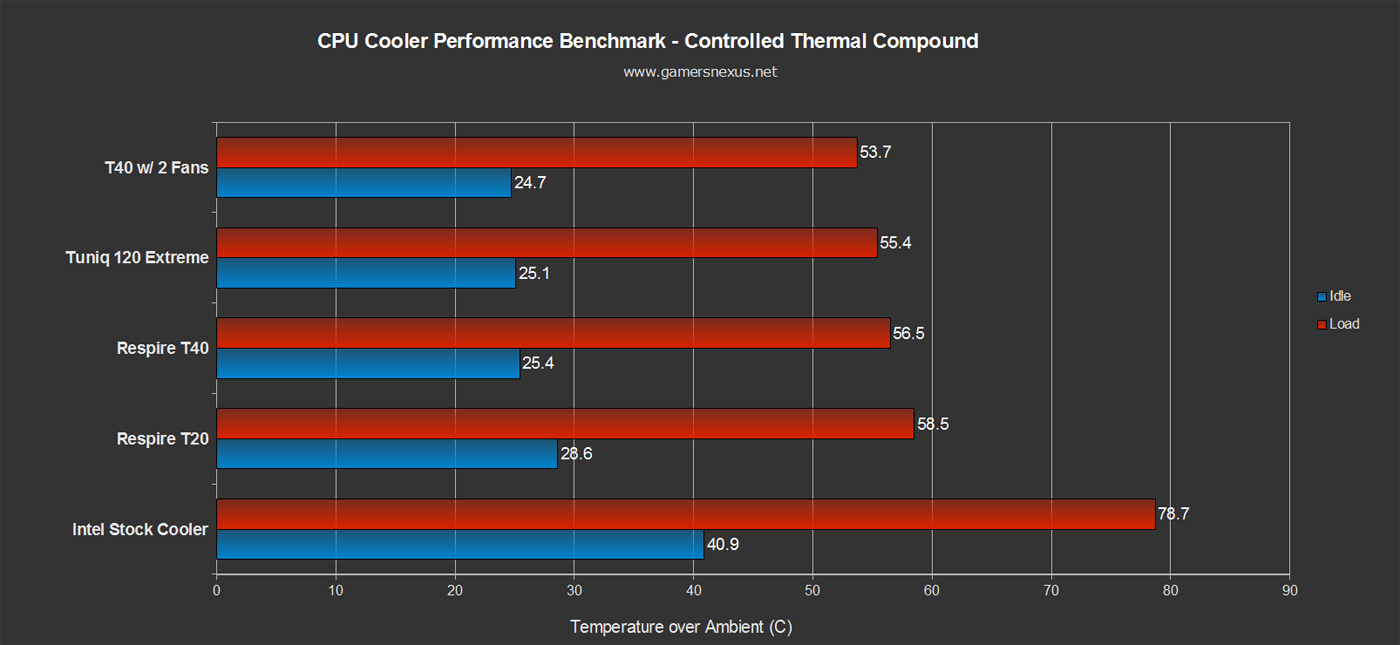
Another important point to consider when purchasing a CPU cooler is thermal compound (explained here). Thermal compound improves the transfer of heat from the CPU to your heatsink by filling microscopic grooves in the surface plates that leave small air gaps when mounted to the CPU. The divots in plate surfaces trap hot air and cause uneven thermal distribution across the chip, but thermalpaste fills these gaps with a heat transfer medium that ensures something more effective than air for thermal conductivity. Most CPU coolers (air or liquid) come with thermal compound included or pre-applied. However, if you're checking out product reviews, you'll notice that these products often yield pedestrian results with their stock compound (Tuniq Tower 120 Extreme withstanding), but perform much better when equipped with an aftermarket compound. Arctic's well-known Arctic Silver 5 is one of the best choices for mid-range thermal conductivity at a reasonable price.
Case in point: We recently tested out the NZXT Respire T20 and T40 and noticed significant variation in thermal performance between compounds and heatsinks. Operating on an overclocked core i7-930 and an X58 board, the T20 struggled during load with the stock paste, but its temperature dropped dramatically when we substituted stock thermal paste for an aftermarket product. You can see in the graph below that the two coolers easily stayed below 60 degrees Celsius on load.
It's also important to consider how you apply the compound to the heatsink, of course - we previously made a video for how to apply thermalpaste.
That said, we liked the Respire T20 and T40 for entry-level aftermarket air coolers. Both Respires are rated to perform at or below 34.0 dBA during load, which makes for a relatively quiet aftermarket air option at the low price. As we mentioned earlier, try to find a cooler with at least copper piping. The Respire is just one example of a product with aluminum fins and copper heatpipes, but certainly isn't alone.
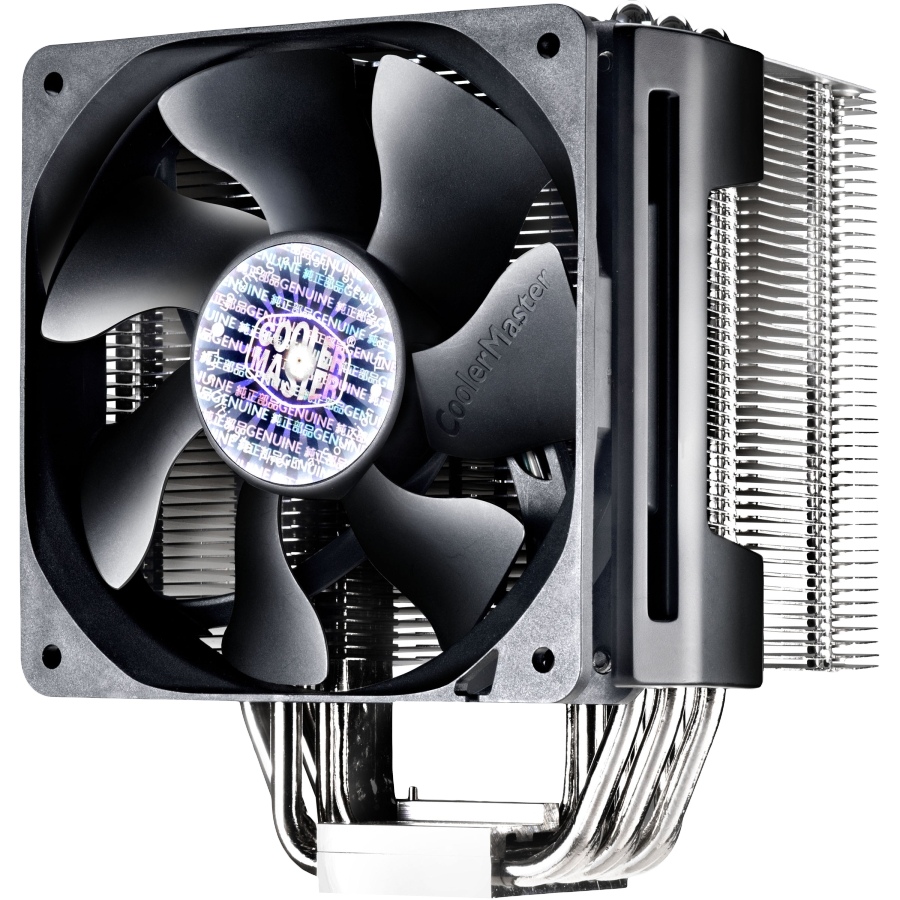
For a higher grade in cooling and a lower noise level, you may want to look into Cooler Master's T812 CPU cooler or Tuniq's Tower 120 Extreme. The T812 comes with a single 120mm PWM fan (600-2400RPM) and has room for a second. Noise levels hover comfortably around 19dBA for lower RPMs, but can peak at 40dBA when in performance mode. The T812 runs around $60 and frequently goes on sale, so keep an eye out.
What to Look For in Aftermarket Liquid CPU Coolers
While some users prefer air cooling, other users side with liquid cooling. You probably have friends who build intricate loops with bottle-size reservoirs and neon green tubing, but that's out of the scope for today. Let's look at compact, affordable liquid coolers and their benefits.
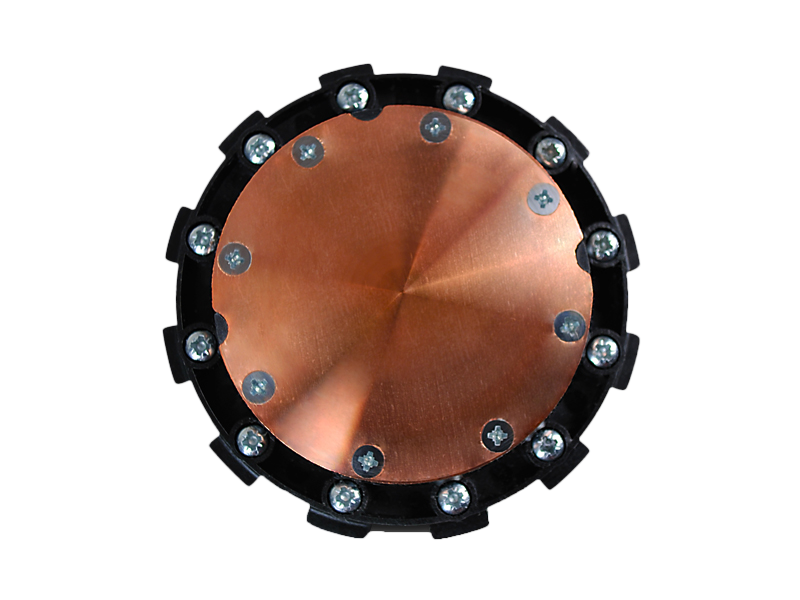 The bottom of NZXT's new Kraken cooler features a dense microfin heatsink.
Many of today's all-in-one liquid coolers streamline the cooling process with a small pump that covers the CPU, a radiator that most users normally mount on the inside of the case's frame, and two tubes which transfer heat and exchange liquid -- much like the copper pipes in an air cooler. Most liquid coolers run for $50-$100, so there are a couple of performance gaps across different models as well as a couple of key feature differences I highlight below
Features to look for:
- CPU socket compatibility (most products support all modern Intel and AMD CPUs).
- Surface area of pump/cold plate: how much cooling is delivered to your CPU.
- Tubing: Look for tubing that won't corrode/wear but is also flexible enough and sturdy.
- Radiator: Check the fan specifications and noise testing.
- Software: Allows you to monitor and control CPU temperatures, fan speed, etc.
- Cold plate material: copper conducts better than aluminum, also check model of cold plate; remember that, as with air coolers, you also want to consider the thermal compound you're using between your cooler and CPU.
Why choose liquid over air? Two reasons I'd like to emphasize pertain to convenience and stress on your CPU. While slightly more time consuming to install, liquid coolers leave you more space for making tweaks to the area surrounding your socket (like RAM and high PCI-e slots). Liquid coolers also put less physical strain on your CPU, which will matter more when transporting your system around or opening it up for upgrades/tinkering. I also value liquid CPUs from an aesthetics point of view.
Why choose air over liquid? Other than price, air coolers possess the unique ability to conduct heat from surrounding motherboard heatsinks/pipes, like the VRM heatsink or nearby RAM; a liquid cooler isn't equipped with the same large sinks and vapor chamber designs that an air cooler is, so if you experience a hot VRM or RAM modules, look into an air cooler (which will also help channel air through the case).
This in mind, let's find out how some of the more basic setups perform.
We looked at some benchmarking tests for Antec's KUHLER H2O 620 and noticed that during overclocking, noise levels were maxing out around 40-43 dBA and CPU temps were at or below 50 degrees Celsius during gaming/moderate performance. That level of thermal performance is more or less on par with similarly priced air coolers. We noticed that Zalman has come into the mix with their LQ-310 cooling unit, which also cools via a copper cold plate. It’s worth waiting for reviews and building projects to surface since the unit is currently priced at $52.
If you want a multi-GPU or overclocking environment for the future, but want to keep things simple internally, consider a liquid cooler with a 240mm radiator for peak cooling capacity. There aren't too many of these to pick from, but the market is growing rapidly (especially with NZXT's Kraken addition, which we're reviewing presently). Corsair's made some improvements to its H100 including the new generation (4th gen) of flexible tubing; the new H100i model runs quieter and has greater thermal dissipation than its H100 precedent.
What to Look For in VGA/GPU Cooling Upgrades
Although not as common among mid-level systems as case fan upgrades or aftermarket CPU coolers, GPU coolers can make a significant difference in not only maintaining a GPU's out-of-box performance levels, but also in contributing to an overall cooler system internally. As I mentioned earlier, not all cases' default cooling setups will reduce specific component temperatures, and the last thing you want is a hot mess in the middle of your case.
Features to look for:
- Support for specific VGAs: check the mounting kits.
- Maximum power supplied by VGA in relation to the cooling required.
- Overall size of the VGA cooler: consider how much space you have to work with.
- Targeted cooling: whether there's additional cooling support aside from the VGA itself, like the Phantom 820's internal, directional fan.
- Fan bearing design: hydro-dynamic bearings yield quieter performance and have a more graceful lifecycle than sleeve bearings.
- Thermal paste also a factor.
A couple of tips: First, understand that video card fans are generally 80mm or 92mm, so they require a higher RPM (i.e. 2500RPM is on the low end) to generate sufficient cooling, especially during overclocking, causing noise levels to rise quickly. Also, more fans does not necessarily equate a better video card, it just means there are more fans. A properly designed, finless fan toward the end of the card will pull enough air through to cool down internals while also maintaining a low dust-gathering level and moderate noise level. Design is everything.
Mainstream performance VGA coolers, like Deepcool's Gamer Storm Dracula, which is compatible with most NVIDIA and AMD cards, can reduce GPU core temperatures dramatically (as much as 30 degrees Celsius during full load) and increase GPU longevity. That said, keep in mind that reference card cooling has improved between series.
VGA coolers will often require additional 3-pin or 4-pin power slots on the board, so keep that in mind when specing out your upgrade.
Also, consider a VGA cooler if you have a feeling you won't buy another video card for a few generations. A solid entry-level VGA cooler can be as cheap as $35, so it's unlikely to affect your future video card upgrade plans and could seriously improve GPU stability (especially under OC load).
We recommend looking into affordable models like Zalman's VF950 ($35) or Arctic Cooling's Twin Turbo cooler for dual-fan reference cards ($50). We've seen similar coolers drop core temps by around 10C during GPU-intensive gaming on high-end cards, and because they often have lower RPM than most 80/92mm fans, they'll perform at low noise levels (~28.5 dBA on normal/idle airflow mode).
These are just a few of the crucial upgrades that can be made to minimize noise levels and maximize cooling output for your gaming rigs. If you look at some of our mainstream upgrades, we've factored in around $100 for quiet cooling upgrades which will lengthen our sample system's lifespan and let us enjoy games without the rig providing its own soundtrack. You'd be looking at around ~$30 (case fan overhaul) + ~$50 (new CPU cooler) + ~$35 (VGA cooler) to complete the quieter cooling overhaul in its entirety, which isn't bad at all. Most of these parts are items that can be carried over to newer rigs, too, so money won't be lost when you build anew.
We'll follow this article up with a Part II that highlights key items to look for in a quiet gaming case, so stay tuned for that.
Have a question on cooling? We've got plenty more to share with you, so let us know how we can help by typing out a comment below or joining our hardware support forums.
- Nick "stuBEEF" Pinkerton.