The advent of a new technology does not necessitate the invalidation of long-standing solutions. Just look at tape drives:
We've often remarked that high-end air coolers will beat-out low-end liquid coolers any day -- the Corsair H60 comes to mind -- and this is a chance to put the concept to the test.
In this review of Be Quiet!'s Dark Rock Pro 3, we benchmark the performance of the hardware world's most monolithic CPU cooler.
Be Quiet! Dark Rock Pro 3 Hands-On, Video, & Installation
Be Quiet! Dark Rock Pro 3 Specs
| Overall Dimensions | 150x137x163mm |
| Weight | 1.197kg |
| Max TDP | 250W |
| Socket Mount | Intel: LGA775, 1150, 1155, 1156, 1366, 2011 AMD: 754, 939, 940, AM2(+), AM3(+), FM1, FM2(+) |
| Fan Spec | 1x135mm internal fan 1x120mm external fan 1400~1700RPM 67.8 / 57.2 CFM @ 12V Fluid-Dynamic Bearings 300,000 hour life @ 25C 13.2~26.1dBA |
| Heatpipes | 7x6mm copper heatpipes |
| Baseplate | Copper, nickel-plated, direct contact. |
| Fin Spec | Dual-Tower. Aluminum, nickel-plated. 90 fins. 123 x 133 x 163mm heatsink size. |
| Release Date | Out now -- in theory. |
| MSRP | $110 |
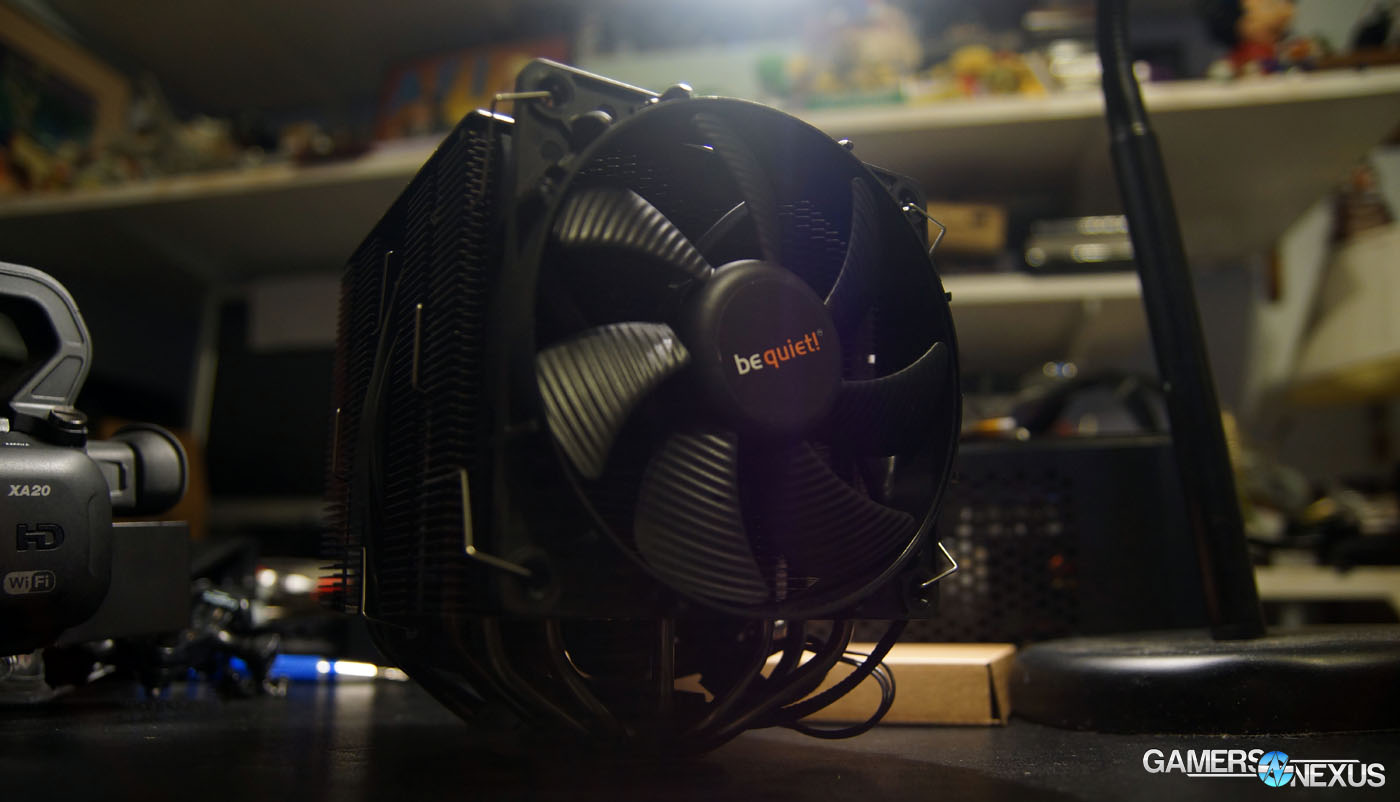
There's something about being physically imposing and plated in nickel that lends a perception of quality to a CPU cooler. By no means do these aesthetic traits guarantee cooling prowess, but they certainly have "the look." The Dark Rock Pro 3 towers over other system components at a somewhat commanding 150 x 137 x 163mm (5.9" x 5.4" x 6.4"), almost resembling a Borg Cube in appearance.
The unit includes two fans in a push/pull setup. The inner fan -- buried within an alcove of nickel-plated aluminum -- is sized at 135mm and pulls air from the outer fan, sized at a more standard 120mm. The fans are PWM-controlled and are rated for 1400~1700 RPM, pushing a reported 67.8 CFM at 12V. Somewhat reasonable RPM and fluid-dynamic bearings ensure an overall bearable noise level rated at a maximum of 26.1 dBA (100% RPM). The first few hours of use yielded an incessant whining noise, but that rapidly died down as the bearings were burned-in to their new homes. This is a good thing, considering you'll be listening to the fans for the effective life of the system -- the cooler's fans are rated for 300,000 hours of life.

Interestingly, the middle fan can daisy chain off of the primary fan in such a fashion that the dual-fan setup only saturates a single CPU_FAN header on the board.
In terms of the actual hardware handling the phase changing and cooling (read about how CPU cooler work here), the DRP3 uses a dual-tower design with 7x6mm heatpipes to perform the heavy-lifting. That's two aluminum towers gapped by the 135mm fan, making for a somewhat unique design among air coolers.
Installation - Bloody Knuckles, Swearing, and Copper's Vengeance
After testing so many CLCs recently, I'd almost forgotten what it's like to complete a cooler install with five bloody knuckles and a blood-stained heatsink. Anyone who worked with the pure copper coolers of the early 00s knows precisely what I mean. The fins back then were razor sharp, too ("when I was yer age...").
The problem with the Dark Rock Pro 3 is an obvious one: It's effing big. Using a motherboard with flanking VRM heatsinks guarantees a painful night of cooler mounting. Anyone demanding this type of hardware will certainly be on a board with VRM sinks, too.
 Don't install it this way. Mount the nut to the bolt prior to placing the heatsink -- this is just impossible.
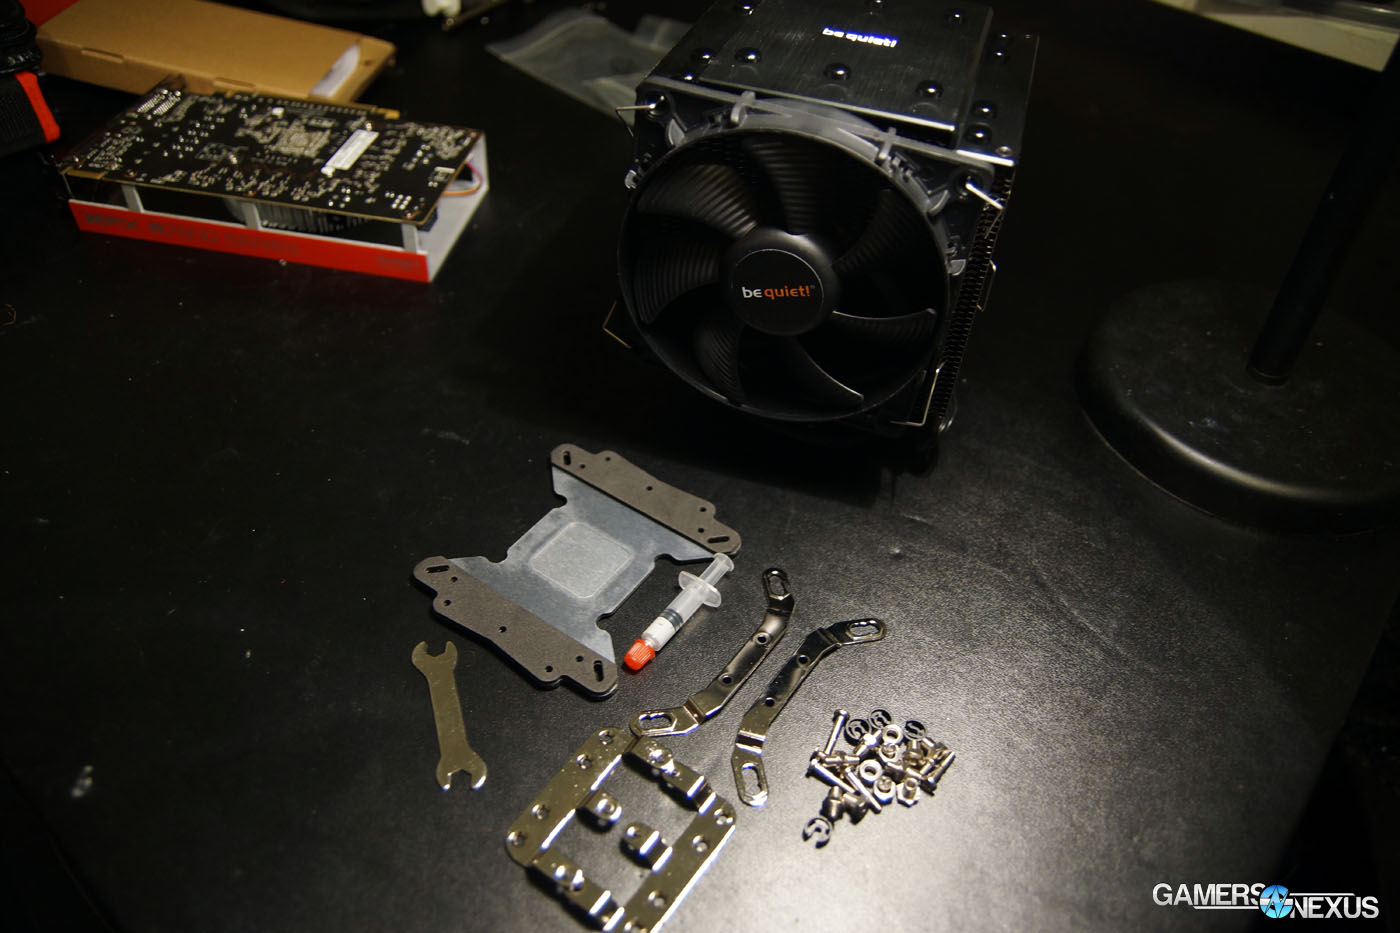
First, the backplate is installed for support. Four screws are inserted through the drilled holes, with plastic clips to receive and secure the screws on the CPU side of the board. Once you've got the screws temporarily secured, it's time to prepare the heatsink. A pair of brackets must be screwed to the cooler itself (rather than the board -- a bit unconventional), with more screws being socketed through these brackets. These screws are then capped with a nut, then the original screws (from the backplate) are screwed into those.
If I've lost you, it's OK -- that's normal. The provided manual is sorely lacking in clarity when it comes to best practices with the cooler. I'd originally attempted to mount the entire cooler before capping the screws with the nuts, only to realize that it was genuinely impossible to do so due to the overwhelming size of the unit.
The best way to go about this is to find another pair of hands. Ideally a pair of hands in the non-fat variety, as it'll make your lives easier. If that's not available, I'd suggest hanging the board over the ledge of a table, crouching under it, and screwing in the screws that way. Just trust me. Craning your neck for a moment is far better than jamming knuckles into aluminum fins for 20 minutes.
Sheesh.
The installation process for the DRP3 is one of the most over-engineered, painful cooler installations I've ever had the misfortune to experience. It's not quite as infuriating as Antec's 1250 mounting plate, but it's close.
That said, I can get over aggravating installation if the performance is good enough.
Continue to page 2 for the benchmark & performance results.
Test Methodology
We have a brand new test bench that we assembled for the 2013-2014 period! Having moved away from our trusty i7-930 and GTX 580, the new bench includes the below components:
| GN Test Bench 2013 | Name | Courtesy Of | Cost |
| Video Card | XFX Ghost 7850 | GamersNexus | ~$160 |
| CPU | Intel i5-3570k CPU | GamersNexus | ~$220 |
| Memory | 16GB Kingston HyperX Genesis 10th Anniv. @ 2400MHz | Kingston Tech. | ~$117 |
| Motherboard | MSI Z77A-GD65 OC Board | GamersNexus | ~$160 |
| Power Supply | NZXT HALE90 V2 | NZXT | Pending |
| SSD | Kingston 240GB HyperX 3K SSD | Kingston Tech. | ~$205 |
| Optical Drive | ASUS Optical Drive | GamersNexus | ~$20 |
| Case | Phantom 820 | NZXT | ~$130 |
| CPU Cooler | (This is what we're testing) Be Quiet! Dark Rock Pro 3 | Be Quiet! | ~$110 |
All of our testing is conducted in a temperature-controlled environment. Ambient is between 21C and 22C for CPU cooler tests. The graphs measure temperature in Delta over Ambient (C) - so the ambient temperature is subtracted from the component temperature.
Each test is initiated with a cold boot, where the system will sit idle for 15 minutes and collect thermal data. We use CPUID's HWMonitor Pro for thermal logging and tracking.
After this idle time, the system will launch a Prime95 instance running four torture threads on Large FFTs for maximum heat generation and power utilization. This is run for 15 minutes, throughout which the logging utility will collect the data we used in the below charts. A final round of idle time is allowed to ensure data consistency. Redundant tests are run in the event of unexpected results.
We keep a consistent case and airflow configuration for all CPU cooler tests.
Our degree-per-dollar chart is measured by using the stock cooler as a temperature baseline. We calculate Delta T between the tested coolers and the stock Intel cooler, then divide price by Delta T (example: $65 / dT 28C = $1.85/degree C). This is used for buyers who are looking for a perspective on relative value and aren't necessarily after each individual degree. For value charts where coolers utilize two fans, we assume an average price of $8 per additional 120mm fan.
All automatic fan controls are disabled for testing purposes. All system case fans and CPU cooler fans run at 100% load during testing. This means these tests will represent the cooling capacity when the CPU fan runs at its maximum speed and load consistently. If you would like to reproduce our results. you can disable fan control in BIOS - often under the "Hardware Monitor" tab.
Be Quiet! Dark Rock Pro 3 vs. Liquid Coolers, Argon AR01, T40, X60, etc.
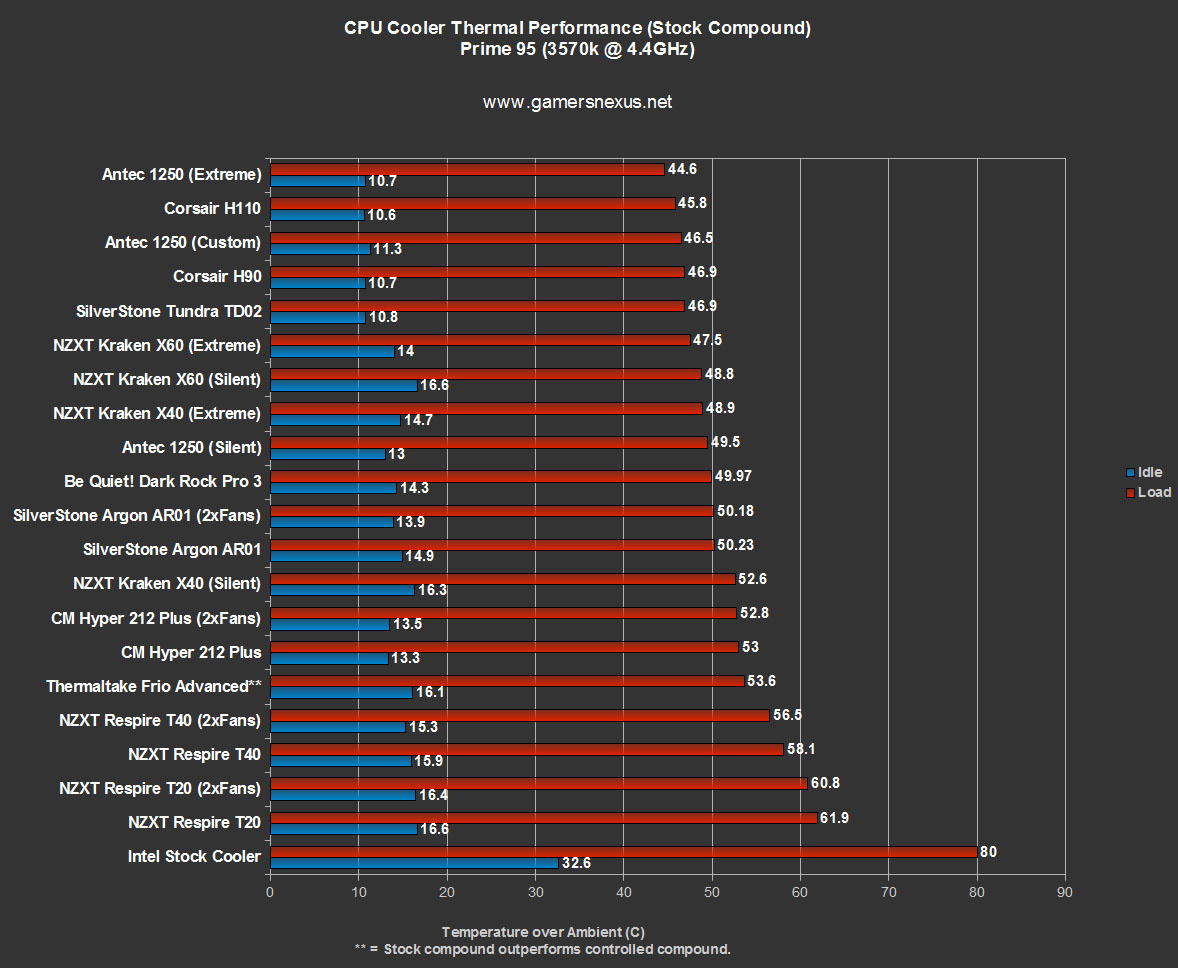
Let's just run straight through the numbers.
As always with air coolers, I benched the Dark Rock Pro 3 using both the supplied stock thermal interface and our controlled Antec Silver compound. The compound included with the DRP3 is exceptionally runny (liquid-y) and doesn't stick very well when battling the mounting mechanism, and as such, didn't see as reliable performance as with the Antec compound (which is a bit more solidified).
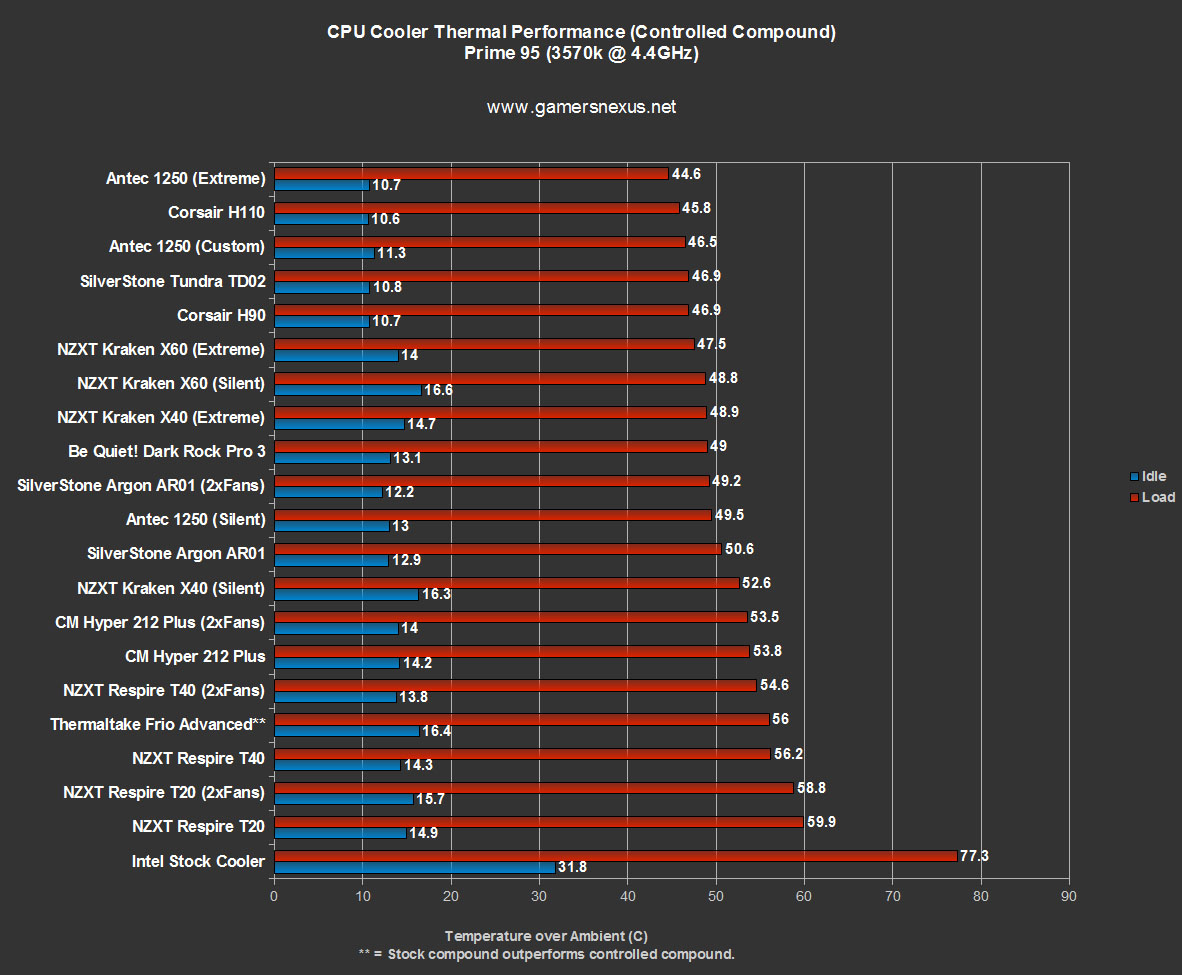
Above is the stock thermalpaste test. The DRP3 ranks just barely above all other air coolers on our bench -- just above the dominating AR01 with 2 fans -- and rests firmly below the X40 CLC on its loudest settings. It's worth noting that the DRP3 runs substantially quieter than the X40 on Extreme, perhaps making it a better choice for noise-conscious users (unless you're fine with running the X40 on Silent, in which case it's going to be quieter than the DRP3).
Here's the controlled test. Performance is marginally better, but there aren't phenomenal gains. At 49.97C load, the DRP3 lands just below the 1250 on silent, X40 on extreme, and above all air coolers.
Conclusion - is the Dark Rock Pro 3 Worth It?

We unfortunately don't have a decibel testing rig established for this bench (but the next one will be prepped for this), so discussing noise levels is purely subjective at the moment. I will note that the DRP3 remains true to its brand name; the cooler is significantly quieter than the liquid coolers when tested on extreme or "medium" (custom) settings. It tends to be louder than the 1250 on silent, though, and the 1250 runs cooler. The Argon AR01 has an annoying whine that hasn't yet subsided, and while it isn't loud, the DRP3 does beat it out in silence and just slightly in cooling.
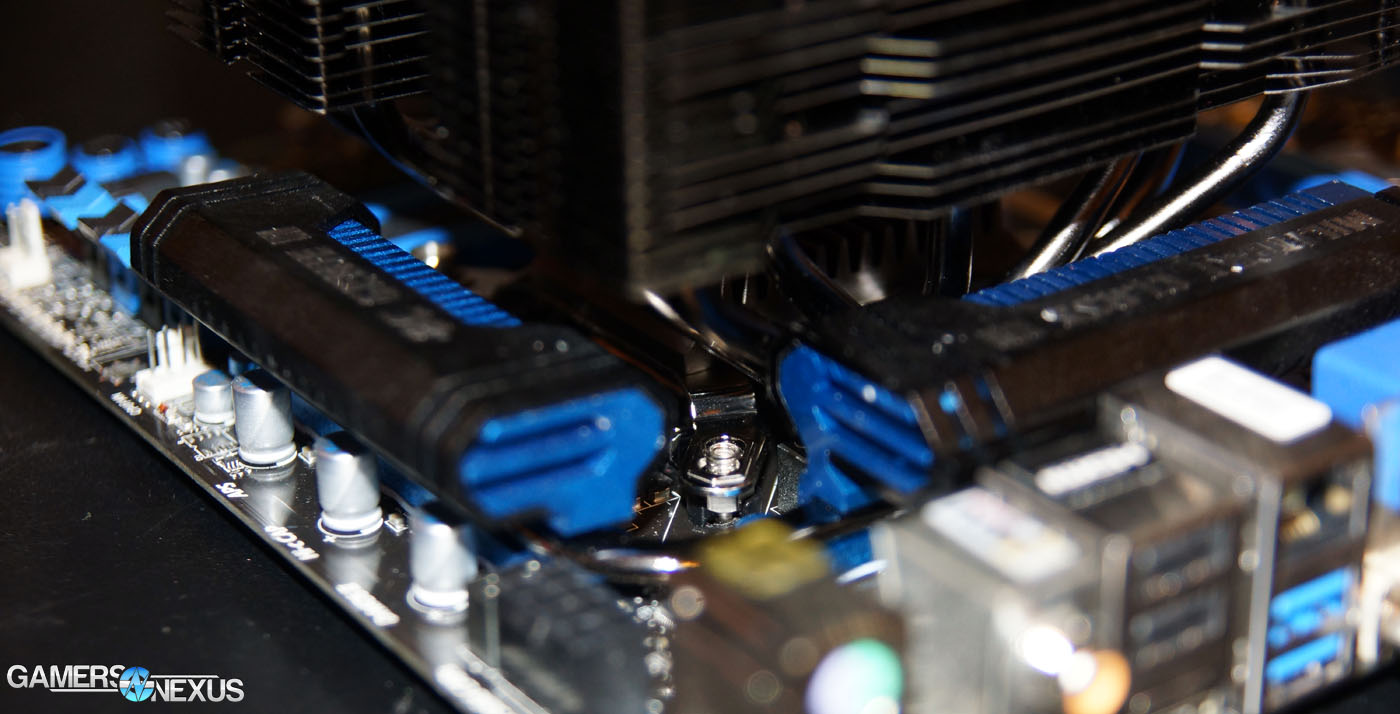
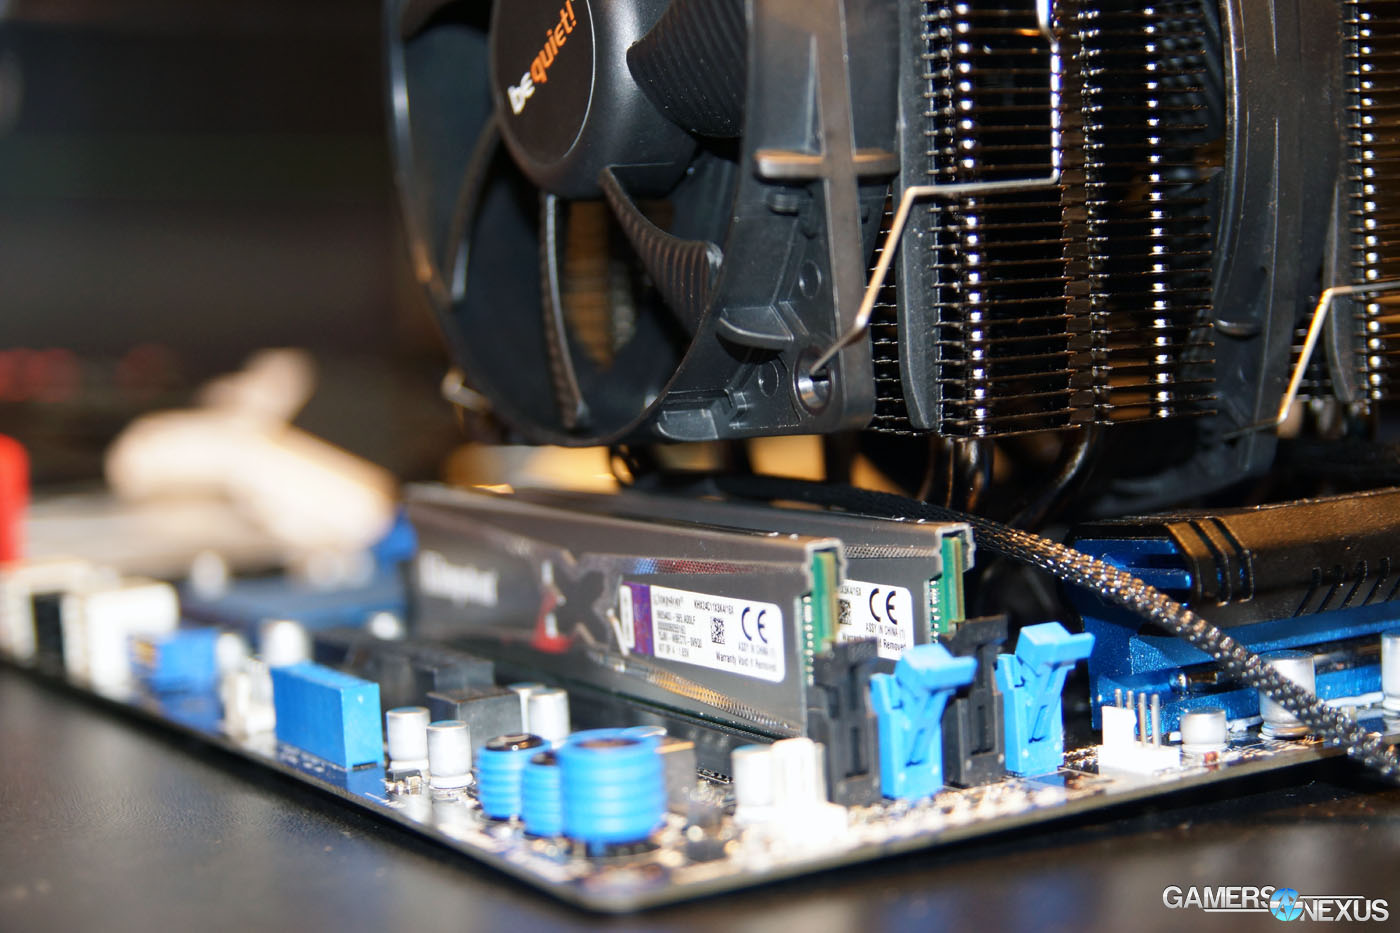 RAM clearance is a non-issue for the most part. Some heatsinks will be tight -- like Vengeance memory. You can move the fan to a higher position if so.
 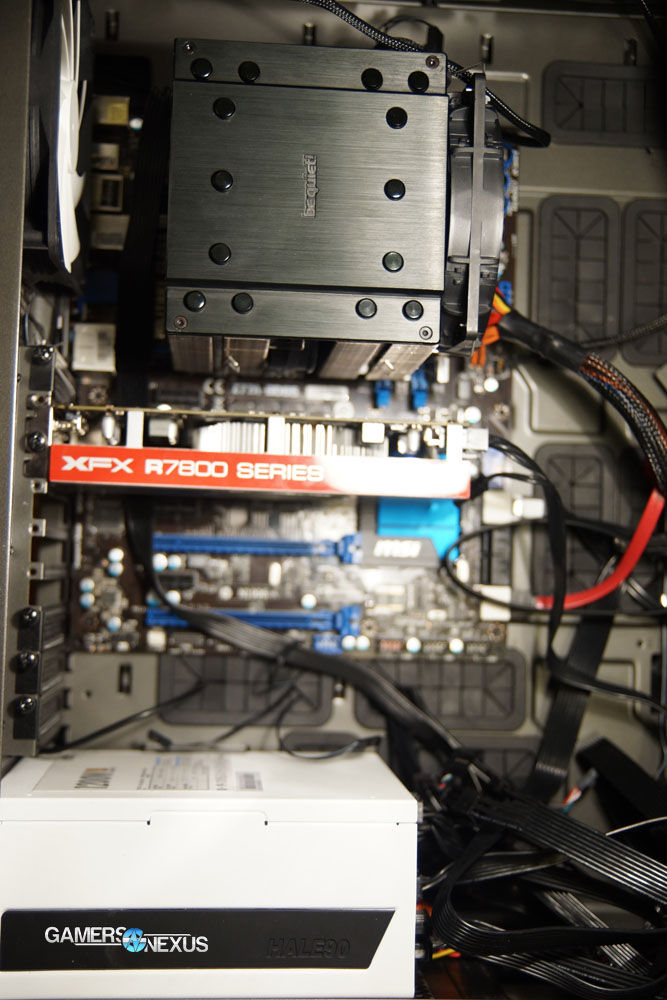 This shows just how huge the cooler is. Ignore cables -- they weren't managed yet as this was mid-installation. Massive cooler.
Realistically, at $110, you're paying for three things: Aesthetics, silence, and endurance. The Argon AR01 has effectively identical performance (within margin of test error) and is priced at around $30. If you just wanted the cooling without the massive cooling unit and could live with slightly louder volume, the Argon AR01 makes much more sense. That said, Be Quiet's Dark Rock Pro 3 is hands-down the most physically imposing, monolithic cooler we've ever tested; the Dark Rock Pro 3 is a work of art in its own right, making it a potential front-runner for enthusiast projects that demand a specific appearance. The DRP3 has effectively dethroned SilverStone's Argon AR01 as the best cooler on the bench, with Be Quiet! now laying claim to our "Best of Bench" award.
As for endurance, well, the bearings are rated for an impressive 300,000 hours -- more than the usable life of most systems.
 At the price, though, it's not for everyone. You could grab a 240/280mm CLC at that cost -- probably an Antec 1250 ($100) (we reviewed this here) or NZXT X61 ($140) -- and achieve marginally better performance, reasonable silence (if not on 'extreme'), and the liquid appearance. Still, not everyone wants a liquid block in their configuration. If that's the case for you and you'd prefer a longer-lasting air unit at 300,000 hours, the DRP3 makes the best sense.
- Steve "Lelldorianx" Burke.