It’s been busy here, but we finally have a brief window to talk about something other than GPUs. Today, we’re reviewing Lian Li’s Lancool 215, internally nicknamed the “P400A killer” despite a design that visually takes more inspiration from Cooler Master’s H500-whatever cases, as we’ve seen some other cases do recently. We’ve been very interested in this design since we first saw it during a visit to Lian Li’s headquarters back in March, when they showed us around several of the factories they work with. The design was made public back in July, but some (understandable) production delays have prevented it from hitting the market until now, with preorders currently open for an October 12th release date. The nickname comes from the 215’s airflow-focused design at a target price of $70, which directly competes with the two-fan P400A, currently $71 on Amazon and Newegg. The four-fan P400A Digital, the one which we reviewed highly last year, is currently more in the $80-$90 range in the stores where it’s actually in stock. The Lancool 215 has addressable RGB LEDs and three stock fans, two of which are 200MM intake fans that cover the entire surface of the front panel, making it potentially a very strong competitor to Phanteks’ offerings. As we’ve already reported, Lian Li has been able to keep the price low by contracting out case production rather than making the 215 in-house (as they would for their more expensive aluminum cases).
Lian Li Lancool 215 Specs
Model | LANCOOL 215 |
Dimensions | (D) 462mm x (W) 215mm x (H) 482mm |
Motherboard | E-ATX(width: under 280mm)/ATX/M-ATX/ITX |
PSU | 210mm |
Color | black |
Materials | 0.75mm SGCC (MB tray, and most of the interior) 4.0mm tempered glass (both sides) |
Incl Fans | 2 x 200MM 3-PIN 800 RPM ARGB fans (front) 1 X 120MM 3-PIN 1100 RPM Fans (rear) |
Fan Support | Front: 2 x 140mm or 3 x 120mm Top: 2 x 120mm or 2 x 140mm Top of PSU chamber: 2 x 120mm |
Radiator | Front: 1 x 280/360mm ["with max 70MM thick"] Top: 1 x 240 / 280 mm ["with max 55MM thick"] |
VGA Length | 370mm |
CPU Clearance | 166mm |
Drive | Behind MB Tray: 2 x 2.5″ SSD Hard Drive Cage: 2 x 3.5″ HDD or 1 x 2.5″ SSD |
Slot | 7 |
I/O Ports | Power button Reset button LED button for lighting mode control 1 x HD AUDIO 2 x USB 3.0 |
Dust Filters | 1 x Top (magnetic), 1 x Bottom (tray) |
*Specs table copied directly from product page, please read review for our own measurements and opinions
The Build
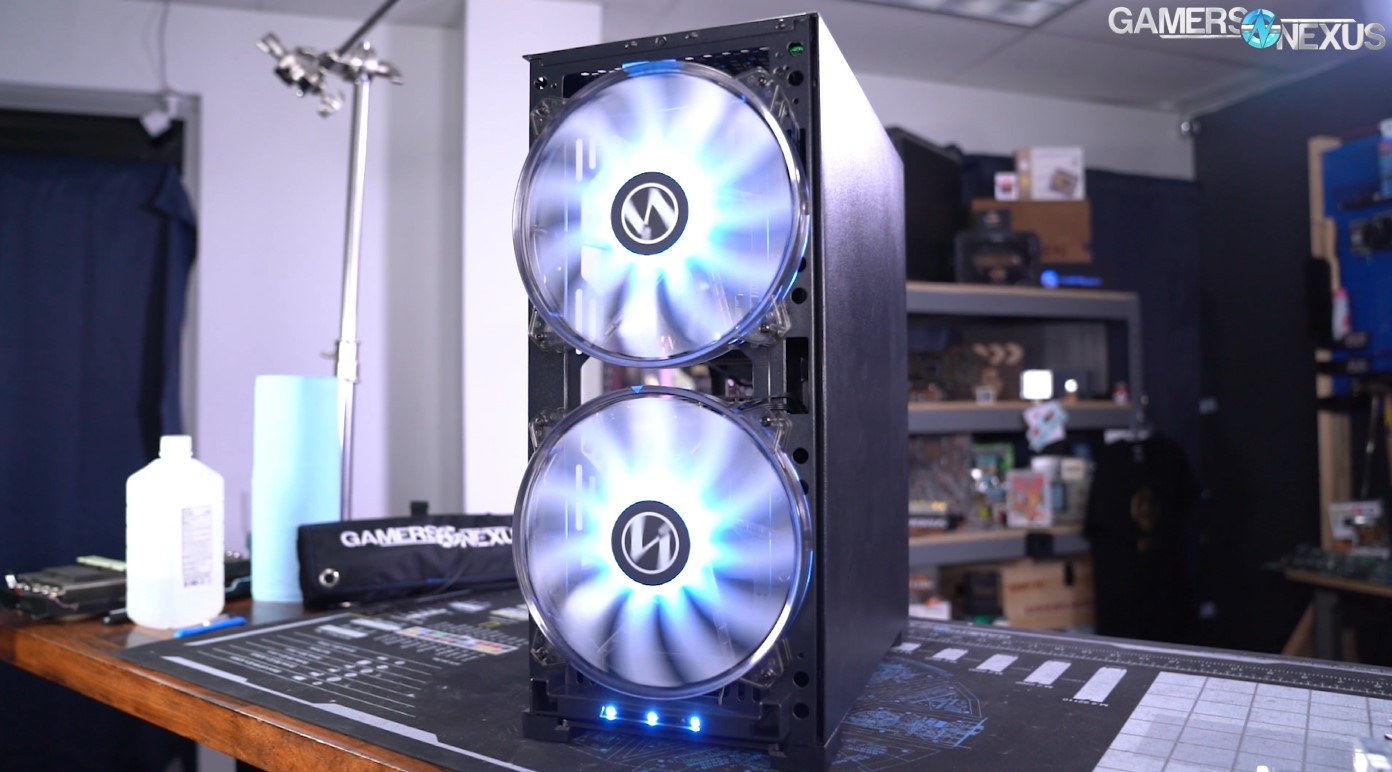
The front panel in our sample is one of those old-school designs that’s extremely difficult remove, but Lian Li has assured us that the production version will be revised to address this, which we’re happy to hear. We took a Dremel tool to our Noctis 450 for the same reason a couple years ago, and we’re not afraid to do it again. The intended point at which to grab the panel is a handle at the bottom, which is frequently a problem in budget cases--manufacturers will put a filter on the front of the case, then leave a wide-open unfiltered cutout as a handle at the bottom. That’s not a problem here, both because the bottom of the panel is fairly well sealed and because the 200mm intake fans are mounted out on the front of the chassis, close to the mesh. The fact that there’s no separate filter behind the front panel’s mesh surface means that the front panel will rarely need to be removed for cleaning.
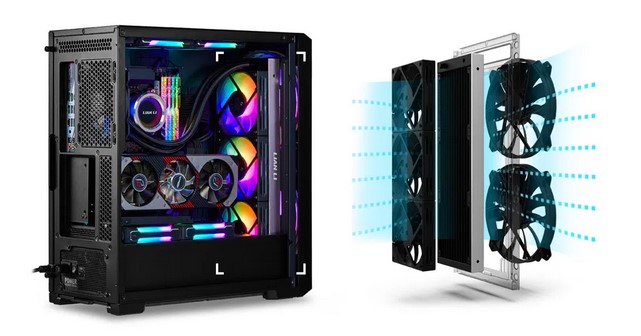
It will rarely need to be removed at all, in fact, since the 200mm intake fans can’t be moved to any other location in the case, and it’s unlikely anyone would want to buy a Lancool 215 and then get rid of the 200mm fans that define it. These fans indirectly limit the radiator compatibility of the case: radiators should be used with relatively high static pressure fans that correctly match their size. 200mm radiators are rare, and even the ones that do exist wouldn’t fit in this case. Do not use these fans to cool a 120mm or 140mm wide radiator. Lian Li’s product page shows another option, a 360mm radiator sandwiched between the two 200mm fans and three 120mm fans in a push/pull configuration, but the 200mm fans are redundant and add nothing but noise in this arrangement--we don’t recommend it, nor do we recommend the tubes-up radiator orientation they used for that picture. That leaves the top of the case, which has space for two 140mm fans side by side or two 120mm fans, for a max of 280mm radiators supported. The rear exhaust slot only supports 120mm fans due to the narrow footprint of the case, but the rear fan can be adjusted up or down by 3cm. The top of the case is 6cm above the top edge of the motherboard, which is the effective limit for combined radiator and fan thickness--Lian Li’s spec sheet claims a conservative 55mm. 120mm-wide radiators potentially have a little more wiggle room since they can be offset away from the board.
Also depicted in that advertising image is a vertical GPU mount. There is no vertical mount included in the case, but like Phanteks, Lian Li sells an add-on kit that replaces the horizontal mounts. We’re not especially fond of vertically mounting air cooled GPUs, but we’ve found this style of add-on mount to be as effective as possible since it keeps the GPU cooler intakes away from the side panel, and our recent tests with the 3080 FE and 2080 Ti Strix vertically mounted in the P400A confirm that. We’d recommend against using shroud-top fans with a vertically mounted, air-cooled GPU the way they are in the picture, though, since they have limited access to cool air and will do little to help, and some designs will just see hot exhaust pushed back into the GPU cooler.
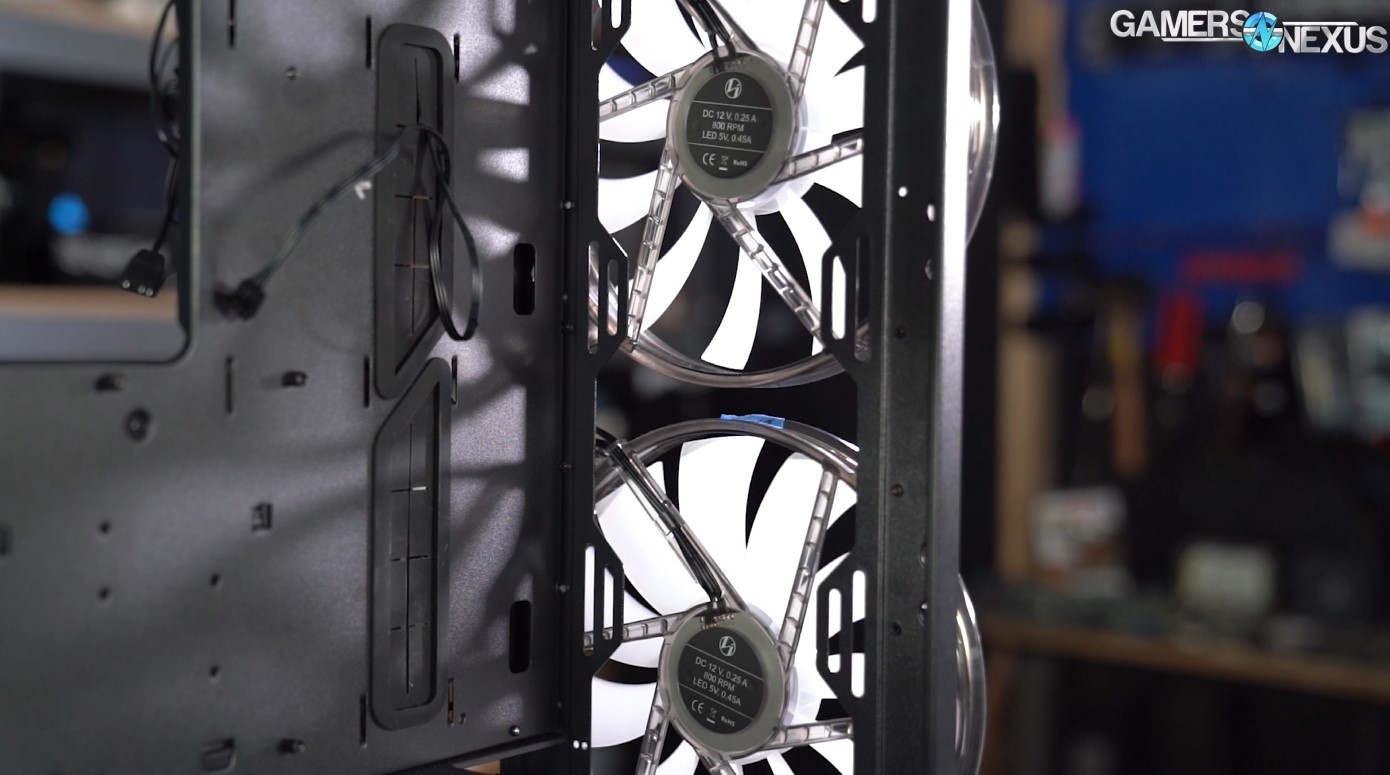
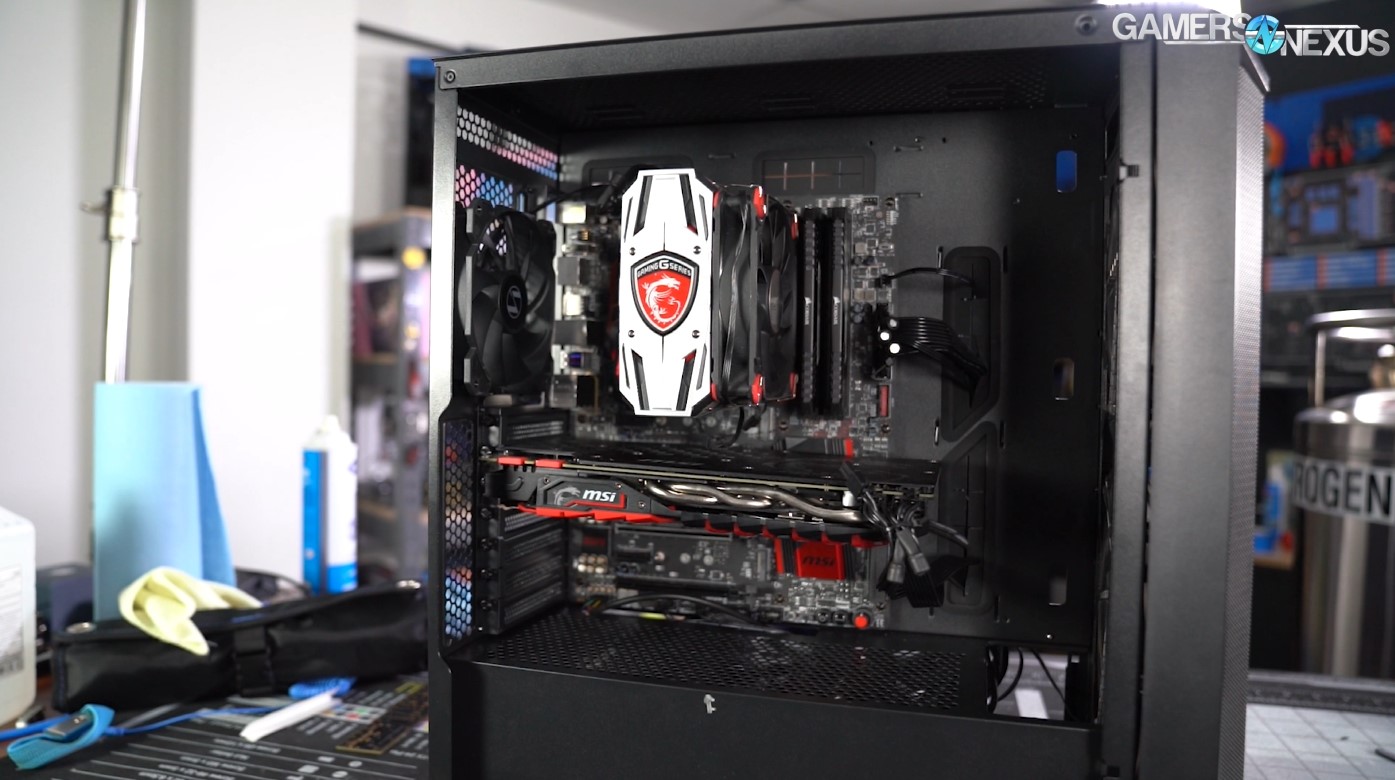
We’ll cover the efficacy of the intake fans in the thermal section later on, but the size of the fans is decorative. They may be 200mm in diameter, but they’re mounted on the front of a chassis that was built for 120/140mm fans, so that easily a third of each fan’s surface is blocked by steel. They still work just fine, but make no mistake--the reason these are 200mm fans rather than 140mm (like the ones in the Lancool II Mesh) is aesthetic, not functional, while 140mm fans would maintain better pressure. In contrast, the rear of the case is unusually well-ventilated, with holes punched from the top edge of the case right down to the surface of the PSU shroud. Hopefully this will allow a direct front-to-back airflow pattern without hot air pooling around the CPU cooler, but again, we’ll test that in the thermal section.
Other than the LED and reset buttons, there’s an illuminated power button, two USB 3.0 ports, and a combined mic/headphone jack. It’s absolutely minimal, but this is a budget case.
The two side panels share the same attachment method, with two captive thumbscrews at the back and two stamped-out steel lugs at the front that slide into the chassis. It’s a simple system, and it works well. The steel side panel is reinforced with thick rolled-over edges, and the glass side panel is bordered with a foam strip on the top edge to cushion it and a steel strip at the bottom to protect the edge from chipping. There are only two minor problems we can see: users should avoid bowing out the steel side panel since it only attaches to the case at the front and rear edges, and the glass panel has no handle. We’d like to see a handle along the rear edge (like the one on the steel panel) to make it easier to pull out.
The screws on the 200mm fans weren’t particularly tight, but the relatively fragile corners of the fans had almost all buckled, which seems more the fault of the fan’s design than whoever assembled the case. The fans still worked normally, but users should be extra careful when removing or replacing them. Lian Li has told us that the fan hub stickers on the final production cases will be smaller, but this is the only design change to the fans that we’ve been made aware of, so the fans in our review sample should be mechanically identical to the final versions.
The hard drive bay is interesting, and near the limit of the least possible material used for its construction. It can still hold two 3.5” drives, as is standard for mid towers these days, but it’s just a single bay that slots into the bottom of the case. One drive can be mounted inside, and one more on top. Installing drives requires screws (no fancy toolless sleds here) but slotting the bay itself into place underneath the shroud is toolless, which is a good thing, since the full-length bottom filter prevents easy access to the bottom of the case. The bay can be mounted in two positions, forwards or backwards to give more room to either the power supply or the front fans.
The bottom filter is unusually large for a case that has a PSU shroud, covering the entire floor of the case at approximately 40cm x 16cm. For the most part that’s a positive, but there are two problems with it that other cases have already solved: first, it’s a rear-eject filter, so taking it out for cleaning will require pulling the case out at least 40cm away from whatever is behind it. Secondly, the rails for the filter are bulky and extend the full length of the case. They work well for their intended purpose, but they also form a skirt around the edges of the case that restricts airflow. The case legs are already stumpy at just under 2cm, and the plastic rails cut that space in half, so there’s a less-than-1cm gap for air at the bottom edges of the case. There’s a reason this matters: the PSU shroud is fully ventilated and has two 120mm fan mounts on top (one of which is unusable because of the power supply, but still), the case floor is fully ventilated, and even the HDD bay has perforations in its surface. The intent here was clearly to allow bottom intake, but the execution leaves something to be desired. For any users who want to try installing fans on the surface of the PSU shroud, we’d recommend finding a way to boost the case legs. Lian Li’s own Lancool II Mesh takes a similar approach with fan mounts on top of the shroud, but it has both more room for airflow underneath the case and plenty of ventilation along one side of the shroud.
Clearance underneath the power supply shroud is inadequate. We use a run-of-the-mill 8.5cm tall ATX power supply for case reviews, and in this case the surface of the power supply was nearly flush with the shroud. That’s not automatically a problem, but the case is narrow enough that there are cable cutouts which overlap with the PSU, and they’re almost completely unusable. Fitting a fan cable through, for example, would require pulling the connector through BEFORE the power supply was installed--the clearance is that tight. The Lancool 215 does have an advantage over the P400A in that it can fit large power supplies, like the 22cm-long EVGA 1600 T2s that we frequently use for testing, but the longer the power supply, the fewer cable cutouts will be usable.
On the subject of fitting large components, the 215 can technically fit up to SSI-EEB motherboards by virtue of having a flat motherboard tray and stock intake fans that are installed on the outside of the chassis rather than the inside. We wouldn’t recommend installing any board larger than SSI-CEB (12” x 10.5”), since boards wider than 10.5” will cover the cable cutouts at the front of the case and there are few other options for routing cables. Lian Li helpfully lists support for EATX boards “with a maximum width of 280MM,” which is exactly the right width to cover up all the cable cutouts without corresponding to any real form factor. With a normal ATX board installed, we found the cutouts on both the front and top edges of the board to be generously sized.
Cable management room behind the motherboard tray tops out at about 2.4cm, but Lian Li has done a good job of ensuring that cables from the front I/O line up with the included velcro straps. They aren’t bolted into the case, but there are side-by-side loops for the straps built into the case along the front and top edges that make tying down cables very easy. Given the limited space behind the motherboard tray, there’ll inevitably be some clutter underneath the PSU shroud, but the compact design of the HDD bay means that it doesn’t need to be completely removed to make room for cables.
Given that Lian Li is working with another company to manufacture this case, an interesting point is that they’ve still made an effort to make this case fit in with the rest of the Lancool line rather than buying a generic ready-made case off the shelf. The shape of the front panel, the shroud-top fan mounts, and the lighting in the front panel seem likely to be elements that Lian Li has designed specifically for this case as part of the Lancool family.
The fan and LED arrangement is basic and therefore mostly un-annoying. The front RGB fans have separate headers for LED and fan control, a positive change that Lian Li has made in their more recent cases. The built-in fan hub has six three-pin fan headers (all of the stock fans are 3-pin) and no speed control--but since the fans can be connected directly to the motherboard, that’s fine. The stock 200mm front fans are fairly quiet, so running them at 100% at all times via the fan hub isn’t out of the question. There are also four ARGB headers on the hub (three of which are populated out of the box), which can be cycled through a selection of built-in lighting profiles or controlled via a motherboard header. The front I/O has a separate LED control button rather than just repurposing the reset button, a nice touch for such an inexpensive case. The two front fans and the Lian-Li logo at the bottom of the front panel all contain LEDs. The logo is illuminated from a strip of three LEDs housed in the chassis, a clever way of getting lighting into the front panel cheaply and without tethering it to the chassis with wires. It works well, too. If there’s a weak point in the system, it’s the molded plastic duct between the LEDs and the logo--it’s slightly misshapen on our sample, and a small piece has chipped off.
NOISE & THERMALS
As we’ve already mentioned, it’s impossible to rearrange the 200mm fans within the case, and it’s hard to imagine a scenario where replacing them makes sense. Therefore, we mostly limited ourselves to our standard set of tests, and two additional tests with a 120mm ID-COOLING fan turned down to approximately 1200RPM. For the first, we removed the top filter and positioned the fan as top exhaust in the rearmost slot. For the second, we positioned it as intake on top of the PSU shroud in the frontmost slot. The shroud-top mount further towards the rear of the case is better positioned to directly cool the GPU die, but this mount is practically flush with the surface of the power supply, making it useless.
CPU Torture
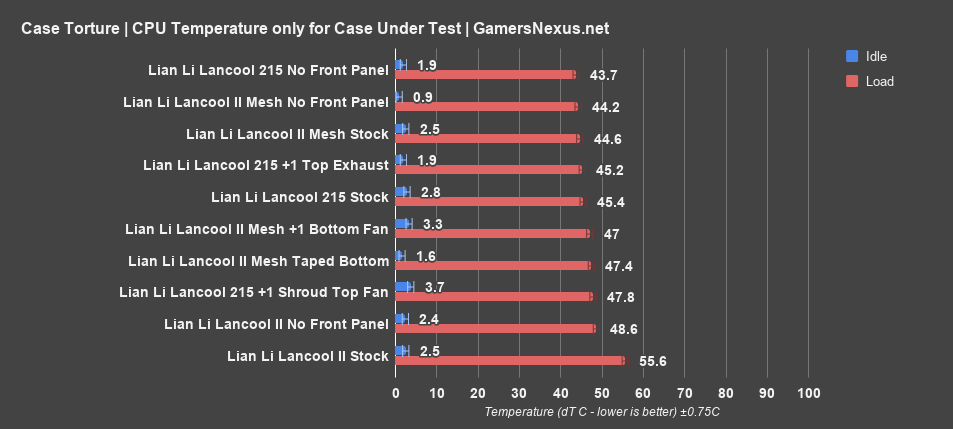
In the torture test, starting with just some Lian Li cases, CPU temperatures averaged 45 degrees Celsius over ambient with the stock fan arrangement. This fell only slightly down to 44 degrees with the front panel removed entirely, indicating that Lian Li has done a good job of pairing the large intake fans with a front panel that doesn’t restrict them, although the backing chassis does. The extra top exhaust fan didn’t drop the CPU delta significantly below the baseline temperature delta of 45 degrees, while adding an intake fan to the top of the PSU shroud warmed it up slightly to 47 degrees, because hot GPU exhaust was encouraged to move upwards in the case towards the tower cooler. The Lancool II Mesh is tied with the 215 in this test at 45 degrees above ambient, while the original Lancool II is of course much warmer at 56 degrees.
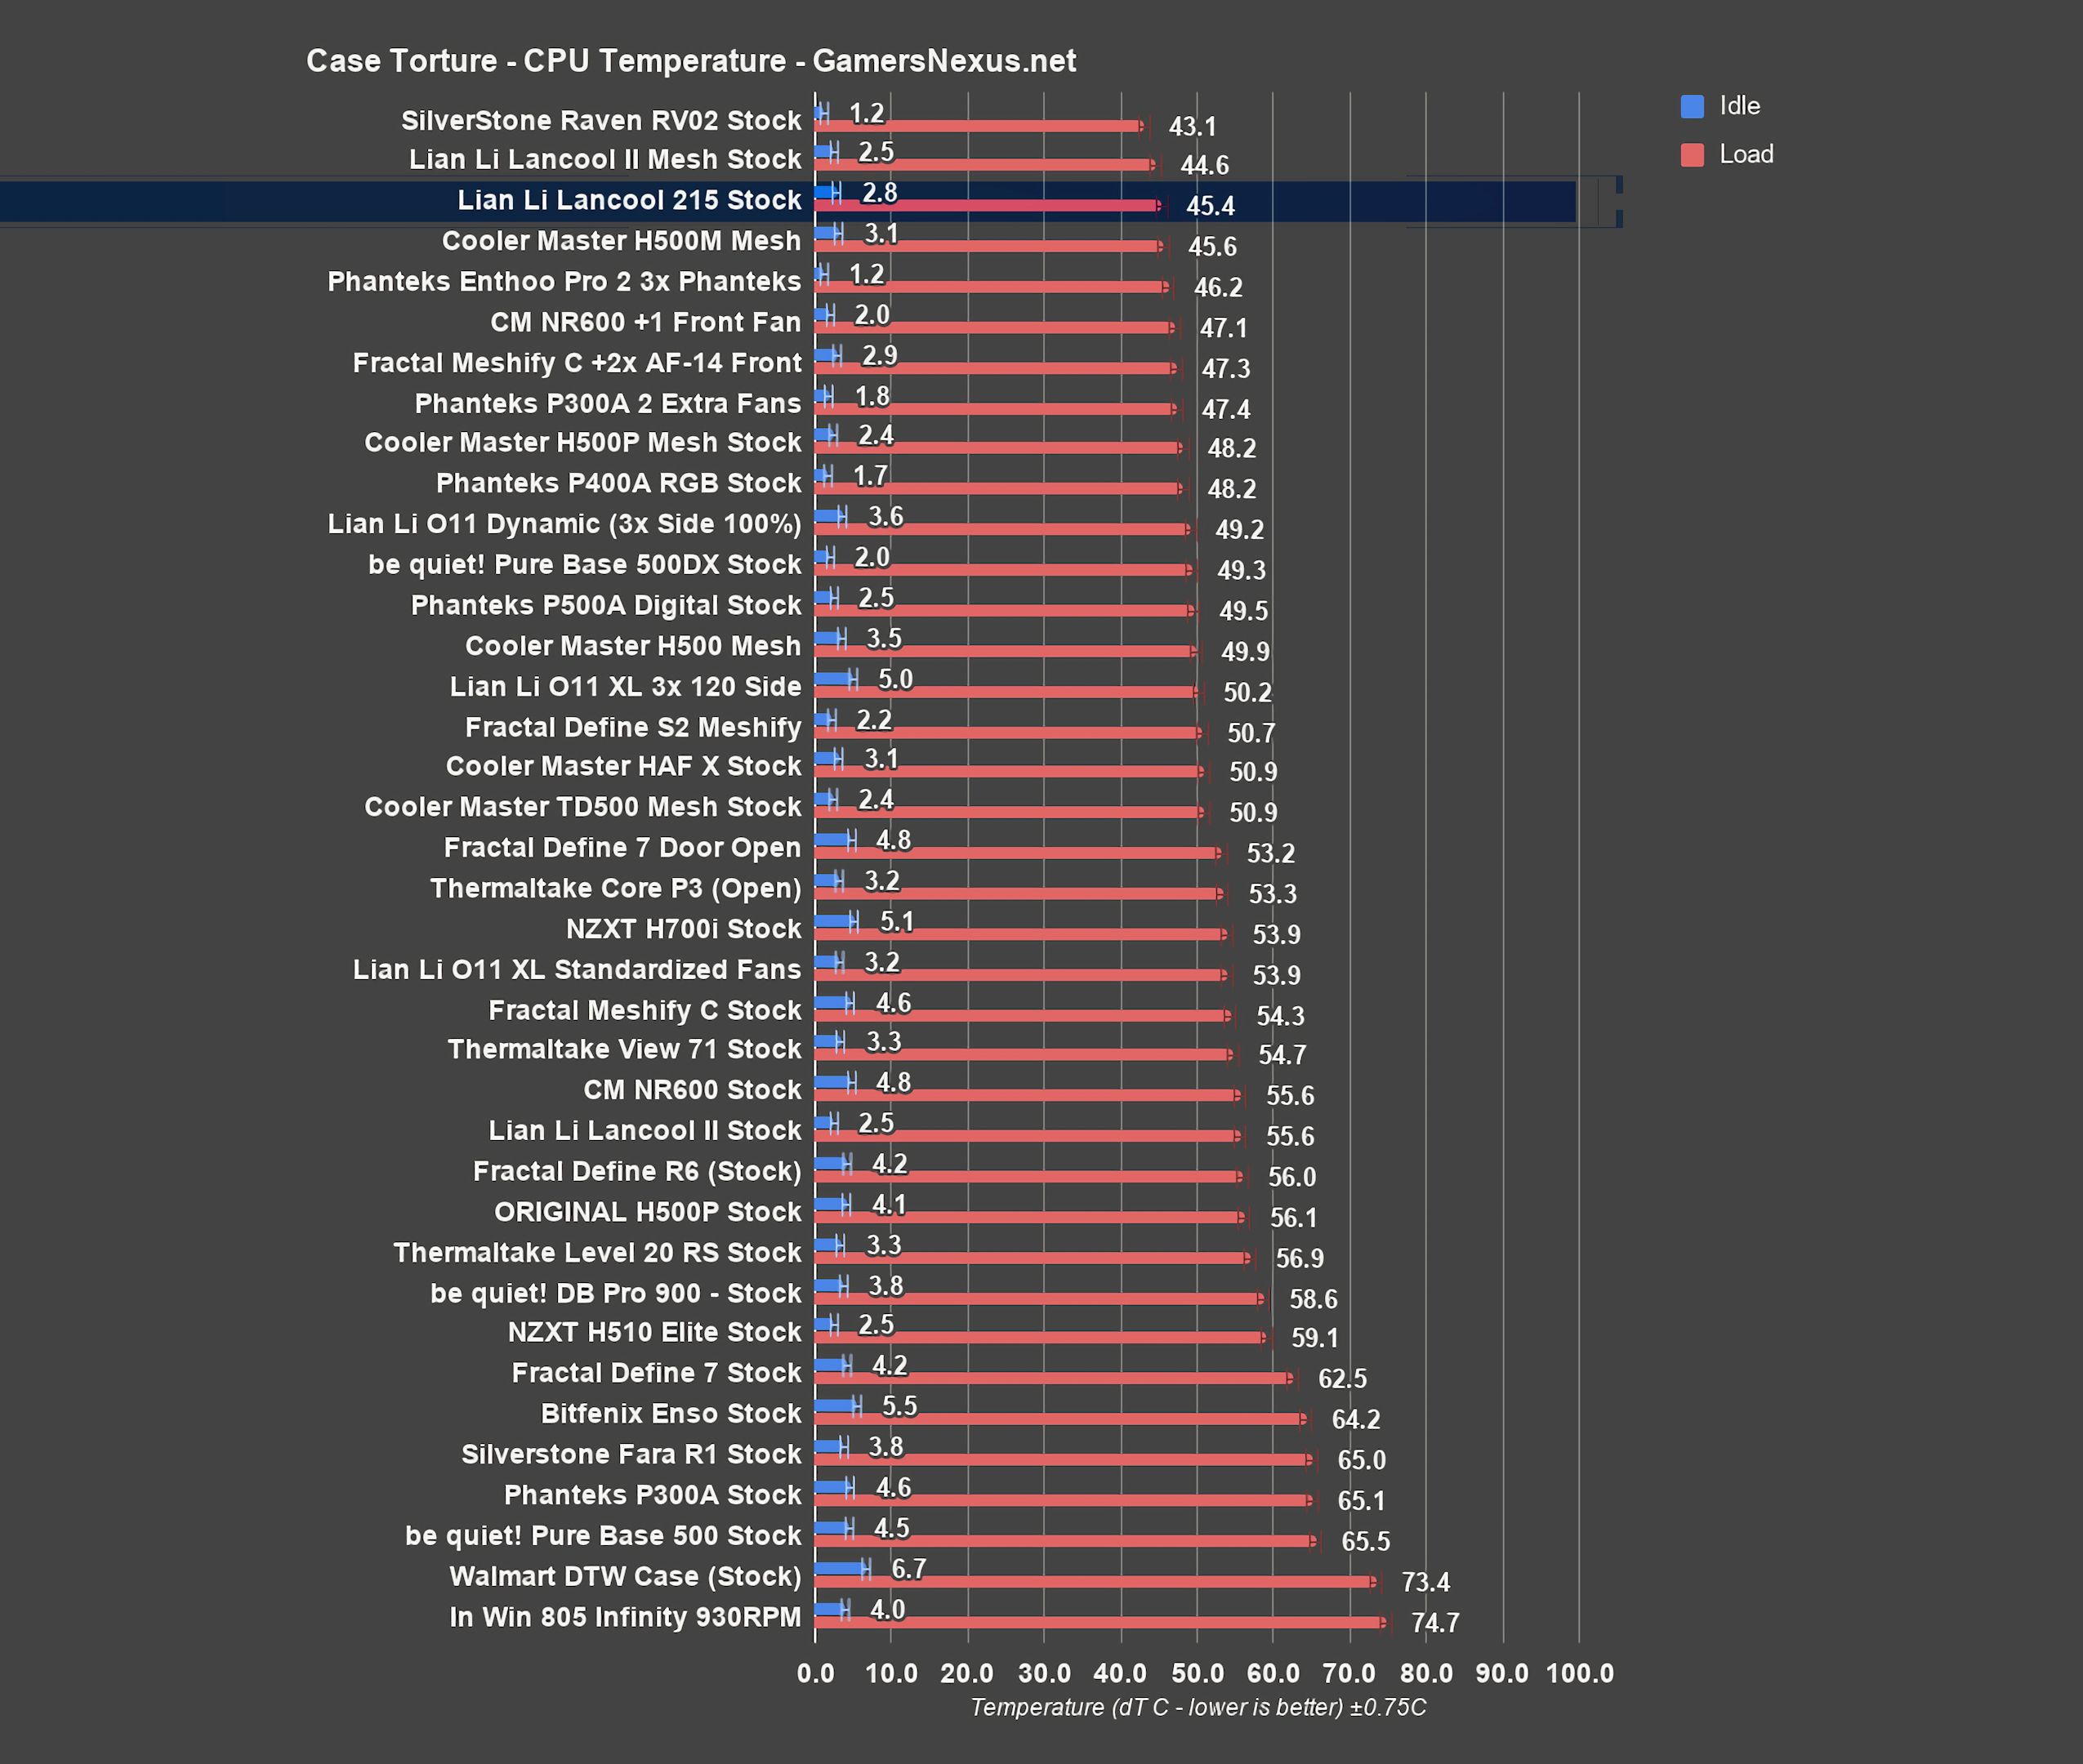
Comparatively, 45 degrees above ambient for the average CPU temperature positions this case well. It’s a few degrees below the P400A Digital’s average of 48 degrees. The Lancool 215 (and Lancool II) benefit from having a CPU exhaust fan--the P400A gets along just fine without it, but there’s no denying that an exhaust fan behind a tower cooler helps. “P400A killer” might be overly ambitious, but so far, the Lancool 215 is a high-performance alternative, and it does cost less than most of the cases that it shares space with on this end of the chart, like the Cooler Master H500M Mesh and the be quiet! 500DX.
GPU Torture
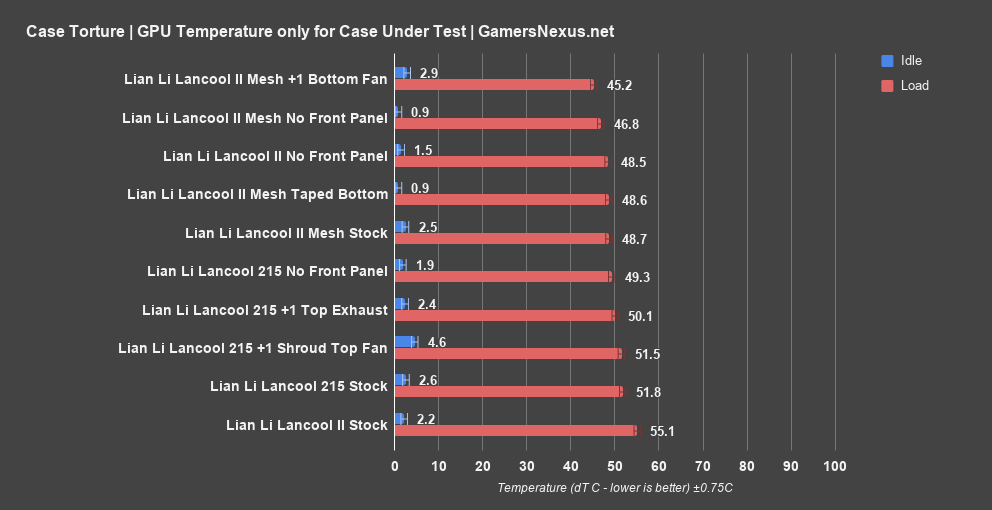
In the same test, the GPU averaged 52 Celsius above ambient. As with CPU temperatures, removing the front panel offered an improvement down to 49 degrees average, but still a small enough difference to indicate good front panel design. An additional top exhaust fan did help slightly as well, lowering the average to 50 degrees, while the shroud-top fan had no significant effect. We’re still interested in the idea of shroud-top fans, as we have been with all the Lancool cases, but this isn’t an effective implementation. Users might be able to get some use out of the mounting points for attaching things other than fans, but there just isn’t enough access to air to make them useful as intake slots. The Lancool II Mesh demonstrates its value here with an average of 49 degrees Celsius above ambient, while the original Lancool II is again much warmer at 55 degrees average. It’s fortunate for Lian Li that the more expensive Lancool II Mesh performs better, as they’re dangerously close to competing with themselves as well as Phanteks. There are some other quality-of-life advantages to the Lancool II Mesh, covered in our full review.
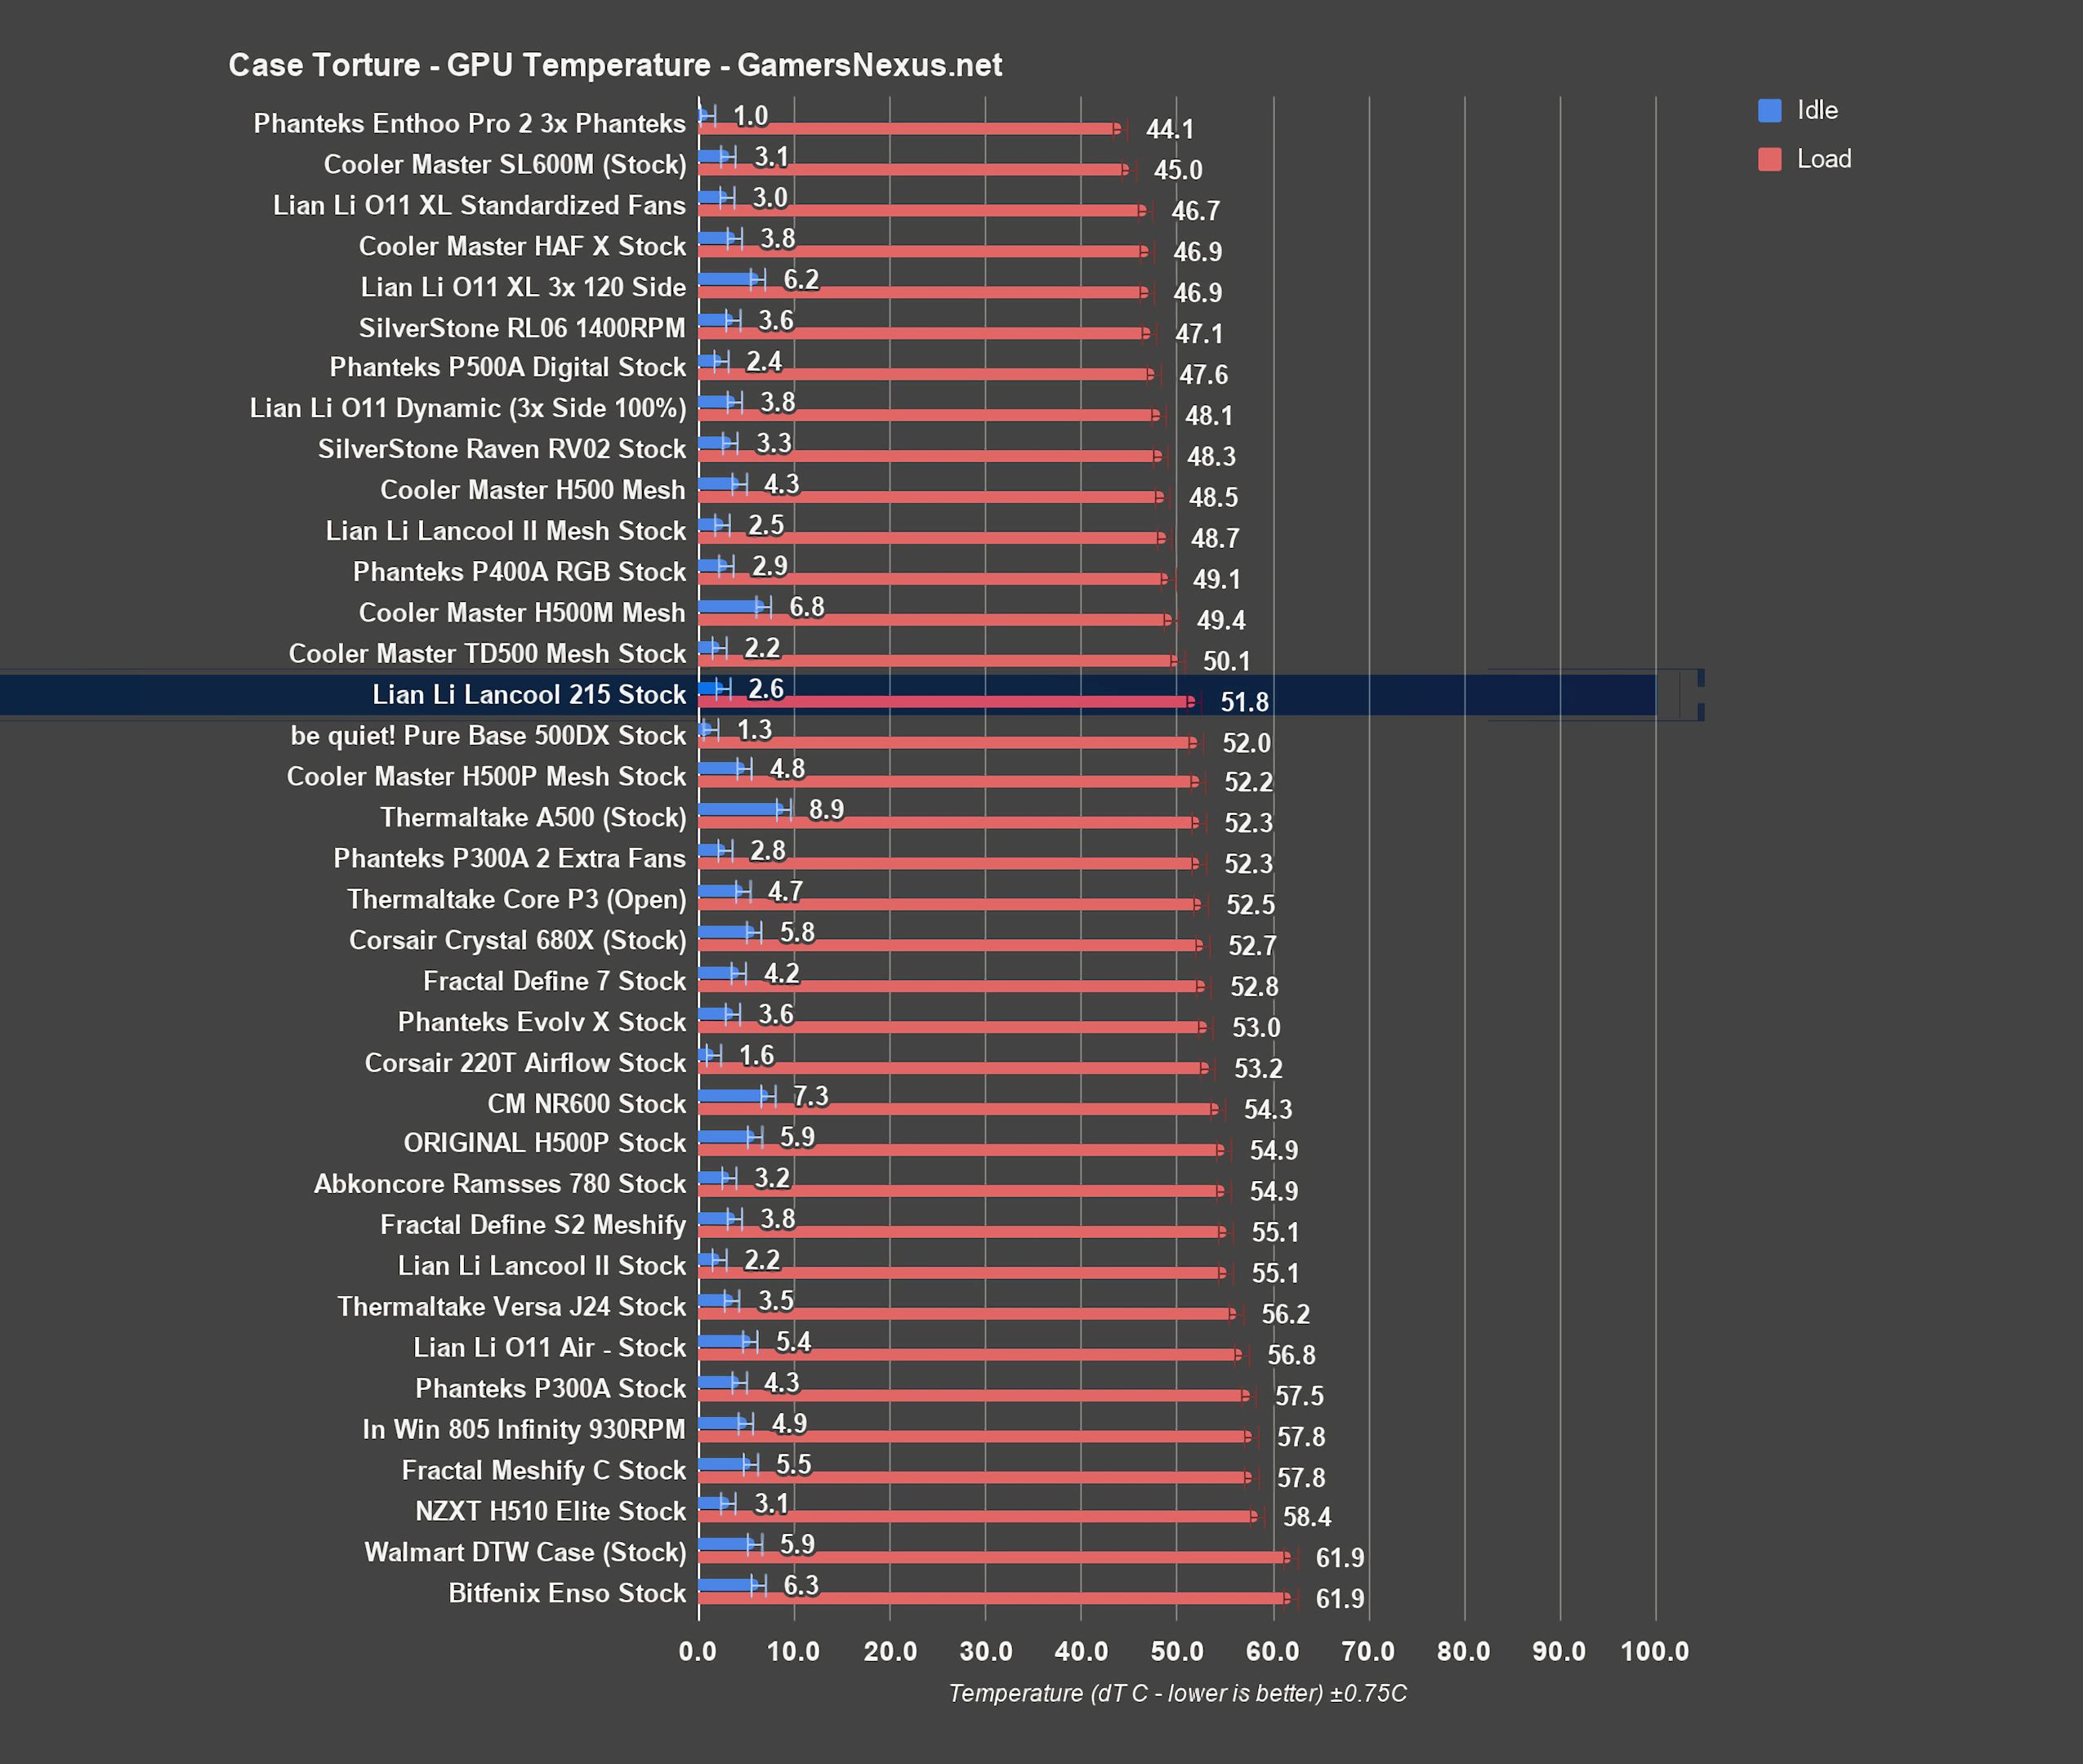
Compared to the rest of the stack, 52 degrees above ambient for an average GPU temperature is fine, but not nearly as impressive as the CPU temperatures were. It’s tied with the Cooler Master H500P Mesh and the be quiet! 500DX, but it’s beaten by the P400A’s 49 degree average and the TD500 Mesh’s 50-degree average. Part of the 215’s disadvantage next to something like the Lancool II Mesh may be the case’s relative narrowness--the cooler on the GPU we use for case testing is both extremely wide and exhausts air out to the side, so that the extra centimeter of clearance in the L2M between the glass side panel and GPU offers a real advantage.
3DMark
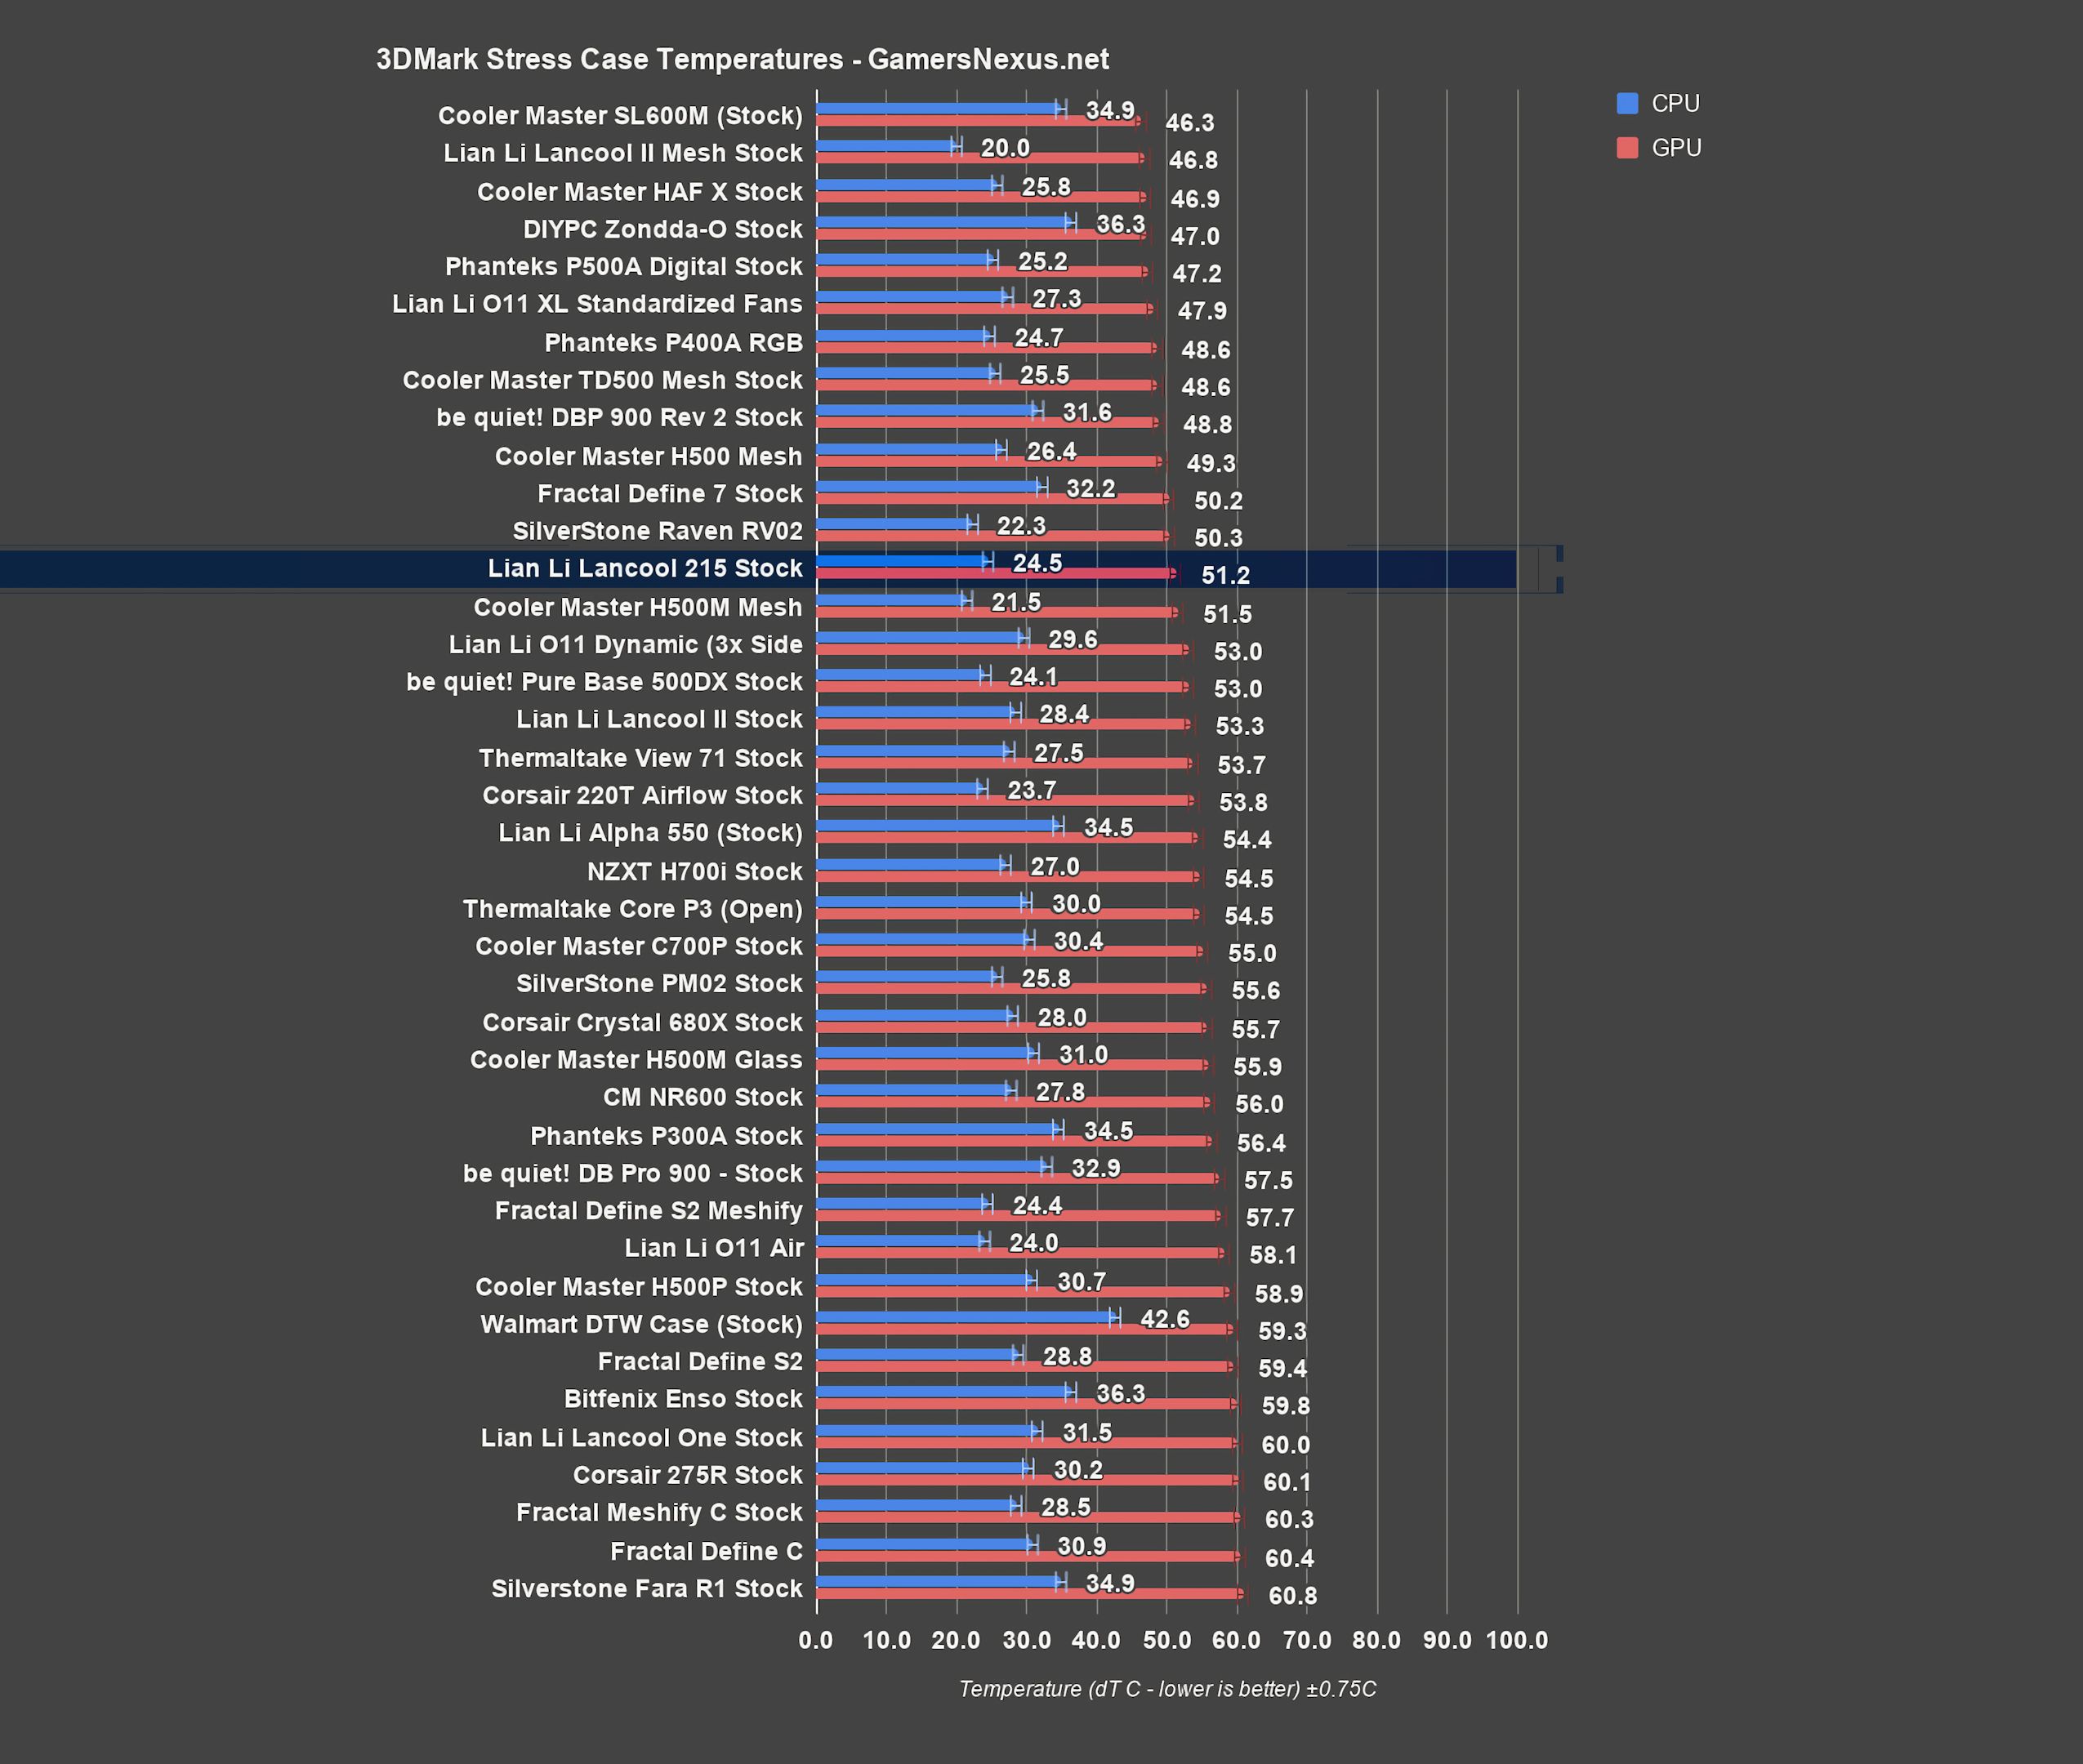
The 3DMark stress test is a way of confirming the GPU torture results, as well as seeing whether GPU temperatures are improved without interference from CPU exhaust. The average GPU temperature here rounds to 51 degrees Celsius above ambient, but it’s within one degree of the baseline average. The Lancool II Mesh widened the gap in this test with an average of 47 degrees above ambient. The 215 has proven to be a strong case overall so far, and these GPU temperatures only appear unimpressive when compared to the CPU temperatures. For a $70 case, this is good.
Blender
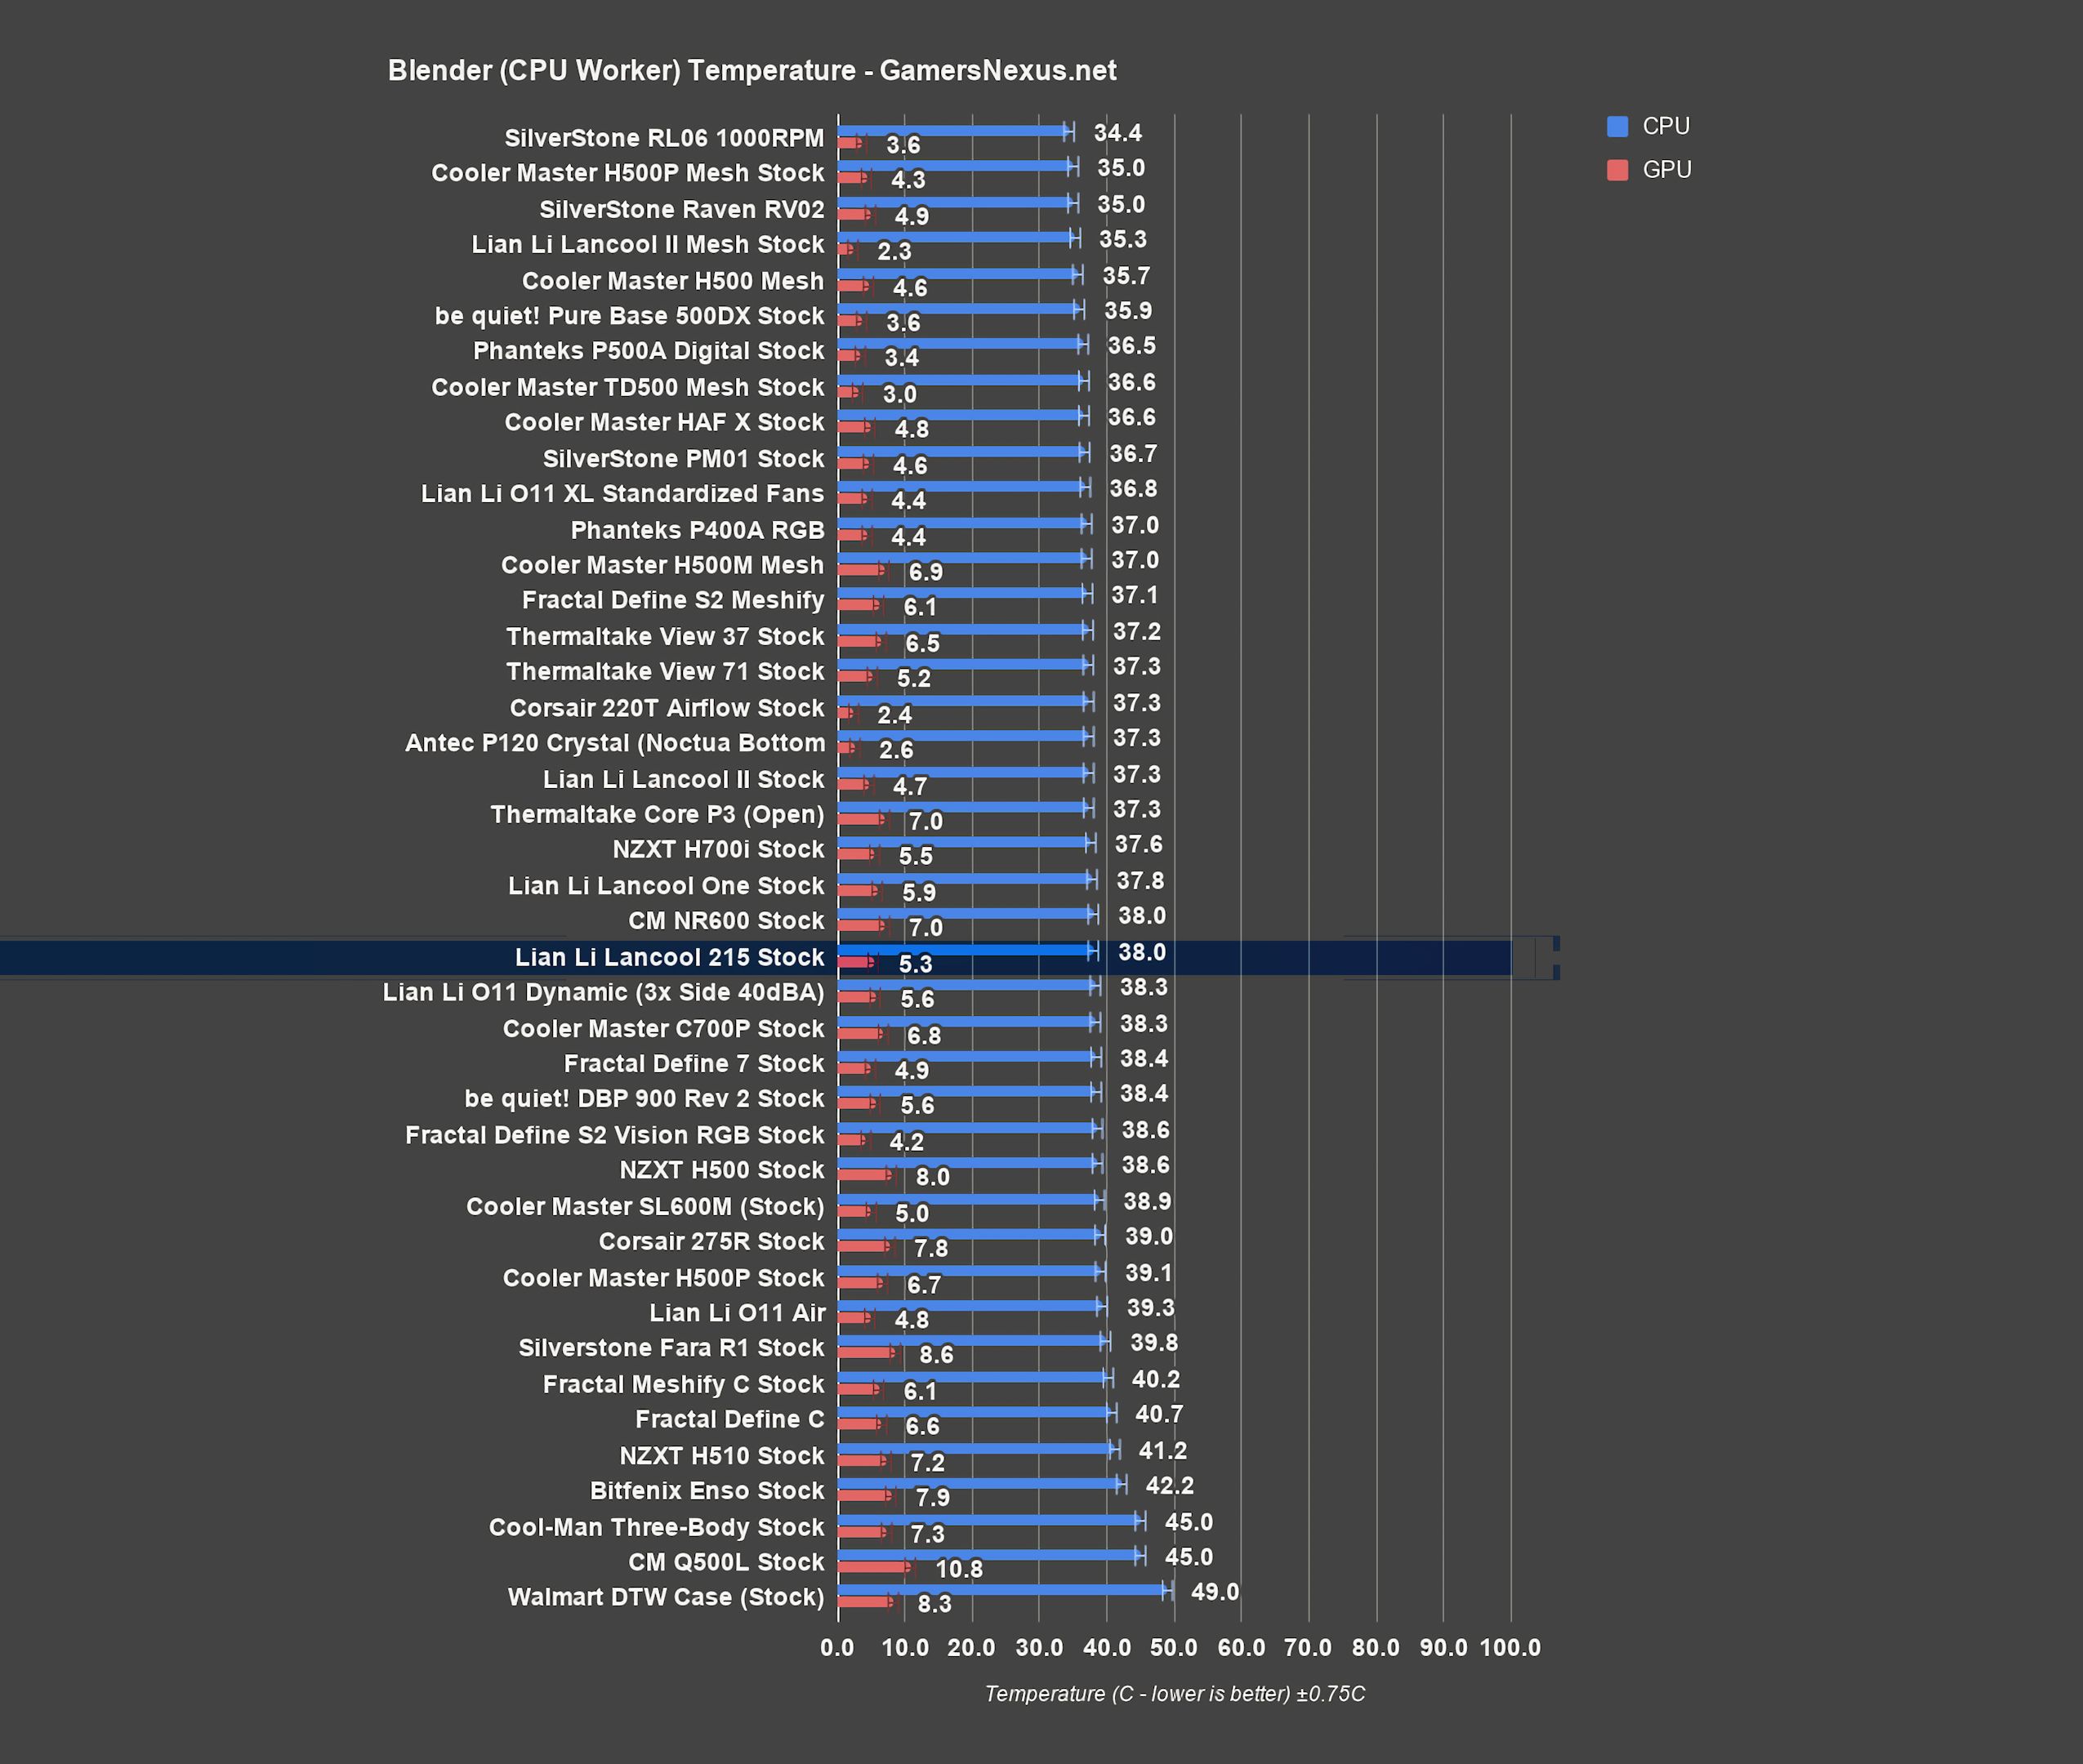
For Blender testing, we run the same render twice, once exclusively on the CPU and once on the GPU. For the first test, the CPU averaged 38 degrees Celsius over ambient, surprisingly much more towards the middle of the chart than the torture results, although competition is much tighter here and a difference of a fraction of a degree can create a deceptively large gap on the chart. It’s tied with the stock NR600, a few degrees warmer than the Lancool II Mesh’s average of 35.3 degrees.
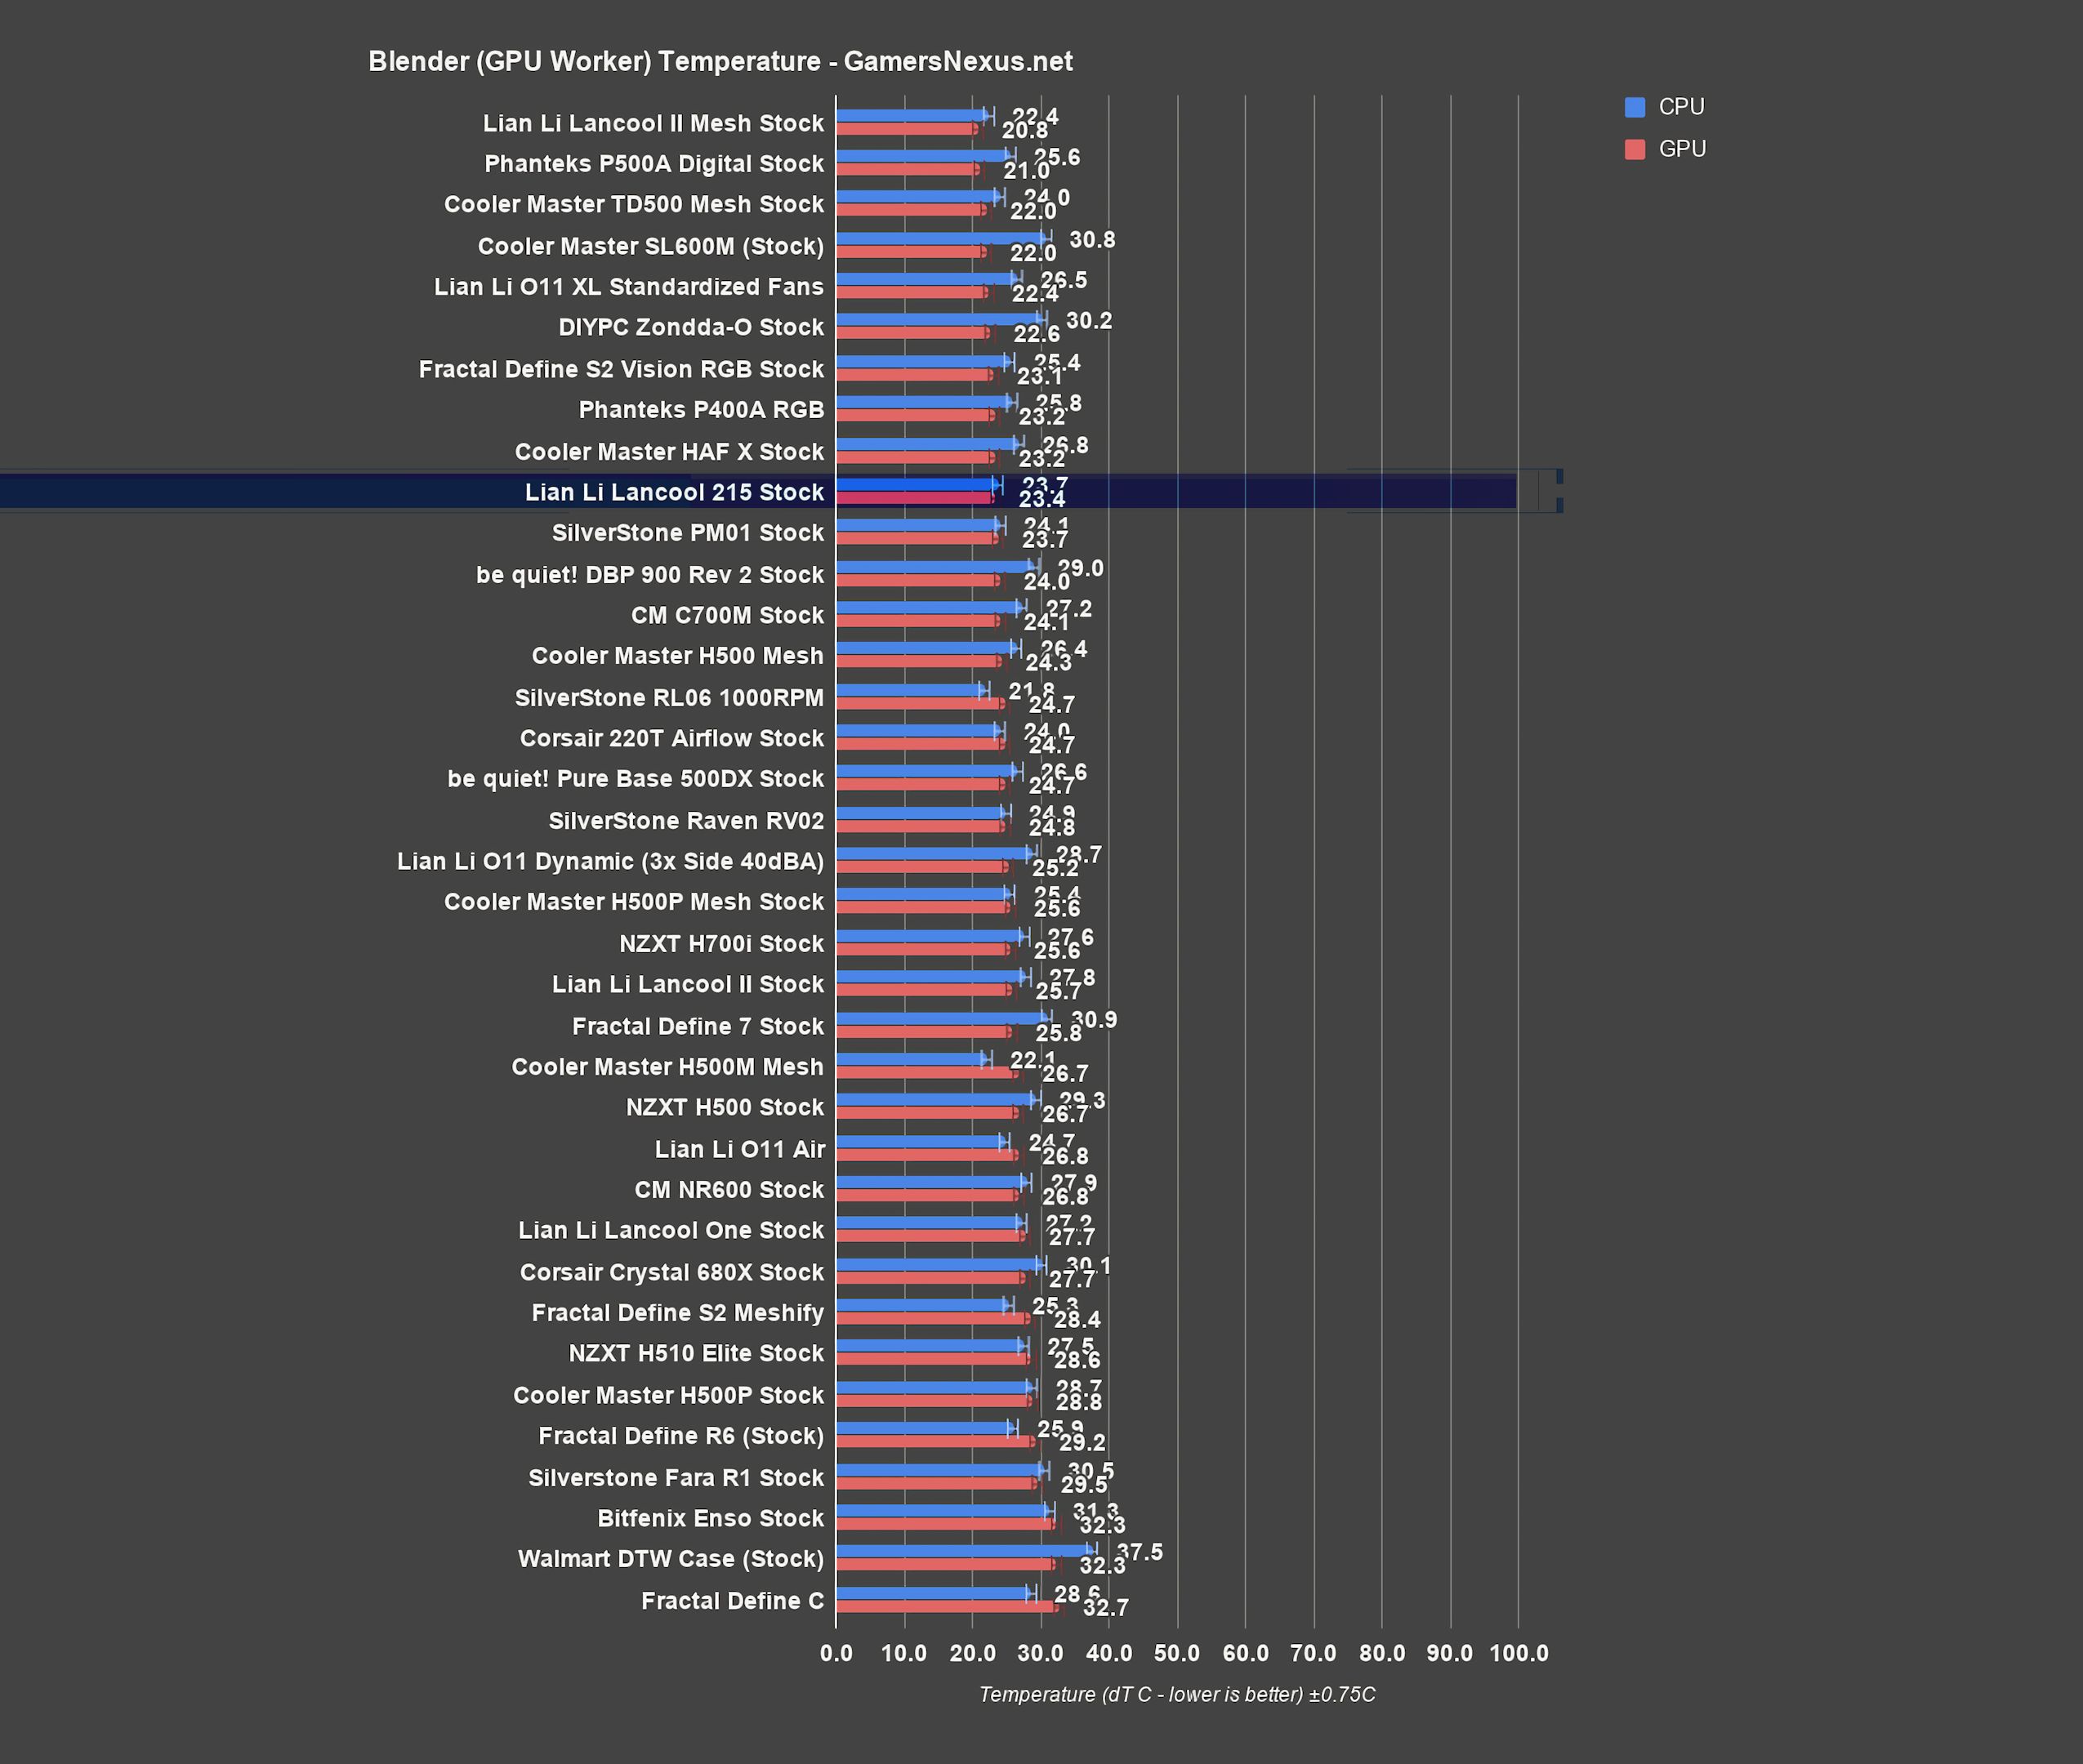
With the GPU render, average GPU temperature was 23.4 degrees Celsius above ambient, a slightly more favorable average compared to the rest of the chart than was seen in the torture and firestrike tests. The P400A was within error and tied at 23.2 degrees, while the Lancool II Mesh retained champion status at an impressive 20.8 degrees average.
Standardized Fans

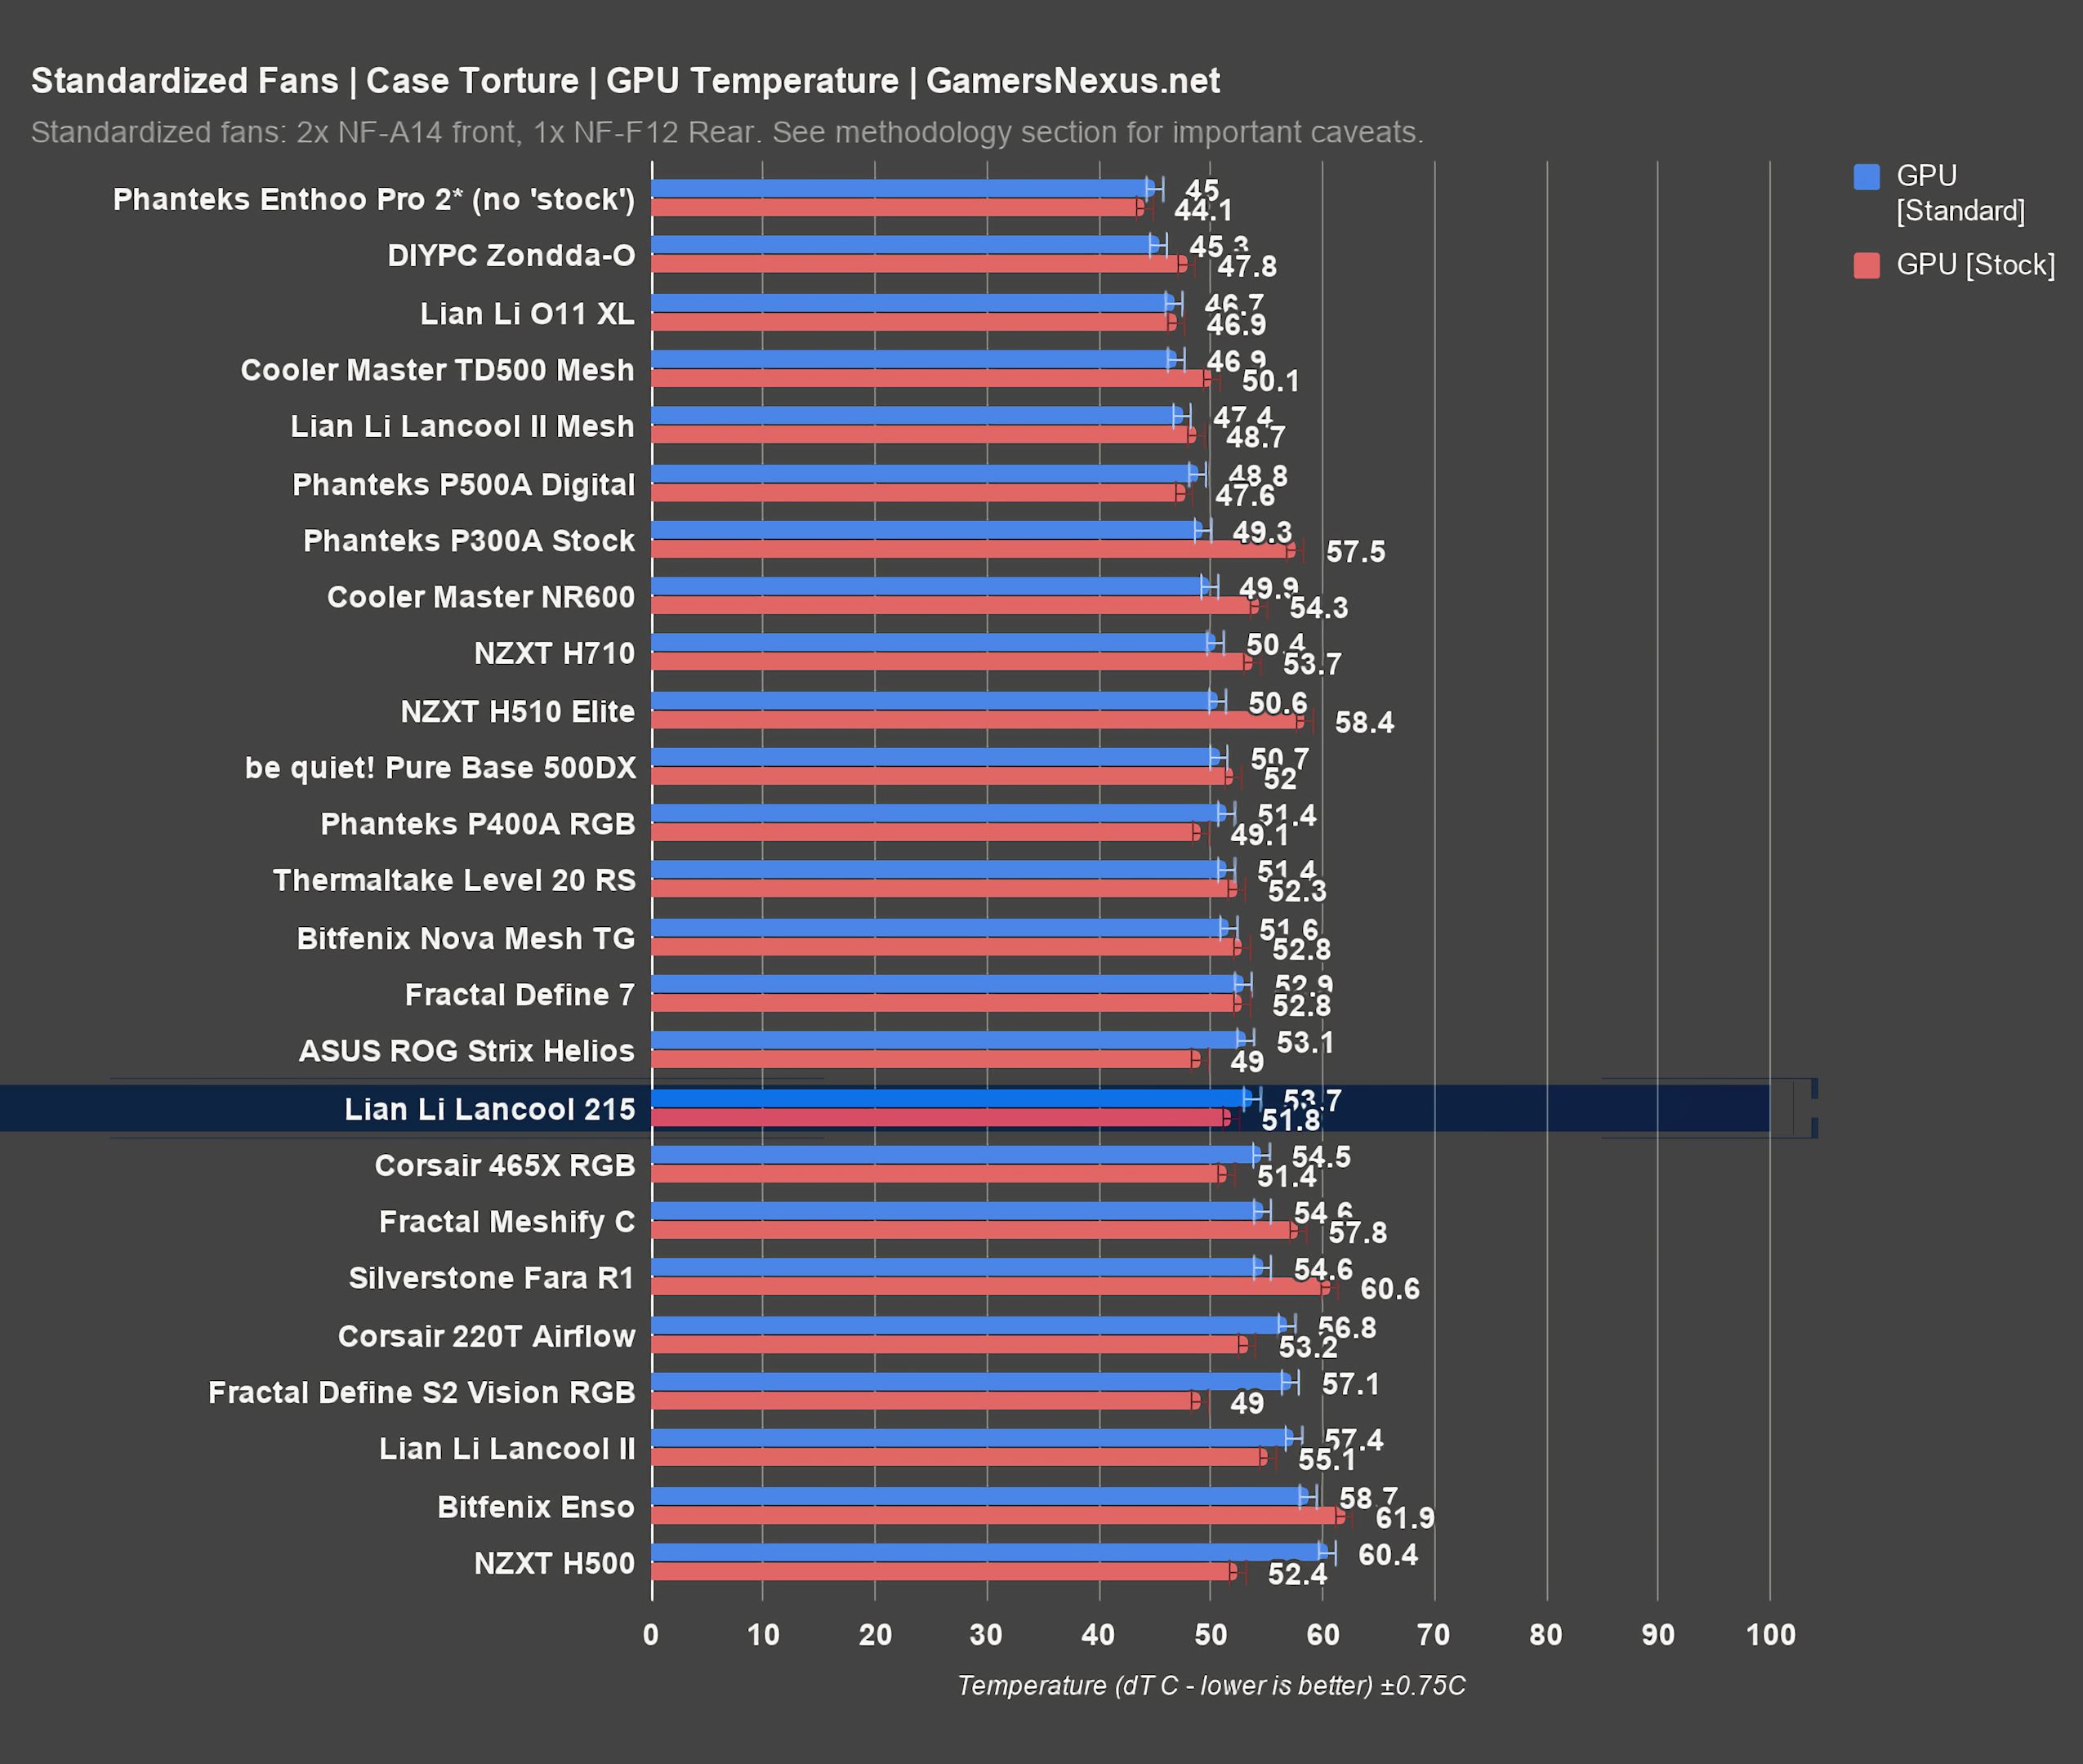
Beyond its usual purpose, here the standardized fan test gives us a chance to see what case thermals are like with “normal”-sized 140mm intake fans, so we can see whether Lian Li’s decision to use 200mm fans on a standard mid tower helped or hindered them. Average CPU temperature was 43 Celsius above ambient in this test, better than the 45 Celsius baseline and even the 44 Celsius average with the front panel removed. The smaller fans perform better here, but these are 1400-1500RPM Noctua fans and they only improved the CPU temperature by two degrees--we’d consider that a good mark for Lian Li’s stock fans. As for the rest of the cases tested with standardized fans, the 215 is tied here with the Lancool II Mesh, which makes sense--the front panel mesh densities of the 215 and the Mesh are similar, if not identical. That makes the 215 one degree cooler than the P400A and P500A Digitals here, right at the top of the chart for CPU temperatures again. This is a favorable case design for CPU air coolers, with plenty of ventilation on the top and rear faces of the case.
Average GPU temperature in this test was 54 degrees Celsius, warmer than the baseline average of 52 degrees. Even though the 215 isn’t chart-topping in the GPU cooling category, it’s evidently not the fault of its stock fans.
Noise & Noise Normalized
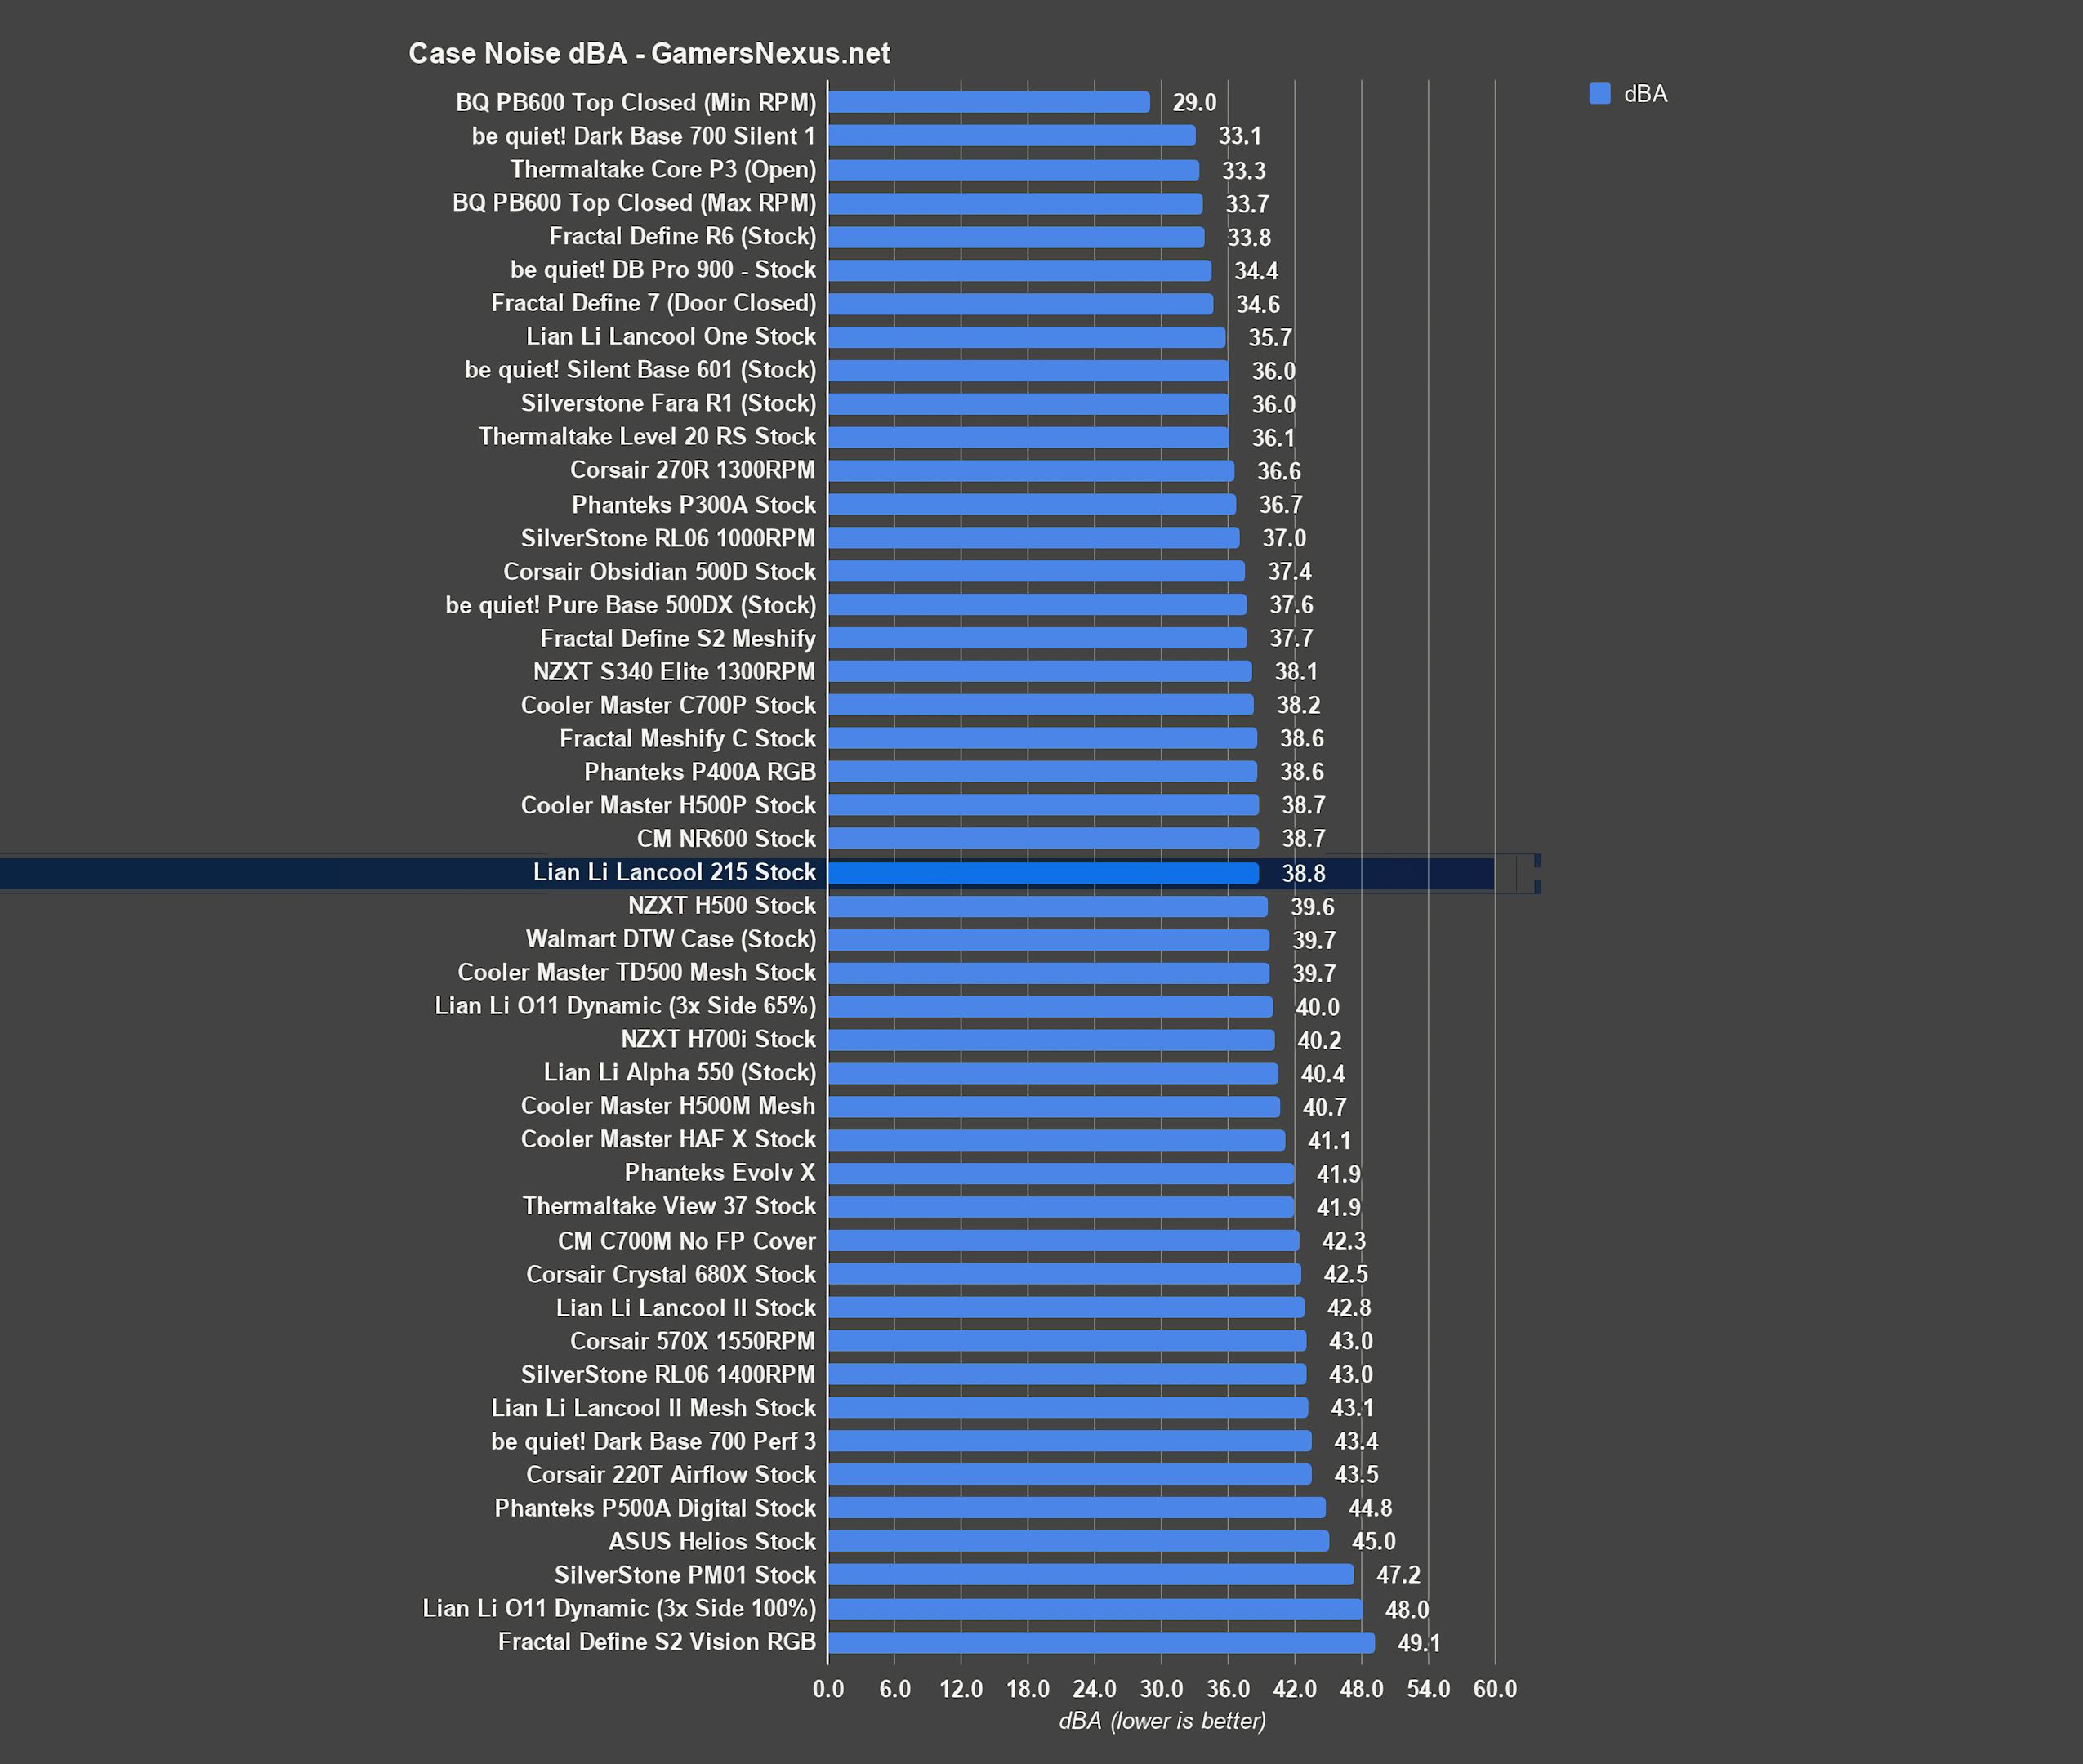
Stock noise level with all case fans at 100% was 38.8 dBA, barely an audible increase over the 36dBA threshold that we use for noise normalized testing. Reducing noise to that threshold required reducing the case fans to 75% speed in BIOS, but in reality that translated to a reduction of only about 100RPM for the big 200mm intake fans, down from about 700 to 600. One major advantage of extra-large fans is their silence, so this is a strong category for the 215--it might be stronger still if there wasn’t a bunch of steel behind the intake fans interfering with them.
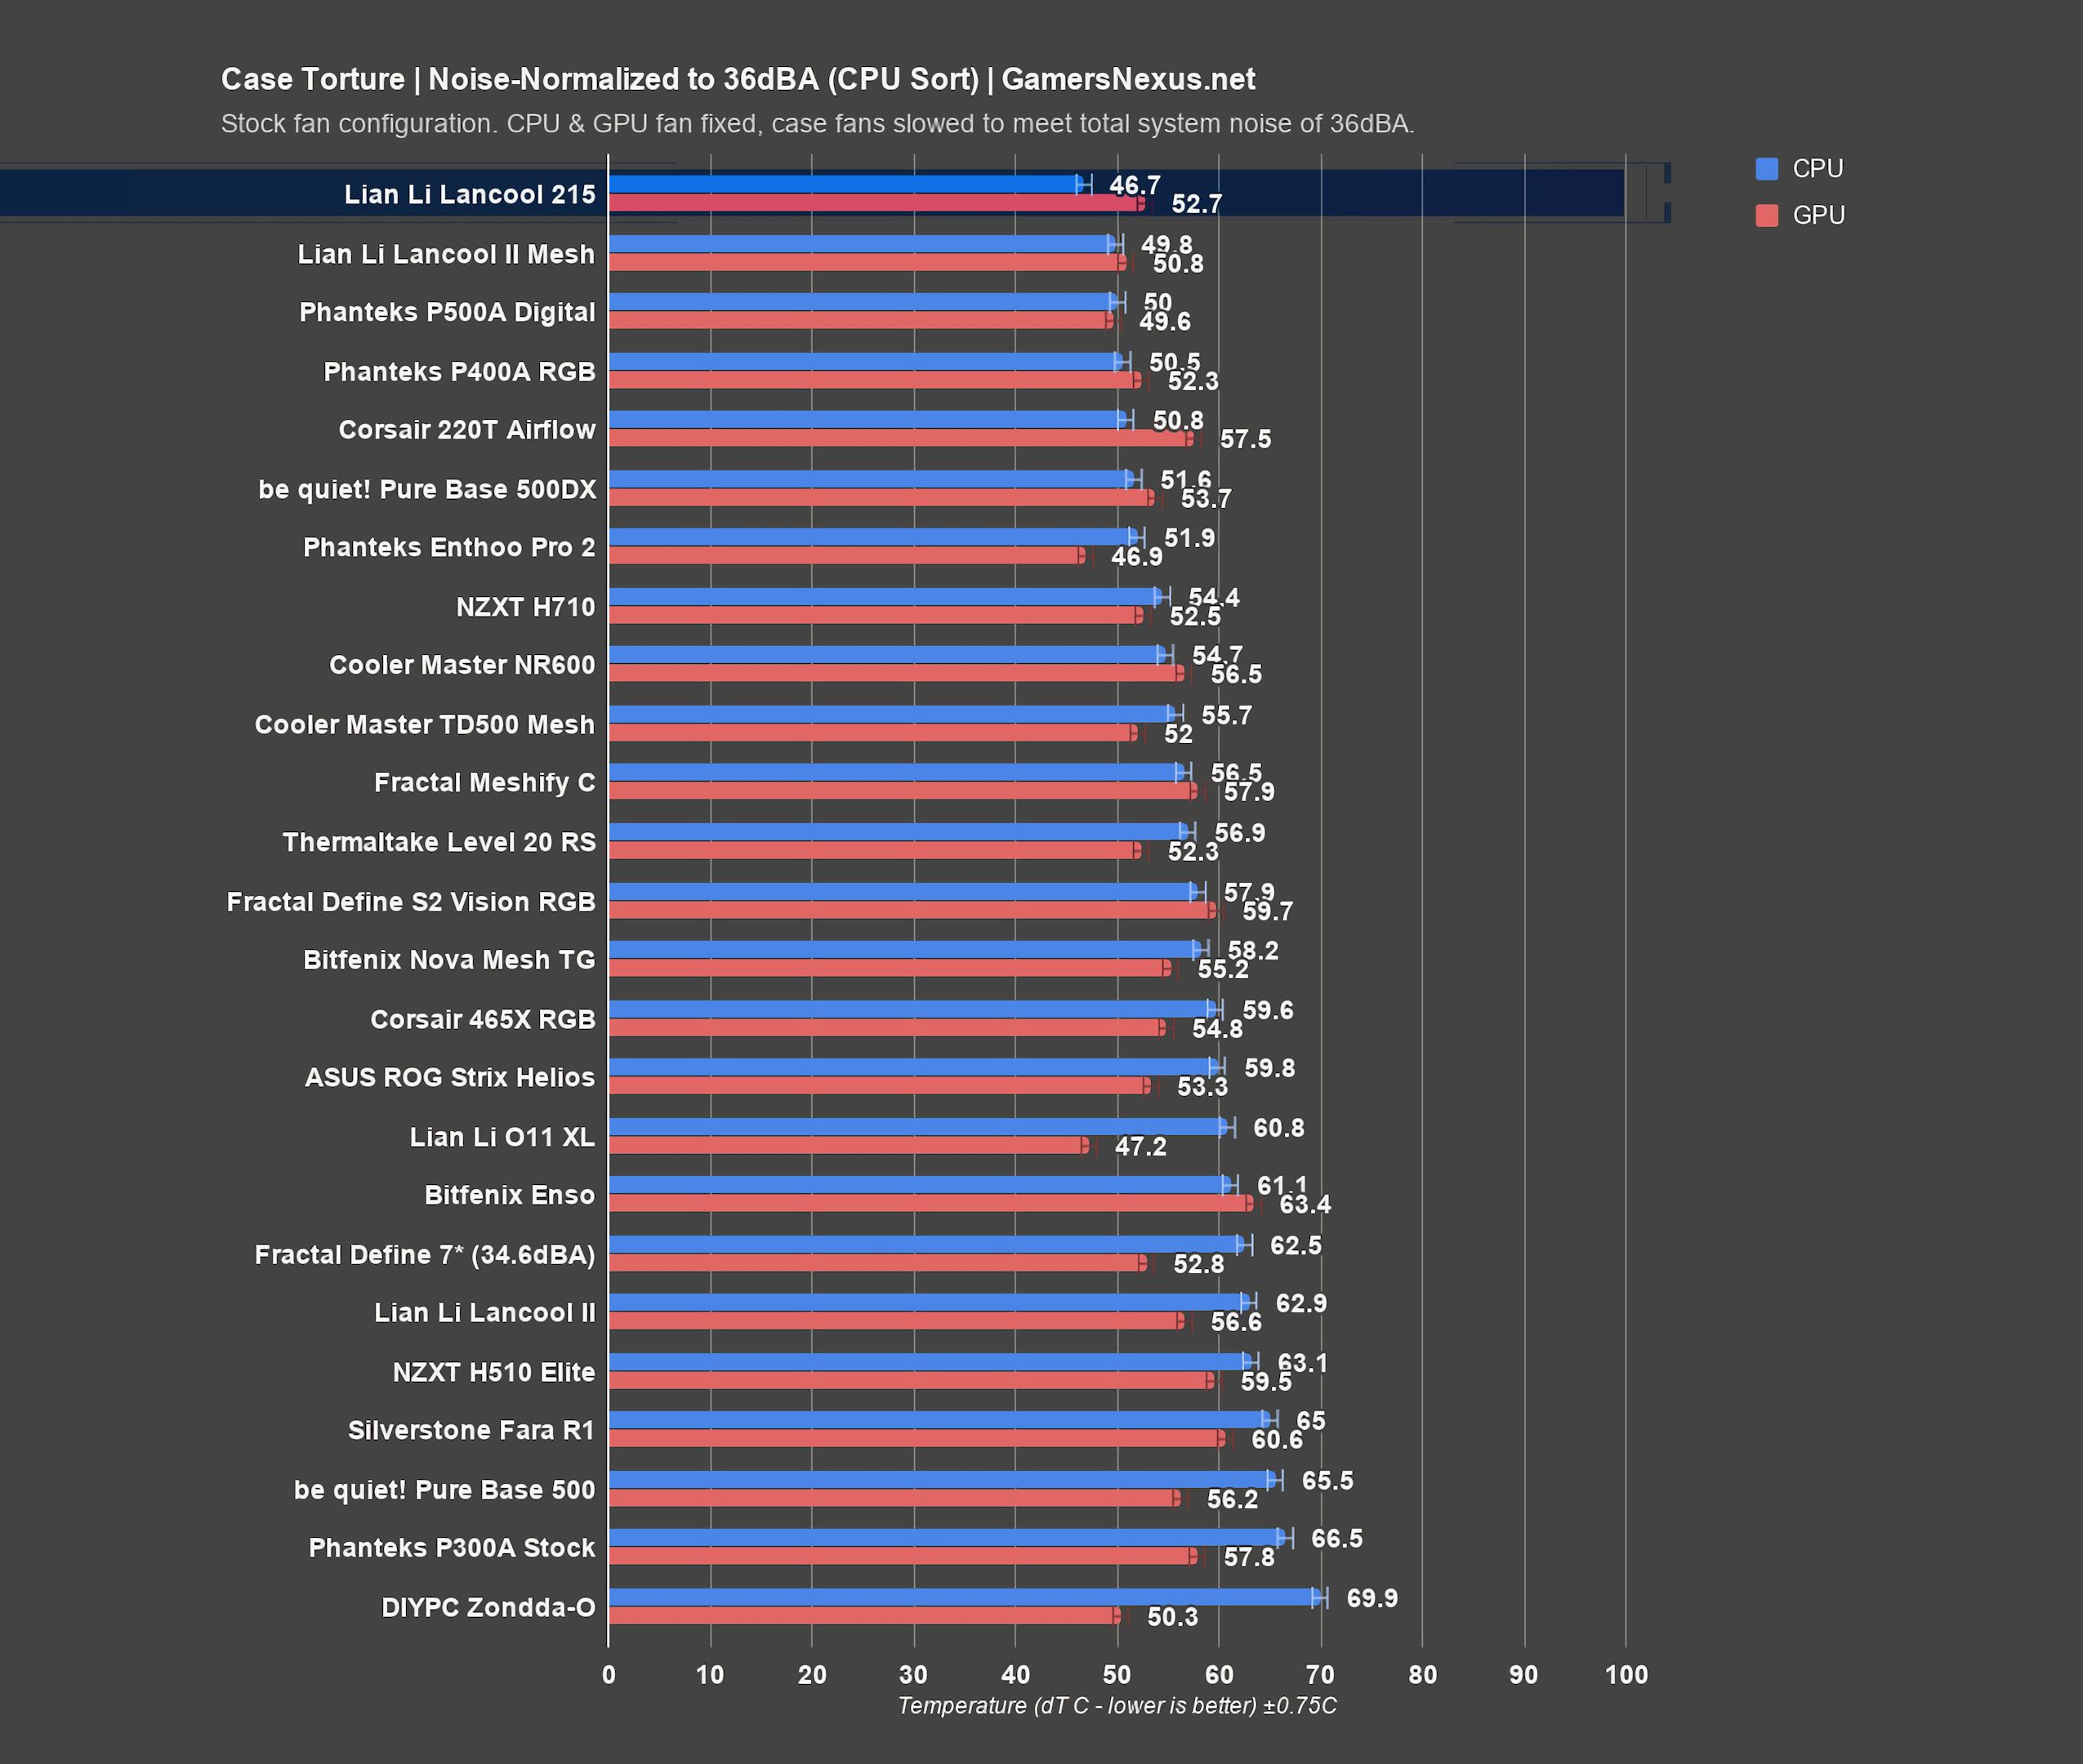
The increase in average temperatures was therefore fairly small, with the CPU delta up from 45 Celsius to 47. Compared to the other noise-normalized results, the 215 is extremely strong in CPU temperatures, besting the previous coolest average of 50 degrees scored by the Lancool II Mesh. This is still a relatively new test, so we don’t have cases as old as Cooler Master’s H500 Mesh included on this chart--we’d expect it to do very well here. In terms of silent CPU air cooling, the 215 is hands down the best case on this chart, beating out the Digital variants of the P400A and P500A.
The increase in the GPU delta was even smaller, up from 52 to 53 Celsius. That’s not much warmer than the P400A’s 52 Celsius average, but the Lancool II Mesh pulls ahead a little further at 51 Celsius average. Again, air-cooled CPU temperatures in the 215 are exceptional, while GPU temperatures are on the good side of average.
Conclusion
The Lancool 215 is a good budget case for air cooling. We wouldn’t recommend this case for serious liquid-cooling setups, because anything larger than a 280mm radiator would necessitate swapping out the front fans, and the front fans are the primary feature that differentiates this case from the other sub-$100 mesh-fronted cases that we’ve repeatedly recommended, especially the P400A Digital. Don’t try to stick a radiator behind the 200mm fans. Lian Li has done a good job of making this a budget version of their other Lancool cases, namely the Lancool II Mesh, and we’d strongly recommend checking out our coverage of that case to anyone that’s interested in this design but willing to spend about $30 more. For air-cooled systems on a tight budget, or systems with a single CLC, Lian Li has accomplished their mission of creating an excellent alternative to the P400A.
Host, Test Lead: Steve Burke
Editorial, Testing: Patrick Lathan
Video: Keegan Gallick, Andrew Coleman