Corsair Carbide 400C Review vs. S340, P400 - The Most Comprehensive Benchmark
Posted on
Teased at CES 2016, Corsair's 400C ($90) enclosure swiftly followed the chart-topping 600C, a case that dominated our GPU cooling charts. The 600C and 600Q cases instituted an inverted motherboard layout – rotating and flipping board installation such that the GPU is oriented “upside-down” – but stuck with tried-and-died optical drive support. To allow for an enclosure more fitting of the “mid-tower” form factor, Corsair removed the 5.25” support in its new Carbide Series 400C & 400Q cases, shrinking the height from ~21 inches to ~18.27 inches.
This review of the Corsair Carbide 400C benchmarks cooling performance for CPUs and GPUs, all accompanied by build quality and installation analysis. The 400Q is more-or-less the same case, just with the window removed and sound-damping material added.
Corsair 400C Gaming Case Specs
| Case | Carbide 400C | Carbide 600C |
| Motherboard Support | ATX | ATX |
| Cooling | Included: Front: 1x140mm Rear: 1x120mm Optional: Front: Total 2x140mm / 3x120mm Top: 2x120/140mm | Included: Front: 2x140mm Rear: 1x140mm Note: 600Q only 1x140 Front Optional 3x120/2x140 Bottom |
| Radiator Support | Front: 360mm Top: 240mm Rear: 120mm | Front: 240/280mm Rear: 140mm Bottom: 280/360mm |
| Expansion & Bays | 0x5.25” 3x2.5” 2x3.5” 7 expansion slots | 2x5.25” 3x2.5” 2x2.5/3.5” 8 expansion slots |
| Front I/O | 2xUSB3.0 2x3.5mm | 2xUSB2.0 2xUSB3.0 2x3.5mm 3-Speed Fan Controller |
| PSU Form Factor | ATX | ATX |
| Clearances | CPU Heatsink: 170mm PSU: 200mm GPU: 370mm | CPU Heatsink: 200mm PSU: 210mm GPU: 370mm |
| Dimensions | 425 x 215 x 464mm | 454 x 260 x 535mm |
| Price | $90 to $100 | $150 |
Corsair 400C Layout Walkthrough
Corsair's 600C took risks. The case uses an inverted motherboard layout, something discussed extensively in our previous review, and reminds us of a select group of Cooling Elite in this regard. But it's those same risks which increase the case's cost – new tooling often has that effect – and push some users away. For that, Corsair's designed its more compact Carbide 400C.
But the 400C isn't totally without risk: It's ditching the 5.25” optical drive bays, something NZXT famously did with its H440 and carried on with the competing-class S340.
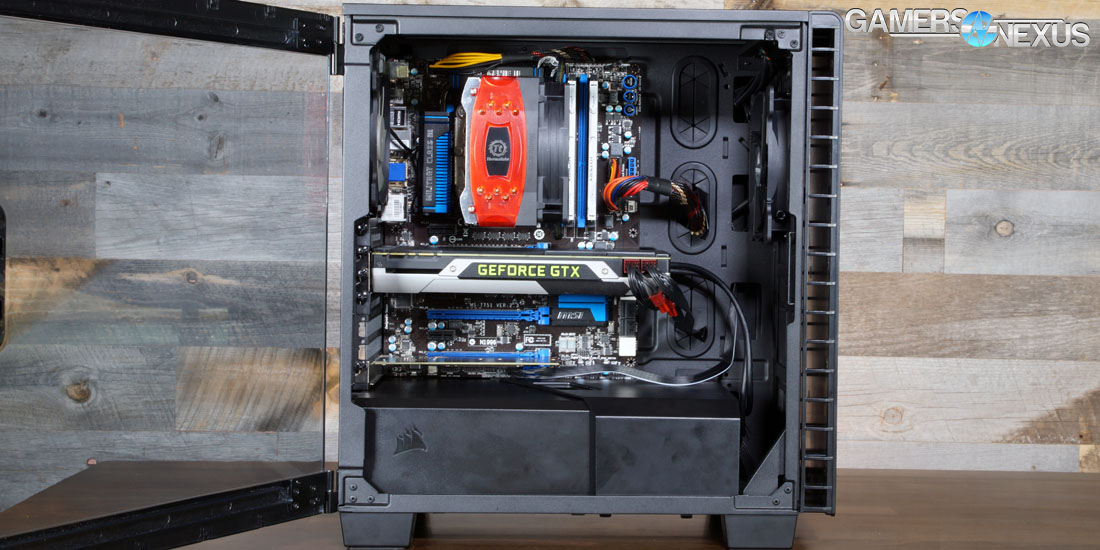
The 400C ditches its larger counterpart's inverted motherboard layout, instead reverting to familiar territory and exposing the board to the left side. Stock cooling is simplified to a set of two fans, one 140mm and one 120mm, shooting a straight line of air from the front-top and out the back-top. Because the 400C's PSU shroud has been shifted to the bottom, two top-mounted fans can be installed as optional add-ons or for large radiators. We tested a few non-stock configurations to determine which setup made the most sense when looking at CPU and GPU thermals; more on that below.
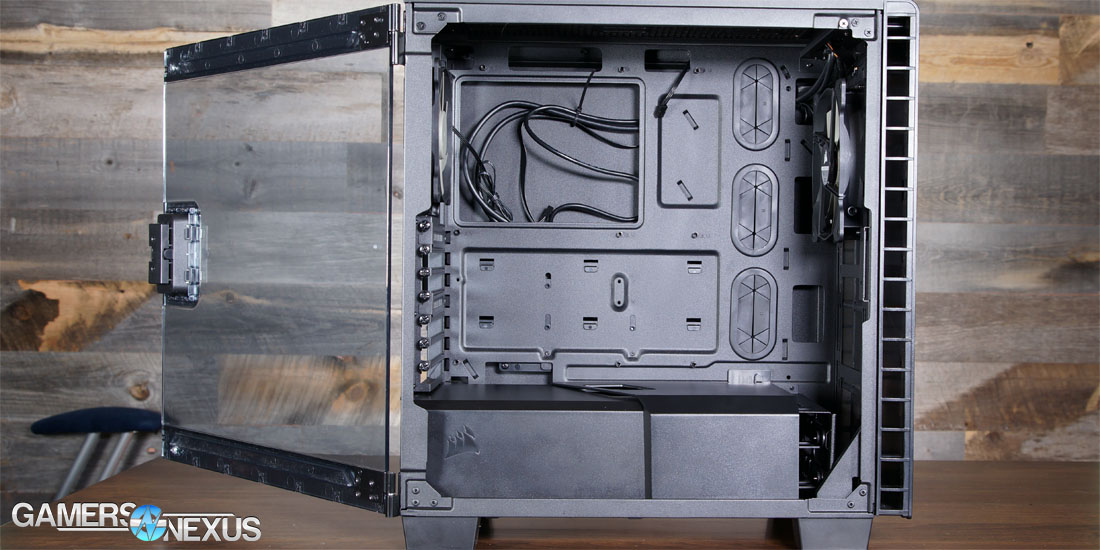
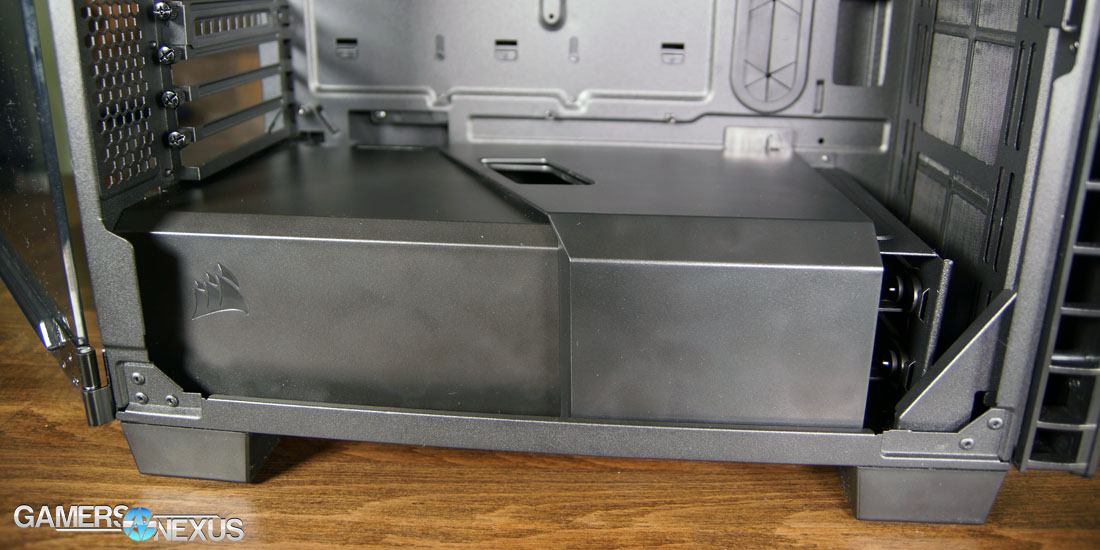
The motherboard tray is flanked by cooling and a power supply shroud. Corsair deploys a familiar design approach to the 600C's shroud, but the plastic cable concealer is functionally different. The 400C's shroud uses a two-piece, all-plastic system (sort of like the ancient HAF X). Pulled apart, there's better accessibility to removable, bottom-mounted drive cages and the PSU's cabling. A slot aligns between the separable shroud components, funneling direct-to-GPU wiring for cleaner cable management. This is something we complained about with the 600C, demanding a PCI-e hole be cut into the shroud, and is a noticeable improvement for clean cable management.
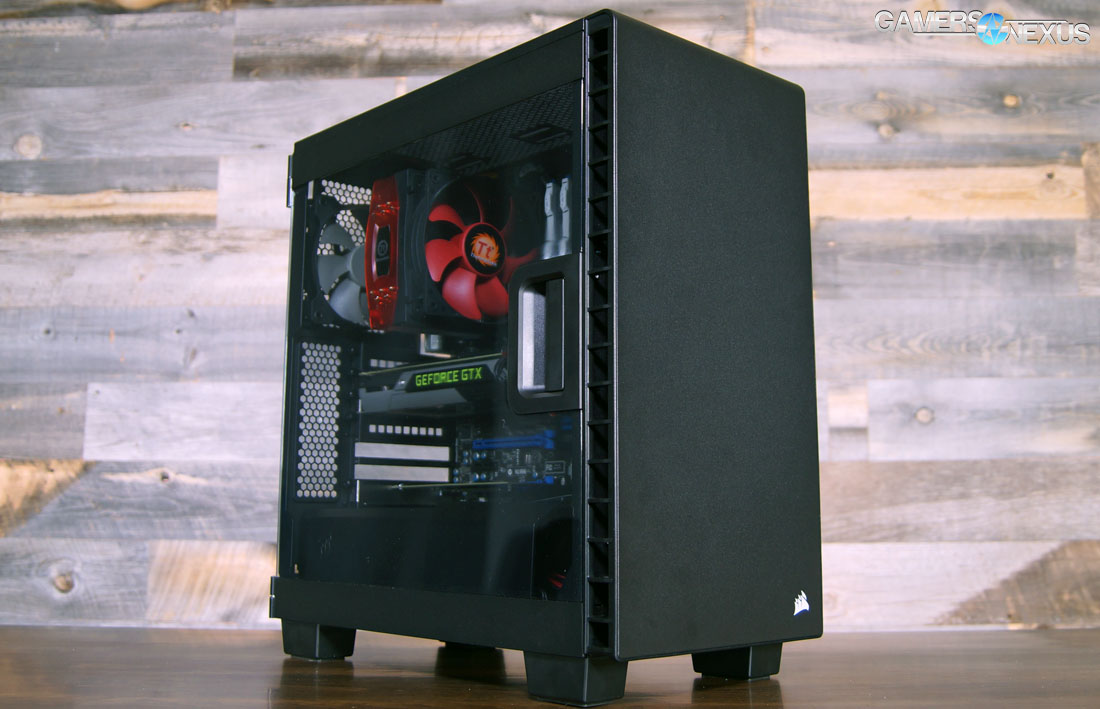
Externally, the case fronts Corsair's newest design choices, as introduced on the 600C. Flat, smooth paneling adorns the front, top, and right side of the case, exposing internals with a large side window (somewhat of a Corsair trademark, at this point). A fair mix of curves and hard edges comprise the case's exterior. As often stated in these reviews, we try to stay away from aesthetics for the most part – but it's worth some discussion. The decision to mix a curved top-front bezel with hardened edges elsewhere in the case, particularly the PSU shroud's jutting angularity, does feel a bit haphazard and lacking of cohesion in overall design. Small beans, really – the rest of the case is unoffensive and cleanly executed, which is about all we ask for in a case. Such is the nature of an objective, data-driven website. The photos and video b-roll should help you formulate opinions.
Corsair 400C Ease-of-Installation, Build Quality, & Cable Management
Installation is standard and without frills. Management room is ample, accessibility to oft hard-to-reach EPS 12V cables is made easy, and there's no fuss with core component clearances. The SSD sled has a clever mounting mechanism to make for easy extraction and addition of rear-of-tray SSDs, partly negating the issues we had with the front-side drive cages.
PSU mounting forgoes the externally-fitted bracket of the 600C, instead deferring to a standard set of four screws and rear-first installation. Despite support for 200mm PSUs, we had to remove the bottom hard drive cages to accommodate our 180mm test power supply. The PSU technically mounted, but cabling was hellish and pressed against the cages, making it effectively inaccessible and unsupported. We wish this would be made more clear in documentation, but PSUs nearing the 180mm form factors will likely force removal of bottom-mounted drive cages, lest cabling is kinked into uncomfortably angled/forced positions.
Another note on the PSU is its shroud: The 400C's PSU shroud forced us to route front I/O connectors above the PSU shroud (could not reasonably fit any other way – either due to length or the shroud's restrictive space). It's a bit uglier that way, but does work. Corsair should seriously consider lengthening front I/O cables or finding a better way to slot the front half of the PSU shroud into its rear structure. The PSU shroud runs so close to the FPC on the motherboard that cables can get pulled (undesirably), pinched, or completely forbid the locking action of the PSU shroud components. After fighting with it for a few minutes, we were able to assemble the shroud and route its neighboring cables with acceptable results – it's mostly aesthetic, after all – but life would have been much easier with the aforementioned changes.
Test Methodology
We tested using our Ivy Bridge test bench, detailed in the table below. This particular configuration has been retired and brought back into service, following some changes to our hardware availability. We’ve moved from a one-bench-fits-all setup (which uses a Haswell config in an mATX board) to multiple benches, one for mATX and small towers and one for ATX / mid-towers. This bench is for the latter.
Conducting thermal tests requires careful measurement of temperatures in the surrounding environment. We control for ambient – which is set to a constant 21C – and then produce charts using a Delta T(emperature) over Ambient value. This value subtracts 21C from the measured output, producing a delta report of thermals. AIDA64 is used for logging thermals of silicon components, including the GPU diode.
All case fans are manually configured to their maximum throughput using BIOS. If a fan controller is present, we opt-in and test on multiple settings. This forces testing of case fan performance in addition to the case's air channeling and airstream design. This also ensures minimal variance when testing, as automatically controlled fan speeds can reduce reliability of benchmarking. The CPU fan is set to use a custom fan curve that was devised in-house after a series of testing; setting the CPU fan to its maximum speed can limit the disparity shown from case-to-case as the CPU cooler is extremely efficient, and will create a ceiling for thermal performance if bottlenecked.
| Component | Courtesy Of | Price | |
| Video Card | GTX 980 Reference (PhysX) MSI GTX 980 Gaming | NVIDIA CyberPower | $500 |
| CPU | Intel i5-3570K @ Stock | GamersNexus | - |
| Motherboard | MSI Z77-GD65 | GamersNexus | - |
| Memory | HyperX 2x4GB 1866MHz Fury | Kingston | $45 |
| SSD | HyperX Predator PCI-e 480GB | Kingston | $400 |
| PSU | Enermax Platimax 1350W | Enermax | $200 |
| Case | This is what we're testing! | - | - |
Additional thermal testing was conducted for the Corsair 400C case – something we're continuing from the Manta – for determining the best possible fan configuration. The following matrix was engineered for positional testing of radiators and case fans in the 400C.
| Front | Top BACK | Top FRONT | Rear | Total Fan # | |
| Stock | 1x 140 intake | 0 | 0 | 1x 120 exhaust | 2 |
| +1x 140 Front | 2x 140 intake | 0 | 0 | 1x 120 exhaust | 3 |
| +1x 140 Front +1x 140 Top-Front [E] | 2x 140 intake | 0 | 1x 140 exhaust | 1x 120 exhaust | 4 |
| +1x 140 Front +1x 140 Top-Front [I] | 2x 140 intake | 0 | 1x 140 intake | 1x 120 exhaust | 4 |
| +1x 140 Front +1x 140 Top-Rear [E] | 2x 140 intake | 1x 140 exhaust | 0 | 1x 120 exhaust | 4 |
| +1x 140 Front +2x 140 Top [I] | 2x 140 intake | 1x 140 intake | 1x 140 intake | 1x 120 exhaust | 5 |
Our objective was to figure out the optimal number and orientation of case fans in the Manta and now the 400C.
The video card is configured to run at 55% fan speed at all times. Stock clocks are used. We employ an NVIDIA GTX 980 reference for the case test bench.
Prior to load testing, we collect idle temperature results for ten minutes to determine the unloaded cooling performance of a case's fans and air channels. Thermal benchmarking is conducted for twenty minutes, a period we've determined sufficient for achieving equilibrium. The over-time data is aggregated and will occasionally be compiled into charts, if interesting or relevant. The equilibrium performance is averaged to create the below charts.
Load testing is conducted using Prime95 LFFTs and Kombustor “Titan Lake” stress testing simultaneously. Testing is completely automated using in-house scripting, and executes with perfect accuracy on every run.
Note: We retested the Corsair 600C following some configuration changes to our test environment. We've introduced additional measurement tools, so these results are not comparable to our previous benchmarks. The NZXT S340, Corsair 600C & 400C, Rosewill Gungnir, and Phanteks P400 were all freshly tested with our new instruments.
Continue to the next page for thermal benchmarking and optimal case fan placement.
Note: No Objective dBA Analysis At This Time
We’ve said this a few times, but it’s worth repeating: We do not presently test for noise emissions / decibel levels on products. It’s something we’re passively exploring, but dBA testing is not trivial, requires a stable environment with a known noise floor, and requires expensive equipment and training. We may be able to sort out the math and the methodology, but there’s still that environment limitation.
Our approach to methodology is underscored by one point: If we can’t do it consistently and confidently, we don’t do it at all. For noise, we aren’t yet confident in a reliable methodology given our setup, so we don’t test noise. Subjectively, the 400C is fairly noisy at the higher fan speeds, but is perceptibly the same as the staple S340 enclosure. A “Q” model of the Carbide 400 exists (400Q), which eliminates the side window in favor of additional foam padding for noise control.
Corsair 400C Thermals over Time Benchmark – Optimal Fan Configuration
We're starting strictly with the Carbide 400C's data, then will move into comparative analysis versus other enclosures. For 400C testing, as we did with the Manta, we tested most possible / realistic fan placement configurations within the case. This includes these setups:
| Front | Top BACK | Top FRONT | Rear | Total Fan # | |
| Stock | 1x 140 intake | 0 | 0 | 1x 120 exhaust | 2 |
| +1x 140 Front | 2x 140 intake | 0 | 0 | 1x 120 exhaust | 3 |
| +1x 140 Front +1x 140 Top-Front [E] | 2x 140 intake | 0 | 1x 140 exhaust | 1x 120 exhaust | 4 |
| +1x 140 Front +1x 140 Top-Front [I] | 2x 140 intake | 0 | 1x 140 intake | 1x 120 exhaust | 4 |
| +1x 140 Front +1x 140 Top-Rear [E] | 2x 140 intake | 1x 140 exhaust | 0 | 1x 120 exhaust | 4 |
| +1x 140 Front +2x 140 Top [I] | 2x 140 intake | 1x 140 intake | 1x 140 intake | 1x 120 exhaust | 5 |
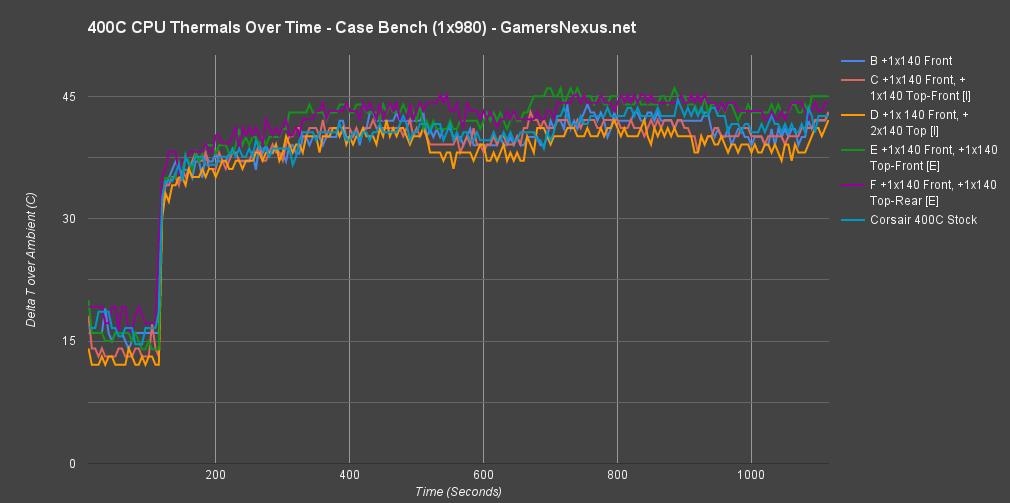
The above charts show thermals over time (TOT) for CPU and GPU temperatures. It's not quite as easy to read as the equilibrium charts – immediately below – but gives an idea for ramp-up and cool-down time of the cases. The CPU chart is zoomed-in a bit more to help differentiate the data, so our Y-axis limit is only 50C in this instance (just a note, for those who might be confused by the change of scale).
There's not a massive difference between any of these results except for in a few key places – we'll talk about that in the next chart section.
Corsair 400C Thermals at Peak Load – Optimal Fan Configuration
The equilibrium chart above paints a clearer picture as to performance.
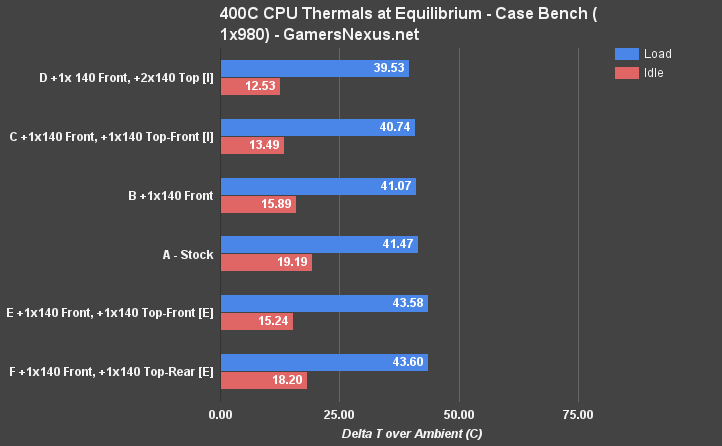
Configuring everything as intake, unsurprisingly and in-line with previous case tests, benefits the CPU markedly. Top intake is obstructed in this case, but it still performs significantly better than top exhaust (for tower-cooled CPU thermals). Our range for these results is just 4.07C (43.6C to 39.53C), so all-in-all a fairly inconsequential performance impact – but the world of cooling is often a fight for single-degree gains. The stock configuration performs only marginally worse than mounting an additional 140mm fan in the front (aligned with the GPU – so that makes sense), and optimal CPU cooling scenarios all center around intake-heavy setups (with 1x rear fan still mounted). Top exhaust setups actually end up siphoning fresh, cool intake from the CPU before the air ever hits the tower cooler, effectively suffocating the CPU for a constant flow of cool air.
Not a major difference overall, but we'd suggest opting-out of top exhaust for tower cooler scenarios. It makes more sense to take your extra fan and put it somewhere else – like front intake or, maybe, top intake. Let's look at GPU thermals before making conclusions, though.
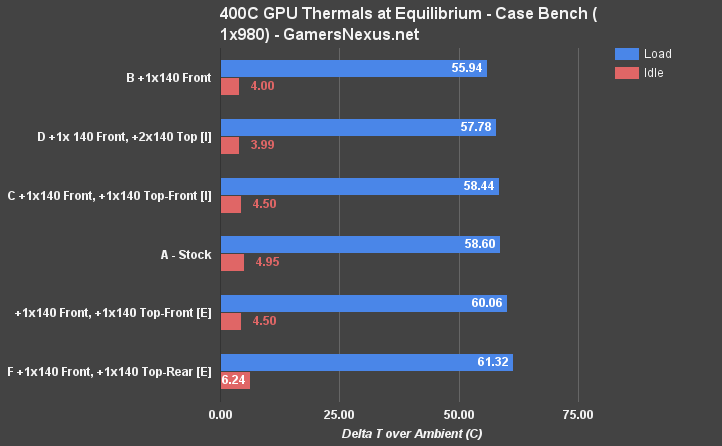
Despite its insignificance for CPU thermals, adding the lower-mounted 1x 140mm fan (intake) noticeably improved GPU cooling performance within the 400C, a delta of 2.66C (4.64% difference). This is the best possible configuration for raw GPU thermals (note: ours uses a blower fan), and the one we'd probably recommend as a go-to. Interestingly, dumping more cool air into the system (from upstairs) doesn't further improve GPU thermals; there's an improvement over stock, but GPU temps actually increase from the +1x 140mm front / 0x top configuration. This is because the top intake fans assist in dissipating heat from the tower cooler, but as a result, push that heat down and into the back of the GPU. As with the Manta tests, there's a trade-off to be made between GPU and CPU performance.
Top exhaust fans again damage cooling potential. This is in part because we used fairly powerful Corsair 140mm fans (the same as used in the 600C), which then go on to 'steal' air from the core components before the air can reach the heatsinks.
If you're adding one fan, we think it makes the most sense to place that fan in the front-bottom slot. CPU cooling is about the same, but GPU cooling sees a couple degrees improvement and has no perceptible downside.
Corsair 400C Thermals at Peak Load – 400C vs. S340, Phanteks P400, Others
Note: We retested the Corsair 600C following some configuration changes to our test environment. We've introduced additional measurement tools, so these results are not comparable to our previous benchmarks. The NZXT S340, Corsair 600C & 400C, Rosewill Gungnir, and Phanteks P400 were all freshly tested with our new instruments.
Our comparative testing mostly lines-up similarly classed cases: Mid-towers with PSU shrouds, a couple fans, primarily solid paneling (read: minimal intake meshing), and priced under $100. The 600C is the only case that doesn't necessarily fit here – it's a bit more expensive at $150 – but has been included for familial comparisons.
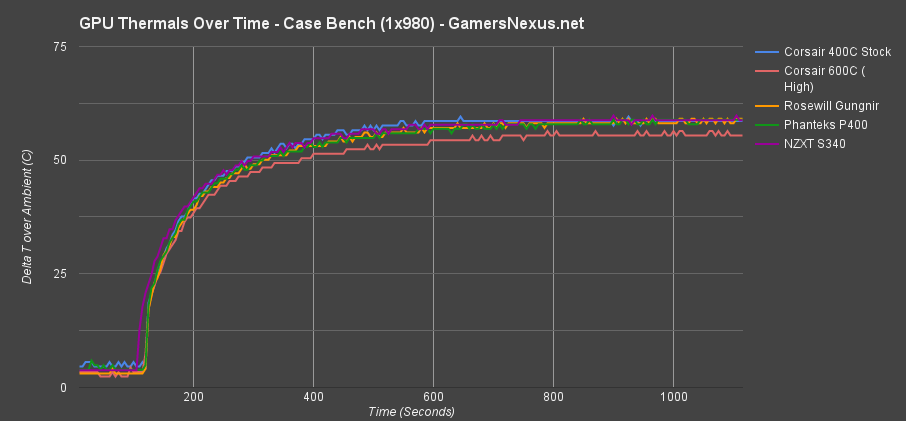
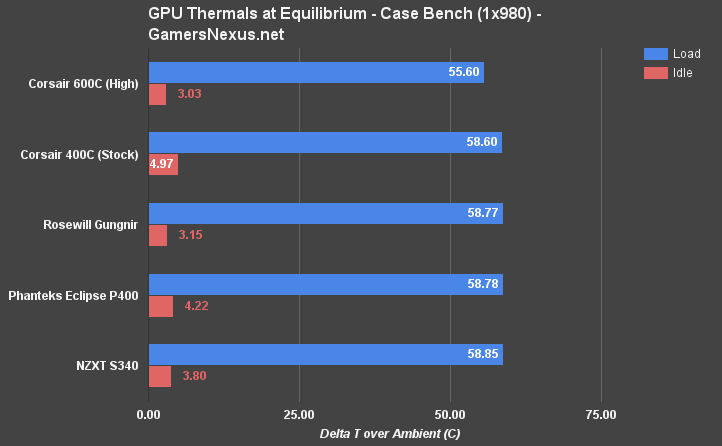
The 600C leads thermal performance. Its rotated board layout leverages the PSU's fan as a means to draft air up and toward the GPU, which assists the blower fan's ability to dissipate thermals. That keeps the 600C markedly ahead of all the other cases on the GPU bench (delta vs. 400C: 5.25%; range for entire chart: 3.25C). None of these differences are big enough to impact the daily life of a user, particularly once we ignore the 600C and look only at the similarly-priced and specified products.
The 400C operates at 58.60C load for the GPU (dT over ambient), though runs a hotter idle temperature at 4.97C; its competition sits in the 3.15 to 4.22C range. Again, effectively inconsequential for most users. We attribute this to the positioning of the stock intake fan on the 400C.
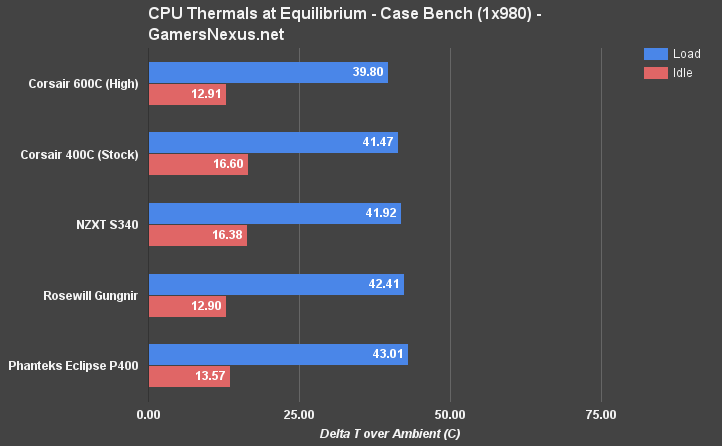
For CPU thermals, we again see higher idle temperatures than some competitors (S340 runs a bit warm – a trend for NZXT's recent and steel-heavy cases), but load temperatures are fully acceptable at 41.47C; in fact, CPU load thermals for the 400C plant it firmly above its same-priced competition, beaten out in this chart only by Corsair's own 600C. The chart range is 3.21C (load), with a 400C vs. S340 load delta of just 1.08% (imperceptible). Against the Phanteks Eclipse P400, there is a more noticeable gain at 3.65% – though still small.
Corsair 400C Thermals over Time Benchmark vs. S340, Phanteks P400, Others
Just to show the data a different way.

Conclusion
Corsair continues its focus on high-performance enclosures with the 400C. Even with the move to solid paneling and relying almost entirely on side- and bottom-vented intake, the 400C outperforms similarly classed, directly competing enclosures. The fans contribute most directly to this, but tooling large gaps in the sides of the front panel ensure greater access to cool air. On this limited-run bench, the Corsair Carbide 400C is second only to the 600C – a larger version of the case – and outmatches NZXT's S340, Phanteks' brand new Eclipse P400, and Rosewill's Gungnir (another new case of the same type).
We had some trouble with power supply installation on the Corsair 400C. For 180mm long PSUs, note that you may have to remove (or intensely battle) the 2x 3.5” HDD bay cages. Unfortunately, this is the only point of installation for 3.5” HDDs, so its removal relegates the system to saturation of the 3x 2.5” SSD sleds on the rear side of the board. If you're building an entirely new system and have already decided on the 400C, we'd recommend a PSU smaller than 180mm in length.
The front panel of the 400C is also difficult to remove. The use of clips (one of which has already broken) does limit the installation/removal cycle more than, say, what NZXT uses on its Manta. This complaint is ultimately minor – how often does the average user really remove the front panel? – but one that's worth mention as a point of improvement.
Corsair does do well with other aspects of ease-of-installation, however. Screws are packaged individually and clearly marked, the 2.5” SSD sleds are easily accessed and well designed, the PSU shroud looks good once in-place, and build quality is overall rigid and strong.
Like all products, the 400C has several points of improvement – but they're mostly small items and mostly pertain to convenience (aside from the HDD cage's restrictions on modular 180mm PSUs). This is a good thing for Corsair; we can overlook installation inconveniences when considering that most users will only build a system once. In terms of cooling, the 400C is undeniably the best of its class on the bench. It marginally outperforms the S340, P400, and Gungnir. Most users won't see the difference, but for folks who devoutly seek every (tenth of a) degree of difference, the 400C is the clear winner. We mostly leave aesthetics to the readers – the photos tell that story – but the case is overall unoffensive and somewhat discreet. We'll let you figure out if you like it more than the competition.
Build quality is high, cooling performance is superior, and the price (~$90 right now) is about what we'd expect.
If you're researching cases of this class, we'd suggest additionally investigating the S340 ($60 to $75) and P400. Our review of the P400 is forthcoming. The S340 is already live.
Editorial, Test Lead: Steve "Lelldorianx" Burke
Test Technician: Mike "Budekai" Gaglione