BitFenix’s new flagship case is the Shogun, a “super mid-tower” compatible with up to E-ATX boards, and a thematic successor to the similarly simplistic Shinobi mid-tower. We haven’t covered a BitFenix enclosure since we named the Pandora one of the best mid-range cases of 2015, and we were curious about the company has changed since its LED-laden efforts.
BitFenix made a name for itself with the Prodigy small form factor case a few years ago, and has been trying to recreate that success ever since. The new BitFenix Shogun case is what we’re reviewing today, priced at $160 and targeting the (“super”) mid-tower market with its mix of aluminum, steel, and glass. The case primarily differentiates itself with a slightly user-customizable layout internally, something we’ll talk about in this review.
BitFenix Shogun Specs
| Form Factor | Super Mid-Tower |
| Motherboard Support | E-ATX/ATX/M-ATX/mini-ITX |
| Dimensions (W x H x D) | 250 x 565 x 525mm |
| Weight | 14.15kg |
| I/O | 2 x USB 3.0 2 x USB 2.0 3.5mm mic & headphone |
| Expansion/Bays | 5.25” none 3.5” x 6 2.5” x 5 (and the 6 x 3.5” bays) |
| Cooling | FANS Front: up to 140mm x 2 or 120mm x 3 (120mm x 2 included) Rear: 120mm x 1 or 140mm x 1 (120mm included) Top: up to 140mm x 2 or 120mm x 3 RADIATORS Front: up to 280mm x 1 or 240mm x 1 Rear: 120mm x 1 or 140mm x 1 Top: up to 360mm x 1 or 280mm x 1 |
| Price | $160 |
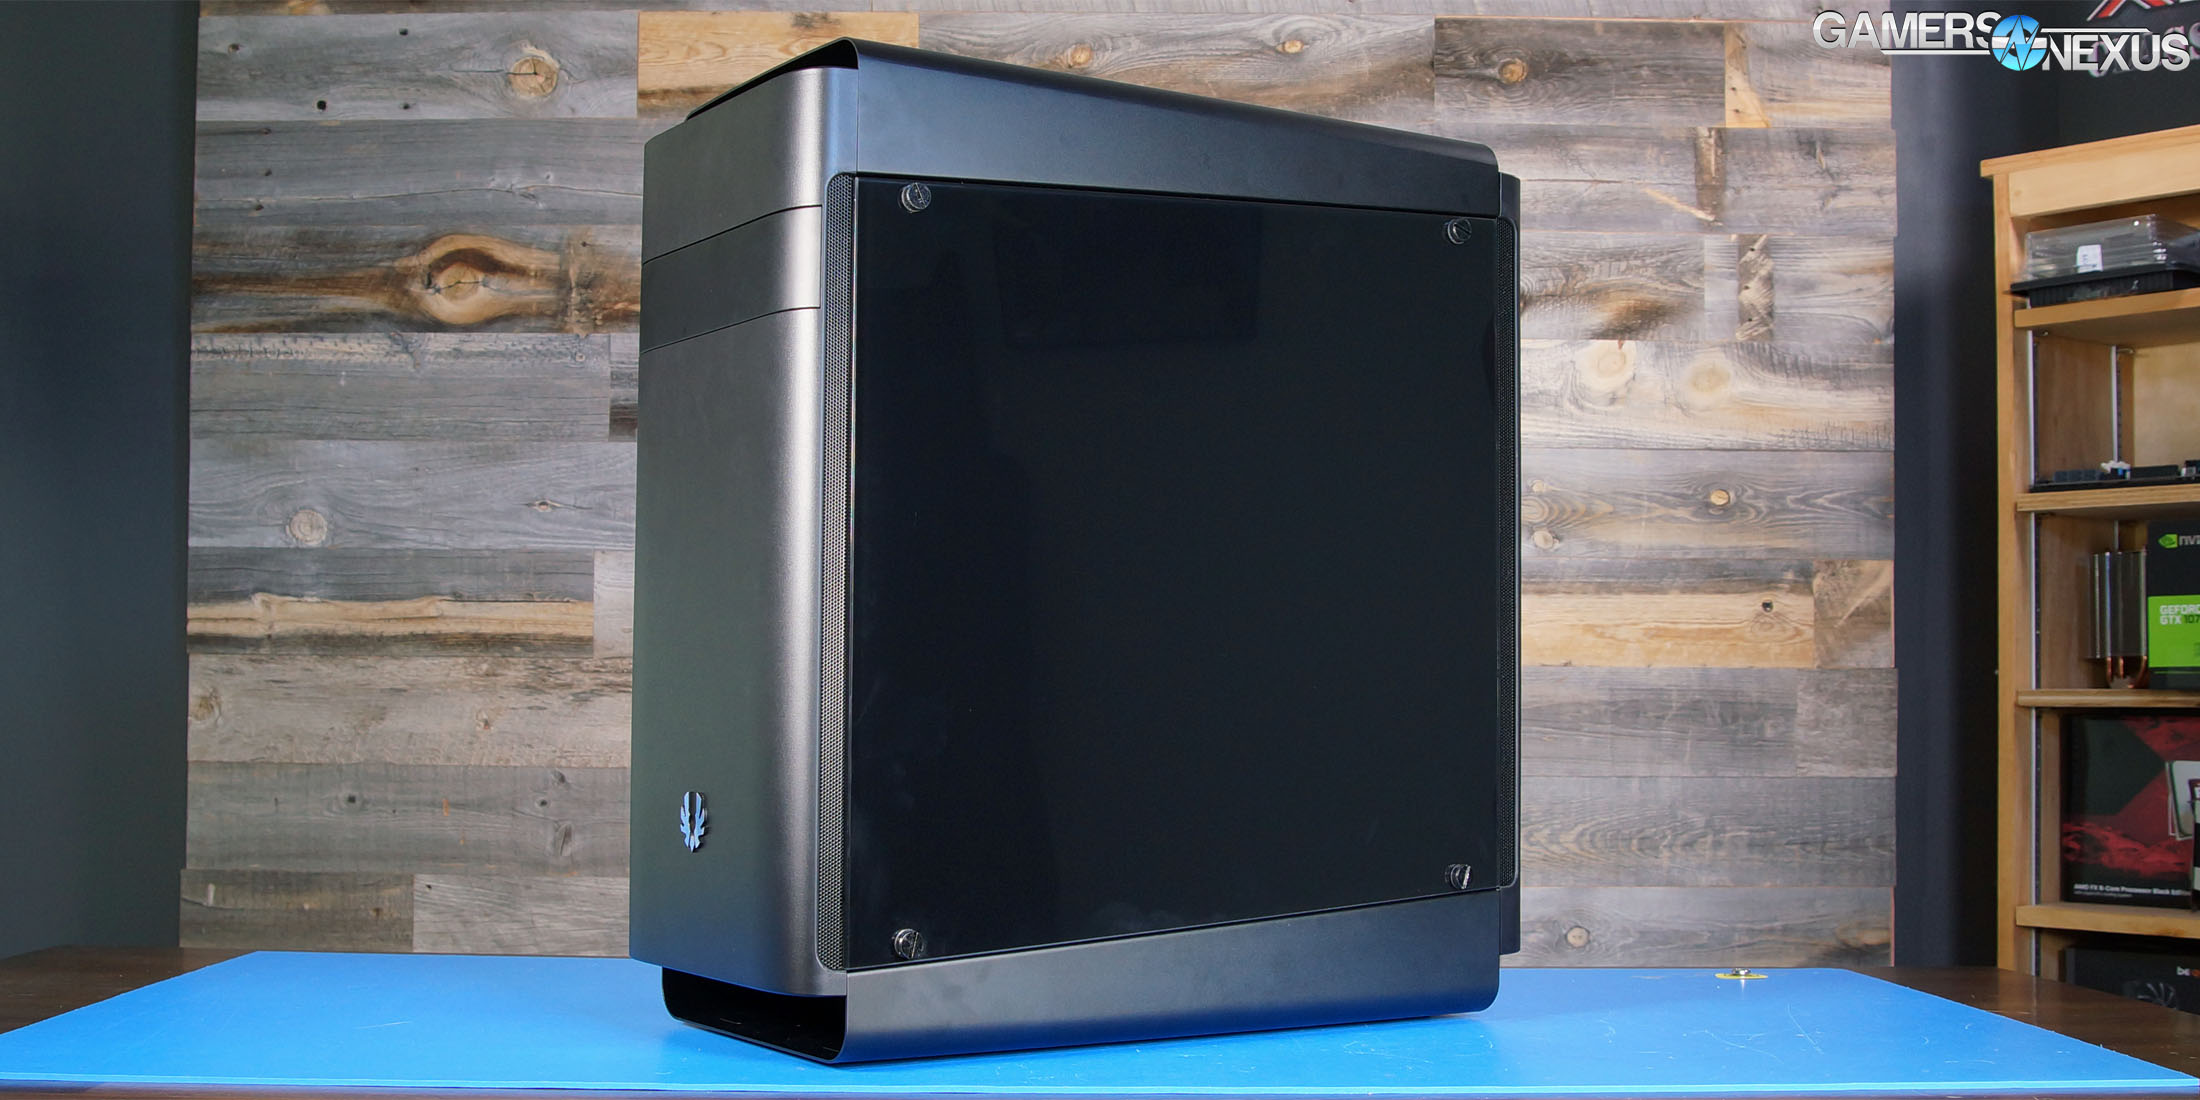
BitFenix Shogun Exterior
The side panels are identical panes of parallelogram-shaped, lightly-tinted tempered glass, although the panel behind the motherboard is blacked out to hide cables. The glass extends for nearly the entire length of the case, leaving half an inch of ventilation mesh at the front--a decision we appreciate--and the same strip of mesh is mirrored purely for decoration at the back. Foam and rubber pieces are carefully arranged so that no metal contacts the glass from either the chassis or the screws. The top and bottom are huge 2mm thick aluminum arches, reminiscent of BitFenix’s popular Prodigy enclosure, extending the full length of the case and protecting from dust on both ends. The overall effect is pleasant symmetry along every axis, but in a way that doesn’t impair function.
Much is made of the case’s RGB LEDs and ASUS Aura compatibility. An industrial-looking flat metal sheet with two recessed 2.5” bays forms a pseudo-shroud, and three RGB LEDs light each of the bays (surprisingly, they’re fitted with rubber washers to silence non-solid-state 2.5” drives). The strips of plastic intended to diffuse the light from these LEDs isn’t particularly effective, and each individual LED is clearly visible on the surface of the drive--this is a little underwhelming, but seems like something that could be fixed with a better diffuser (or diffuser) tape) and a little experimentation, particularly with brighter bulbs from BitFenix.
The upshot is that BitFenix takes their “quick custom design” philosophy seriously: the LEDs can be repositioned to the side of the drive, plugged into a controller in the case, plugged into an ASUS Aura board, turned off, taken out; in fact, the entire shroud is optional and can be cleanly removed, which it definitely should be during the process of building a system. The built-in case controller can be switched between seven colors, a rainbow setting that steps through every color, and off.
BitFenix Shogun Functionality
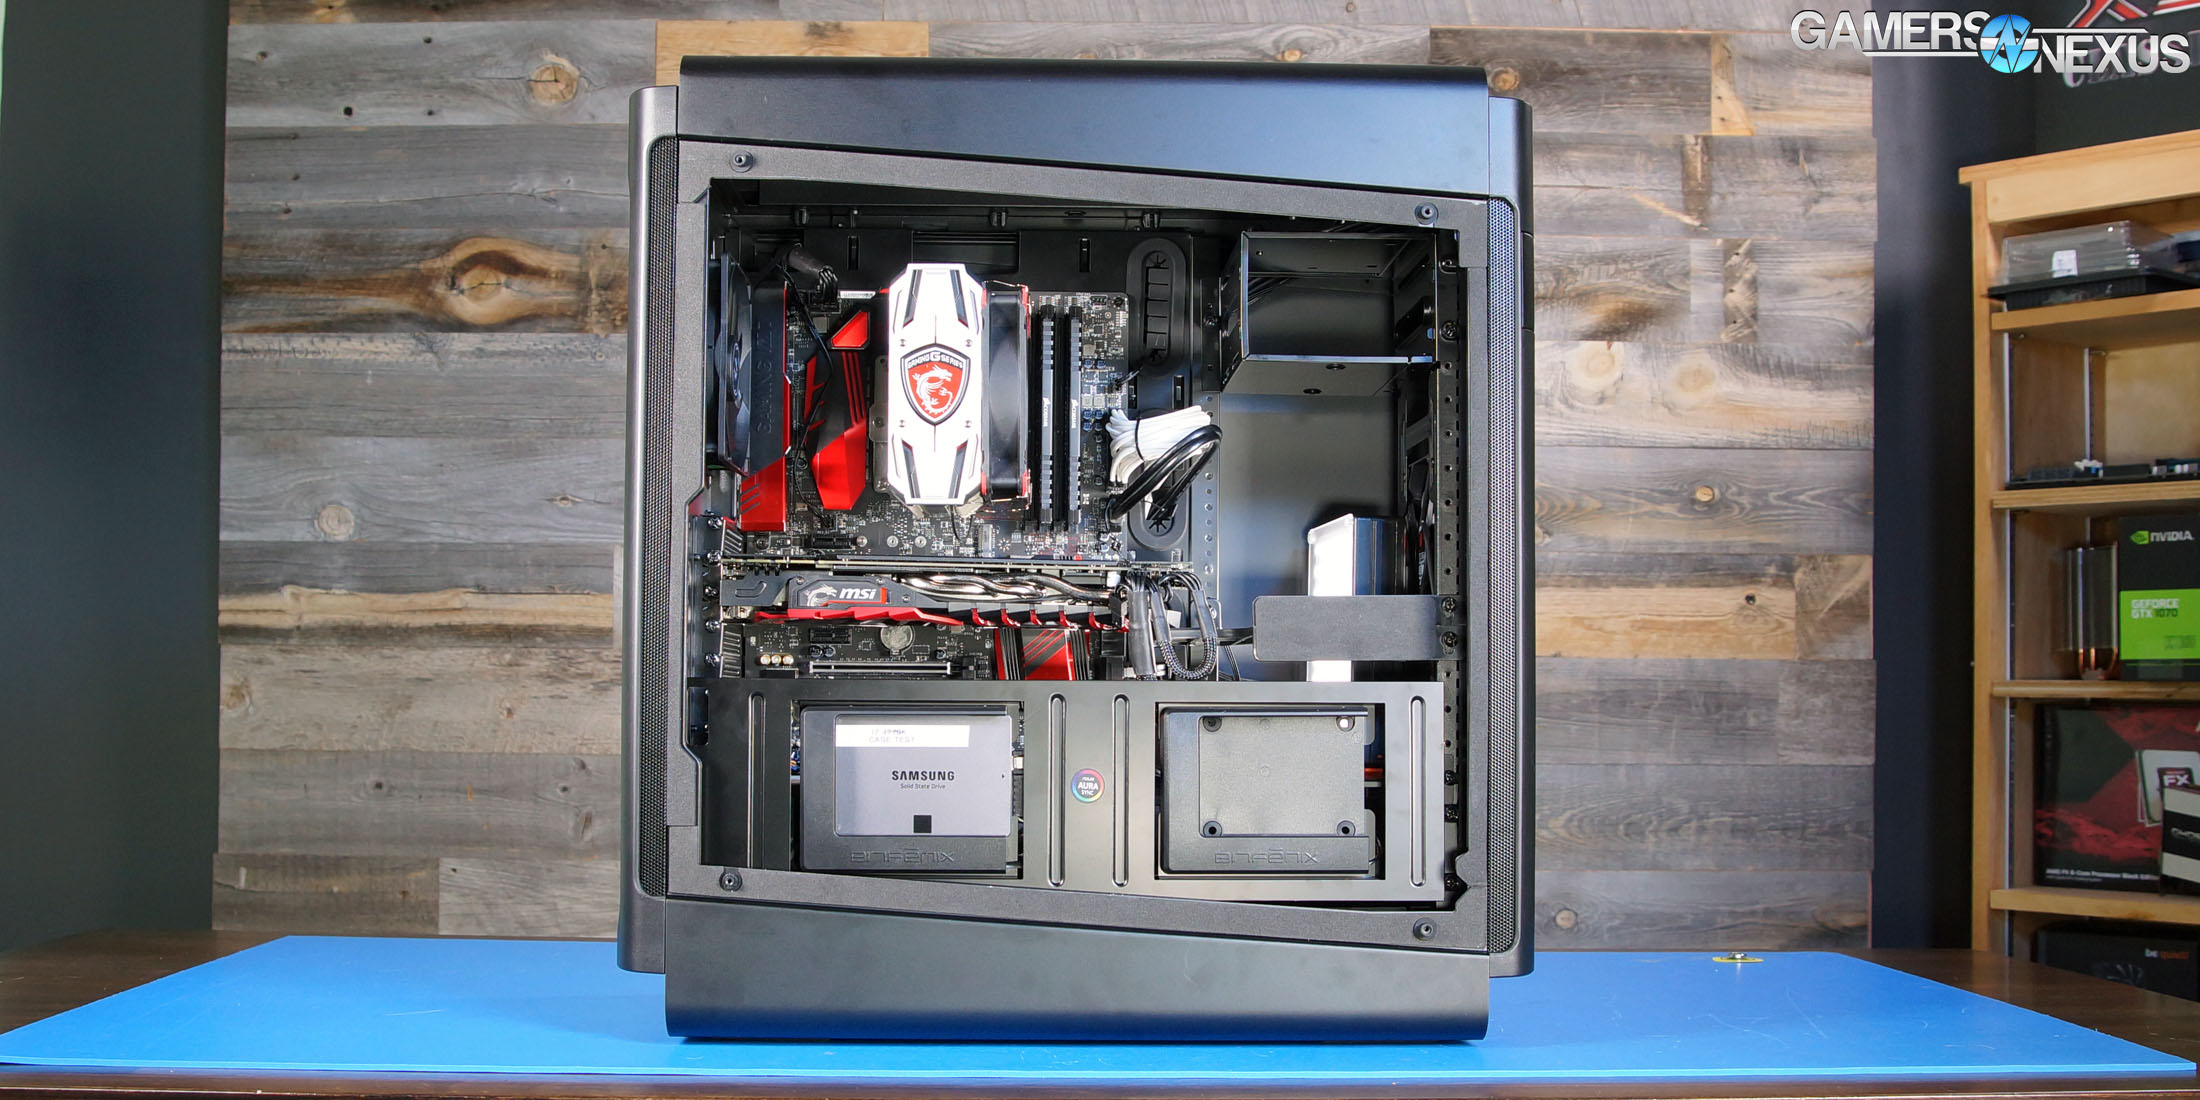
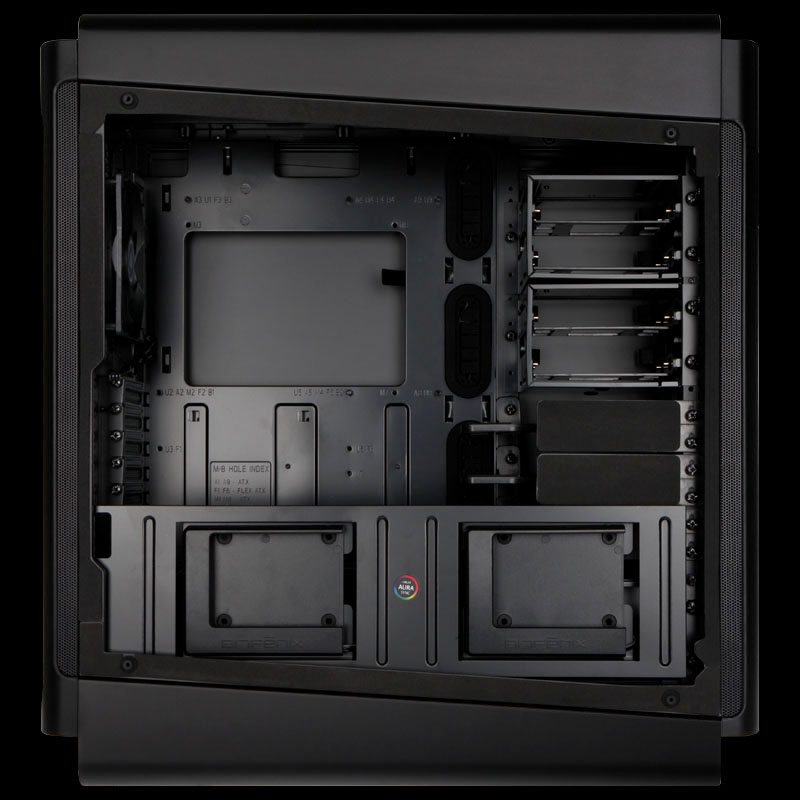
The other major “quick custom design” aspect of the case is the E-ATX shield. Cable cutouts in the Shogun are clearly designed around a full ATX board and many of them are behind the profile of a wider E-ATX form factor, but an additional five inches of shield (with cable cutouts and tie points) is included with the case and can be installed for easier cable management. There’s nothing stopping users from installing the shield even with a smaller board, except that it blocks the screw holes for most of the HDD cages and all of the VGA supports. Anyone with two or fewer 3.5” drives and a sturdy graphics card can opt to forego these in favor of installing the shield for a tidier look.
Drive bays were acceptable, but nothing special. BitFenix’s 3.5” drive sleds are easy to remove and use unthreaded pins with rubber grommets, which do their job well enough but are very fiddly to get into place with an HDD. We’d prefer to see a system where the pins are captive and can’t possibly fall out, like NZXT and other manufacturers now use. In addition to the two RGB 2.5” bays, there’s a drive sled at the bottom of the case and two more behind the motherboard. Notably, there is no 5.25” optical drive bay at all, despite the appearance of one on the front panel. This is purely cosmetic. There is a recessed section in the plastic at exactly the spot where an optical drive would be, except it’s instead covered by a sheet of metal and without an actual bay behind it. That said, demand for ODDs is low and it doesn’t hurt the value of the case not to include one. Most manufacturers have moved on.
Two long rows of screw holes run down the middle and front of the case, to be shared by the VGA supports and HDD cages; the sheer number of holes provided means that they can be adjusted to any height. BitFenix supplies three support shelves (and three HDD cages) – more than enough – and we found them pretty effective at supporting a sagging card. Only the biggest and heaviest cards actually extend far enough to make use of the shelves, and effectiveness will vary, but it’s a nice feature to have included with the case.
A thin metal tab on the E-ATX shield was bent on our review sample, but it didn’t affect installation and was easily corrected with pliers. Overall, the quality of manufacturing and tooling on the case was high, with one other minor complaint: some screws were overtightened, to the point of mashing screwholes out of shape on the VGA supports (and very minor cosmetic bending where they were fastened to the case). This didn’t affect any functionality in our sample, but seems a little excessive.
The Shogun wasn’t difficult to build in, but it was certainly time consuming. As listed above, there are a lot of pieces to figure out, and all of them are well secured with multiple screws. Cable management was a non-issue excluding the RGB drive bays, which require two cables for the LEDs (plus whatever SATA and power cables the actual drives require) to be routed from the front of the case to the back; however, all of this is obscured by the shroud in which the drives are mounted. Cable cutouts are generous, especially at the top of the case, where there’s massive headroom for radiator compatibility. The top metal arch and filter is fully removable as one piece, for easy motherboard/radiator access and washing the filter if necessary. The bottom arch is part of the chassis and cannot easily be removed.
Case Test Methodology
We tested using our new Skylake case test bench, detailed in the table below. This particular configuration is brand new with the launch of the 570X & 270R. Results on this test platform cannot be compared to previous case benchmark results, as the platform has completely changed.
Conducting thermal tests requires careful measurement of temperatures in the surrounding environment. We control for ambient by constantly measuring temperatures with thermocouples and laser readers. We then produce charts using a Delta T(emperature) over Ambient value. This value subtracts the thermo-logged ambient value from the measured diode temperatures, producing a delta report of thermals. AIDA64 is used for logging thermals of silicon components, including the GPU diode.
All case fans are manually configured to their maximum throughput using BIOS, then we configure to an RPM closer to 1050 for a universal "quiet" testing. If a fan controller is present, we opt-in and test on multiple settings. This forces testing of case fan performance in addition to the case's air channeling and airstream design. This also ensures minimal variance when testing, as automatically controlled fan speeds can reduce reliability of benchmarking. The CPU fan is set to 1100RPM (constant) for consistency, and the CPU is overclocked to 4.4GHz with a vCore of 1.272V (constant). C-States and power saving states are disabled.
| Component | Courtesy Of | Price | |
| Video Card | MSI GTX 1080 Gaming X (OC Mode) | MSI | $640 |
| CPU | Intel i7-6700K @ 4.4GHz | GamersNexus | $300 |
| CPU Cooler | MSI Core Frozr L | MSI | TBD |
| Motherboard | MSI Z170A Gaming M7 | MSI | $180 |
| Memory | Corsair Vengeance LED 32GB 3200MHz | Corsair | $200 |
| SSD | Samsung 850 EVO 120GB | Samsung | N/A |
| PSU | Corsair RM650x | Corsair | $100 |
| Case | This is what we're testing! | - | - |
The video card is configured to run at 55% fan speed at all times.
Prior to load testing, we collect idle temperature results for ten minutes to determine the unloaded cooling performance of a case's fans and air channels. Thermal benchmarking is conducted for 1400 seconds (23 minutes), a period we've determined sufficient for achieving equilibrium. The over-time data is aggregated and will occasionally be compiled into charts, if interesting or relevant. The equilibrium performance is averaged to create the below charts.
Load testing is conducted using Prime95 LFFTs and Kombustor “FurMark” stress testing simultaneously. Testing is completely automated using in-house scripting, and executes with perfect accuracy on every run.
We recently validated our test methodology using a thermal chamber, finding our approach to be nearly perfectly accurate. Learn more here.
Continue to Page 2 for the thermal & noise testing and the conclusion.
Shogun Thermal Testing
BitFenix ships the Shogun with three plain 120mm fans (max: 1260RPM), adequate for cooling but nowhere near the capacity of the case (all three slots can fit 140mm fans, for a start). The default positioning is one exhaust fan in the rear and two intake fans in the front. Bizarrely, although BitFenix claims to support three 120mm fans or two 140mm fans in the front, we found the opposite--mounting holes were provided for two 140 or 120mm fans with an additional 140mm slot at the top (120mm fan could conceivably be mounted in this spot instead, but it would only be attached by two bottom screws). We have informed BitFenix of this and they have acknowledged the listing error and corrected it.
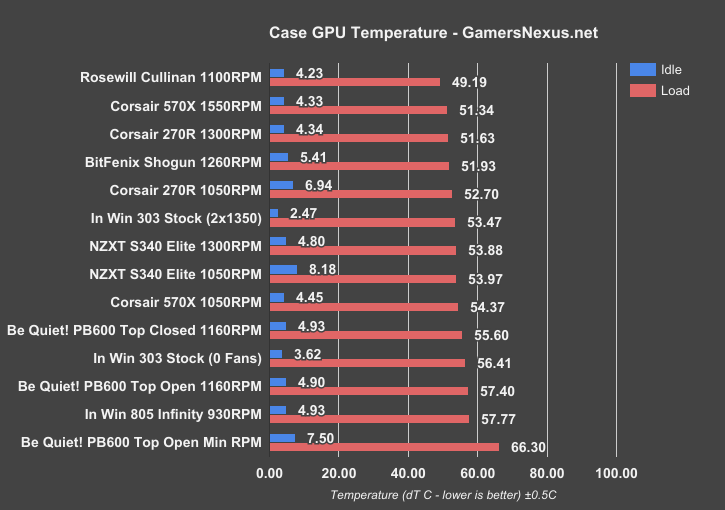
BitFenix Shogun – GPU Thermals
Let’s start with GPU thermals.
In our tests, the intake fans kept the GPU well-supplied with cool air for a respectable temperature of just under 52C delta T, but this cool air continued flowing out of the back of the case without touching the CPU. Comparatively, the Corsair 270R and In NZXT S340 Elite are just behind this performance.
BitFenix Shogun CPU Thermals
At the maximum 1260 RPM fan speed for the case fans, our CPU was running 61.74 degrees Celsius above ambient; not especially impressive, but unsurprising given the size and speed of the fans. This puts the Shogun below the toasty 66.18 dT that our recently-reviewed Pure Base 600 managed.

Adding a Corsair 140mm fan to the front intake array drove CPU temperatures down to 55.7C delta T, landing it ahead of the S340 Elite, Cullinan, and behind the Corsair cases. This is because the 140mm fan lands straight across from the CPU, creating a tunnel of airflow into and out of the tower cooler.
BitFenix Shogun Noise Levels
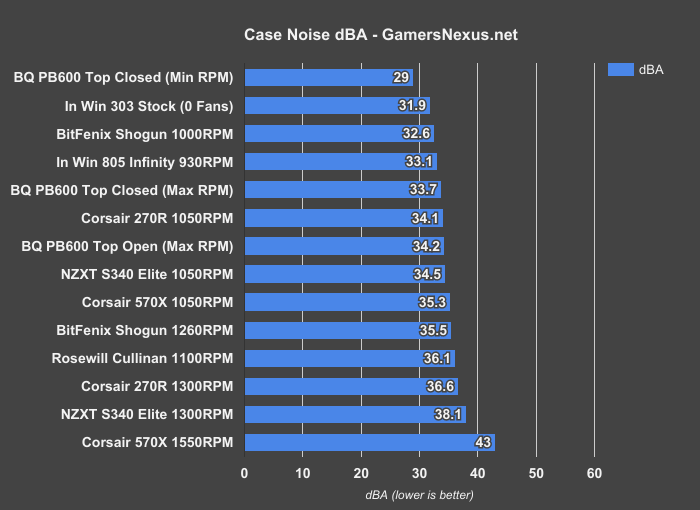
Moving on to noise testing, we see the stock Shogun with three fans performs about where the Corsair 570X sits, another case with 3x 120mm fans, when configured to 1050RPM. At the quieter speed of 1000RPM, the Shogun measures at 32.6dBA when containing our standardized test bench.
BitFenix Shogun Conclusion
The BitFenix Shogun feels like it was designed with the intention of making it worth your money. The extra features like the RGB shroud, VGA supports, and E-ATX shield aren’t necessary, but it’s reassuring to know that they’re there. Buyers should budget for at least one additional 140mm fan, and perhaps replacements for the stock 120mm fans as well (as they’re essentially placeholders), bringing the total package up into the $170-$180 range. The thick aluminum dust cover arches at the top and bottom represent the enclosure pretty well: sturdy, good-looking, and functional. For a flashy, high-end system that could benefit from a pane of tempered glass, the Shogun is a good choice.

The Shogun includes several semi-modular and fully modular features, useful for tuning the case specifically to your needs. Granted, this also means that you’re paying more and receiving more hardware as a result, so if the modular bays, PSU shroud, and VGA holders aren’t interesting to you, you’re going to be shelling out money for unused parts.
At $160, it’s really not bad pricing given the high-quality materials used and the relative ease of installation for the build process. The LEDs aren’t that impressive, if that matters to you, and despite high tooling quality, several screws are over-torqued to the point of causing cosmetic damage to the video card holders, but that is a relatively minor complaint overall.
For competition to this, we’d suggest looking into the Corsair 570X, the MasterCase Pro 5, and In Win’s lineup.
Editorial, Testing: Patrick Lathan
Host, Test Lead: Steve Burke
Video Production: Andrew Coleman