The original Sandia & Coolchip style coolers spiked interest in a market segment that’s otherwise relatively stagnant. With a whirling aluminum block serving as both the fan and the heatsink, the cooling concept seemed novel, dangerous, and potentially efficient. That’s a mix to cause some excitement in CPU coolers, which are otherwise the expected mix of metal and air or, if you wanted to get really crazy, liquid, metal, and air.
That concept largely vanished. We haven’t heard much about the use of Sandia-inspired designs since 2014, and certainly haven’t seen any majorly successful executions of either Sandia or Coolchip coolers in the CPU cooling space. Nothing that took the market by force and demanded eyeballs beyond initial tech demos and CES showcases.
Thermaltake decided to take its own stab at this type of cooler, working with Coolchip on technology implementation and execution of the Engine 27 unit that was at CES last month.
Thermaltake’s Engine 27 is $50. It’s a 27mm form factor cooler, meaning it’s one of a select few that could fit in something like a SilverStone PT13 with its 30mm requirement. The direct competition to the Engine 27 is SilverStone’s NT07 and NT08-115XP, the latter of which we’re also testing. This Thermaltake Engine 27 review looks at noise and temperatures versus the SilverStone NT08-115XP & Cryorig C7.
How it Works
The original Sandia Cooler had a different design. Instead of a center fan piece, the entire block of aluminum spun. Sandia used a hydrodynamic air bearing and a fluid dynamics property that relied on heat transfer across an air gap, and then high RPMs for the spinning aluminum block.
The idea was that you could use the entire heatsink as a “fan,” and that doing so at high RPMs would minimize the boundary layer of air that clings to the blades.
Thermaltake is using the piece that got the most heads turning – the rotating aluminum blades – and has attached it into a more traditional heatsink. The company is using 119 L-shaped aluminum fins in the outer layer and 40 aluminum fins in the inner layer, with a kinetic bearing and an 8-pole motor in the hub. As a side note, an 8-pole motor does mean you’ll have to divide your RPM measurements by two to get an accurate reading, since BIOS doesn’t quite understand what it’s looking at. This is the exact same thing you’d have to do with most liquid cooler pumps to determine their real RPM, as they also have double the poles of what is expected for PWM. This means that BIOS and software will report 5000RPM when the fan is actually at 2500RPM.
Back to the design: The Sandia concept is a good bit different from this, and it’s worth noting that Sandia’s cooler never properly landed in the hands of hardware reviewers, so we have no idea if that design actually works for CPU cooling.
The Thermaltake fan spins at 2500RPM, though again, BIOS sees that as 5000 because of the 8-pole motor. Thermaltake advertises its Engine 27 as quiet and cool, both things we’ll validate, and uses a single, easy-to-assemble backplate and set of screws for installation. This is probably the best part of the product – 2-minute installation.
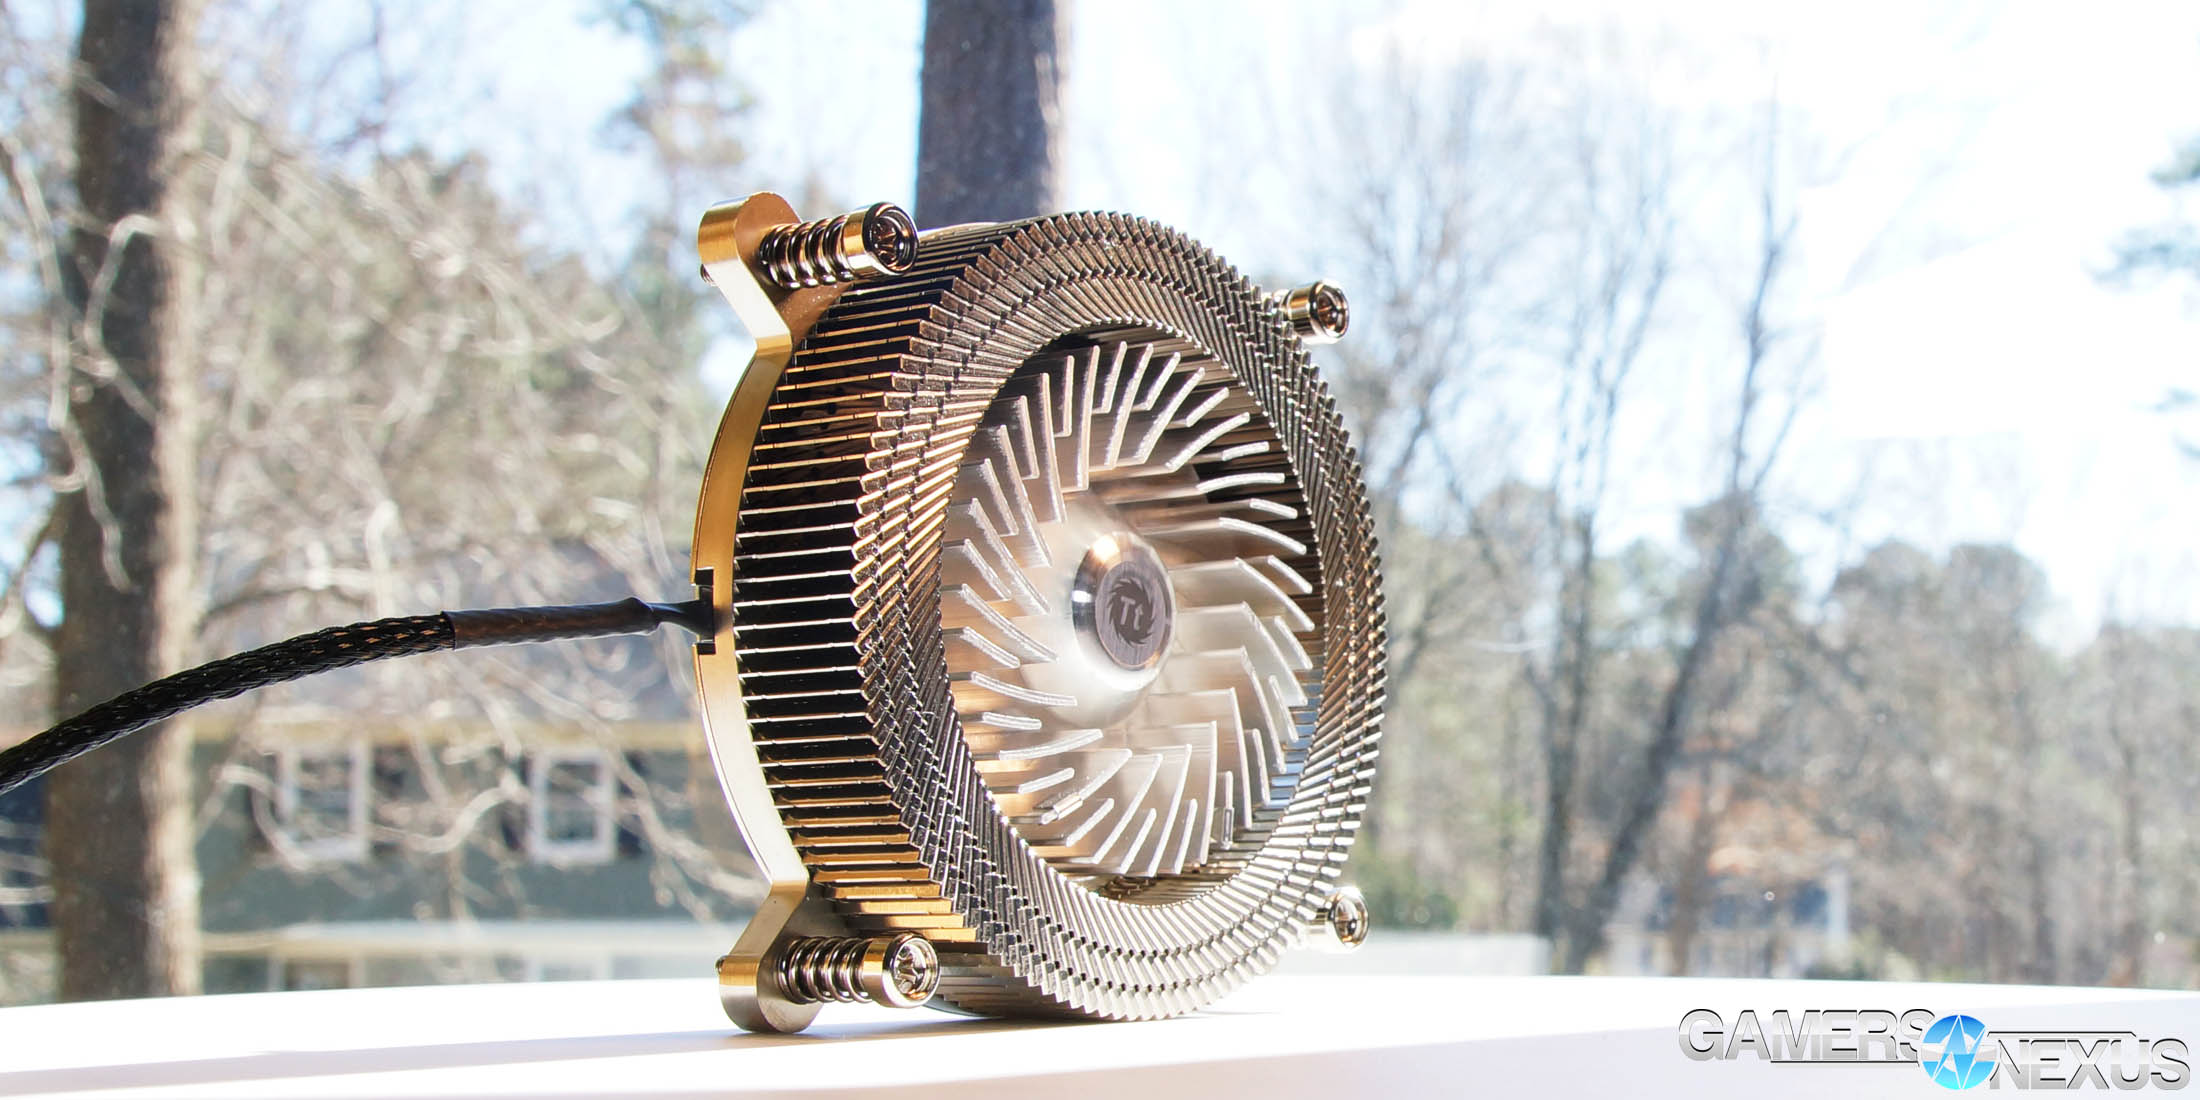
Taking it Apart
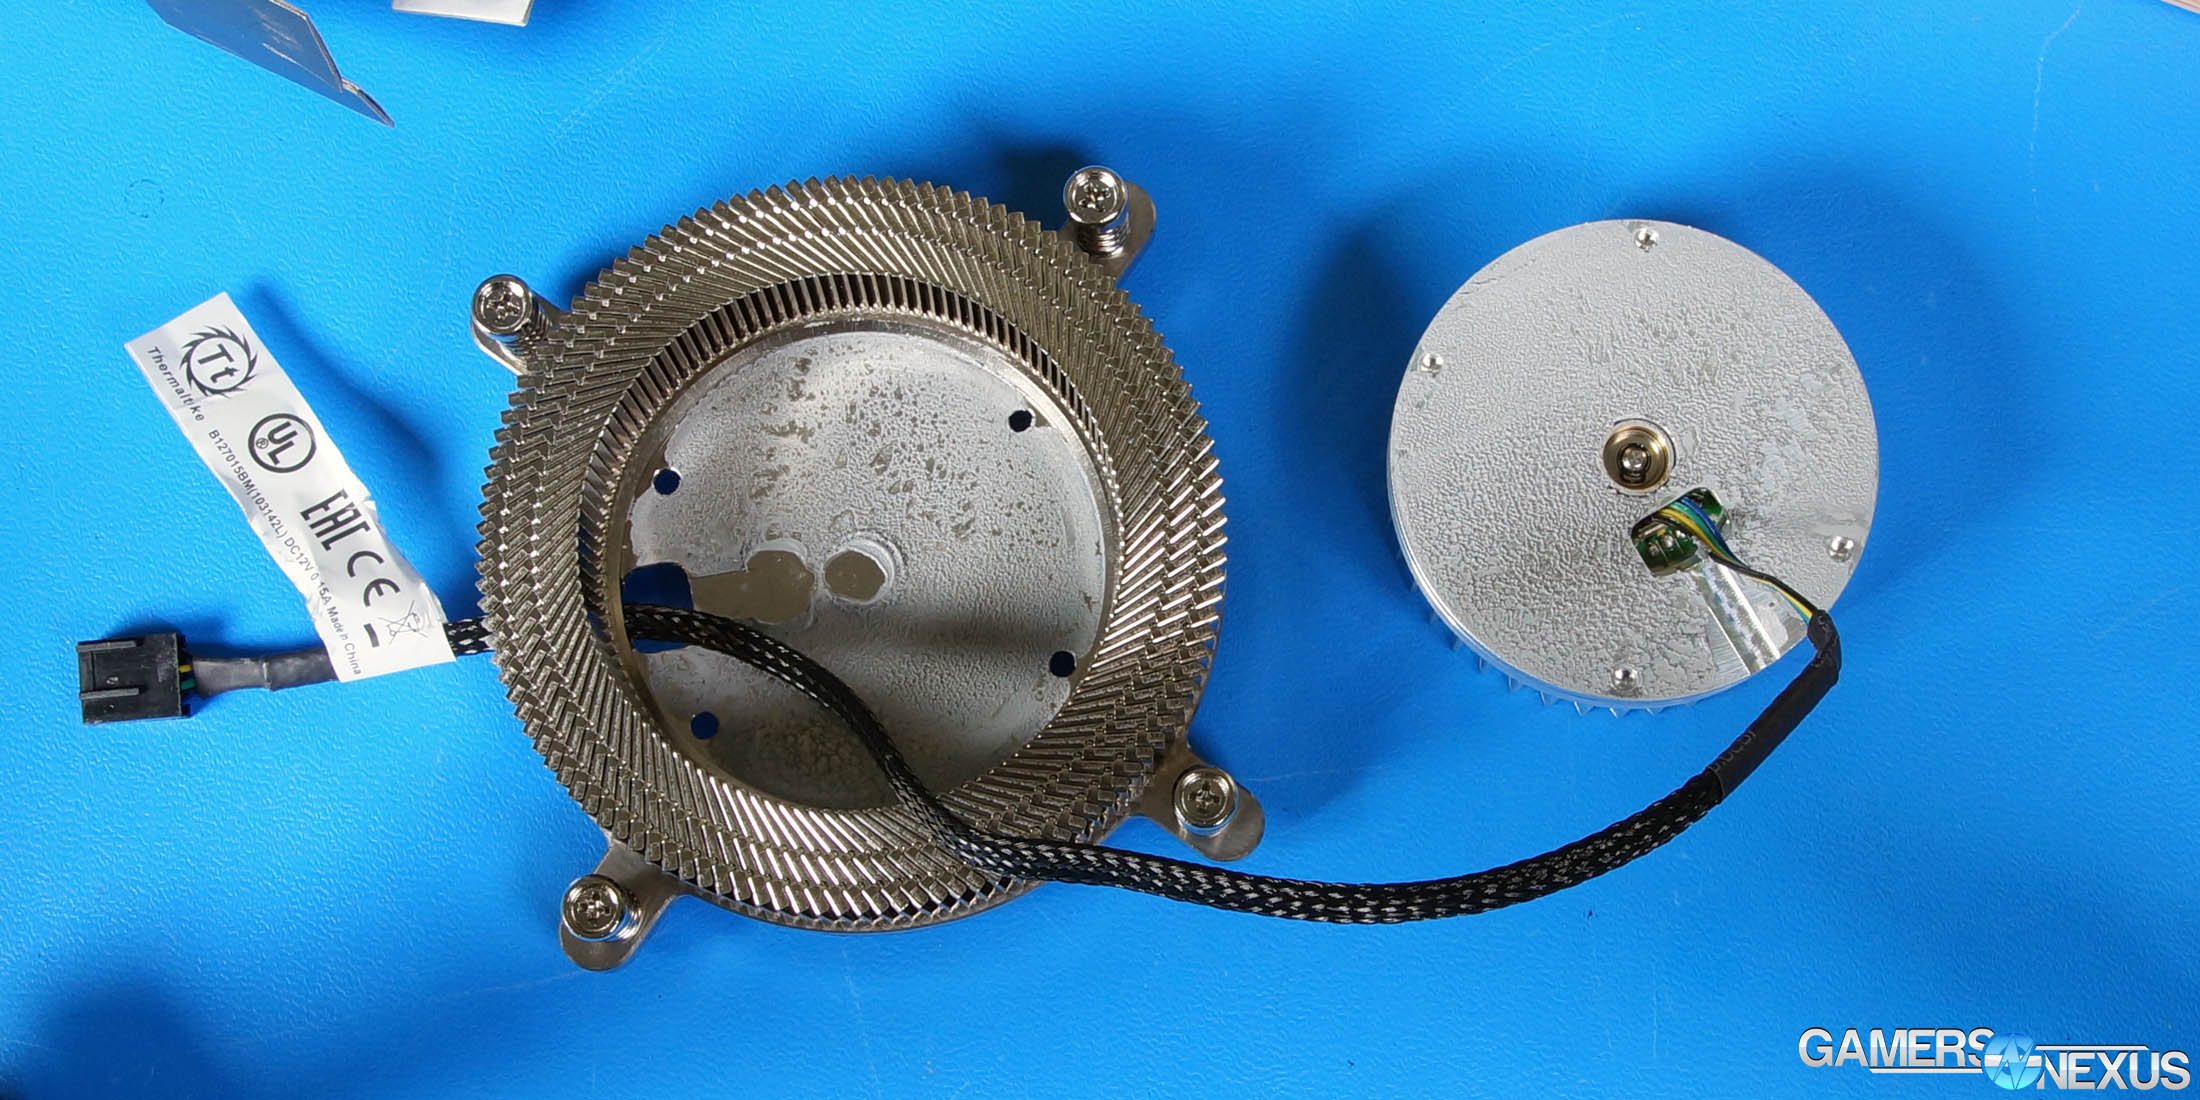
We dismantled the Thermaltake Engine 27 just to show how the base and rotating fins attach to one another.
Separating the rotating aluminum blades from the outer heatsink ring reveals that the two are connected with a thin layer of thermalpaste between them, with the spinning blades fixed on an unmoving base. The Engine 27 sinks heat through a nickel-plated copper coldplate, as is traditional, then spreads the heat into the outer fins (the unmoving ring) while the rest theoretically transfers through the TIM and into the central blade array. These then spin, the intent being to pull air in from the top and dissipate heat across the central 40 fins and external 119 fins.
Thermaltake's Marketing Image:
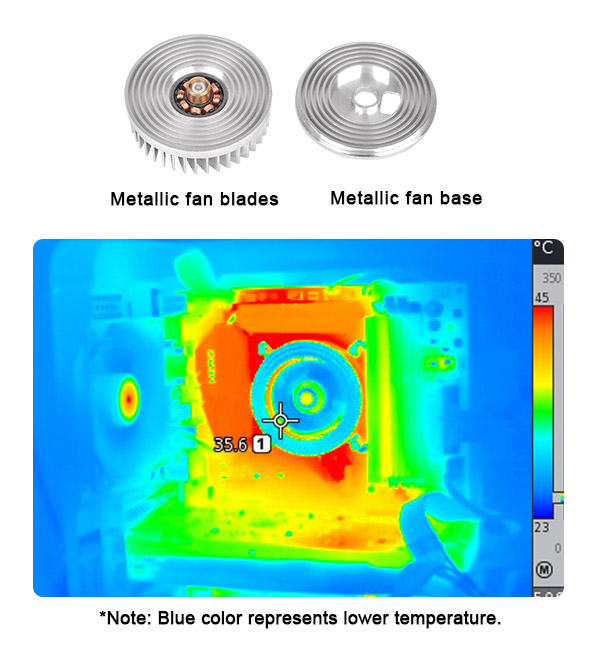
As for the rest of it, Thermaltake’s website uses a thermal image to demonstrate the temperature of the CPU cooler and the surrounding motherboard components. Let’s momentarily ignore the flawed approach to pointing a thermal camera at a heatsink and just talk about scales in charts.
With no scale, the direction we get from this is that the VRMs are hot as hell, as you’d expect – maybe 80-90C – while the cooler measures just 35.6C. Looking to the right to acknowledge the scale, we see that it’s 23C to 45C. That’s probably ambient to… 45 Celsius, for some reason. What looked like a potential 50C difference is actually a 10C difference, and is totally insignificant.
And again, that’s ignoring the fact that measuring a CPU heatsink doesn’t tell you the temperature of the CPU anyway, VRMs run hot to begin with, and comparing these two serves no purpose other than marketing. This is an uninformed and useless image, and we suggest deferring to our tests (below) instead.
CPU Cooler Testing Methodology
CPU cooler testing is conducted using the bench defined below. We use a bench that is more carefully crafted for noise performance, opting for a passively cooled PSU and 23% RPM 980 blower fan for very low system noise.
We strongly believe that our thermal testing methodology is among the best on this side of the tech-media industry. We've validated our testing methodology with thermal chambers and have proven near-perfect accuracy of results.
Conducting thermal tests requires careful measurement of temperatures in the surrounding environment. We control for ambient by constantly measuring temperatures with K-Type thermocouples and infrared readers. Two K-Type thermocouples are deployed around the test bench: One (T1) above the bench, out of airflow channels, and one (T2) approximately 2-3" in front of the cooler's intake fan. These two data points are averaged in a spreadsheet, creating a T3 value that is subtracted second-to-second from our AIDA64 logging of the CPU cores.
All six CPU cores are totaled and averaged second-to-second. The delta value is created by subtracting corresponding ambient readings (T3) from the average CPU core temperature. We then produce charts using a Delta T(emperature) over Ambient value. AIDA64 is used for logging thermals of silicon components, including the CPU and GPU diodes. We additionally log core utilization and frequencies to ensure all components are firing as expected. Voltage levels are measured in addition to fan speeds, frequencies, and thermals.
The cores are kept locked to 3.8GHz (x38 multiplier). VCore voltage is locked to 1.200v for the CPU. C-States are disabled, as is all other power saving. The frequency is locked without any interference from boost or throttle functions. This is to ensure that the CPU does not undergo any unexpected/uncontrollable power saving or boost states during testing, and ensures that the test platform remains identical from one device to the next.
Fan speeds are manually controlled unless otherwise defined. For liquid coolers, pumps are set to 100% speed unless otherwise defined.
Two 120mm open bench fans are used for these CPU cooler tests on our "red" bench. These are connected to the PSU.
| GN Test Bench 2015 | Name | Courtesy Of | Cost |
| Video Card | GTX 980 Reference 23% RPM | NVIDIA | EOL |
| CPU | Intel i3-6300 CPU 3.8GHz | GamersNexus | $160 |
| Memory | GSkill Trident Z 16GB 3200MHz | GSkill | - |
| Motherboard | EVGA Z170 Stinger | EVGA | $110 |
| Power Supply | Enermax DigiFANLESS | Enermax | $250 |
| SSD | Crucial Arc100 | GamersNexus | $100 |
| Case | Top Deck Tech Station | GamersNexus | $250 |
| CPU Cooler | This is what we're testing! | - | - |
We use an AMPROBE multi-diode thermocouple reader to log ambient actively. This ambient measurement is used to monitor fluctuations and is subtracted from absolute GPU diode readings to produce a delta value. For these tests, we configured the thermocouple reader's logging interval to 1s, matching the logging interval of GPU-Z and AIDA64. Data is calculated using a custom, in-house spreadsheet and software solution.
Our test starts with a 180s idle period to gauge non-gaming performance. A script automatically triggers the beginning of a CPU-intensive benchmark running Prime95 LFFTs. Because we use an in-house script, we are able to perfectly execute and align our tests between passes.
Continue to Page 2 for temperature results & the conclusion.
CPU Temperature Testing of Thermaltake Engine 27
Getting into this review, we’re abandoning our standard cooler test bench in favor of an ITX-specific bench. These small form factor coolers can’t handle as much heat as the big stuff, with the TT Engine 27 rated for 70W TDP CPUs. Because of that, rather than use something way beyond spec like a 6700K, we’re opting for an i3-6300 CPU and an ITX motherboard. Ultimately, this cooler is meant for ITX, and so we’re testing it with that in mind.
But for competition, we’re testing against the SilverStone NT08-115XP and the Cryorig C7 coolers, both of which are also small form factor. The SilverStone unit measures at 33mm tall, with Cryorig’s quite a bit larger than both Thermaltake and SilverStone (at 47mm tall). This means that Cryorig’s will undoubtedly outperform both the others and at lower RPMs, but provides a smallest-to-largest look at performance.
CPU Temperature Benchmark – Thermaltake Engine 27
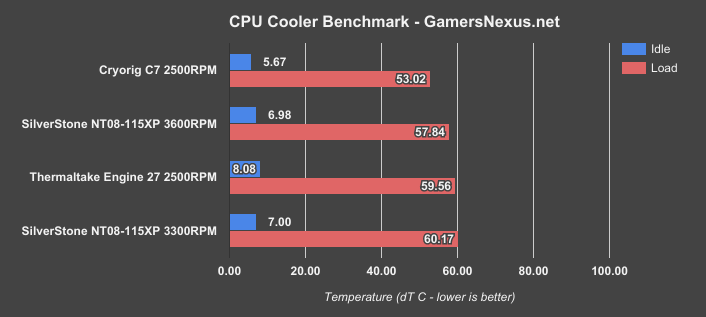
We’re only showing three coolers for right now, as ITX cooler testing is new for us. The Cryorig C7 lands at the top of the bench with a load temperature of about 53C delta T. This cooler is also 47mm tall, or 20mm taller than the Engine 27 and 15mm taller than the NT08.
At a loud 3600RPM, SilverStone’s NT08 operates at around 57.8C delta T load, with idles around 7C. The Thermaltake Engine 27 at 2500RPM, its max speed, keeps temperatures insignificantly warmer at 59.6C delta T load.
None of these are particularly impressive, but they are all more or less equal when considering the lessened cooling potential of a small form factor cooler. Cryorig’s C7 manages to properly differentiate itself with a more noteworthy advantage in cooling, and one which is attributable to its larger stature and superior heatsink, but Thermaltake and SilverStone aren’t too far apart.
The numbers that matter most, purely from a competing size perspective, will be the SilverStone and Thermaltake numbers.
For a proper comparison, we’re setting each cooler to run at an RPM that equals a noise output of 43dBA. This means the SilverStone cooler operates at 3300RPM and the Thermaltake Engine 27 operates at 2500RPM. Those two results land us at 60.1C versus 59.6C -- within our 0.5C range of variance on CPU temperature generation and measurement. For all intents and purposes, when equalizing the noise levels, these two coolers are identical.
Noise Comparison – Thermaltake Engine 27
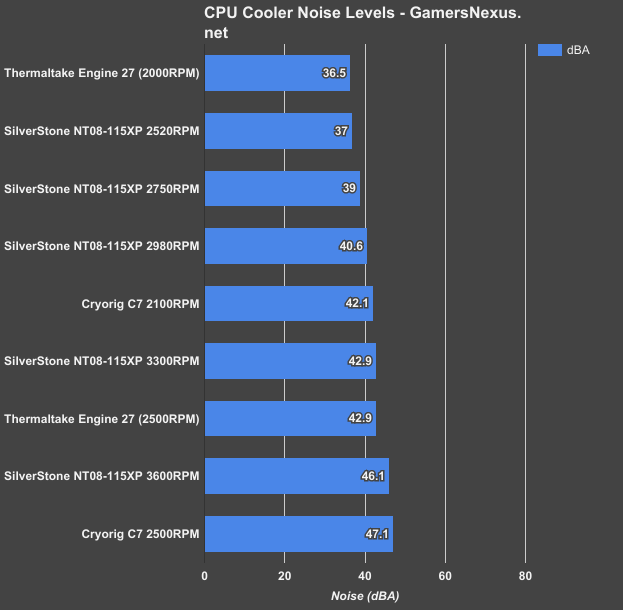
Here’s a chart showing all the noise levels. The coolers tend to be most effective in terms of cooling-to-noise when around 40dBA, just by coincidence, with the Engine 27 still maintaining some level of acceptable performance when at 70% fan RPM with a 36.5dBA output. It wouldn’t do so well with heavy load at that RPM, but idle and low workloads are sustainable.
If you want all of the noise levels for everything we’ve tested, here’s a quick chart for that:
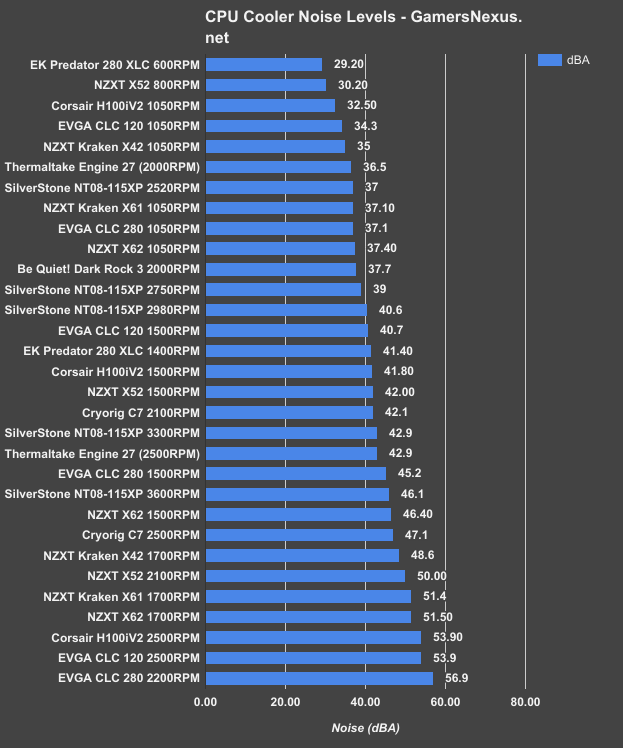
The test methods between platforms are comparable enough to look at all the data for coolers we’ve benched in the past, despite temperature testing being hugely different (different CPUs, motherboards, so forth).
One Thing About Noise
One thing that isn’t shown with our noise testing, though: The type of noise. We’re not doing frequency spectrum analysis, so what you don’t see is that the type of noise made by the Engine 27 is a high-pitched whine – very similar to the whine found in Sandia’s original video – whereas the SilverStone cooler’s same-dBA output is a lower-pitched hum. This is a lot more tolerable to the end-user. Running the Engine 27 at 100% fan speed is borderline unbearable, subjectively, but you’d hopefully be running lower RPMs in most HTPCs where workloads aren’t too devastating to cooling.
Conclusion: Is the Thermaltake Engine 27 Any Good?
The Engine 27 is a unique attempt at making a small profile cooler. It’s interesting, and Thermaltake explained that they worked with Coolchip to develop the Engine 27 for this largely untried approach to cooling. Strictly in terms of thermal performance, it’s around where the comparably sized SilverStone NT08-115XP lands, particularly when considering equal noise output.
It’s also over two times the price, with the NT08 at $20 and the Engine27 at $50. If you can fit a 47mm cooler and still have breathing room above it, Cryorig’s C7 at $30 is the clear winner of all three coolers – it’s just a lot bigger, and won’t fit in slim HTPCs like the SilverStone PT series.
Ultimately, the Engine 27 isn’t a bad cooler – it performs about the same as similarly sized products, so it’s not some crime against humanity. That said, it’s priced significantly out of its performance bracket, and the high-pitched whine at max RPM can get a bit irritating. You’d want to run this at a lower RPM to account for that.
Editorial: Steve Burke
Video: Andrew Coleman