Corsair’s SPEC-04 ($50) is a new mid-tower aimed squarely at the budget market. The case shares its price and much of its hardware (and tooling) with the aged SPEC-01, but with the alien, angular appearance of the SPEC-ALPHA, channeling the aesthetics of the once-$80 case into an affordable $50 package.
Borrowing tooling from its predecessors, the SPEC-04 is able to ship with a lower price-point, aided further by a stripped-down set of interior accoutrements. The SPEC-04 is a small case, but capable of supporting ATX form factor components. This makes the unit deployable for ultra-budget machines, theoretically perfectly fitting for G4560 users.
Today’s review will heavily analyze the thermals, acoustics / noise levels, and build quality of the Corsair Spec-04 case. We test for thermal throttling and additional fan installation, wherein some time is spent adding +1x 120mm fan to multiple positions in the case.
Corsair SPEC-04 Case Specs
Form Factor | Mid-Tower |
Motherboard Support | MicroATX, ATX, Mini-ITX |
Dimensions | 492mm x 201mm x 433mm |
Weight | 4.2kg |
I/O | (x1) USB 3.0 |
Expansion/Bays | (x7) Expansion Slots |
Cooling | Fans: Front: (x2) 120mm (1 included) or (x2) 140mm (Front can mount x3 120mm without HDD cage) Radiators: Front: 120mm or 140mm |
MSRP | $50 |
Corsair SPEC-04 PC Build
The SPEC-04 is an incredibly light case, easily carried in one hand. 4.2kg is much less than the other mid-towers we’ve reviewed lately, approximately 1/3 the weight of the hefty Bitfenix Shogun, and correspondingly easy to lift out of its packaging. Weight is one way to add perceived quality to components, but lightness is welcomed during the building process: flipping the case over and moving it around was trivial, unlike some other recent cases. The thinness of the steel is noticeable, but not a problem as most parts of the case are bent in such a way that it’s reinforced.
Clearance is minimal in most areas. The MSI CPU cooler we use for case testing barely fit under the edge of the chassis frame, and although the side panels are convex in the center and do allow some additional space, our cooler was positioned at the less roomy margin. It did fit, but since we don’t remove the cooler (for consistency between tests), it made it difficult to angle the motherboard into place. Even without that policy, the lack of height above the motherboard would have made it difficult to install a cooler from inside the case. There are no cutouts above the motherboard, and the only route available for our CPU power cable was a cutout behind the actual board that squashed it against the chassis. Best to pre-wire that. Elsewhere in the case, cutouts are generously distributed along with plenty of cable tie points. There was very little room for cable management, so cables had to be tied down securely in the center of the case to take advantage of the convex side panel.
Front I/O is minimal: there are only 2x USB ports -- 1x 3.0 and 1x 2.0, and the standard 3.5mm in/out jacks. The I/O is mounted to the chassis on the non-windowed side of the case, keeping the outward-facing side clean and presentable. The USB ports are connected via a single cable which plugs into a 3.0 socket on the motherboard.
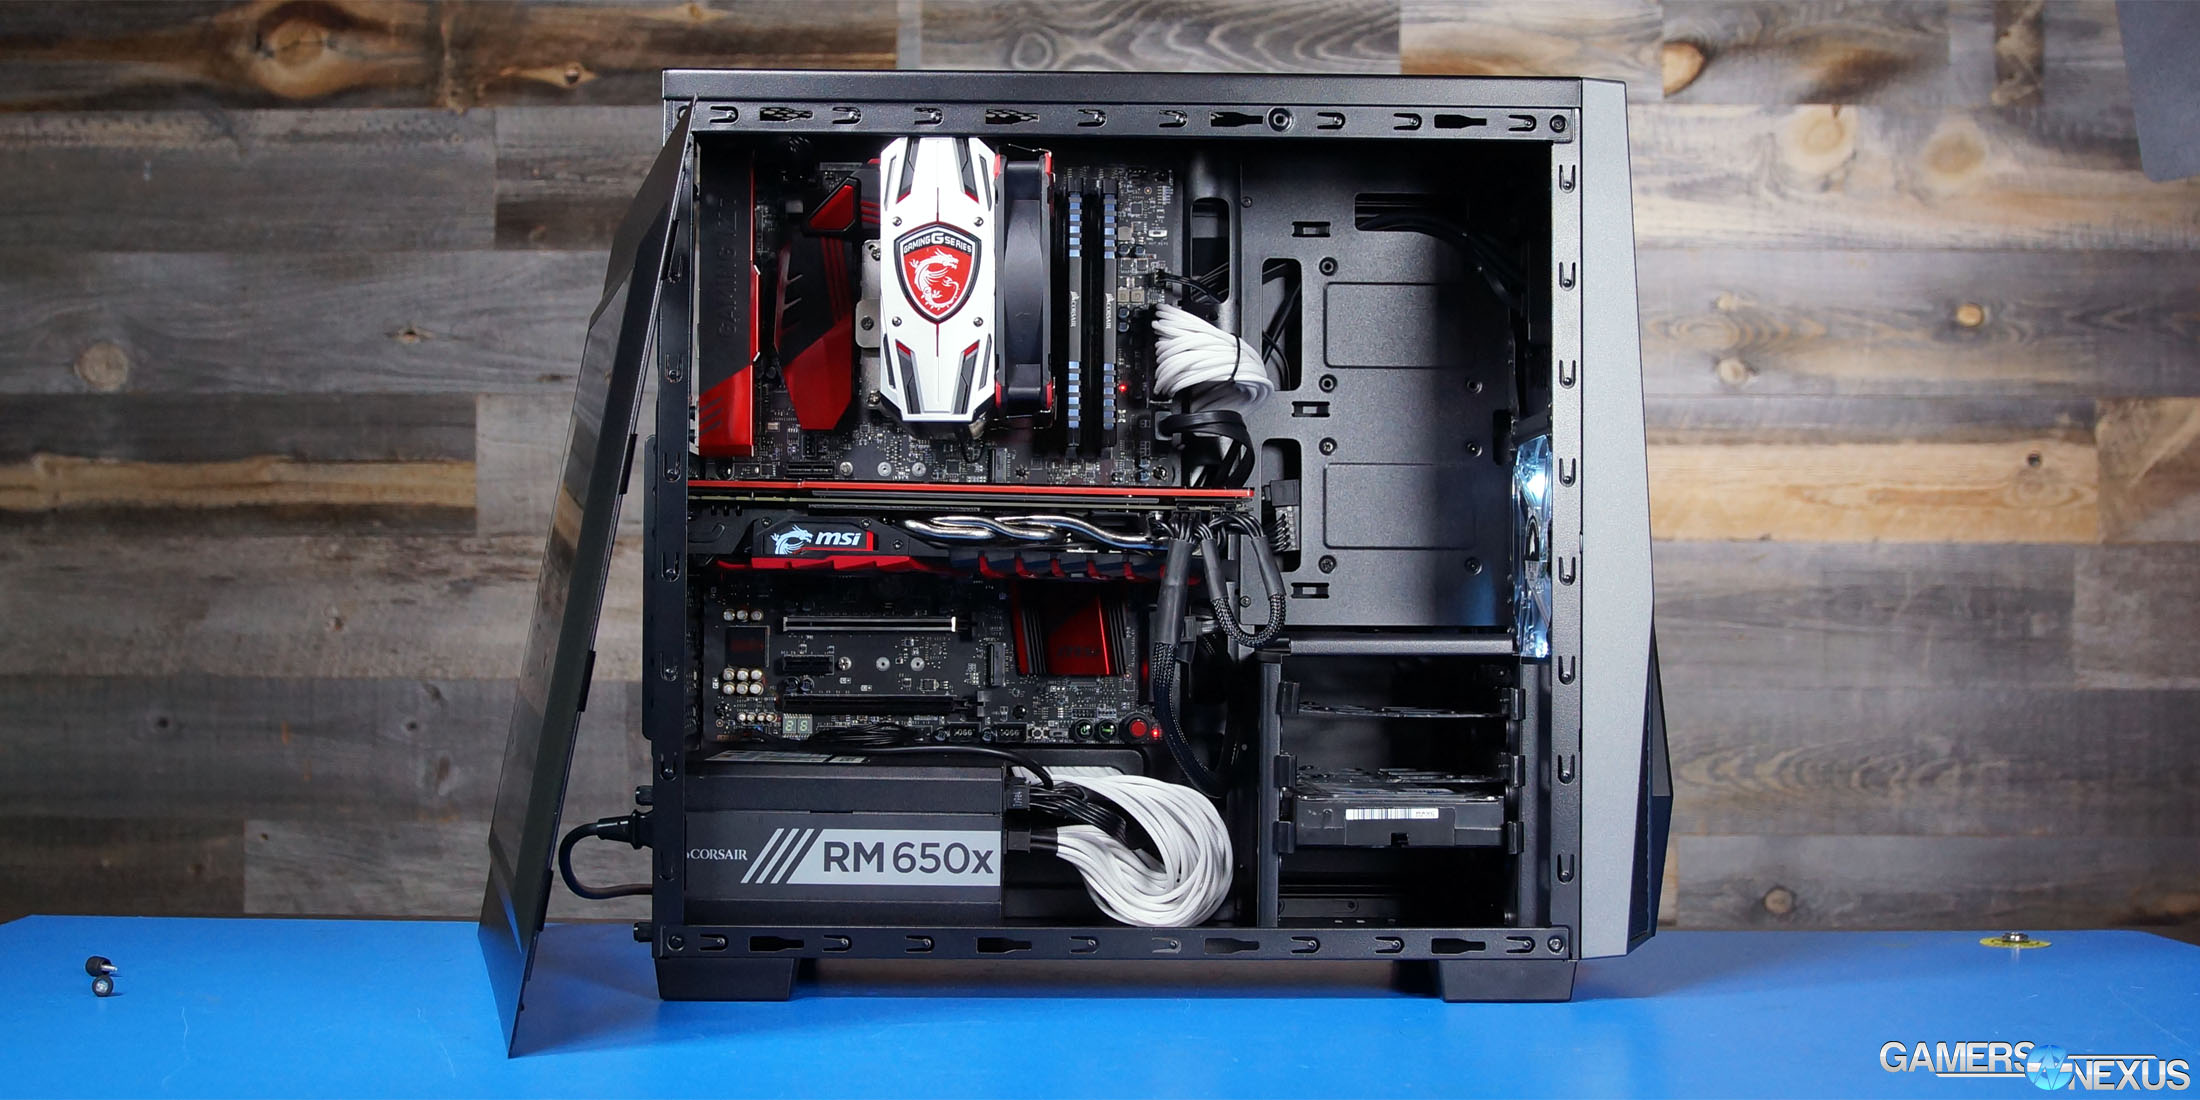
Expansion slots screw in externally, a somewhat uncommon feature among the cases we’ve reviewed. This causes a small protrusion on the back of the case, but primarily it makes the slots blessedly easy to reach with a screwdriver and without cross-threading risk. Hard drive and SSD installation was also easy; the 3.5” bays are tool-less and the cage can be fully removed, although Corsair doesn’t make a big deal about this, presumably because customers buying a $50 case will want to use a hard drive. There are actually four 4x 3.5” slots, but only three drive sleds are included.
The skeleton of the SPEC-04 is identical to that of the SPEC-01, but without the 5.25” optical drive bays, making space for one more fan mount than its ancestor. Corsair doesn’t advertise three front intake slots as (unlike the 01) using the bottom-front slot requires removing the HDD cage, leaving only a couple 2.5” mounts. This gives Corsair’s case the potential fan capacity of Silverstone’s excellently cooled RL06, but packaged with only one to Silverstone’s four. The fan we received maxed out at about 1300RPM.

Intake is filtered by the mesh triangles on the front of the case rather than removable filters. Theoretically, the mesh triangles are themselves removable, but it’s far easier just to wipe down the front panel once in awhile, as the mesh is firmly latched into place. There is one removable filter over the PSU intake.
The exterior is clearly following in the footsteps of Corsair’s angular SPEC-ALPHA, but with a skeleton and pricetag identical to the SPEC-01. The side window is fairly large and takes advantage of the lack of optical drive bays to extend farther than it could otherwise, and it’s tinted (despite being plastic), reducing glare from the white LED fan. Users can form their own opinions on appearance, but I personally dislike the lack of symmetry in this and the ALPHA: it looks more decorative than functional, and it makes me concerned about the amount of air available to the intake fans (see below for actual results on this). The ALPHA style has quite a few advocates, though, and this case was made for them.
Case Testing Methodology
We tested using our new Skylake case test bench, detailed in the table below. This particular configuration is brand new with the launch of the 570X & 270R. Results on this test platform cannot be compared to previous case benchmark results, as the platform has completely changed.
Conducting thermal tests requires careful measurement of temperatures in the surrounding environment. We control for ambient by constantly measuring temperatures with thermocouples and laser readers. We then produce charts using a Delta T(emperature) over Ambient value. This value subtracts the thermo-logged ambient value from the measured diode temperatures, producing a delta report of thermals. AIDA64 is used for logging thermals of silicon components, including the GPU diode.
All case fans are manually configured to their maximum throughput using BIOS, then we configure to an RPM closer to 1050 for a universal "quiet" testing. If a fan controller is present, we opt-in and test on multiple settings. This forces testing of case fan performance in addition to the case's air channeling and airstream design. This also ensures minimal variance when testing, as automatically controlled fan speeds can reduce reliability of benchmarking. The CPU fan is set to 1100RPM (constant) for consistency, and the CPU is overclocked to 4.4GHz with a vCore of 1.272V (constant). C-States and power saving states are disabled.
| Component | Courtesy Of | Price | |
| Video Card | MSI GTX 1080 Gaming X (OC Mode) | MSI | $640 |
| CPU | Intel i7-6700K @ 4.4GHz | GamersNexus | $300 |
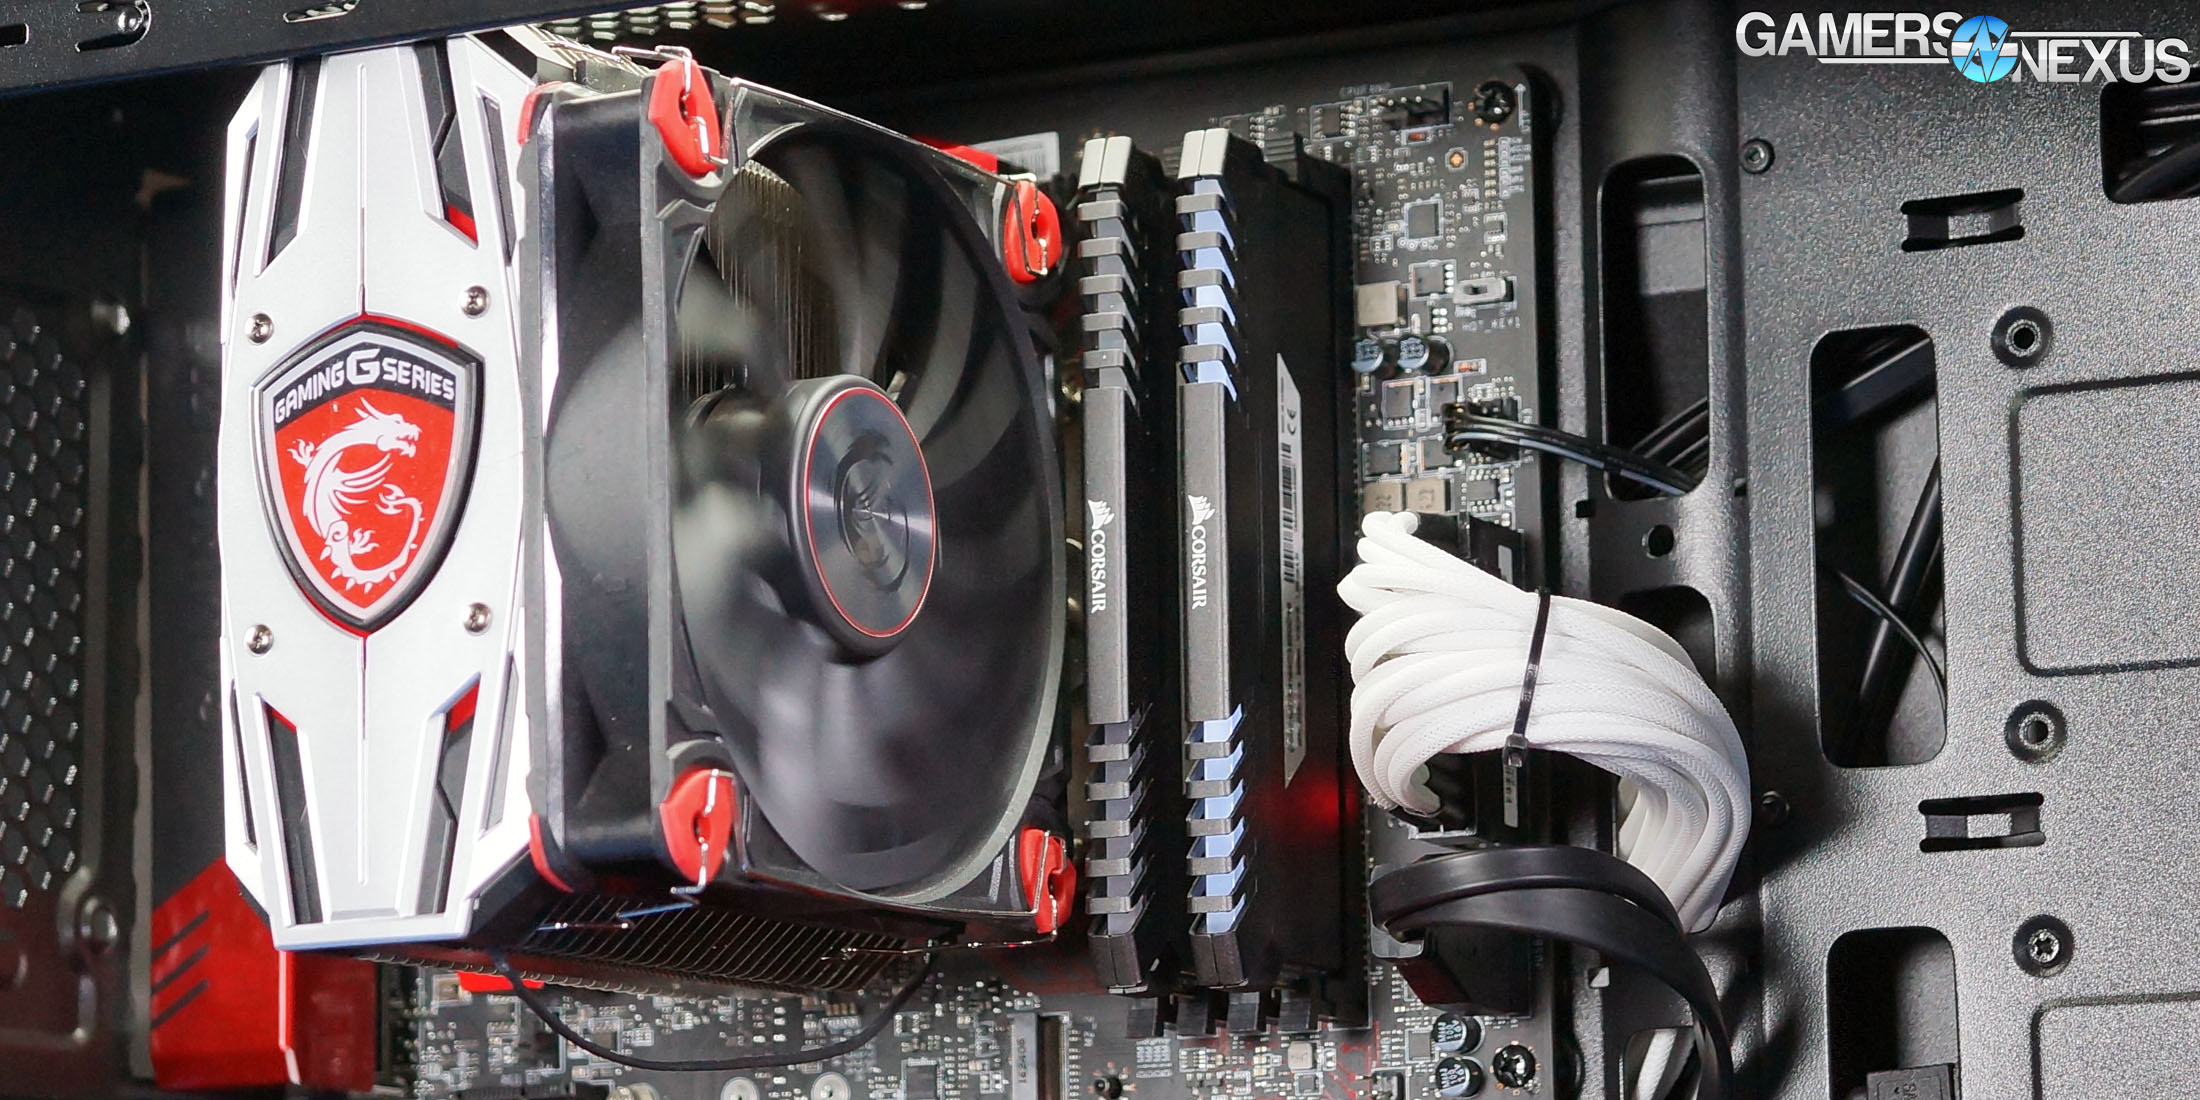
| CPU Cooler | MSI Core Frozr L | MSI | TBD |
| Motherboard | MSI Z170A Gaming M7 | MSI | $180 |
| Memory | Corsair Vengeance LED 32GB 3200MHz | Corsair | $200 |
| SSD | Samsung 850 EVO 120GB | Samsung | N/A |
| PSU | Corsair RM650x | Corsair | $100 |
| Case | This is what we're testing! | - | - |
The video card is configured to run at 55% fan speed at all times.
Prior to load testing, we collect idle temperature results for ten minutes to determine the unloaded cooling performance of a case's fans and air channels. Thermal benchmarking is conducted for 1400 seconds (23 minutes), a period we've determined sufficient for achieving equilibrium. The over-time data is aggregated and will occasionally be compiled into charts, if interesting or relevant. The equilibrium performance is averaged to create the below charts.
Load testing is conducted using Prime95 LFFTs and Kombustor “FurMark” stress testing simultaneously. Testing is completely automated using in-house scripting, and executes with perfect accuracy on every run.
Our new testing methodology includes real-world workloads, like Blender on the CPU, Blender on the GPU, and 3DMark - FireStrike Extreme (1440p) Stress test. The Blender passes use GN's in-house CPU benchmark render scene, with one pass rendered entirely on the CPU and the next pass rendered entirely on the GPU. During the CPU render pass, we set the GPU fan to 25% (minimum manually tuned duty cycle). During the GPU pass, we configure the fan speed to 55% (the VBIOS average high when under load). This prevents unpredictable fluctuations. 3DMark serves as our gaming workload, providing a 1440p workload on both the CPU and GPU. These two tests are in contrast to our torture scenario, which looks at worst case performance.
Continue to the final page for in-depth thermals, noise, & the conclusion.
Thermals
The SPEC-04 is the first case to receive our recently-improved, finalized benchmarking treatment. We still performed the torture test that we usually publish (generating as much heat as possible), and although that’s great for comparing relative performance between cases, it’s not a real-world scenario. We have therefore added our standard Blender rendering test (performed on the CPU and the GPU) to simulate a realistic production workload, and the 3DMark Firestrike Extreme stress test to simulate load-intensive gaming workloads. We also took the liberty of performing some tests with an additional fan installed in the case.
This makes the SPEC-04 one of our most in-depth case reviews, perhaps adjacent to the NZXT Manta review.
Torture Test
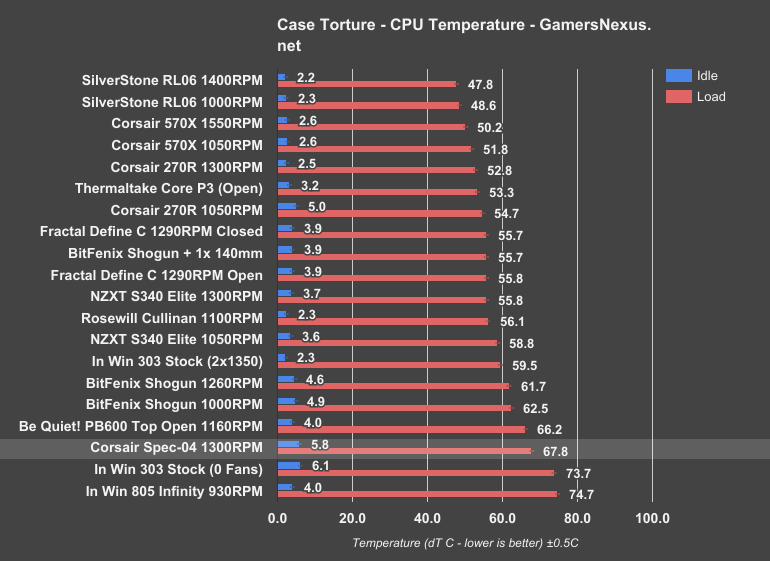
In our torture test, CPU dT got almost exactly as high as it did with Be Quiet!’s Pure Base 600 (with the top closed). Temperatures reached about 100 Celsius at times and, by the end of the test, the CPU was throttling in an attempt to keep temperatures down. The stock SPEC-04 isn’t the hottest case on the bench by this metric, but with the CPU beginning to throttle, it couldn’t have gotten much hotter.
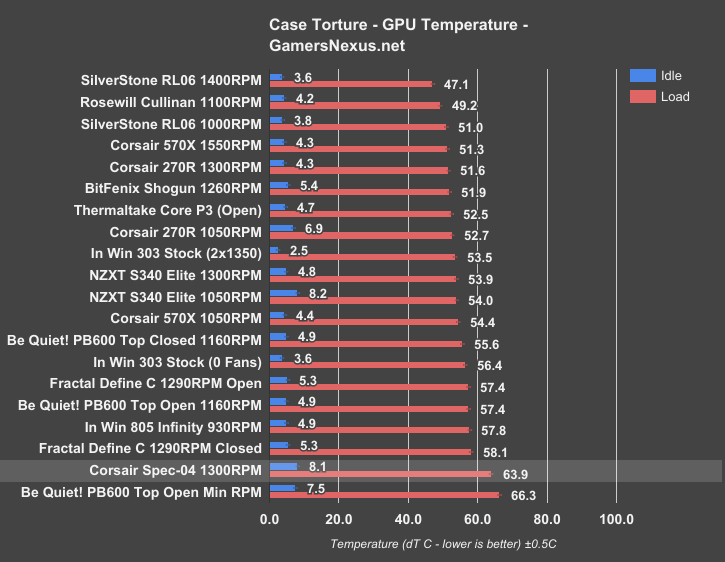
GPU dT was even worse in comparison to its peers: 63.9C dT over ambient is a higher temperature than any case except the Pure Base 600 with its fans turned down, and that includes the completely fanless In Win 303 (which breathes through the bottom, permitting the GPU to bring air in where the SPEC-04 bars this).
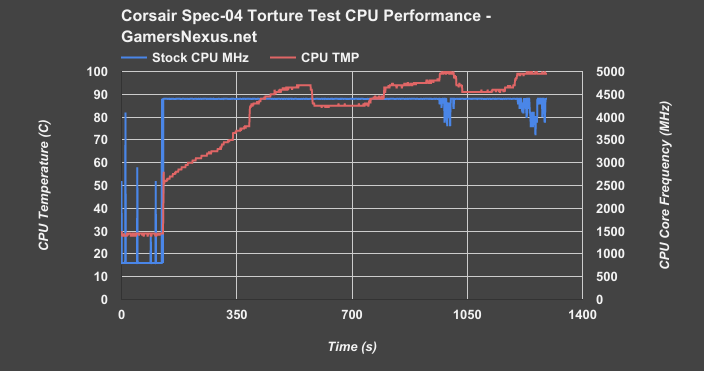
Yikes -- those frequency versus time charts are a little scary, but remember, this is a torture scenario. The other cases can handle it, but our $50 DUT with one fan doesn’t hold up. We need to leverage our new real-world test cases to better understand performance; this is exactly the reason we began introducing those tests. Before getting to those tests, let’s add a fan to the case.
Additional Fan Torture Testing
Corsair’s 120mm stock fan may be decent, but it’s pushed to its limits trying to move air through a case on its own. For our final tests, we did what the SPEC-04 really deserves: we added an additional ~$8 Arctic F12 fan. Filling every fan slot would give the SPEC-04 a huge boost, but it would also add ~$20-$30 to the price, at which point Corsair has better cases that we’d recommend -- like the 270R. For our first experiment, we placed it in the top-front slot, freed-up by the lack of optical drive support, and set it to maximum RPM.
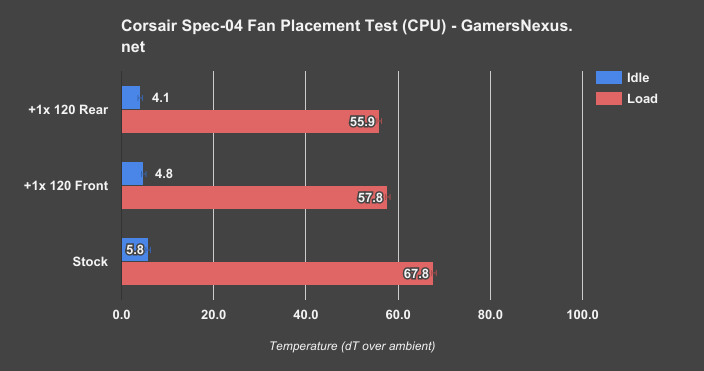
Starting with CPU torture test temperatures for the extra fan tests, we see that adding a fan to the front grants an immediate performance uplift of about 10C, reducing temperatures to 57.8C delta T over ambient. This helps dramatically in CPU temperatures, and brings us down under throttling territory; unfortunately, the fan is partially obstructed by the front panel, so its ability to improve thermals is limited by this. The rear exhaust configuration helps marginally more – just outside of our test resolution – and can be explained by ridding of radiative heat off the GPU backplate, in addition to being fully unobstructed. Either way, adding one fan to the case helps tremendously, and would be a worthwhile investment.
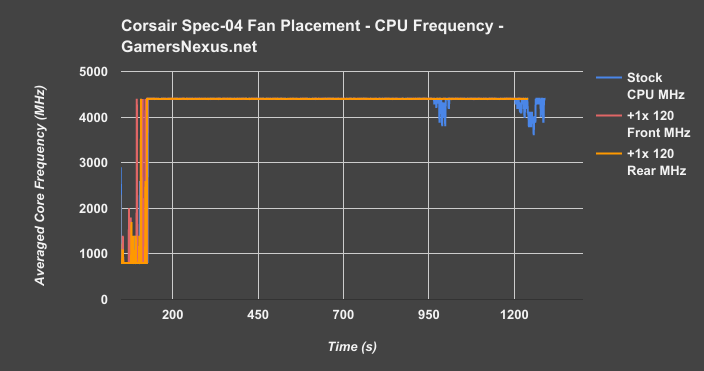
Here’s a look at CPU frequency versus time with these configurations. With the stock configuration, we can see clear throttling as the CPU enters the 90-100C range of our torture workload. Adding a fan in either configuration removes this throttle event.
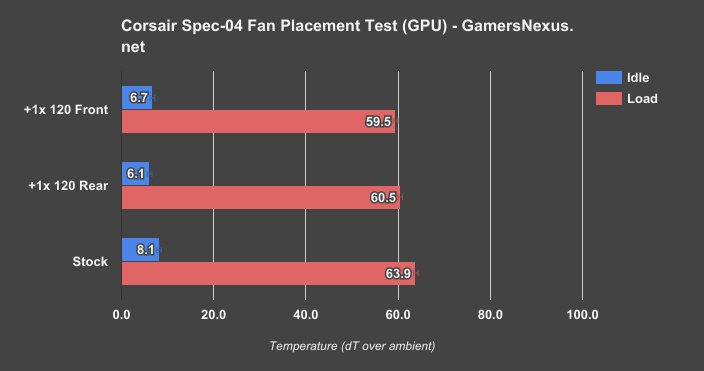
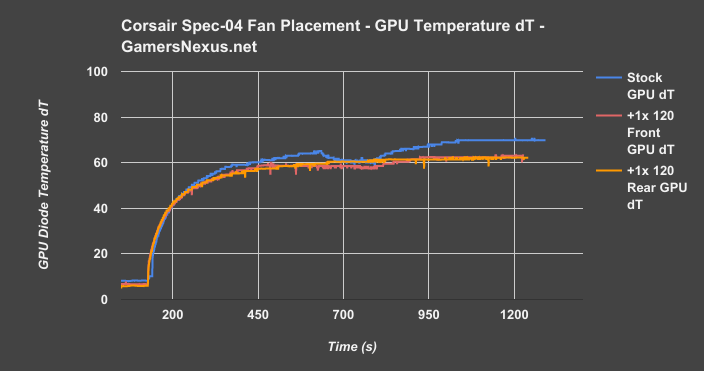
Looking at GPU temperatures after adding an extra fan, we see a reduction from 64C delta T over ambient – which is roughly the throttle point – to around 60.5C delta T with an extra rear fan, or around 60C with the extra front fan. Performance between these two is insignificantly different, meaning that they are within our test-to-test variance and resolution accuracy. The two are effectively the same for GPU performance, and we cannot claim a definitive advantage between front and rear mount options. That said, we can show a definitive improvement with an extra fan over the stock configuration. A fan mounted in the lower position would further aid the GPU, though the CPU would be left to run hot.
Blender Renders
Still, this is a $50 case, and $50 cases shouldn’t necessarily be expected to compete in a thermal torture test with more expensive cases that ship with more fans. That’s why we added these new tests, after all.
Blender rendering was the first of our two more realistic tests, and temperatures were far more reasonable. Our methodology going forward will be to do two renders, one using the CPU and one using the GPU, but in this case we did three. When rendering on the CPU, we tested leaving the GPU fan speed at the standard 55% or turning it down to 25% to minimize any effect on airflow, and we will be using the 25% method from now on.
[blendercpu_gpu25% cpu temp vs frequency]
[optional: add blendercpu_gpu55% cpu temp vs frequency to show consistency between tests]
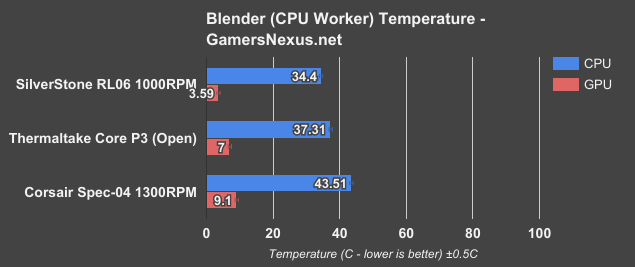
With CPU rendering enabled, we see the Corsair Spec-04 with a single fan pushing the CPU to 43.5C delta T over ambient with our cooler. This is about 6.1C warmer than the open Thermaltake Core P3 configuration, which runs a load CPU dT of 37.3C. Idle temperatures are also a few degrees higher on the GPU, which isn’t doing work in this scenario, but is humming along in the box.
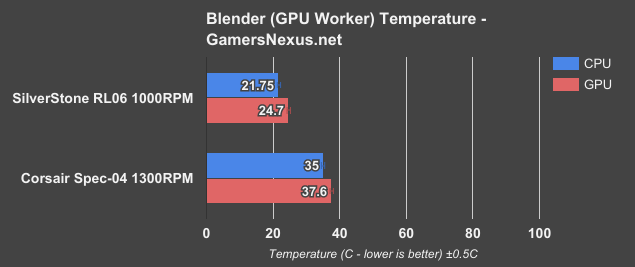
Moving to Blender GPU rendering, we’ve only got two cases on this chart as it’s still new – but it’s a good first look. The Corsair Spec-04 with its single fan at 1300RPM runs a CPU dT of 35C over ambient, with the GPU load dT at 37.6C over ambient. The SilverStone RL06 at 1000RPM, with its 3x 120mm front fans and 1x 120mm rear exhaust fan, is able to sustain a 22C dT CPU temperature and 24.7C dT over ambient GPU temperature. For an extra $15, that’s a significant reduction in temperatures.
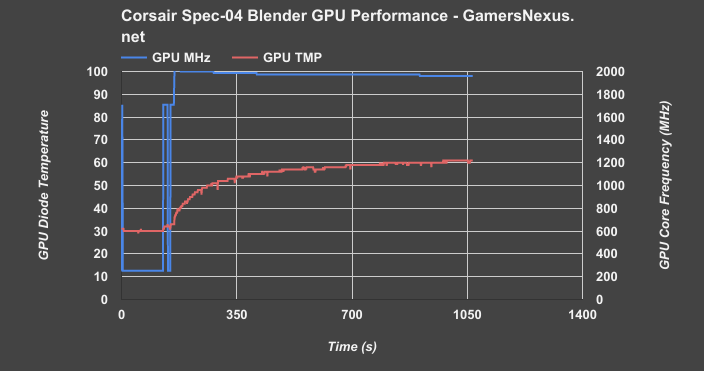
Rendering on the GPU again lacks a truly fair comparison, as Silverstone’s case came with three more fans installed. Frequency did remain fairly stable, steadily dropping only about 40MHz over the course of the test and staying close to 2000MHz overall. This is within normal behavior of Pascal cards.
3DMark Test
3DMark is one of our new introductions to case testing. We’re using a looping FireStrike Extreme test for half an hour here, producing load on both the CPU and GPU in a less torturous manner than is done in our extreme burn-in. This more closely resembles gaming workloads for extended periods of time. As these are new tests, we are still adding to the charts, and only presently have two devices plotted.
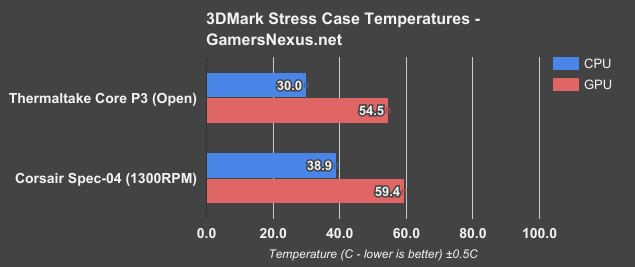
The Corsair Spec-04 runs a CPU temperature of 38.9C delta T over ambient in the 3DMark burn-in, which is about 9C higher than our open-air Core P3 configuration, effectively the resting state of where you’d be mostly without an enclosure. Or a limited one, anyway. The GPU temperatures run about 5C higher, with a delta T of 59.4C on the Corsair configuration. To get a better idea of how this looks in reality, let’s look at a frequency versus temperature chart like we use in our GPU reviews.
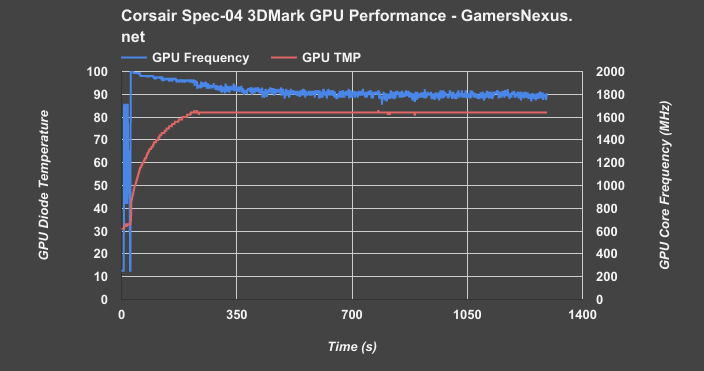
In this chart, we can see how GPU frequency responds to rising temperatures. Our fan is fixed to a 55% fan RPM, which is around where most GPU fans configure their maximum profile before sacrificing frequency rather than noise. Technically, you could run a higher GPU fan speed and solve for this frequency throttling problem, but you’d be drastically increasing noise – something to the effect of a 2x perceived noise increase, depending on what video card is used.
Regardless, there’s a clear down-trend in core frequency until a point where it fluctuates between the high 1700s and low 1800s, resultant of an 84C maximum desirable GPU core temperature. The VBIOS begins throttling back performance to sustain this temperature target under stock configurations, which means losing framerate due to heat. And again, this isn’t a torture workload – it’s just 3DMark.
Running a lower-end GPU like the 1050 would let you get away with the warmer case, but a stock or $20-$30 CPU cooler would still call for an extra fan when the system is under 100% workloads.
Noise
It’s not just about lower temperatures, it’s about lower noise. Sure, 60-70C might be acceptable and won’t throttle too hard outside of torturous scenarios, but if you can run lower fan RPMs on all internal components, that means lower noise.
The SPEC-04’s single fan isn’t incredibly loud, but the limited size of the front panel intakes combined with a double layer of mesh gives it a disproportionately loud whoosh. It’s not a problem at normal fan speeds with only the stock fan installed, but our experiments with two front intake fans at 100% duty cycle got noticeably noisy.
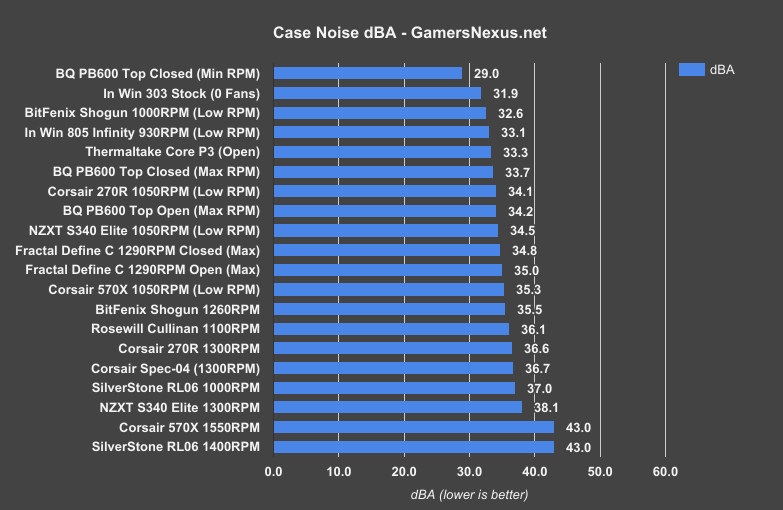
The Corsair Spec-04, by nature of running a single fan, is able to get away with a lower noise output than some of its neighbors. The case doesn’t make any attempts to contain noise – especially with that front mesh intake – but it also doesn’t emit much, given system components that are reasonably inaudible. We measured about a 36.7dBA output with the Spec-04, placing it effectively equal with the 270R at 1300RPM and SilverStone RL06 at 1000RPM. The SilverStone RL06 is able to cool significantly better even at this reduced 1000RPM, and does so while retaining a similar noise output. That said, it’s also an extra $15, so it just comes down to a cost argument and to how much noise and thermals matter to the user.
Conclusion: Corsair SPEC-04 vs. 270R, RL06, & More
The test results might seem negative, but any issues that the SPEC-04 has are perfectly normal at its price. The basic features are adequate, but with the added benefit of a side window and an unusual appearance (if that’s your thing). There is some air filtering and there are plenty of available fan mounts, and we’d strongly recommend filling one of them, as the additional front intake slots are what give the 04 real potential to perform perfectly adequately for a $50 box; however, the main marketing point is the unusual front panel: for customers who love it, this is an easy choice. For those who don’t, well, it’s still an easy choice. Aesthetically, this is a more affordable version of the SPEC-ALPHA, and anyone who’s been tempted by that but unwilling to pay $70-80 should look into the 04 (although the ALPHA is currently on sale). For those who don’t, there are slightly higher-end cases packaged with more fans, like the windowed Corsair 270R (two fans, better performance in our tests) or the Silverstone RL06 (chart-topping performance, but louder). We’d recommend either, although they’re more expensive, they also don’t need any additional fans installed to perform well.
At $50 plus a ~$7 fan, you’re looking at $57 for the Corsair SPEC-04 -- not bad, and it becomes an acceptable, balanced performer once that extra fan has been dropped in. Just get the fan. It’s worth it. For $57 with the extra fan, we feel confident recommending the case for budget gaming PC builds. If two extra fans enter into your mind, unless the face of the SPEC-04 is needed, just jump ship and go with either the 270R windowed ($70) or SilverStone RL06 ($75).
Writer, Testing: Patrick Lathan
Video Host, Test Lead: Steve Burke
Video Producer: Andrew Coleman