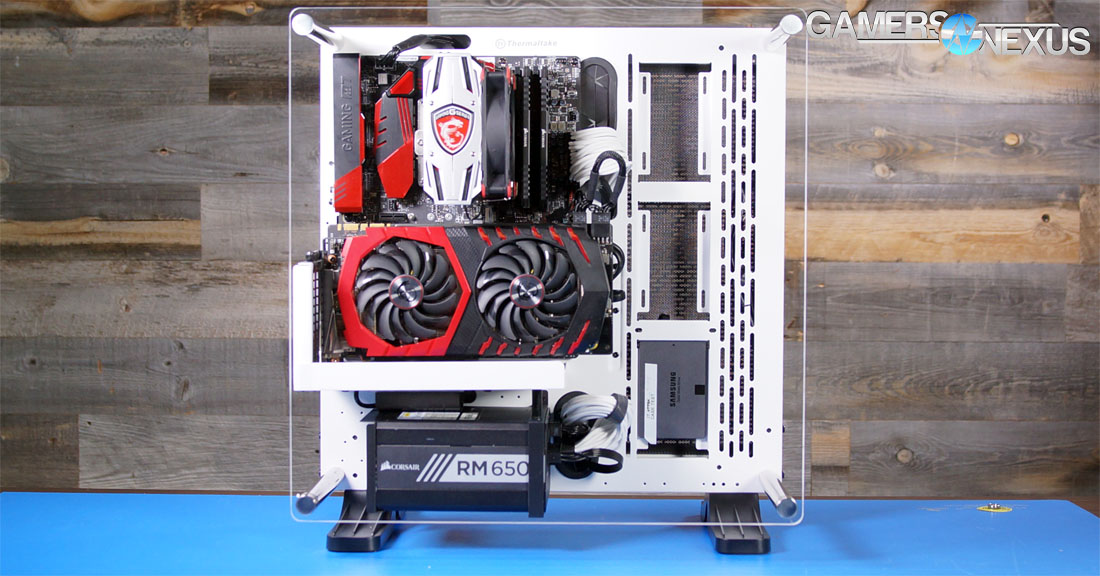
The Thermaltake Core P3 ($100) is one of the more unusual cases we’ve tested: it’s a skeleton case with only two sides, one of which is entirely transparent. This is a case that could theoretically be used as a normal mid-tower, and it’s not priced unreasonably for that, but its design makes the P3 exposed to anything that approaches it at a slight angle -- pets, kids, potentially dust if floor-bound. It’s also cooled just by ambient circulation, as there’s not support for case fans outside of a radiator mount. The P3 is, however, an ideal display case for colorful systems with elaborate liquid cooling, and it’s also a much cheaper alternative to the open-air test benches that we use every day.
For modders, the P-series (P1, P3, P5, P7) offer a basic and compact foundation on which to build. For display systems or testing, the case takes a backseat to the components, offering itself up as a platform for hot-swapping components or for component display. These are the use cases where the P3 shines.
Thermaltake Core P3 Specs
Form Factor | Mid Tower |
Motherboard Support | mini -ITX, Micro ATX, ATX |
Dimensions (H x W x D) | 512 x 333 x 470mm (20.2 x 13.1 x 18.5 inch) |
Weight | 10.3kg/22.7lbs |
I/O | 2 x USB 3.0 3.5mm mic & headphone |
Expansion/Bays | VISIBLE: 2 x 3.5” or 3 x 2.5” INTERNAL: 2 x 3.5” or 2 x 2.5” |
Cooling | 1 x 360mm or 1 x 420mm radiator 3 x 120mm or 3 x 140mm fans w/radiator |
Price |
Note: this Thermaltake chart is somewhat outdated, but provides a good comparison of P3/P5 SKUs
Thermaltake Core P3 PC Build
With many cases, the manual is a waste of paper. With the P3, though, more detailed LEGO-style instructions would have been welcomed--there are a lot of loose parts, and it’s not immediately obvious what all of them do or in what order they need to be assembled. This is a case that needs time and love to be put into its assembly, especially since it’s wide open for the world to see.
This complexity is a direct result of the P3’s best feature: its adaptability. The configuration that we assembled and tested was a normal upright mid-tower, but with the graphics card mounted sideways using a riser cable for display purposes. Alternatively, PCIe cards can be inserted directly into the motherboard as usual with a different arrangement of the expansion slots. Drives can be mounted either inside the case to hide them from view, or in the area meant for a radiator (if it’s not completely filled). The PSU can be mounted normally or sideways with an ITX board, and there’s an optional bracket for a liquid cooling reservoir. That’s an impressive amount of changes that can be made right out of the box.
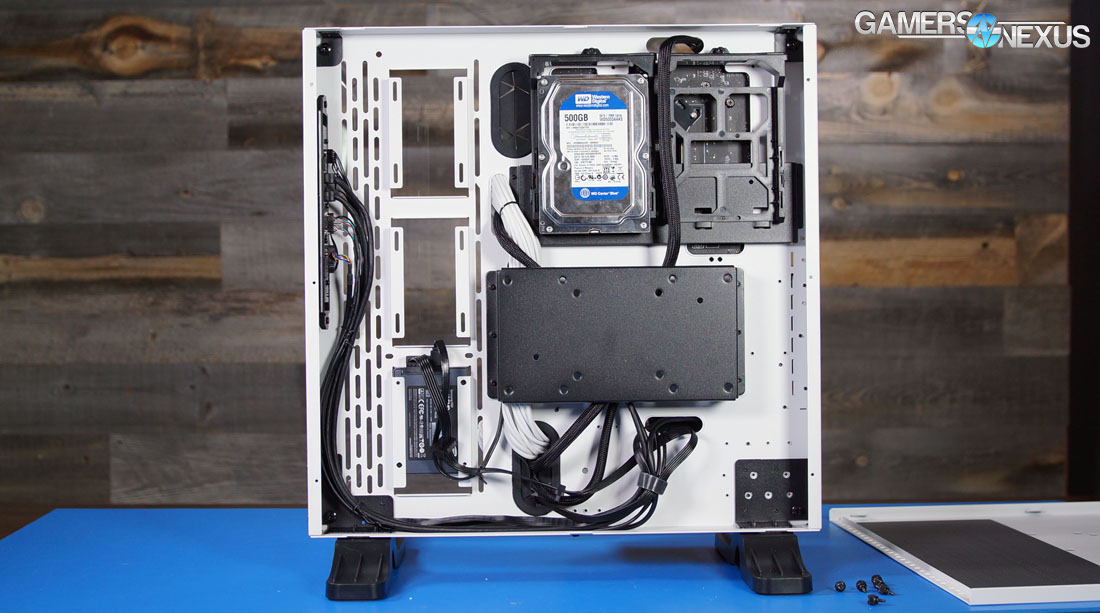
Room for maneuvering is never an issue in a case with no sides, but this also means that it’s very difficult to flip the case over and mess with cables until assembly is complete: putting the feet on after installing the motherboard and standing the case on its side is probably the easiest method. There are also no real cable tie points provided, although there isn’t any lack of space for the cables in the 50mm-wide enclosure.
Cooling capacity is limited to the radiator mount. There is a magnetic air filter clipped to the case, which may or may not be useless, depending on the direction of airflow. This really is a case designed from the bottom-up with the intention of liquid cooling and, although air-cooled systems (like ours) will function perfectly fine, it wastes some of the potential of the case by leaving the one side either empty or filled with 2.5”/3.5” drives.
Thermaltake has a small website dedicated to further modding their cases filled with 3D models of brackets, drive cages and fan covers, which can either be printed at home or shipped from a 3D printing service. Printing a whole drive cage seems a little ambitious, but the liquid cooling brackets could be genuinely helpful while fitting in with the intended color scheme. Also, there’s a $37 tempered glass side panel available on Amazon to replace the stock acrylic one.
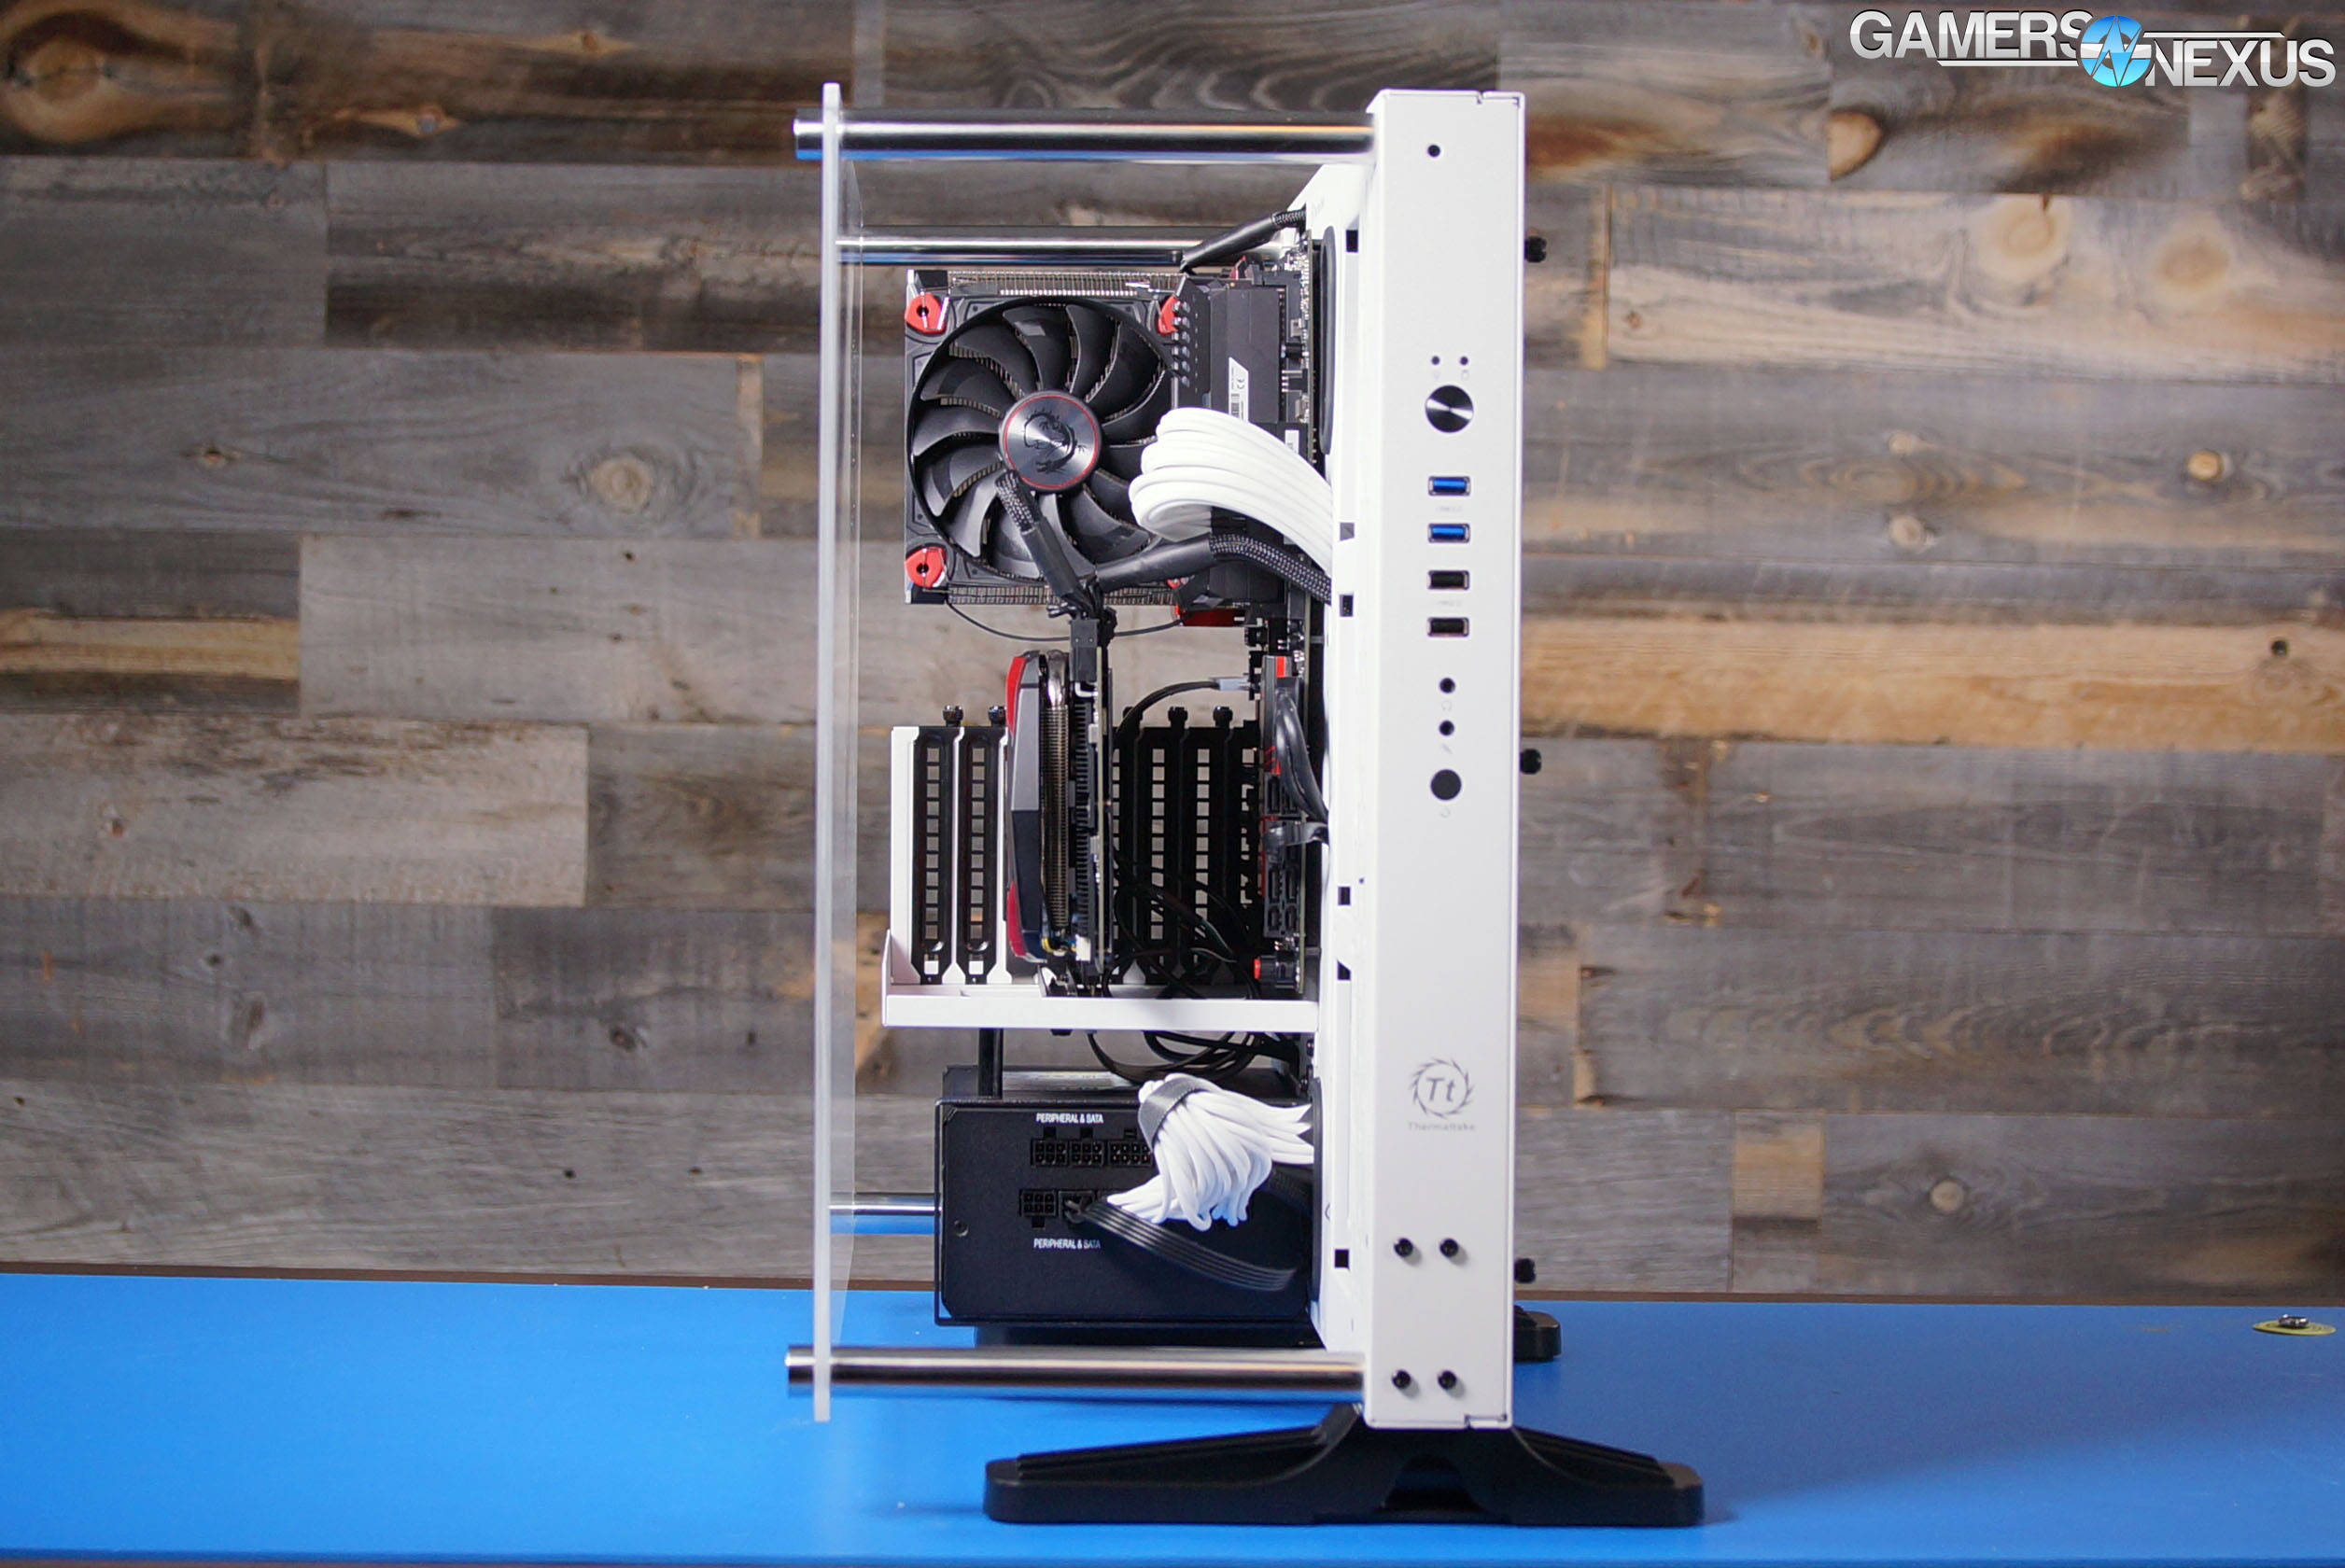
A primary concern at first glance is stability. One entire side is made up of a non-structural acrylic sheet held up by metal bars. The actual enclosed metal section is very narrow, and could be prone to flexing. Luckily, Thermaltake took the simplest possible approach to solving these issues: they used more metal. The steel side panels are roughly 2mm thick (with paint) reinforced with additional 3mm thick steel brackets, and the bars that hold up the side panel are impressively heavy. The legs are as secure as they can be, despite being off-center when the case is vertical (to help balance), and overall the case feels reassuringly sturdy in this “default” orientation. The only supporting structure that fails to perform fully is the PSU bracket, which holds the Corsair RM 650 up entirely by one side and didn’t quite make contact with the middle. This is more likely because of varying power supply dimensions than Thermaltake’s manufacturing: everything else fit together very cleanly, with the exception of some case screws that were difficult to tighten, possibly because of paint in the holes.
The P3 can also be laid on its side or mounted on a wall. We plan to adapt the P3 into an additional open-air test bench soon, and the optional rubber legs that allow it to lay flat are a large part of that decision. Wall mounting could be more difficult, though: the cost of all that heavy steel is a net weight of 10.3kg without any hardware installed. You’d want to go straight into the studs, obviously, lest ripping drywall out of the wall is a pass-time.
Case Testing Methodology
We tested using our new Skylake case test bench, detailed in the table below. This particular configuration is brand new with the launch of the 570X & 270R. Results on this test platform cannot be compared to previous case benchmark results, as the platform has completely changed.
Conducting thermal tests requires careful measurement of temperatures in the surrounding environment. We control for ambient by constantly measuring temperatures with thermocouples and laser readers. We then produce charts using a Delta T(emperature) over Ambient value. This value subtracts the thermo-logged ambient value from the measured diode temperatures, producing a delta report of thermals. AIDA64 is used for logging thermals of silicon components, including the GPU diode.
All case fans are manually configured to their maximum throughput using BIOS, then we configure to an RPM closer to 1050 for a universal "quiet" testing. If a fan controller is present, we opt-in and test on multiple settings. This forces testing of case fan performance in addition to the case's air channeling and airstream design. This also ensures minimal variance when testing, as automatically controlled fan speeds can reduce reliability of benchmarking. The CPU fan is set to 1100RPM (constant) for consistency, and the CPU is overclocked to 4.4GHz with a vCore of 1.272V (constant). C-States and power saving states are disabled.
| Component | Courtesy Of | Price | |
| Video Card | MSI GTX 1080 Gaming X (OC Mode) | MSI | $640 |
| CPU | Intel i7-6700K @ 4.4GHz | GamersNexus | $300 |
| CPU Cooler | MSI Core Frozr L | MSI | TBD |
| Motherboard | MSI Z170A Gaming M7 | MSI | $180 |
| Memory | Corsair Vengeance LED 32GB 3200MHz | Corsair | $200 |
| SSD | Samsung 850 EVO 120GB | Samsung | N/A |
| PSU | Corsair RM650x | Corsair | $100 |
| Case | This is what we're testing! | - | - |
The video card is configured to run at 55% fan speed at all times.
Prior to load testing, we collect idle temperature results for ten minutes to determine the unloaded cooling performance of a case's fans and air channels. Thermal benchmarking is conducted for 1400 seconds (23 minutes), a period we've determined sufficient for achieving equilibrium. The over-time data is aggregated and will occasionally be compiled into charts, if interesting or relevant. The equilibrium performance is averaged to create the below charts.
Load testing is conducted using Prime95 LFFTs and Kombustor “FurMark” stress testing simultaneously. Testing is completely automated using in-house scripting, and executes with perfect accuracy on every run.
Our new testing methodology includes real-world workloads, like Blender on the CPU, Blender on the GPU, and 3DMark - FireStrike Extreme (1440p) Stress test. The Blender passes use GN's in-house CPU benchmark render scene, with one pass rendered entirely on the CPU and the next pass rendered entirely on the GPU. During the CPU render pass, we set the GPU fan to 25% (minimum manually tuned duty cycle). During the GPU pass, we configure the fan speed to 55% (the VBIOS average high when under load). This prevents unpredictable fluctuations. 3DMark serves as our gaming workload, providing a 1440p workload on both the CPU and GPU. These two tests are in contrast to our torture scenario, which looks at worst case performance.
Thermaltake Core P3 Thermals & Noise
We’re experimenting with some new case testing methodology, so there are more numbers than usual to go over. To measure relative performance, our torture test raises temperatures as high as possible, making it easier to tell the difference between cases. For standalone performance, our less extreme 3DMark and Blender stress tests simulate conditions that a user might reasonably experience.
Keep in mind that we aired our SPEC04 review before this one, although the P3 was tested first (and filmed first).
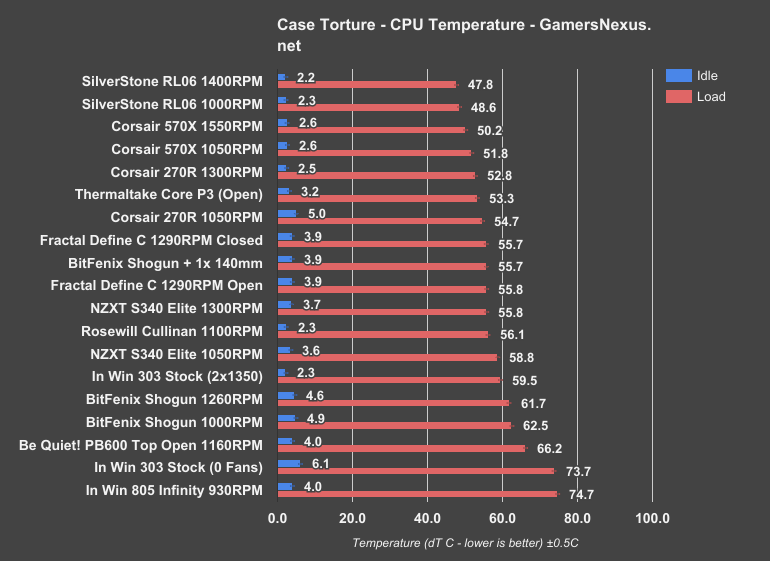
Running the Thermaltake Core P3 through the CPU bench, we see that the open air configuration performs reasonably well overall. The only reason an open setup wouldn’t chart top, as we see here, is because of reduced directional airflow into the components and reduced ability to push warmed air away. In the case of the P3, the acrylic window blocks heat from escaping in a fashion that might occur with a truly open air bench, but not in a way which significantly hinders airflow.
With our standardized case testing bench, the Core P3 under a torture workload operates at around 53C delta T over ambient, with an idle of around 3C delta T. We lose some of the directional airflow and heat exhausting abilities of something like the SilverStone RL06, which is a chart-topper right now, but still perform well in the semi-open air configuration of the P3. The P3 places just outside of test variance margins of the Corsair 270R at 1050RPM, which tested about a degree warmer, and within variance of the 270R at 1300RPM.
The Fractal Define C also does reasonably well here, maintaining some level of silence by nature of being an enclosure.
Speaking strictly to the P3, there’s nothing to complain about here. Provided adequate, active cooling solutions for the CPU, temperatures will remain in check.

Moving on to GPU temperatures during the same torture workload as the previous test, the Thermaltake Core P3 runs a 52.5C delta T over ambient GPU value when the fan is configured to 55%, with the idle values at around 4.7C delta T, prior to test start. This positions the Thermaltake Core P3 open air configuration about equivalent with the 270R stock configuration at 1050RPM, similar to the previous test, and within variance range of the BitFenix Shogun at 1260RPM. It’s not the coolest box on the chart, but for a semi-open air config with a side panel and no directed airflow from case fans, it’s doing well. The GPU is at no risk of throttling in this configuration.
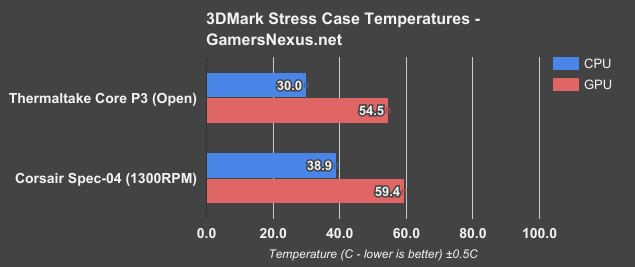
Moving to our 3DMark FireStrike Extreme workload on loop, we can now look at a realistic thermal scenario with gaming-level workloads on both the CPU and GPU simultaneously. This is less intensive than our thermal torture test, but still fairly intensive on some components.
This is a brand new test and doesn’t have comparative data yet, so Thermaltake is the first to go through the 3DMark test run. Our next case reviews will add on this and help provide perspective as to where things fall.
Blender Workloads
This next test was introduced with our SilverStone Redline 06 test, and will slowly build to add more components.
We’re using GN’s custom Blender animation to render on the CPU here, leveraging only the CPU as a worker. The GPU is running at its minimum fan duty cycle, as it is not being loaded at all. We have fixed the GPU fan speed to this cycle so that it does not fluctuate and impact results.
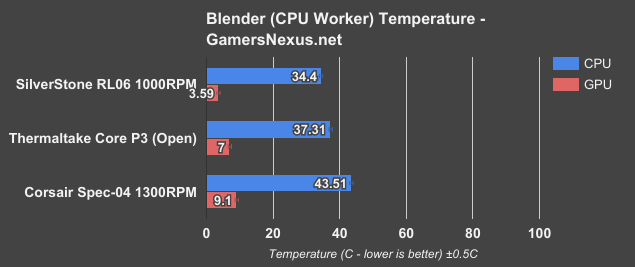
With the CPU worker running, we’re seeing the Thermaltake Core P3 semi-open configuration operate a CPU load temperature of 37.3C delta T over ambient, with its GPU idling at 7C. The SilverStone RL06 is the only other case on this chart and was the coolest case we’ve recently tested, so it’s a high performer. The directed airflow keeps the CPU to around 34.4C delta T load, with idle around 3.6C. Both cases are performing well in the sense of overall temperature being well within any reasonable operating range, but we need to continue iterating on case reviews to add more data to this chart. It’s a start, though.
Thermaltake Core P3 Noise Tests
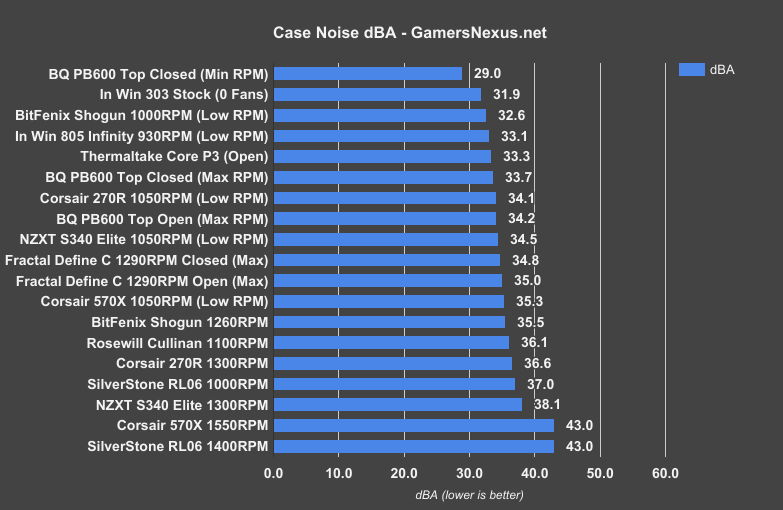
Noise levels were low because of the lack of fans, but also didn’t benefit from any insulation. There’s a very easy way to judge how loud a radiator with fans will be when installed in this case: plug it in and listen, and that’s exactly how loud it will be. Testing noise in this case is basically just testing the noise of our test system, as there’s no sound insulation or damping given the open nature of the case. This means that you’ll want to look up noise of your individual components to figure things out.
Conclusion
There are a few uses for this case, but daily use on a desk is not the target use: there’s no noise insulation, and in those respects it defeats the purpose of using a case in the first place, and it’s open to curious pets. If these aren’t a point of concern, then the P3 is an ideal case for anyone who wants to show off, whether they’re a consumer, a manufacturer, or a modder. For home use, mounting the P3 high enough on the studs would avoid dust, and laying it on its side is probably the way to go for an affordable, high-quality test bench.
For a case that’s clearly designed for expensive components, $93 is an impressive bargain. The acrylic side panel we received with our case is crystal clear, but given the nature of the case, users may wish to upgrade to tempered glass. That brings the price nearer to $140, depending on sales. Even so, the P3 does what it’s designed to do very well, and that price probably isn’t an obstacle for the target demographic. In addition, this is one of the few review cases that we’re planning to continue to use, as it’s an affordable alternative to the open-air benches we use for testing components.
Editorial, Testing: Patrick Lathan
Video Host, Test Lead: Steve Burke
Video Producer: Andrew Coleman