The Be Quiet! Dark Base Pro 900 - White Edition is an upgraded but functionally similar version of the Dark Base 900, the highest of the high end Be Quiet! enclosures. The tagline for this model is “outstanding flexibility and silence,” referring to the fact that the motherboard can be inverted, a feature we previewed at Computex a year ago. We first spotted the white edition at this year’s Computex, where Be Quiet! was showing off the limited edition white variety.
The newest version of the case differs only from previous DBP 900 cases in its color, but as we never reviewed the original Dark Base Pro 900, we’ll be going through the complete review and benchmark today. This Dark Base Pro 900 review includes thermal testing for standard and inverted layouts, ventilation/duct testing, noise testing, and assembly.
Be Quiet! Dark Base Pro 900 Specs
Form Factor | Full-tower |
Motherboard Support | E-ATX, XL-ATX, ATX, M-ATX, Mini-ITX |
Dimensions | 577 x 243 x 585mm (H x W x D) |
Weight | 14.39 kg/ 31.72 lbs |
I/O | USB 2.0 x 2 |
Expansion/Bays | 5.25 x 2 8x Expansion slots |
Cooling | Preinstalled fans: Front: 2x SilentWings® 3 |140mm PWM / 1,000rpm Additional slots: Front: 1x 140mm (w/o ODD cage) Radiators: |
MSRP | $250 (€259. Sorry, Europe.) |
Differences Between “Limited Edition” DBP 900s
Our review sample is one of the limited edition ones, which is unfortunate, because it looks great. Both the interior and the exterior are completely white, except the fans, screws, and some black trim. Even the rubber grommets and feet are white. We didn’t install the included RGB LEDs for this review, but some bright white light illuminating the interior combined with the tinted glass side panel would go well together. There’s some novelty to having #1856 of 2000 cases, but hopefully this limited run was popular enough to inspire Be Quiet! to make some more, as they said they might at Computex.
The Build
The build was a strange mix of convenience and complexity. The DBP 900 has a ton of features, notably the invertible layout, that make it intimidating to build in. For example, installing the PSU took several minutes of studying the manual: the PSU screws into a bracket, the bracket slots onto four screws already installed in the case, and then the bracket is secured with two screws on the side. The manual lists six slightly different ways to do this, depending on case orientation and PSU/board alignment.
There’s plenty of room to work with, as this is a truly massive case. It’s about the same size as the behemoth Rosewill Throne currently housing Steve’s personal system, but even heavier at 31.72 pounds (14.39kg) empty. Nothing in it is lightweight, and that’s just fine, since it’s going to sit in one spot for years at a time.
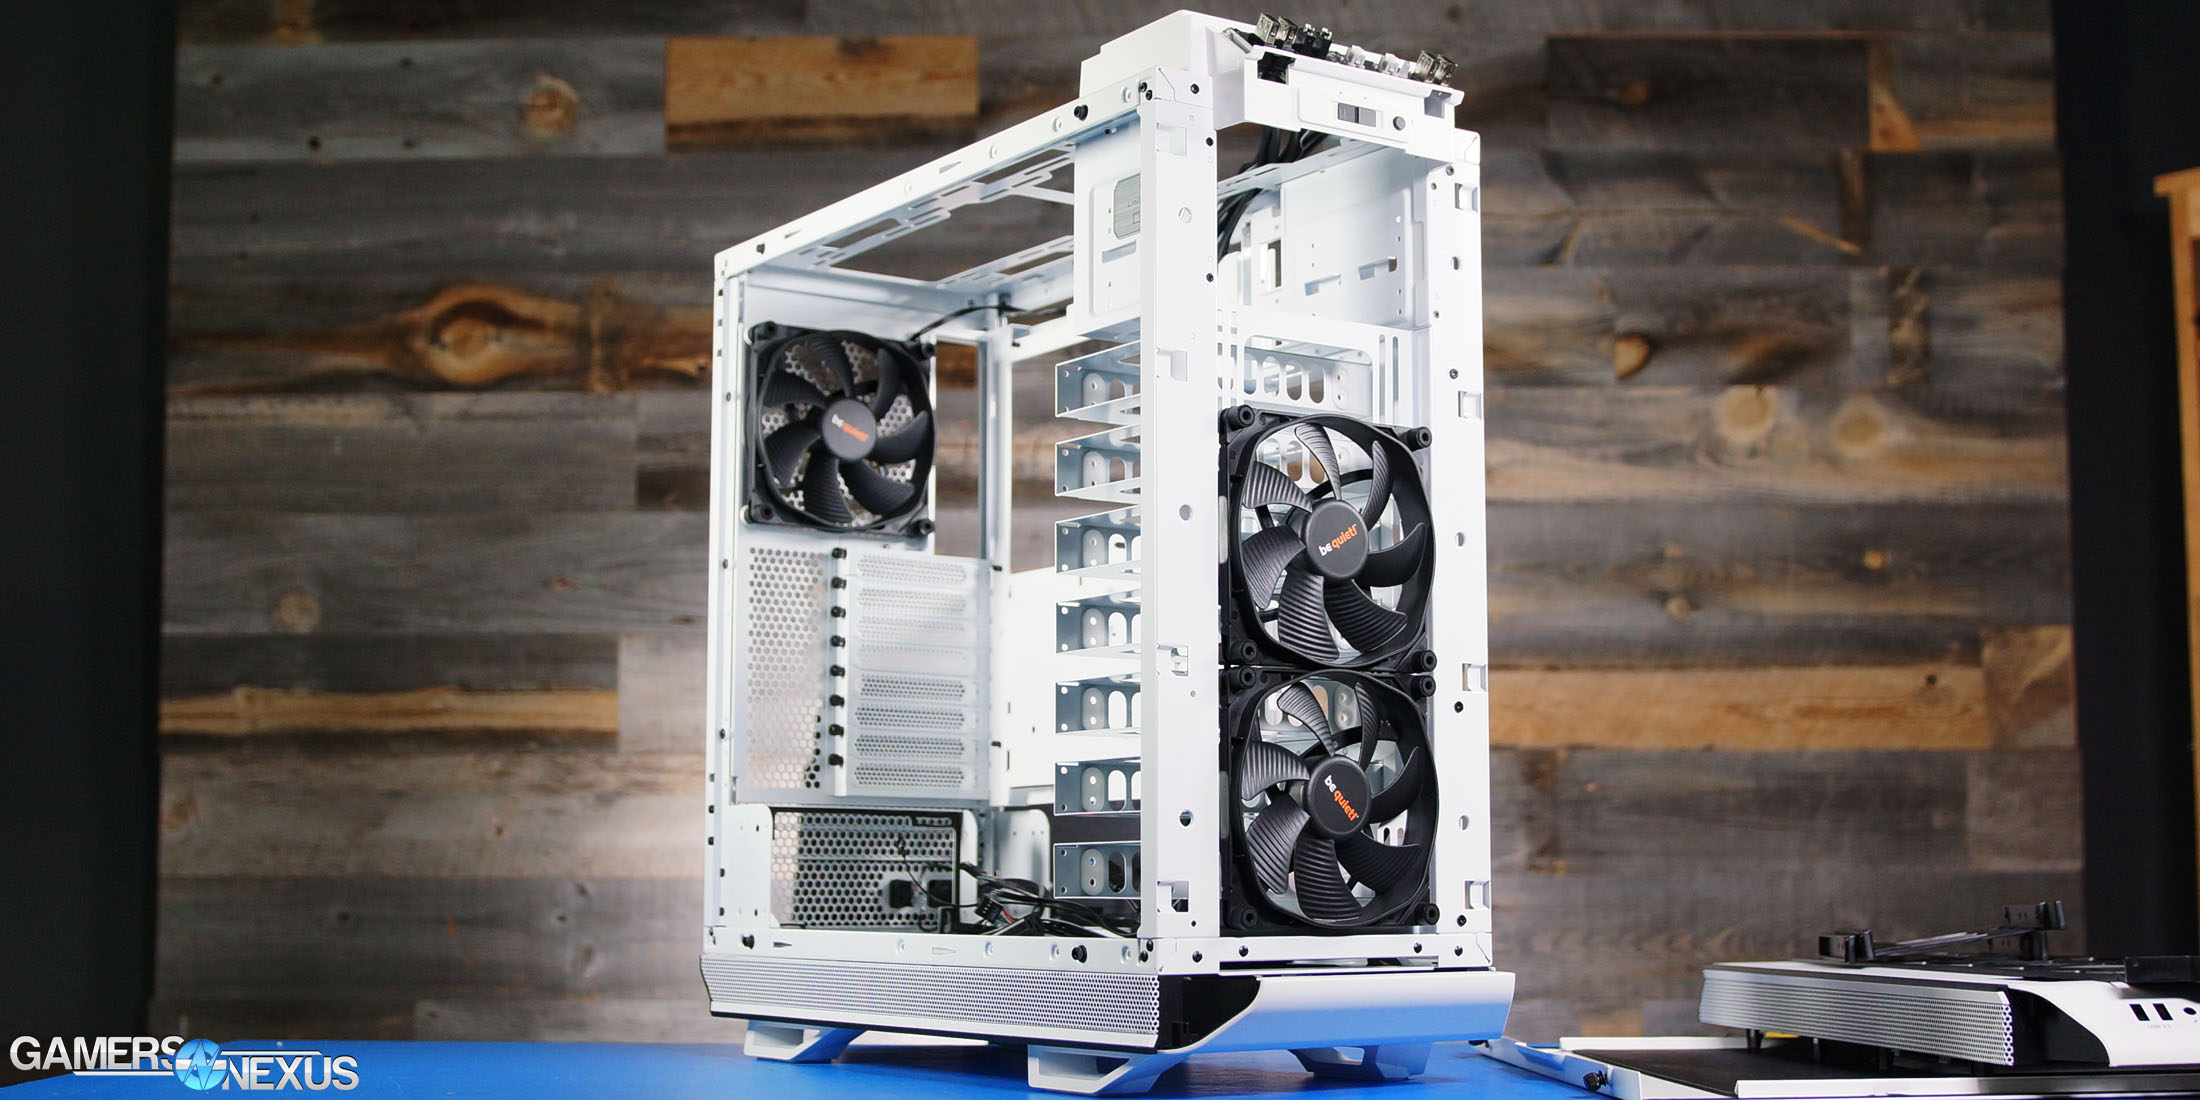
Despite the complexity, everything fits together exactly as intended. The top, front, and bottom compartments of the case, although we left them empty, clearly had a lot of thought put into them. There are tons of places to install additional fans and radiators, but all of them are inside the layers of acoustic foam and thick panels that Be Quiet! takes pride in. This attention to detail extends to a thin foam ring around the edges of the tempered glass panel to cushion it and seal in noise. Two fans can be installed in the filtered vent on the side panel, although this is intended for the non-tempered-glass version of the case, where these fans can be aimed at the CPU/GPU rather than the back of the motherboard.
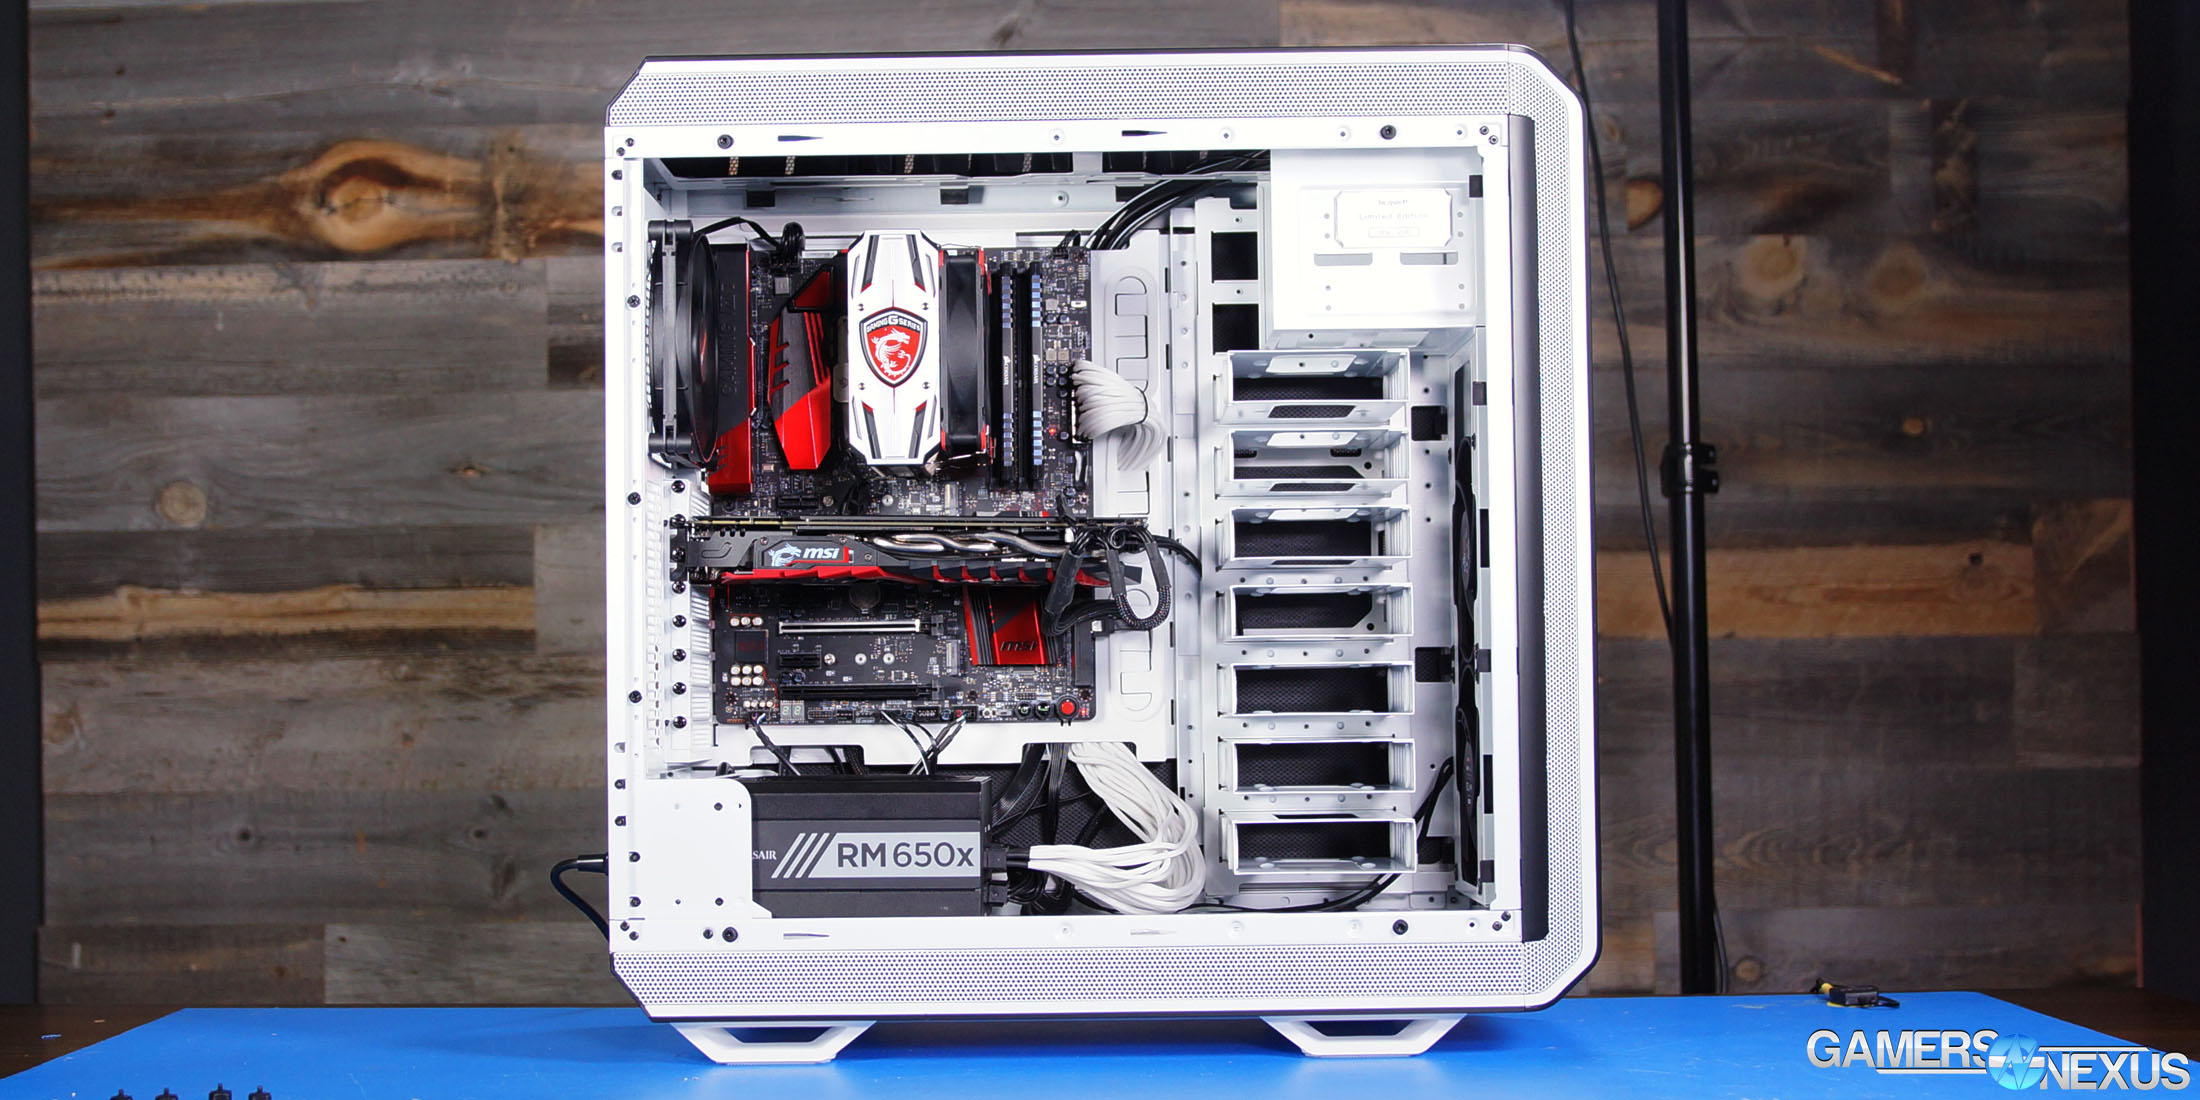
Cable management is good, but requires some planning. Cables must be routed through the motherboard tray rather than over its edges, as otherwise they’ll keep the side panel from sliding on. There are plenty of cable tie points, as well as six velcro ties, and the sheer size of the case makes it easy to find space. That’s fortunate, because without a PSU shroud, there’s nothing to hide lazy cable management.
The fanciest pieces of hardware included are the Qi charger and the fan controller PCB. Somehow, despite being a tech review site, nobody has a single cell phone capable of wireless charging at GN HQ, so we can only speak for the fan controller. The deluxe version included in the Pro case has 4 each of 3- and 4-pin fan plugs, two LED connections for the two included RGB strips (unfortunately adhesive rather than magnetic), and an option for PWM control in addition to the standard manual slider on the front of the case. When connected to the motherboard, this allows the PC to control fan speed when the manual slider is turned all the way down. LEDs can be switched to red, green, blue, white, or orange.
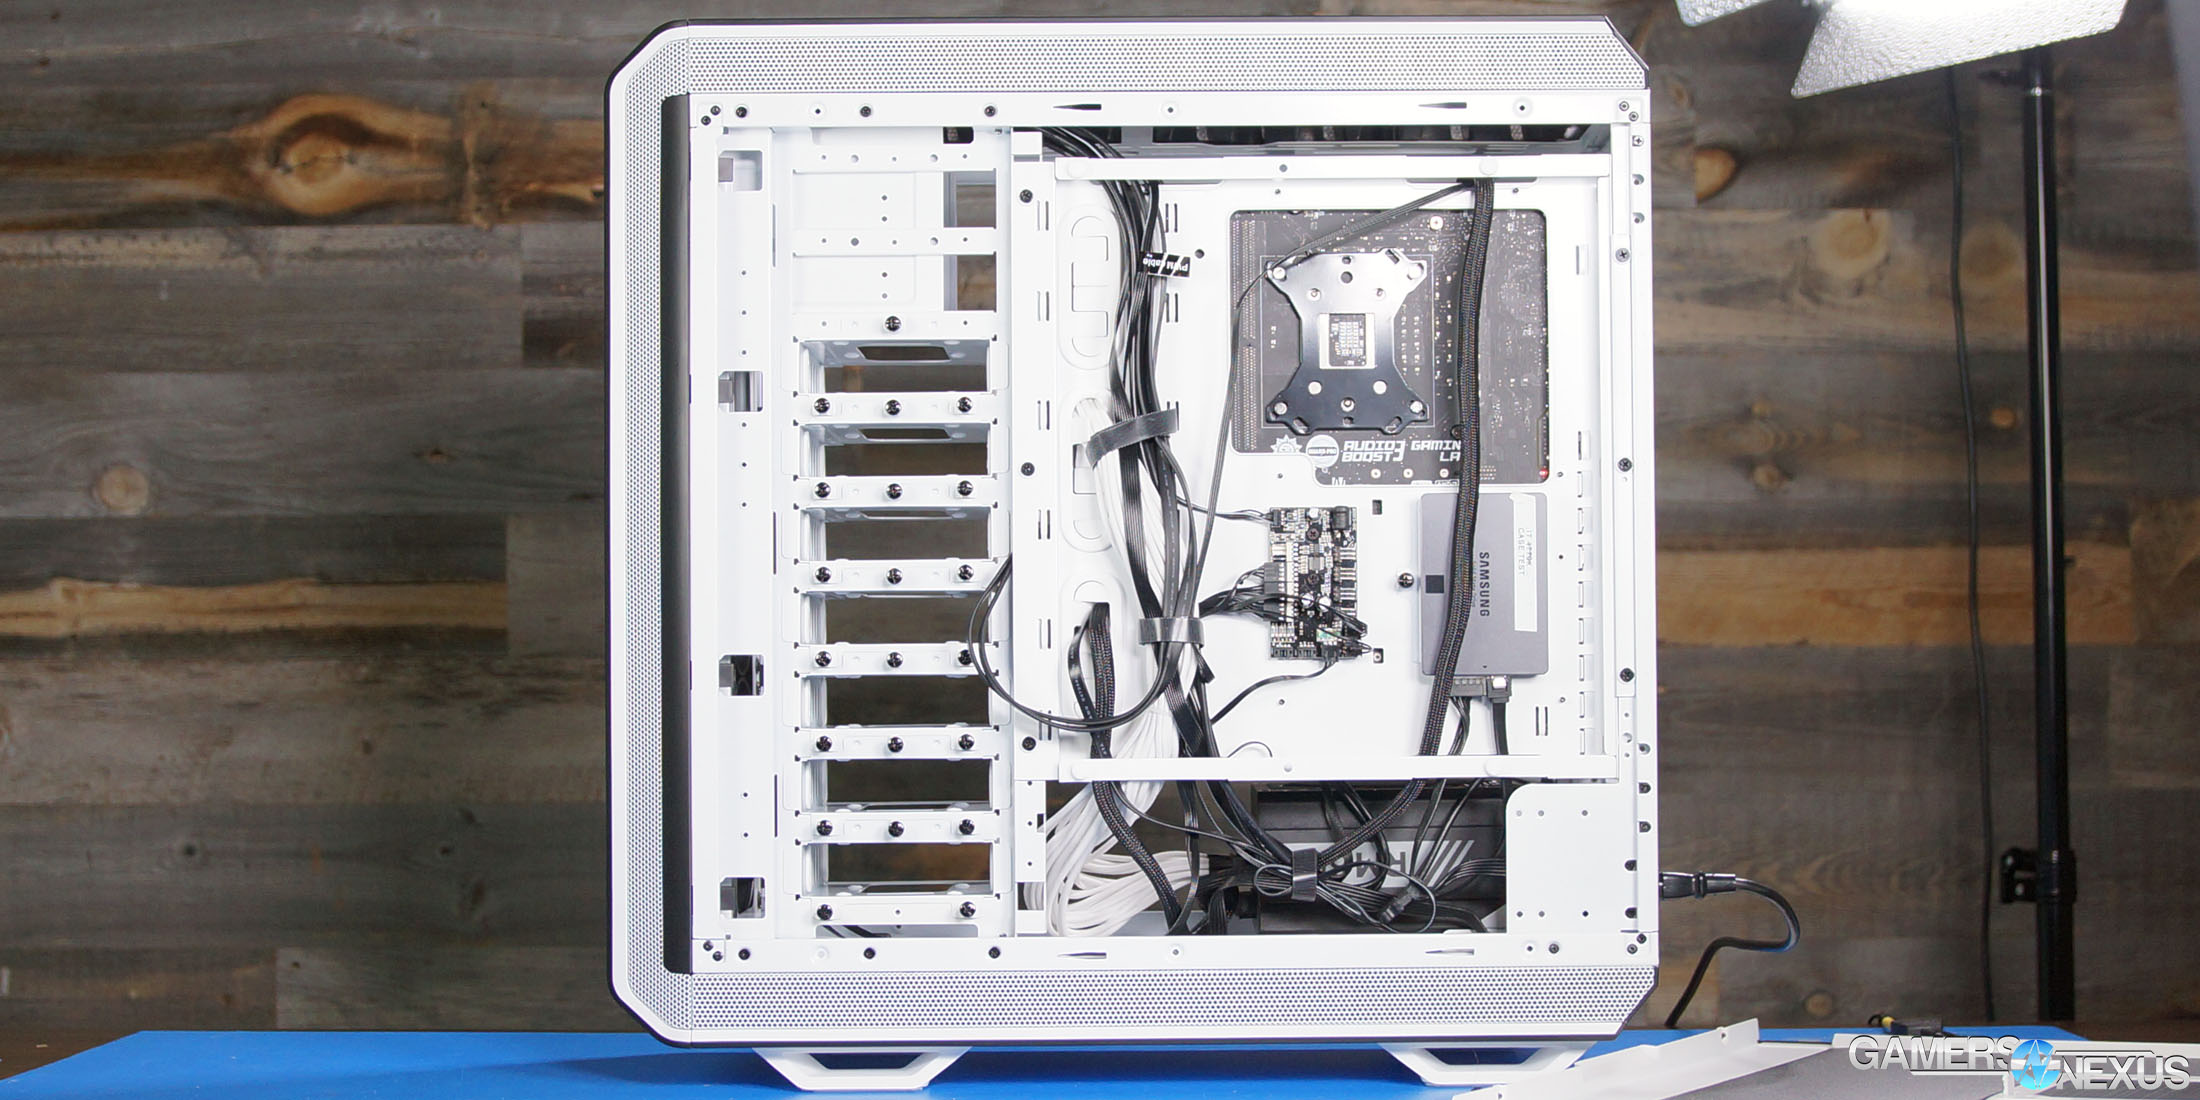
The free-floating HDD slots are familiar from past Be Quiet! cases and are as good as ever. Each slot in the rack is held in with three captive screws and can easily be taken out to improve airflow. There is an ODD cage, but if it’s removed, it can be replaced with an additional fan bracket. There are even little mesh filters built into the ODD bay covers to account for this. ODD and even HDD bays are less and less common in enclosures, but Be Quiet! hasn’t skimped on features.
According to the manual, the motherboard tray (removable for inversion) can also be used as a standalone test bench. That might like a ridiculous waste of a $250 case, but it’s actually very useful. It’s always a good idea to build and test a new system outside of a case before installing it, and this is the perfect platform--and afterwards, the whole thing can be installed in the case, motherboard and all.
Looking at the empty case, the only concern we had was the lack of PSU ventilation, an unfortunate consequence of being invertible. The PSU needs to be able to shift side-to-side, which requires two sets of screw holes, which means there has to be solid structure in those places. The bottom filter covers the entire length of the case, so it can’t be moved with the PSU. This leaves a small strip of ventilation right in the “dead zone” of the PSU fan, and rubber bumpers that lift the PSU up a little and allow airflow from the sides. We chose just to flip it over and draw air from inside the case for our tests.
The case has two main layouts, standard and inverted, each of which has six slightly different configurations. Inverting the case was relatively painless, outside of hiding the shiny Limited Edition badge, but does take some time, patience, and a ton of screws to get everything in place. The glass panel can be shifted to the other side as well, and even the front door can be flipped.
How to Invert the Be Quiet! Dark Base Pro 900
The manual needs to be addressed. This is a case review, not a manual review, so this doesn’t have any bearing on the quality of the product--but the book layout is awful. The first half is printed in typical format, starting with a couple pages in English that are then duplicated in different languages. The second half is a jumble of information with multiple translations on each page. What it sorely needs is a clear step-by-step guide to the inversion process, which requires the removal of basically every piece of the case, so we’re providing a rough one here.
- Remove the bottom filter first (manual section 9.6), then the front panel (8.3), then the top panel (8.2).
- Remove the I/O module and then the ODD cage (9.2) and unplug connections to the PCB panel. Unplug all the fans, too.
- Remove the lowest two HDD slots, unscrew the HDD panel and remove it (10).
- Remove the PCB panel from the motherboard tray.
- Remove the whole motherboard tray and the rear panel brackets (11).
- Remove the PSU bracket, the screws in the chassis that it hooks onto, and the power adapter bracket (12).
- Invert the motherboard tray and screw it back into place (11). Some rubber grommets may need to be moved to new screw holes.
- At this point, try sticking the PSU in the case and check if the motherboard will fit with a heatsink and RAM installed. If not, unscrew the tray and shift it up or down into one of the alternate layouts (5, layouts B1-B6).
- These steps can now be followed in reverse. Experiment with different PSU placements (12) and stick the rear panel brackets in whatever gaps are left (11). Consider rotating fans so that the cables won’t have to stretch.
Case Test Methodology
We tested using our new Skylake case test bench, detailed in the table below. This particular configuration is brand new with the launch of the 570X & 270R. Results on this test platform cannot be compared to previous case benchmark results, as the platform has completely changed.
Conducting thermal tests requires careful measurement of temperatures in the surrounding environment. We control for ambient by constantly measuring temperatures with thermocouples and laser readers. We then produce charts using a Delta T(emperature) over Ambient value. This value subtracts the thermo-logged ambient value from the measured diode temperatures, producing a delta report of thermals. AIDA64 is used for logging thermals of silicon components, including the GPU diode.
All case fans are manually configured to their maximum throughput using BIOS, then we configure to an RPM closer to 1050 for a universal "quiet" testing. If a fan controller is present, we opt-in and test on multiple settings. This forces testing of case fan performance in addition to the case's air channeling and airstream design. This also ensures minimal variance when testing, as automatically controlled fan speeds can reduce reliability of benchmarking. The CPU fan is set to 1100RPM (constant) for consistency, and the CPU is overclocked to 4.4GHz with a vCore of 1.272V (constant). C-States and power saving states are disabled.
| Component | Courtesy Of | Price | |
| Video Card | MSI GTX 1080 Gaming X (OC Mode) | MSI | $640 |
| CPU | Intel i7-6700K @ 4.4GHz | GamersNexus | $300 |
| CPU Cooler | MSI Core Frozr L | MSI | TBD |
| Motherboard | MSI Z170A Gaming M7 | MSI | $180 |
| Memory | Corsair Vengeance LED 32GB 3200MHz | Corsair | $200 |
| SSD | Samsung 850 EVO 120GB | Samsung | N/A |
| PSU | Corsair RM650x | Corsair | $100 |
| Case | This is what we're testing! | - | - |
The video card is configured to run at 55% fan speed at all times.
Prior to load testing, we collect idle temperature results for ten minutes to determine the unloaded cooling performance of a case's fans and air channels. Thermal benchmarking is conducted for 1400 seconds (23 minutes), a period we've determined sufficient for achieving equilibrium. The over-time data is aggregated and will occasionally be compiled into charts, if interesting or relevant. The equilibrium performance is averaged to create the below charts.
Load testing is conducted using Prime95 LFFTs and Kombustor “FurMark” stress testing simultaneously. Testing is completely automated using in-house scripting, and executes with perfect accuracy on every run.
We recently validated our test methodology using a thermal chamber, finding our approach to be nearly perfectly accurate. Learn more here.
Continue to the next page for thermals, noise, & the conclusion.
Thermals & Noise
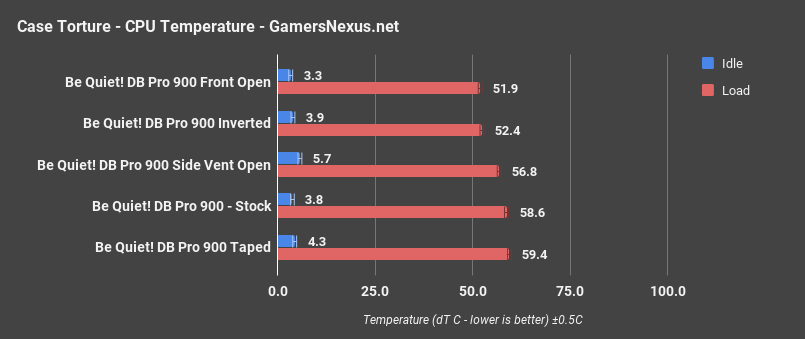
We tested the DBP 900 both stock and inverted, but we also wanted to explore a few other scenarios. First, we ran tests with the magnetic front door open. This is an ugly option, but it would be trivial for a user to reach down and open it during a demanding task, exposing the front fans directly to fresh air. Secondly, we popped up the plastic vent on the side of the case. The pro version of the case obviously doesn’t have these vents on both sides because of the tempered glass, so we expected little to no effect from this. Finally, we taped shut the mesh sections at the top and bottom of the case to determine whether they have any effect without fans in those slots.
There are three fans included in the usual orientation: two front intake, one rear exhaust. These are Be Quiet!’s own SilentWings 3 140mm PWM fans, sold individually for more than $20, and they’re listed as 1000RPM. That’s a good thing, because for $250 it would be unforgivable to include fans that need to be replaced.
Torture Test – Dark Base Pro 900 CPU Temperature
We’ll start with the Be Quiet configurations and then expand into comparative benchmarks. With our torture test, the CPU is plotting a 58.6C delta T over ambient load temperature. Without adding any fans, we taped off the side ventilation just to see if there’s meaningful impact from passive drafting of air. The result was an increase in temperature of about 1C, moving to 59.4C delta T over ambient. These matter more when bottom-mounted or top-mounted fans are present. We removed the tape and opened up the front door to the case, reducing temperature to 51.9C delta T – a marked 6-7C decrease from the stock configuration. Noise goes up a bit, as we’ll show later, but thermals benefit greatly. Opening the side ventilation port behind the motherboard tray produced a 56.8C temperature over ambient – not hugely beneficial, and more suitable for the non-Pro model of the case when mounting extra side panel fans. Finally, inverting the case to be right-facing resulted in significantly improved CPU thermals, now at 52.4C with our tower cooler. That’s with the door closed, just to be clear.
A few things, here: This impact is entirely because inversion means that the case fans are now directly streaming air in and out of the CPU tower cooler. With something like a closed-loop or liquid cooler, this change won’t really do anything. Like always with case testing, you can ultimately only really test for the specific configuration and hope it serves as an analog.
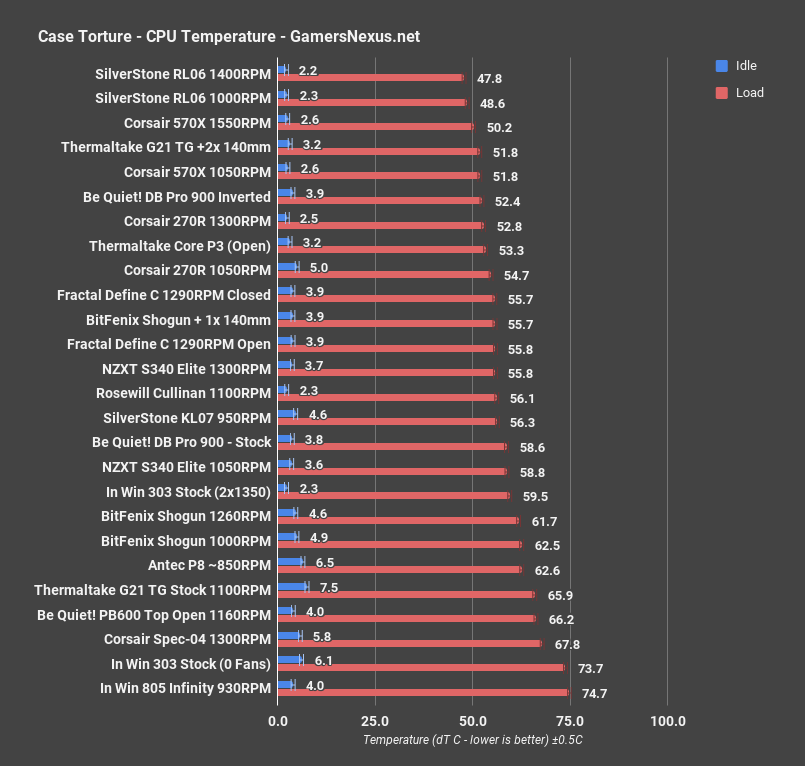
Looking at comparative data, the Be Quiet! Dark Base Pro 900 stock configuration performs about tied with the NZXT S340 Elite. The bigger question will be one of noise levels, which we’ll get to. Inverting the case boosts performance up toward the top 5, placing alongside the Corsair and SilverStone products that benefit from more direct airflow to the CPU.
Torture Test – GPU
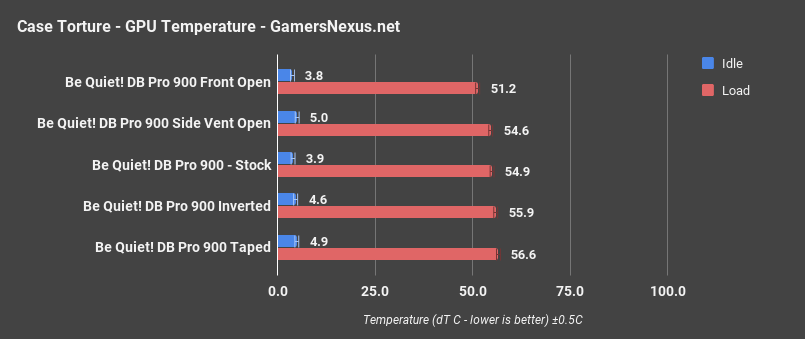
Looking at GPU performance under torture workloads, again with Be Quiet first, the stock configuration runs the GPU at 54.9C over ambient, with the side ventilation opening not measurable outside of error margins. The GPU runs about 2C warmer with the ventilation taped off, showing that there is actual passive benefit here, and the inverted configuration hovers us around 1C warmer than stock. This is because we’ve moved where the video card is in the enclosure, as it now sits more out-of-the-way of the intake fans. Opening the front door and sticking to the stock configuration helps the most, bringing us to 51.2C delta T over ambient.
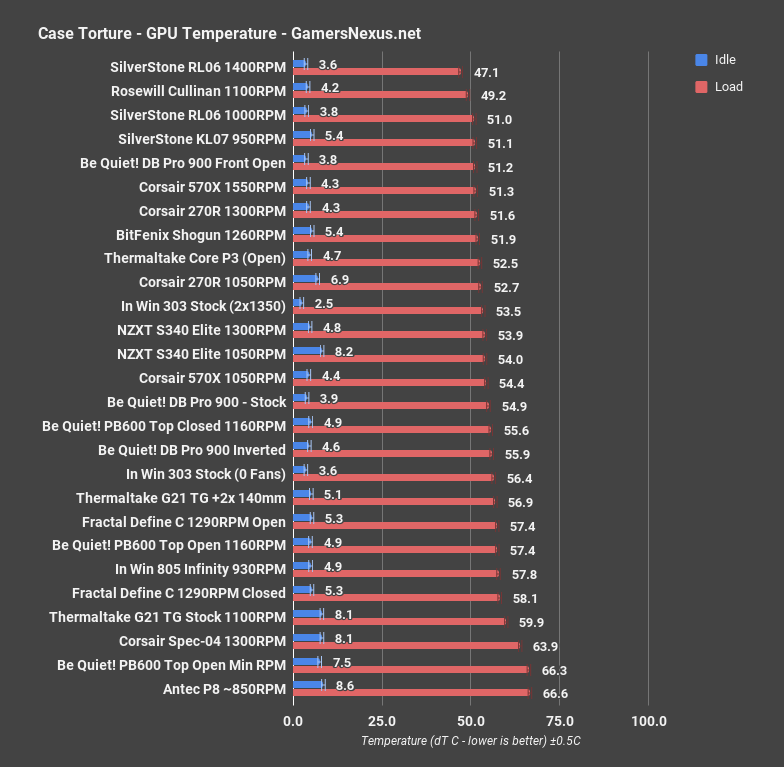
Comparatively, the stock 54.9C dT lands us between the 570X at 1050RPM and Pure Base 600 at 1160RPM. Opening the door puts us up to second place on the charts, between the fan-happy Cullinan and 570X.
Be Quiet! Dark Base Pro 900 Thermals - 3DMark
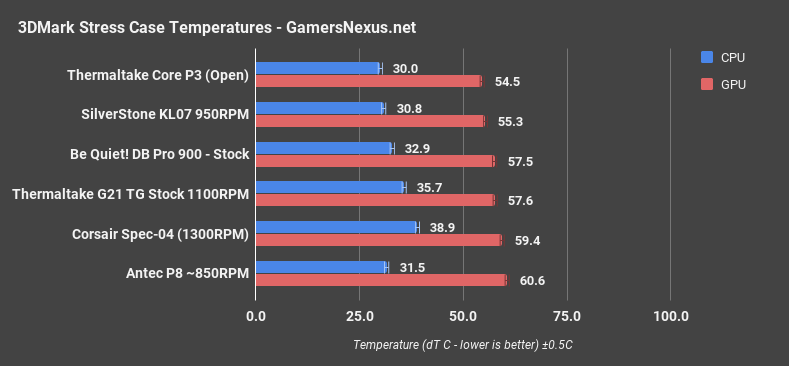
Moving on to 3DMark for a real-world gaming test, the Dark Base Pro 900 – White Edition case performs nearly at levels of an open-air case, the Core P3. Considering that the Core P3 is the closest thing to an open-air bench on this limited list of cases on our new 3DMark thermal test, that’s good performance for the Dark Base Pro’s CPU thermals. GPU temperatures are a bit warmer, but still outside of throttle territory by a few degrees. It could be better on the GPU front; we’d recommend either a modestly more aggressive fan profile or an additional fan nearer the GPU. Bottom intake would work excellently for this.
Dark Base Pro 900 Thermals - Blender
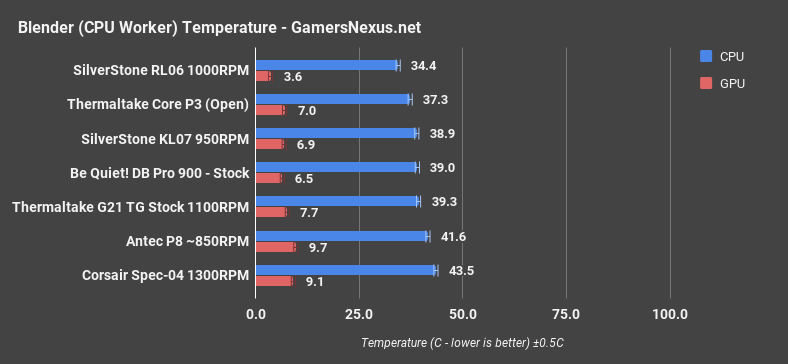
Blender serves as another real-world test. With CPU rendering and the GPU idle, the CPU scores a 39C temperature over ambient, planting the DB Pro 900 right around the SilverStone KL07 – another silence-focused case. Performance is completely acceptable here. The GPU idles around where the P3 and KL07 do, but is warmer than the SilverStone RL06 and its highly directional airflow and front mesh.
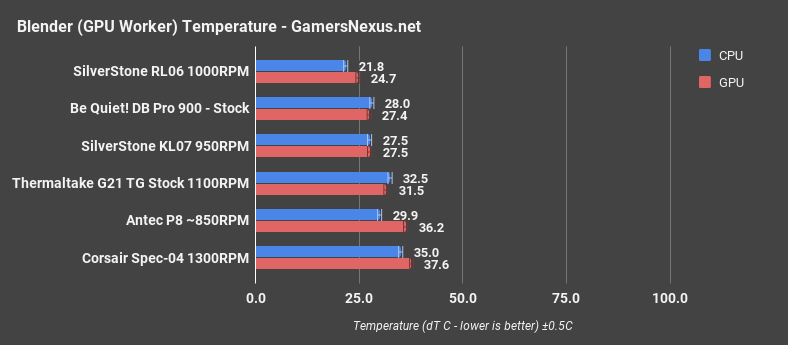
Switching to GPU rendering, the CPU and GPU both run similarly to the silence-focused KL07. There’s nothing to boast or complain about here. Let’s move on to noise.
Dark Base Pro 900 Noise
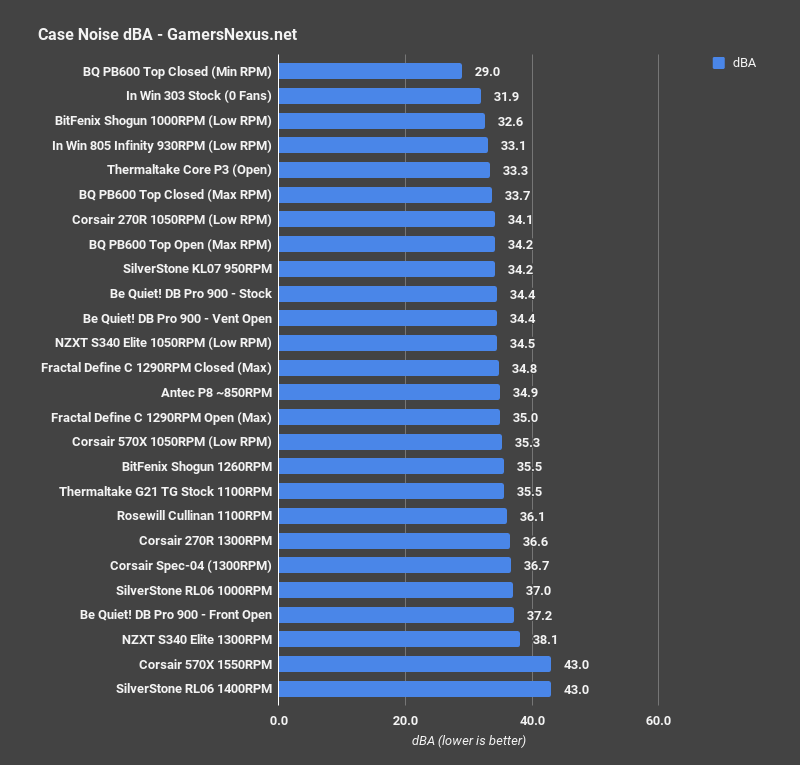
Be Quiet!’s inclusion of three high-performance fans benefit the case’s noise levels: These fans retail for around $20, making them some of the best pre-installed fans that we’ve worked with lately. In its stock configuration, our system operates at about 34.4dBA – the same as when the side ventilation is open, rather expectedly. Opening the front door provides significant thermal benefit, and ultimately increases noise levels audibly – but just barely. We’re at 37.2dBA versus 34.4dBA.
Comparatively, that lands Be Quiet!’s case around the 270R and Pure Base 600 with its top open and max RPM. The front open configuration performs more similarly to the streamlined RL06 airflow case.
Conclusion: Dark Base Pro 900 - White Edition
A case this expensive isn’t meant to appeal to the value-conscious, it’s made for people who know what they want and will pay $250 to get it. Therefore, in order to justify its price, the Dark Base Pro 900 - White Edition doesn’t need a competitive price/performance ratio: it just needs to be the best at what it does. In the past, the high end is where Be Quiet! has really stood out with cases like the Silent Base 800 as compared to their less-impressive Pure Base 600 budget effort.


For customers planning to spend upwards of $200 on an enclosure, this is a worthy choice. For first-time builders googling positive case reviews and wondering what their budget should be: this is really extravagant, nobody needs to spend more than $100 to get a good case.
Review & Testing: Patrick Lathan
Thermals & Noise Analysis: Steve Burke
Video: Andrew Coleman