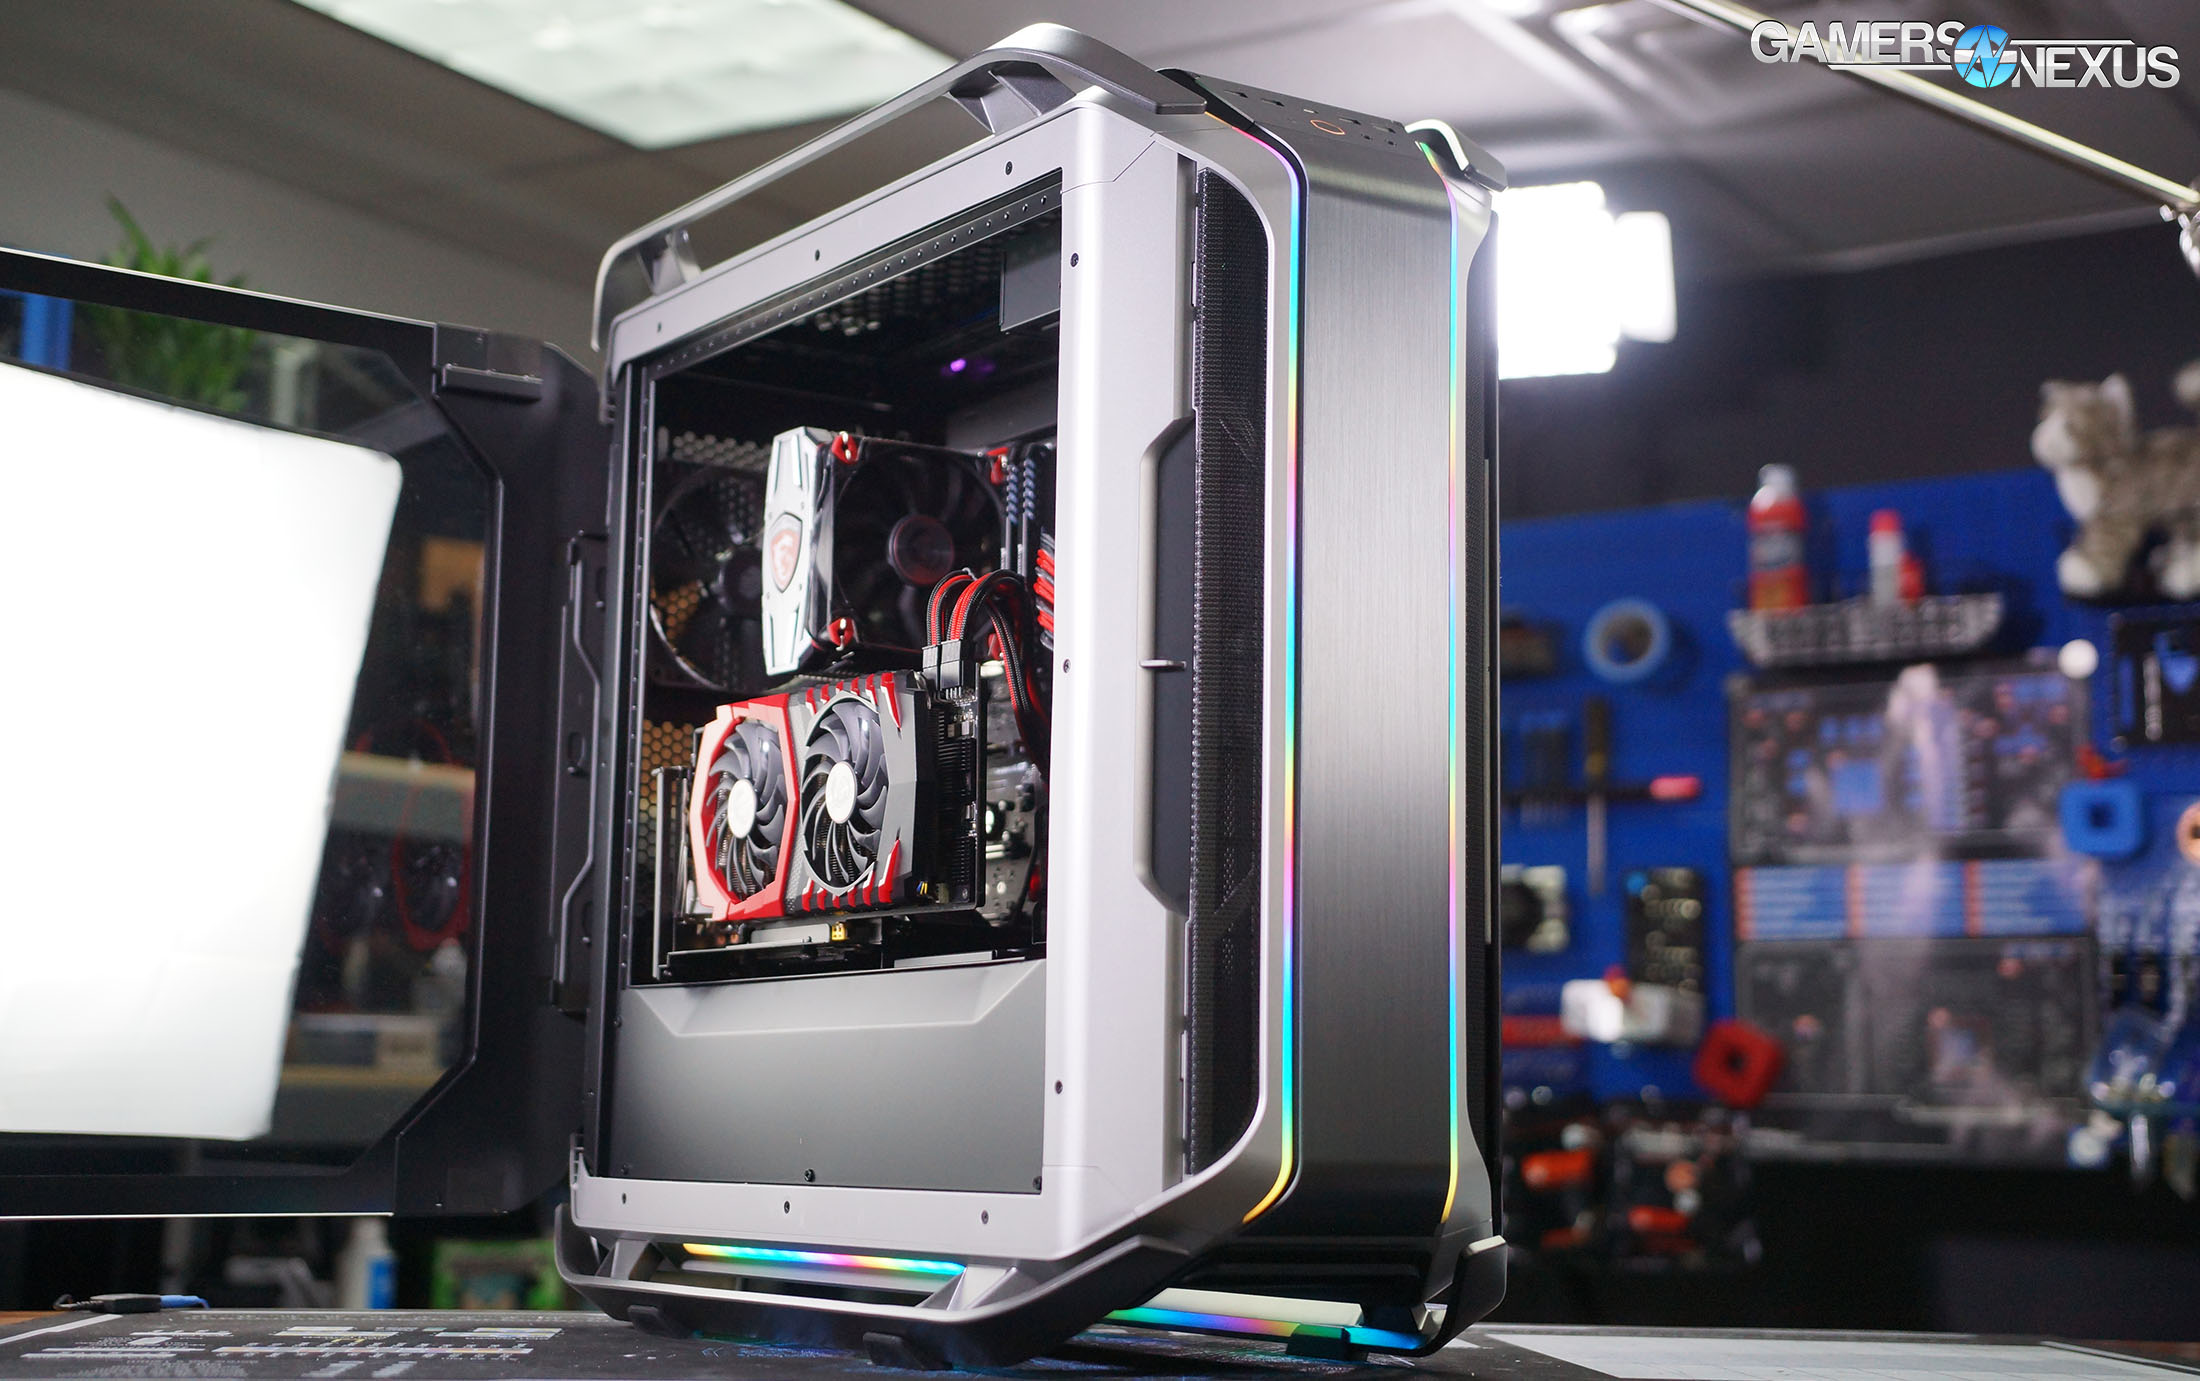
We reviewed the behemoth Cooler Master Cosmos C700P almost exactly a year ago, and now CM is back with the even heavier 51.6lb C700M. Like the H500M versus the H500P, this is a higher-end and more expensive model being added to a family of cases rather than replacing them. The new flagship has a few upgrades over the original, but it retains the same basic look with pairs of big aluminum rails at the top and bottom and dual-curved side panels.
Cooler Master’s C700M is very much a halo product, but our review of the C700M will focus on build quality, thermals, acoustics, and cable management. Ultimately, this is a showpiece -- it’s something one might buy because they can afford it, and that’s good enough reason. We will still be reviewing the Cooler Master C700M on its practical merits as an enclosure, as always, but are also taking into consideration its status as a halo product -- that is, something from which features will be pulled to the low-end later.
Cooler Master C700M Specs
Net Weight | 23.4kg/51.6lb |
Available Color | Grey, Silver & Black |
Materials | Outlook: Aluminum, Plastic, Steel Body: Steel Side panel: Tempered Glass, Steel |
Dimensions (LxWxH) | 650 x 306 x 651mm / 25.6 x 12.0 x 25.6 inch |
Motherboard Support | Mini-ITX, Micro-ATX, ATX, E-ATX, (supports up to 12" x 10.7") |
Expansion Slots | 8 |
Drive Bays | 5.25": 1 2.5"/3.5": 4 + 1 2.5" SSD: 4 |
I/O Port | USB 3.1 Type-C x 1 USB 3.0 Type-A x 4 3.5mm Headset Jack (Audio+Mic) x 1 3.5mm Mic Jack x 1 Fan Speed & A-RGB Control Buttons |
Pre-Installed Fans | Front: 140mm x 3 Rear: 140mm x 1 |
Fan Support | Top: 120/140mm x 3 Front: 120/140mm x 3 Rear: 120/140mm x 1 Bottom: 120/140mm x 2 |
Liquid Cooling Support | Top: 120mm, 140mm, 240mm, 280mm, 360mm, 420mm (remove ODD, maximum thickness clearance 70mm) Front: 120mm, 140mm, 240mm, 280mm, 360mm, 420mm (remove ODD) Rear: 120mm, 140mm Bottom: 120mm, 140mm, 240mm |
Clearances | CPU Cooler: 198mm GPU: 490mm without 3.5" HDD bracket, 320mm with |
Power Supply Support | Bottom Mount, ATX PS2 |
MSRP | $439 |
Cooler Master C700M vs. C700P
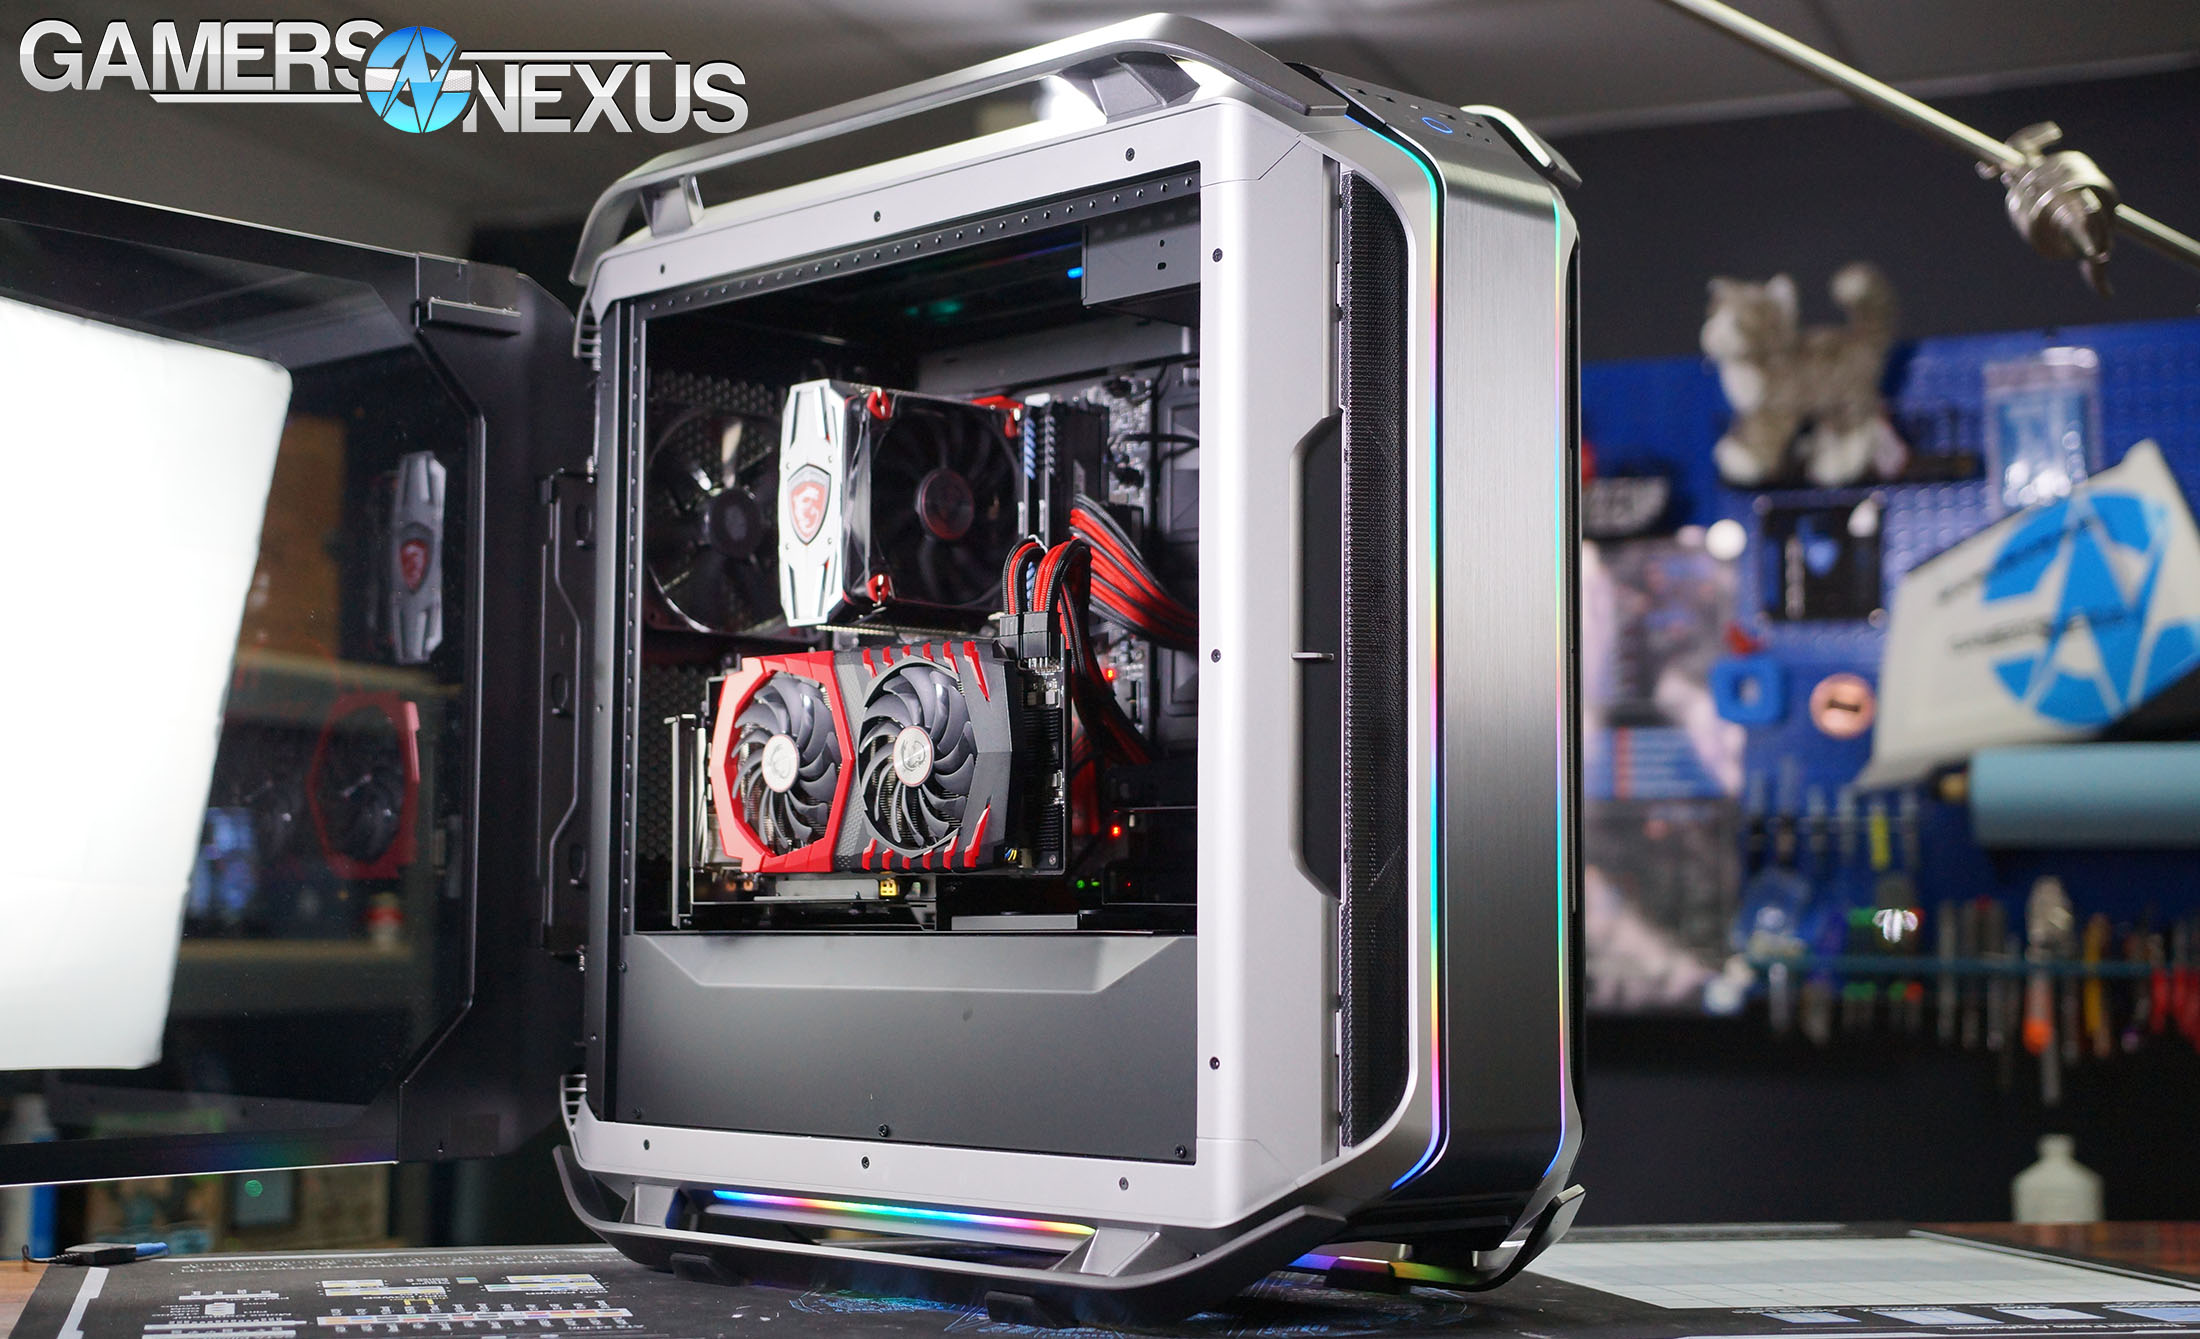
We no longer have the C700P on hand to make side-by-side comparisons (because of limited storage space), but we can start off with a few obvious visible differences. First is the front panel, which we had criticized in the original C700P. In the older model, there was a thin plastic shell that almost completely covered a nice mesh front for no good reason. The shell could be hinged outwards to access an optical drive or the front filter, but leaving it open or taking it off permanently would look weird. The situation is similar here, but the plastic shell is narrower and has strips of ventilation on either side. More importantly, it can be completely taken off and still look natural, albeit with fewer LEDs. This and the Dark Base Pro 900 may be the only cases we’ve reviewed where removing (part of) the front panel is something the user might actually do, rather than something we test just to prove a point.
Cooler Master Cosmos C700M Build Quality, Cable Management, & Lights
The bottom and front filters are sheets of stiff perforated metal backed by thick plastic reinforcement. The bottom filter ejects forward, as is good and proper. The top filter is a more conventional light mesh sandwiched between layers of metal and plastic, and the decorative metal layer may prove restrictive to top-mounted radiators, especially towards the back of the case where there are fewer holes. Both the front and top of the case contain large, easily removable fan mounts.
The built-in lighting is about as good as it gets for ARGB LEDs. The lighted strips around the edges of the case are divided into three sections: top, front, and bottom. There’s no internal lighting, but the external lighting bounces off the inside of the top and bottom rails in a way that’s really pretty cool. Each section is plugged into Cooler Master’s combined fan and LED controller PCB. There are a decent number of baked-in colors and patterns that don’t require external control, but there’s a header to accept motherboard control as well. Fans can be set to high, medium, low, or mobo control, but as usual we plugged all fans directly into the motherboard for testing. The LEDs in the front panel are connected via some gold pins at the bottom that automatically plug in and disconnect with the panel, which we vastly prefer to dainty little cables that get torn out. Our one complaint is the front panel controls for the fans/LEDs. Each is controlled with a pair of + and - buttons, but each pair is covered by a single shell which is marked in three places, and status is indicated by multiple LEDs that aren’t all labelled clearly. It’s easy to operate, but it could be more intuitive.
The rest of the front panel I/O consists of four USB 3.0 ports, a USB-C port, a dedicated mic jack, and a 3.5mm combined headphone/mic jack. We rarely see this many USB 3.0 connections in a case, despite many motherboards having the headers to support them.The combined headphone and mic jack is also a rarity, but it makes sense given how common earbuds with integrated microphones have become.
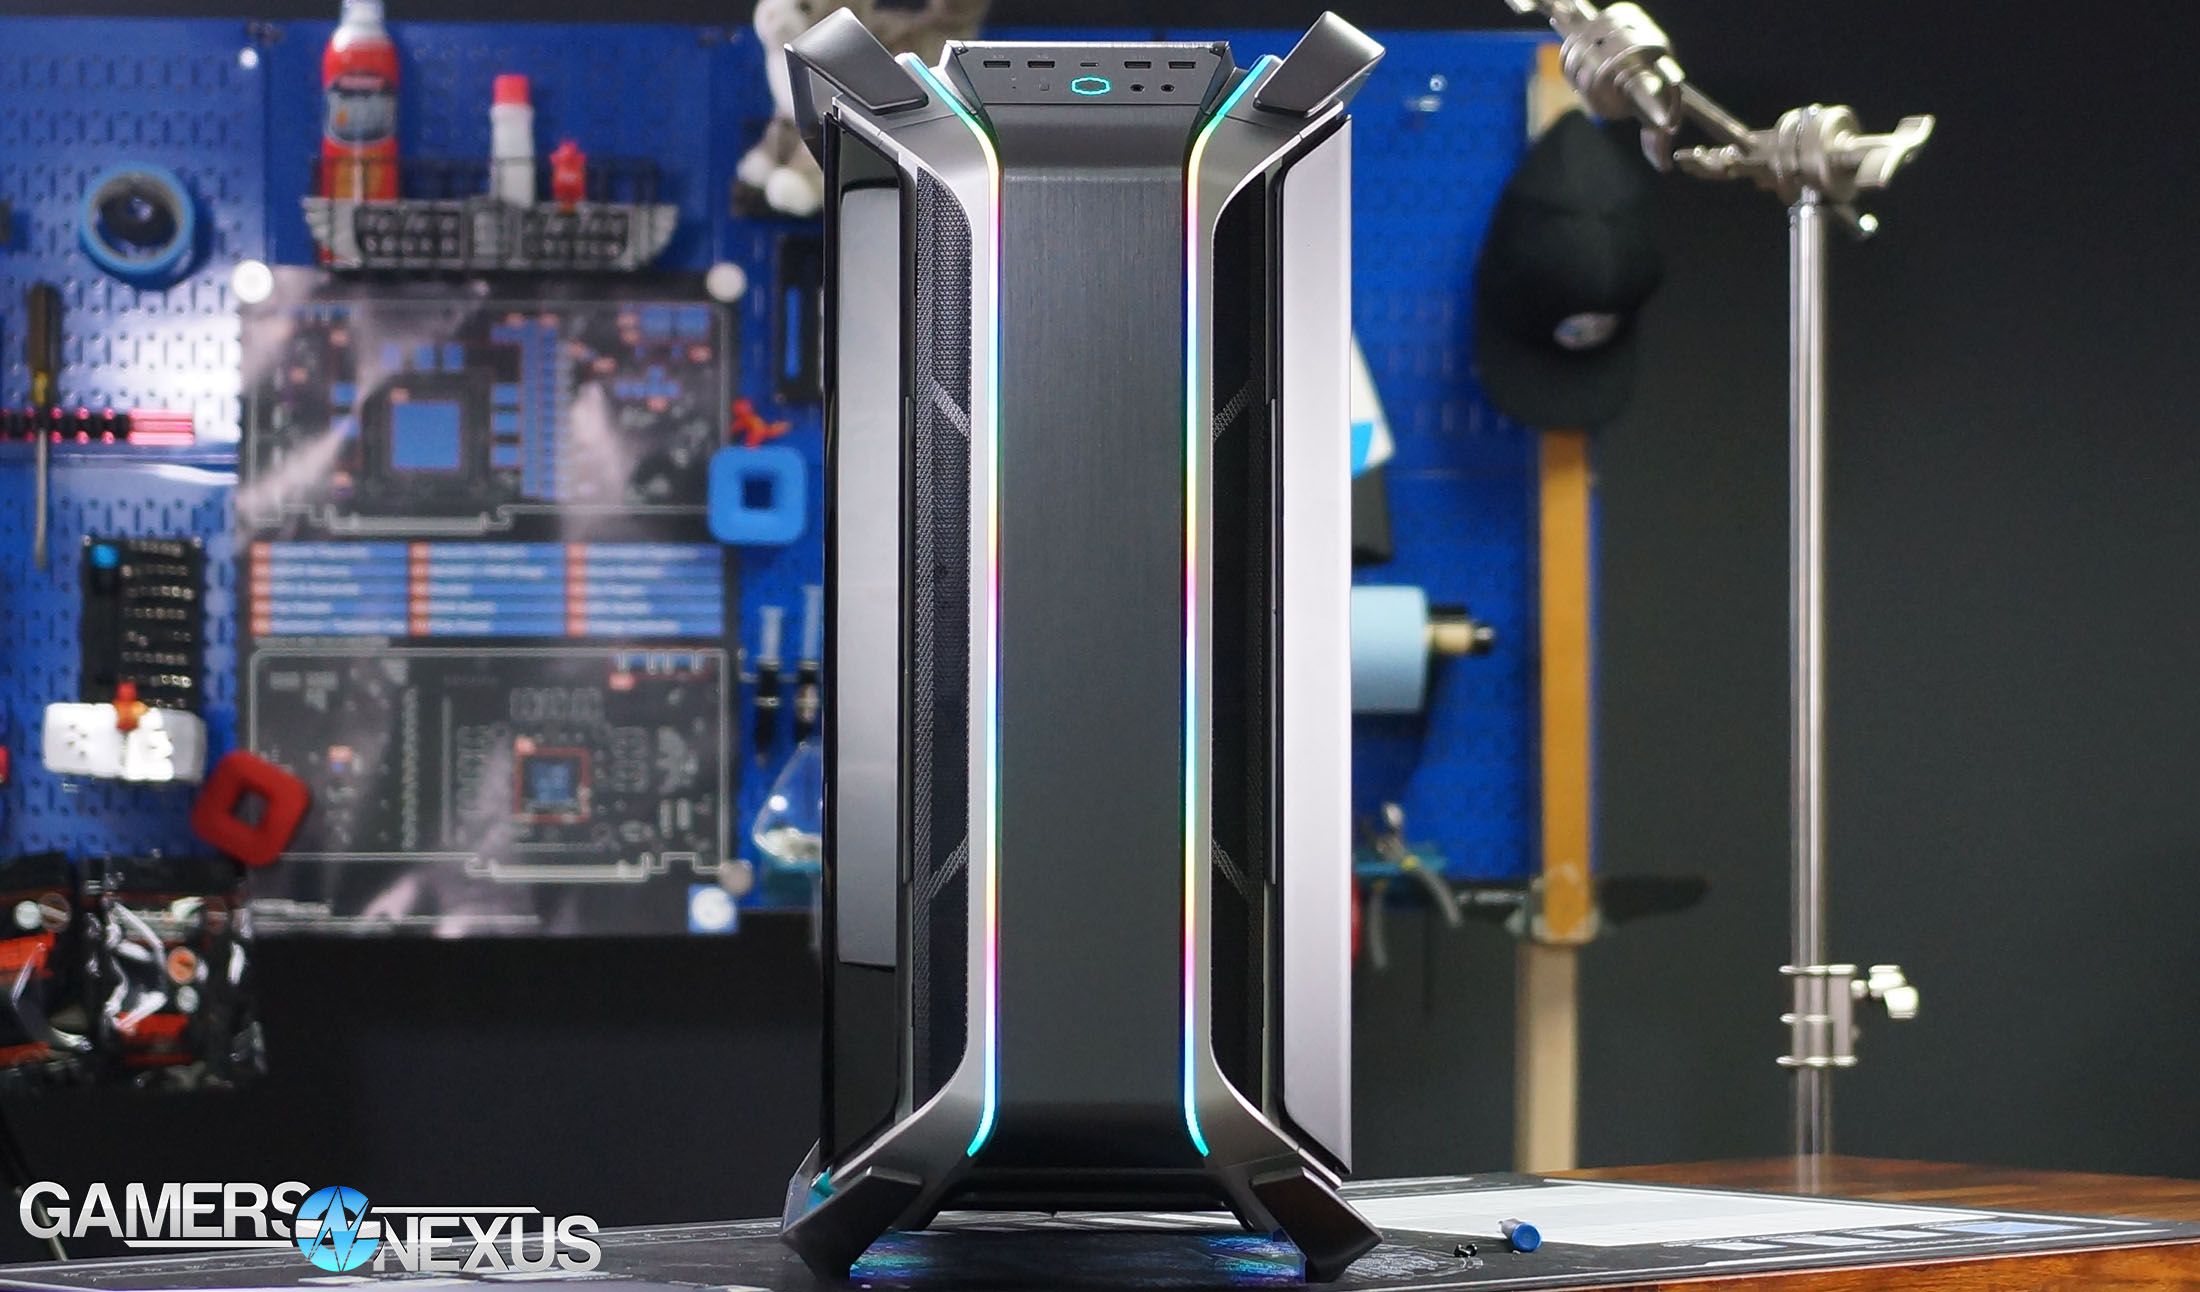
The side panels hinge outwards enough to allow working on the internals, but they also lift up and off the hinges fairly easily. They’re held in place by magnets at the front edge, which might be a be a problem if there weren’t so much room for cables. The single glass panel is curved at both the front and back edges, which is an impressive technical achievement (yields on curved glass panels are very low) and something Cooler Master has been working towards. Frankly, the faux-double-curve in the C700P looks just as good, but it’s understandable that CM is pulling out all the stops for the C700M. Despite this, they’ve resisted the urge to brand any part of the case: other than the overall design, the closest thing to a Cooler Master logo is the hexagonal start button.
Taking a moment to be incredibly picky, there are some pieces of the plastic trim that don’t fit quite flush. There’s nothing that would be worth calling out on a less expensive case, but there shouldn’t be any panel gaps whatsoever in a $440 enclosure. The front panel and the plastic ring that hides the door hinges are the only parts that exhibit this flaw.
Like the C700P, this is an invertible case, but we didn’t test the alternate configurations this time either. It’s a cool feature that adds some interesting options for showing off the case internals, but as we’ve discussed before, the “chimney effect” is useless in PC cases where active airflow from fans absolutely overwhelms any passive effects from heat rising. The other reason we opted out is because it’s a massive hassle. Let us know if you’d like us to revisit this case and try some of the different layouts. Cooler Master showcases three primary ones in a pamphlet shipped with the case: conventional, chimney, and inverted. For layouts that don’t use the motherboard and PCIe cutouts in the back of the case, the back section can be replaced with an alternate plate.
Like be quiet!, Cooler Master has created some individual 3.5” bays that can be installed on rails at the front of the case. Five were included with our sample, but more could fit. There’s also still a single 5.25” bay, with two possible positions. It’s strange to think that 5.25” bays are luxury items now. As hardware ages, there’s a line it crosses between being obsolete and being owned by enthusiasts.
The vertical GPU mount is much more versatile here than in other cases we’ve seen. It’s actually a big hinged support that attaches to the PSU shroud, and can be folded flat so that the card lies fans-up against the shroud, or folded partially to put the card at an angle. Our card was a little too wide for that, but there was plenty of room to mount it vertically, which there often isn’t. If there’s anything the C700M has plenty of, it’s space. The riser cable supplied with the mount is 400mm, which is long enough to allow putting the card anywhere inside the case.
There’s no special channel for power cables at the center of the case, but the C700M is so big that it doesn’t matter. All the cables we needed could be neatly bundled to the back of the motherboard tray without bulging the side panel out even slightly, and that’s with room left over inside the cavernous PSU shroud. The case itself also requires a huge wad of wiring for RGB, USB, and fans, but this is carefully arranged with built-in cable combs behind the typical Cooler Master cable-shield-thing. It’s justified here, since unmanaged wiring could otherwise pop the side panel open.
Case Testing Methodology
GN Case Testing Bench (Sponsored by CableMod)
| Component | Courtesy Of | |
| Video Card | MSI GTX 1080 Gaming X (OC Mode) | MSI |
| CPU | Intel i7-6700K @ 4.4GHz | GamersNexus |
| CPU Cooler | MSI Core Frozr L | MSI |
| Motherboard | MSI Z170A Gaming M7 | MSI |
| Memory | Corsair Vengeance LED 32GB 3200MHz | Corsair |
| SSD | Samsung 850 EVO 120GB | Samsung |
| PSU | Corsair RM650x | Corsair |
| Cables | CableMod Pro Mesh Cables | CableMod |
| Case | This is what we're testing! | - |
The video card is configured to run at 55% fan speed at all times.
Prior to load testing, we collect idle temperature results for ten minutes to determine the unloaded cooling performance of a case's fans and air channels. Thermal benchmarking is conducted for 1400 seconds (23 minutes), a period we've determined sufficient for achieving equilibrium. The over-time data is aggregated and will occasionally be compiled into charts, if interesting or relevant. The equilibrium performance is averaged to create the below charts.
Load testing is conducted using Prime95 LFFTs and Kombustor “FurMark” stress testing simultaneously. Testing is completely automated using in-house scripting, and executes with perfect accuracy on every run.
We recently validated our test methodology using a thermal chamber, finding our approach to be nearly perfectly accurate. Learn more here.
Thermals & Noise
We did all testing with the four stock fans in their default positions (three front intake, one rear exhaust), plugged into the motherboard and set to full speed. We didn’t do any testing of the inverted or “chimney” layout cases due to time constraints, but again, let us know if that’s something you want. Additional tests were done without the front panel covering, without any front panel whatsoever, and using the GPU mount with the GPU in the fully vertical position.
CPU Torture
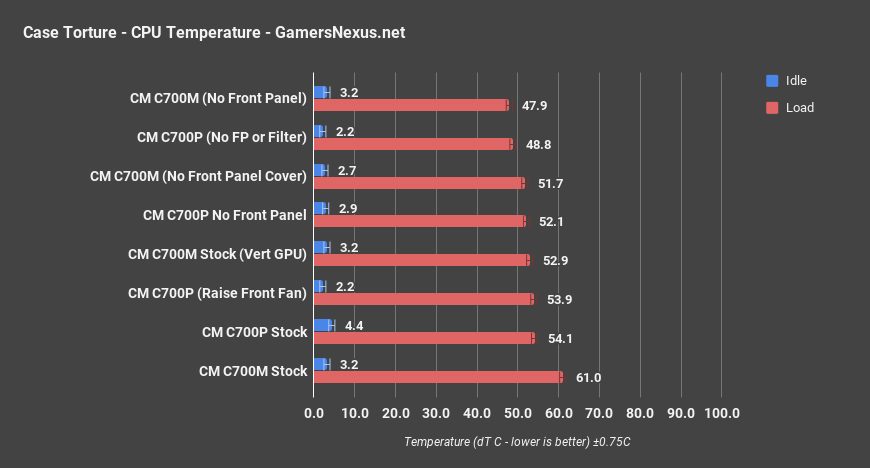
We’ll start first with standalone C700M testing, then move to comparative data. CPU temperature during the torture test averaged 61 degrees Celsius over ambient in the stock configuration. Temperatures improved drastically without the front panel cover and the new average was 51.7 degrees over ambient, a rough 10-degree improvement from baseline. The cover expectedly chokes almost all potential airflow through the front of the case, and the strips of ventilation that are left are covered in an extra layer of decorative mesh. This raises an interesting point: the front panel shell has no unfiltered gaps, so the internal filter is pointless unless the shell is removed. Users should use one or the other, the internal filter or the shell, but not both. We prefer using just the internal filter, which wasn’t that much warmer than the 47.9 degree from using no front panel at all. The vertical GPU test also kept the CPU surprisingly cool, but we’ll discuss that test more in the GPU section.
C700M stock temperature measured warmer than we saw in the C700P, but removing the front panel entirely from each resulted in equivalent thermal performance -- within error, anyway. The frame is overall unchanged, it’s just the front panel and filter that have received those modifications.
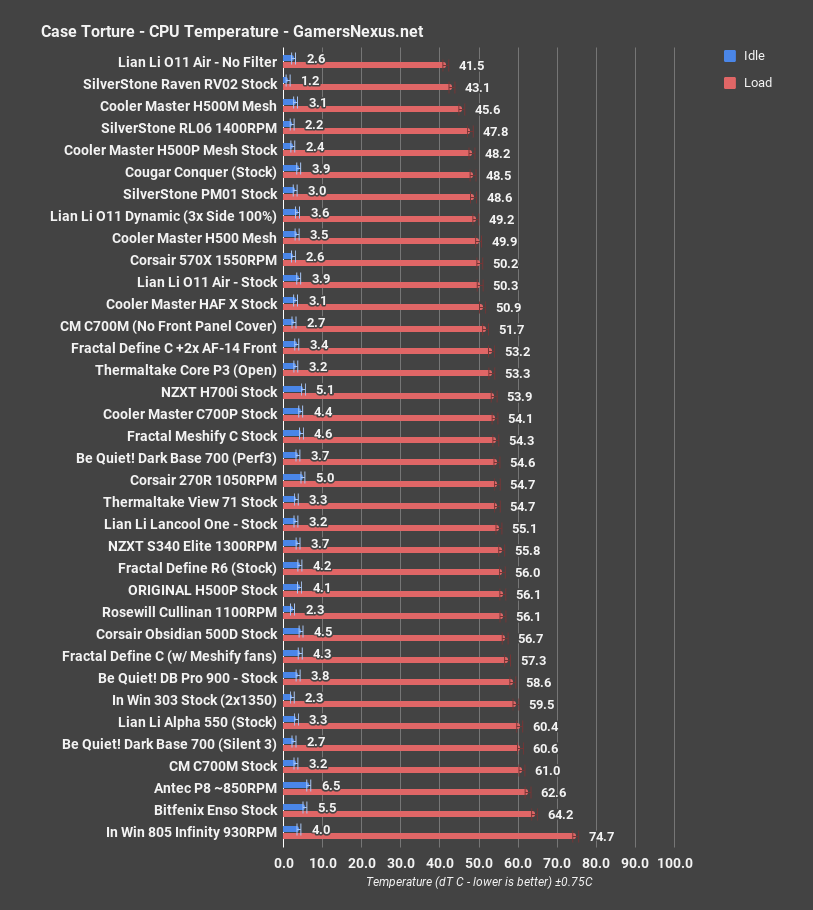
Comparatively, none of the other cases on the full chart really compete in the $400 price class. Assuming a 61-degree standard temperature for stock, it’s not impressive, and toward the bottom of the chart. Assuming a 51-degree standard temperature with the cover removed, the case does well overall. It lands about where the HAF X is, in that instance, and that’s a decent spot to be.
GPU Torture
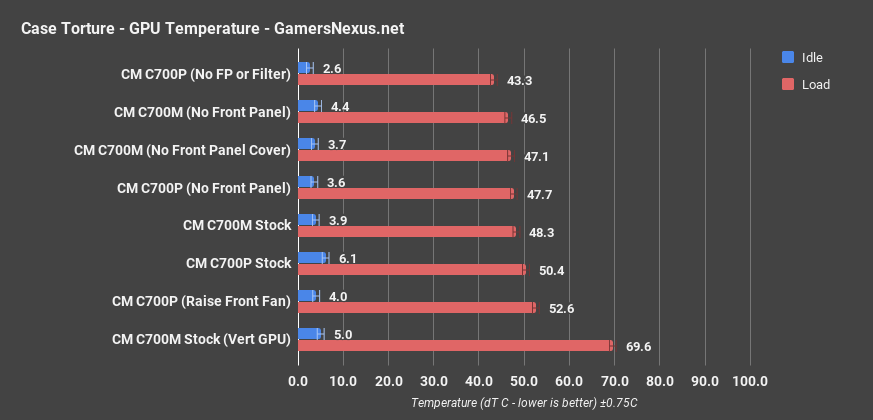
GPU torture temperature averaged 48.3 degrees Celsius over ambient and improved by a couple degrees with the front panel completely removed. The only result that differed vastly from the others was the vertical GPU test, which averaged 69.6 degrees dT. It throttled down to just under 1700MHz to limit thermals, as opposed to about 1780MHz for the standard torture test. That’s partially why the CPU dT was so much cooler with the GPU vertical: with the GPU dissipating less heat and running at lower clocks, the rest of the case remained cooler.
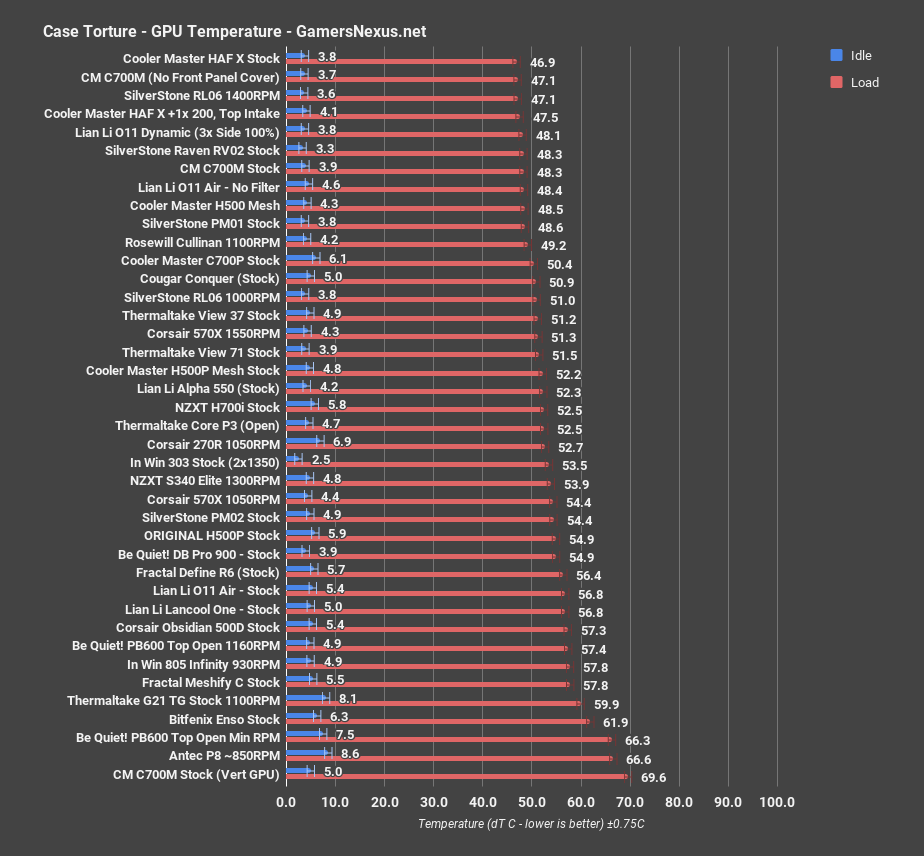
Moving on to the comparative chart, the C700M’s 48.3-degree result is one of the best GPU results we’ve seen, which is why there was so little improvement when the front panel was removed. The number of intake fans combined with the width and general size of the case means that the GPU is supplied with plenty of cool air, and is able to exhaust as much hot air as possible. One of the few cases that did better was the original C700P at 43.3C dT, but only when its front panel and filter were removed. The C700M placed 46.5 degrees in the same configuration, which is more or less equivalent.
3DMark
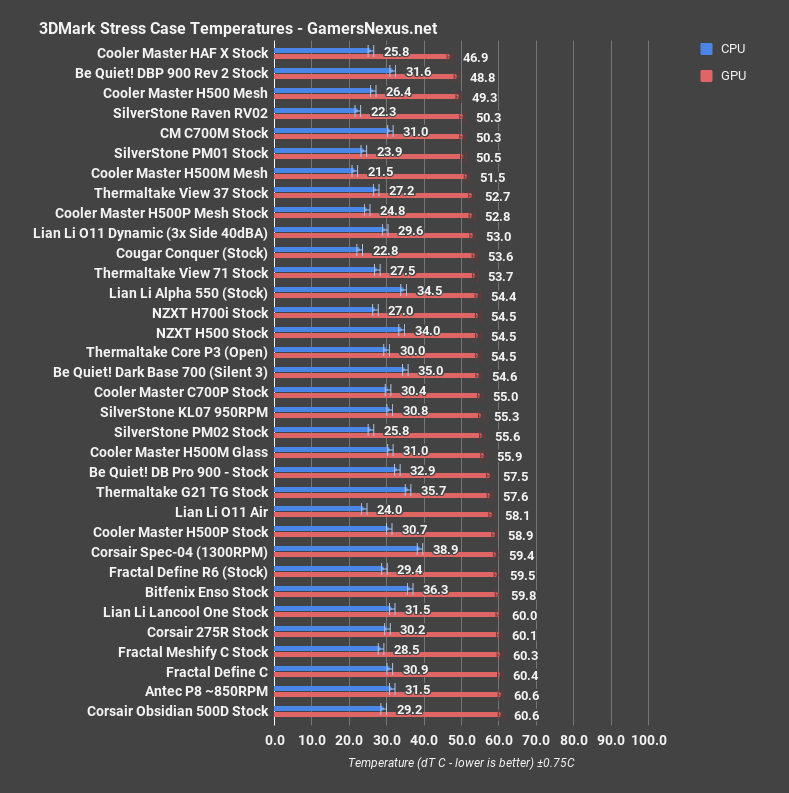
3DMark Firestrike Extreme stress testing raised GPU dT slightly higher than the torture test, to 50.3C dT. That’s great compared to the other cases on the chart, equalling the excellent Silverstone RV02 in performance. The C700M repeatedly does well for GPU temperature.
Blender
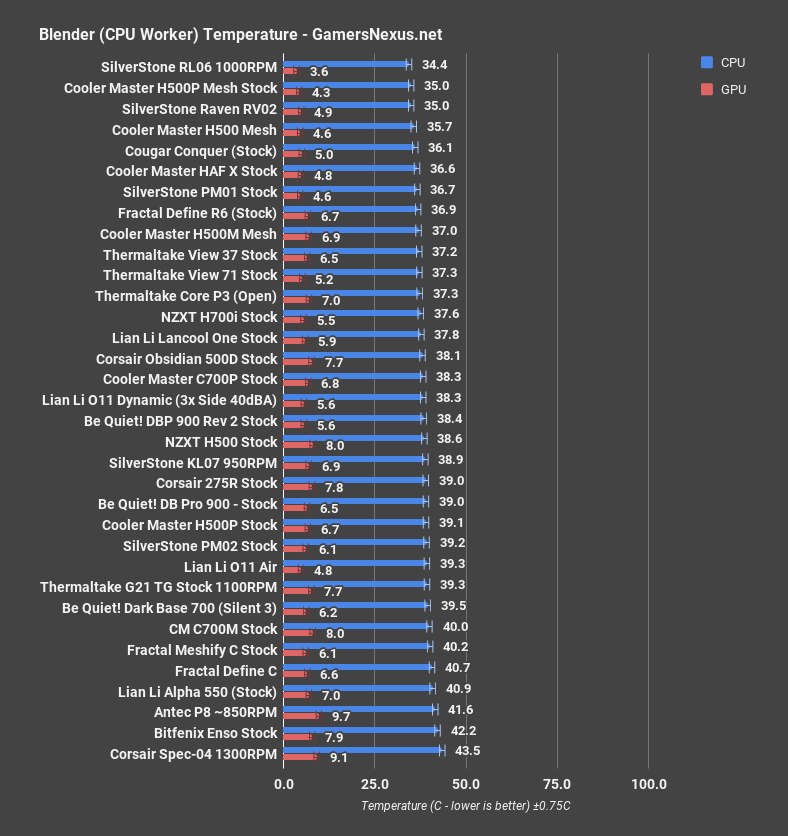
The Blender CPU render raised CPU dT to 40C, around the level of the Fractal Meshify and Define C cases, neither of which ship with as many fans as we’d like (2 x 120mm). The stock C700P managed 38.3C dT in comparison.

GPU dT averaged 24.1C in the GPU render, within margin of error of the top three scores: the Dark Base Pro 900 rev. 2, PM01, and HAF X. The C700P averaged 27C in the same test, definitely not as impressive.
Noise

40.1dBA is a bit louder than the C700P but not significantly so, even though the C700M has an additional fan. Taking the front panel cover off with the fans still at full speed raised dBA to 42.3, one of the noisier results on the chart, but understandable. If this proves anything, it’s that the front panel shell at least does a good job of muffling fan noise.
Conclusion
$440 is outside the range where price is a consideration to the potential customer. For someone who’s looking for functional housing for their PC, nothing can possibly be worth that much unless it comes with a lifetime supply of… anything, really. Instead, this is a luxury item for customers who want to make their computer look as good as possible. Looks are subjective, but we can say that this is a genuinely well-built tower that looks like it costs $400+.
That doesn’t mean it’s worth spending the money on -- we’ll leave that to you. As a halo product, the ultimate goal of the C700M is to bring attention to Cooler Master’s brand. If you like what you see but can’t justify the price, consider the company’s H500P Mesh (we reviewed this very positively) or plain H500.
As for performance: either use the fancy front panel shell or the internal filter. Don’t use both. There’s no point to having two layers of filtration, and one or the other will do just fine. With that in mind, cooling performance with air-cooled GPUs is great, while air-cooled CPUs may get warm sitting in the middle of the vast space between the intake and exhaust fans. Many buyers of this case will probably also invest in liquid cooling, and there’s plenty of space for radiators in the top and front of the case. For pure all-around performance, we’ve recommended much cheaper cases like the Silverstone PM01 in the past. The C700M is great in terms of build quality and looks for those that can afford it, but don’t make the mistake of thinking that buying a more expensive case means more effective cooling.
Host, Test Lead: Steve Burke
Editorial, Testing: Patrick Lathan
Video: Andrew Coleman