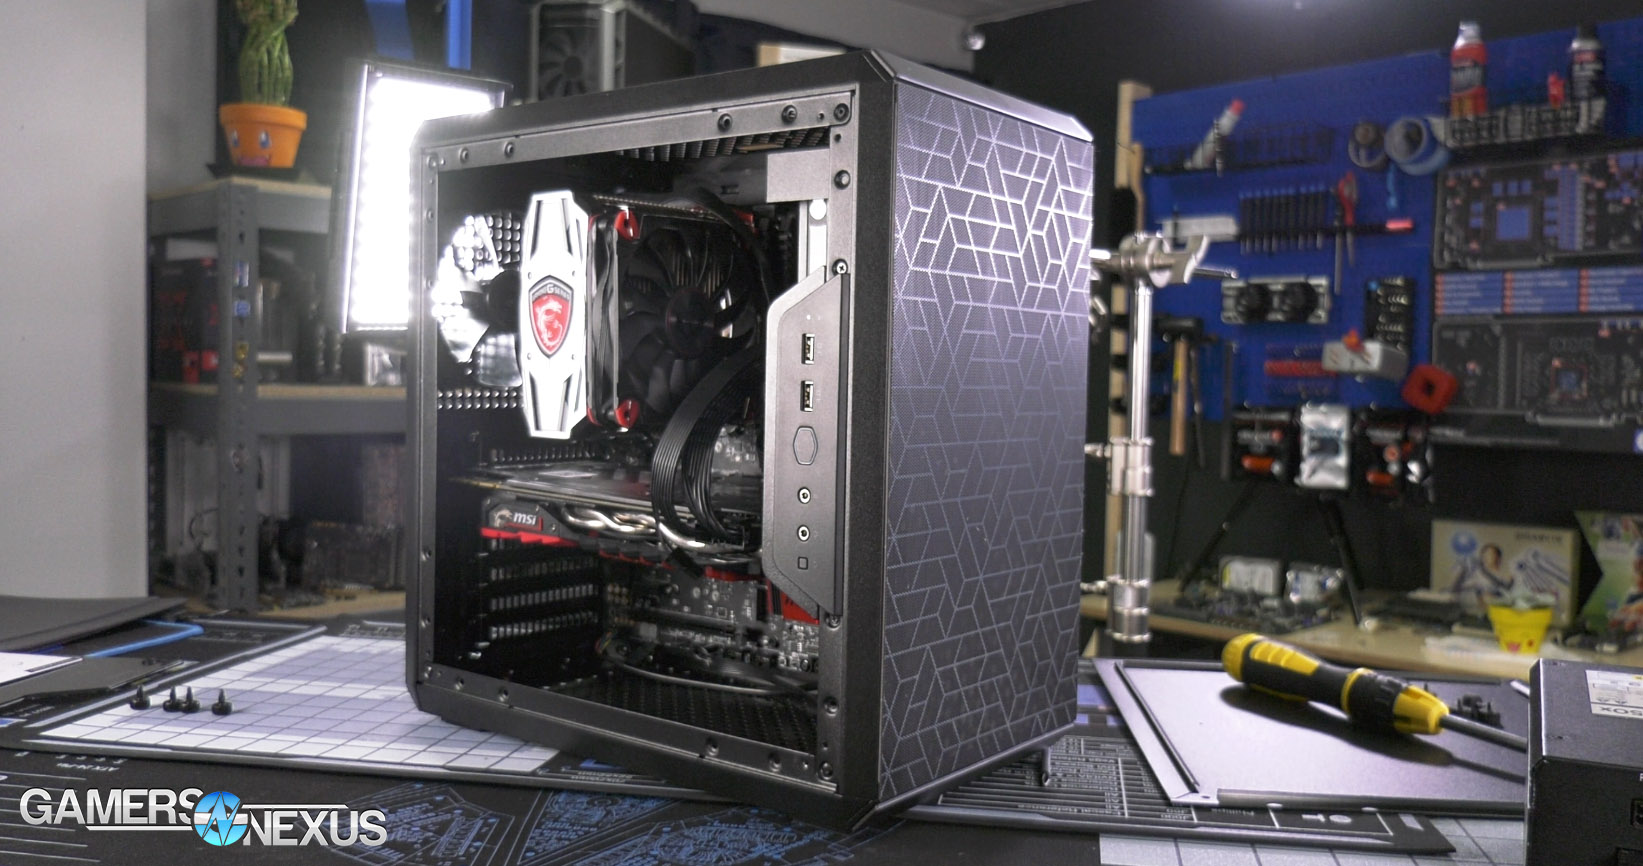
The Cooler Master Q500L is an ATX retrofit of the micro-ATX Q300L, designed to fit full-sized ATX motherboards and components. All of this is done entirely within the footprint of the existing SFF case, which is the gimmick of Cooler Master’s Q series: multiple different cases, one (small) external size. That’s good, because Cooler Master decided to fill the entire thing with Reese’s Cups before they sent it to us, and if they’d done that with something from the Cosmos line we’d be in serious trouble. We have been well-fed, though, and we’ve learned that freezing them makes them much better. Seriously.
We’re definitely losing money on this review, and it’s not just because we had to hire an intern to eat the 18 pounds of Reese’s cups that Cooler Master included in the case. We tried hard to make the Q500L perform well in testing – we tried to force it, with Patrick spending a week longer working on this case testing than we typically spend. This is Cooler Master’s Q500L mini case for full ATX motherboards, re-using the Q300 tooling from a micro-ATX case design, but shifting the power supply around to accommodate ATX motherboards. It’s a unique approach to an enclosure and, at $60, we can overlook a lot of limitations in favor of affordability.
Cooler Master Q500L Case Build Quality
The worst feature of our Q500L is that it permanently smells like cheap chocolate, no matter how many times it’s wiped down. A much better feature is that Cooler Master’s focus on modularity is apparent, although the cramped interior limits some of the potential configurations. There are six different mounting locations for the front I/O panel, a PSU bracket that can be attached in multiple different locations and orientations, and the whole case is invertible. Fans can be screwed on to the perforated panels pretty much anywhere that there’s space, and magnetic filters can be slapped on top to hide the screws.
Our case shipped with one magnetic filter on the front as well as several extras packed separately, but we opted to only use the front filter in testing. They fit neatly against the case trim and the case looks equally good with the filters on or off, as long as nothing is screwed into the panels--once something is attached, using a filter to cover up the screw heads looks much cleaner. Once a position is decided on, Cooler Master also includes small rubber stoppers that clip into the case and keep the filters centered. The bottom filter is a little disappointing in comparison, a rectangle of non-magnetic mesh that’s popped into place with eight easily-lost rubber pins. This is the only filter with cutouts for the case legs, but if the legs are removed and the case is laid out horizontally a magnetic filter can be stuck here too.
Speaking of those case legs, they’re exceptionally short. This will come into play in thermal testing. Typically, we find that a 1” clearance is advisable for anything relying upon bottom intake; even in the stock configuration, with no intake fans, this case will naturally draft air through the bottom by way of its negative pressure setup and proximity of the GPU fans to the bottom. Cooler Master should use taller feet for the next iteration of this design.
One side panel is a thin sheet of clear plastic held in place with plain old thumbscrews at each corner, but that’s not unreasonable at this price point. The steel side panel is held in with four rubber-ringed screws that double as feet if the case is laid on its side, which is a clever feature. It’d be a bad idea to use it as a monitor stand like the Taku, though, as the reversion to acrylic paneling means easy scratches.
In a way, the interior of the Q500L is as simple as it could possibly be, since it’s just one big chamber. Installing the power supply proved more complicated, however. Cooler Master provides a ventilated bracket for the PSU that can be positioned in several locations (including the bottom of the case if a mini-ITX board is installed, exactly like the Q300L). The stock position is inside the front panel, cables down and plug up, with an extension cable running to the rear of the case. Our usual Corsair RM650X was too tall to clear the end of our GPU, so we were forced to use the PSU from our SFF bench, the Enermax Revolution SFX. It would also be too tall, but the length is short enough that the whole PSU can sit above the GPU. Beware: long GPU coolers directly affect the PSU clearance in this enclosure, and Cooler Master recommends 140mm PSUs to maximize compatibility. It’s also worth mentioning that with the PSU mounted on the front panel, its size and number of cables directly affects front air intake. Cooler Master provided a photo in the review guide of a system with an E-ATX motherboard, ATX PSU, massive Threadripper tower cooler, and two triple-slot Strix GPUs, which is an excellent example of what potentially could fit in this case. Could, not should. This configuration would perform exceptionally poorly, especially for that central GPU.
Since there is no PSU shroud, there will always be some number of cables visible inside the case--there’s some cable management space behind the motherboard, but we didn’t make much use of it since the GPU and 24-pin power connectors are positioned directly next to the PSU. Cable cutouts along the edge of the motherboard are surprisingly adequate given how tight the size constraints are, and there are plenty of cable tie points--but again, everything was so close together that we didn’t need more than one or two.
We experimented with inverting the power supply for some of our thermal tests, but moving the PSU lower brought back the same problems with GPU clearance that we’d had with the RM 650X, and it was a struggle to get everything wedged in. The extension cable isn’t quite long enough to reach the opposite corner of the case unless it’s routed through the interior, making this orientation even more difficult to set up.
Fan slots are somewhat limited with the case upright. The case legs are far too short (approximately 0.75cm) for any decent air intake from the bottom, the front may be completely occupied with a PSU depending on its size, which leaves the top and the rear. The single fan that ships with the case is installed in the rear exhaust slot. Even though it already only supports 120mm fans, the vent is 80mm wide, illustrating the pain points of reusing tooling and one of the bigger oversights in the case. The top is the best bet for mounting some extra fans or a radiator, but this likely won’t benefit the GPU at all—laying the case on its side maximizes the number of usable slots.
GN Case Testing Bench (Sponsored by CableMod)
| Component | Courtesy Of | |
| Video Card | MSI GTX 1080 Gaming X (OC Mode) | MSI |
| CPU | Intel i7-6700K @ 4.4GHz | GamersNexus |
| CPU Cooler | MSI Core Frozr L | MSI |
| Motherboard | MSI Z170A Gaming M7 | MSI |
| Memory | Corsair Vengeance LED 32GB 3200MHz | Corsair |
| SSD | Samsung 850 EVO 120GB | Samsung |
| PSU | Corsair RM650x | Corsair |
| Cables | CableMod Pro Mesh Cables | CableMod |
| Case | This is what we're testing! | - |
The video card is configured to run at 55% fan speed at all times.
Prior to load testing, we collect idle temperature results for ten minutes to determine the unloaded cooling performance of a case's fans and air channels. Thermal benchmarking is conducted for 1400 seconds (23 minutes), a period we've determined sufficient for achieving equilibrium. The over-time data is aggregated and will occasionally be compiled into charts, if interesting or relevant. The equilibrium performance is averaged to create the below charts.
Load testing is conducted using Prime95 LFFTs and Kombustor “FurMark” stress testing simultaneously. Testing is completely automated using in-house scripting, and executes with perfect accuracy on every run.
We recently validated our test methodology using a thermal chamber, finding our approach to be nearly perfectly accurate. Learn more here.
Cooler Master Q500L Thermal Benchmark Outline
Since the Q500L is so reconfigurable, we did two full sets of tests as well as quite a few extra torture test passes. The initial runs were stock, with just the rear 120mm case fan. This is clearly a bad idea and nobody should be using this case without additional cooling, so we installed a single Noctua 120mm 1500RPM fan at the front of the case under the PSU, then did all the tests again. We also laid the case on its side to make it as open-air as possible. For every test we did with the case on its side, we left the legs and stock bottom filter on (unless it was a no-filters test) for easy comparison to the upright tests, although users would presumably replace these with one of the extra magnetic filters. We then did a series of torture tests, because if it isn’t obvious by now, just from the lead-in, there were serious thermal issues in our first batches of testing.
In fact, we did so many thermal tests that Patrick spent nearly a week longer on this case review than we’d typically spend. It’s worth it, though, because we really wanted to give the case a fair shot. We also retested our test bench in other cases we’ve previously reviewed, validating that its performance was unchanged and reliable.
Here’s a list of those tests.
- Torture, no front filter: exactly the same as the stock test with the case upright, with just the front magnetic filter removed. We would have removed the whole front panel, but it’s a riveted part of the case structure and there’s no other place to put the PSU, anyway.
- PSU moved +1 fan: Since we used an SFF power supply, we were able to flip it cable-end-up and install it on the bottom half of the front panel under the GPU and put the 120mm Noctua fan where the PSU had been. The front intake fan is therefore pointed at the CPU instead of the GPU. Case was upright.
- Upright +2 fans: Case upright and set up the same way as in the previous test, but with a 1500RPM NZXT Aer RGB120 directly under the GPU die, pulling air in and directing it into the GPU cooler.
- On side +2 fans: same as above but with the case on its side, since there’s barely any clearance for air intake from the bottom with the case upright.
- On side +2 fans, no filters: Same as above but with no front or bottom filter. The GPU temperatures had been much worse than we expected, and we suspected that the bottom filter was causing a bad airflow pattern.
- Better exhaust: same as the original stock test but with the stock fan swapped out for the Noctua one.
- Best-case: a last-ditch effort to make the case cool well. The setup is the same as “on side +2 fans, no filters,” but with an additional NZXT Aer RGB120 on the front panel pulling air in towards the GPU.
- Best-case, front exhaust: because the results still weren’t great, we did one final test with the front NZXT fan flipped around to exhaust out of the front panel.
Torture CPU
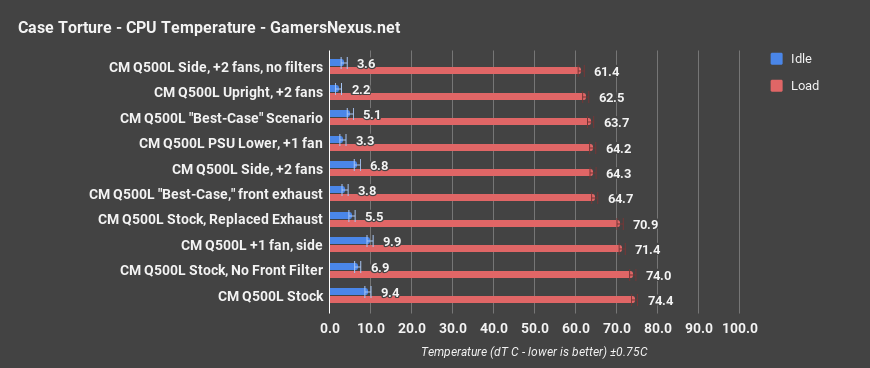
The stock torture test was the worst for CPU temperature, with an average of 74.4 degrees Celsius over ambient under a torture workload. Remember, that’s over ambient -- in reality, the CPU hit 100 degrees at times and was forced to downclock, which is something we rarely see. Normally, removing the front filter would be a significant help, but since the PSU was blocking the section of the front panel in front of the CPU cooler, the effect on CPU temperature was negligible and clocks dropped to the same degree -- we ended up at 74 degrees for this test, not changing much other than idle. Adding one fan and turning the case on its side helped a little, but since the added fan was on the lower half of the front panel, it only lowered CPU temperature by a couple degrees to 71.4 over ambient. Throttling was less severe, but still present. Using the stock configuration with a higher-quality Noctua 1500RPM fan replacing the stock 1200RPM fan lowered CPU delta temperature by roughly the same amount, down to 70.9 degrees, also not enough to prevent throttling. Every test from here down kept the CPU cool enough to prevent downclocking, because they all used an additional case fan for cooling the CPU specifically, either pulling air directly in from the front panel or at a right angle from the top panel.

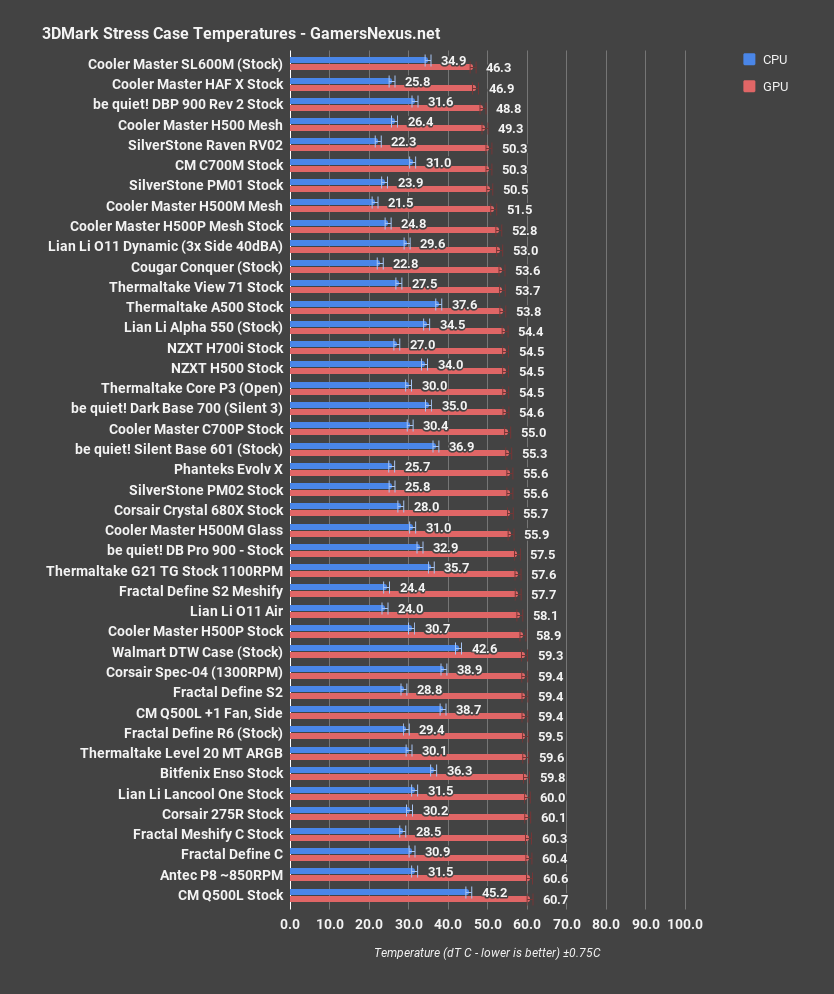
We’ll open up a comparative chart now, but will port over the best result with all our changes. The best result was 61.4 degrees Celsius over ambient with the case on its side, two added fans, and all filters removed, and that’s still among the very hottest results on our chart. The Q500L with all that extra help is still almost on the level of the SL600M in terms of CPU cooling, and that’s a case with a completely sealed front panel and no stock fans directly aimed at the CPU cooler, relying entirely on intake from the bottom -- very far away -- to cool the CPU, which also relies on the same intake to get past a GPU before making it to the CPU. That should illustrate where the Q500L lands. Everything in the case is in tight proximity and airflow isn’t as good as it could be with a normal fan mount. The perforated panels are great for allowing flexibility, but they allow less air through than a normal hole in the case would, and are comprised of too much steel and too little hole. The tightly confined space doesn’t help either, with little room for radiative heat to escape, but we’ve seen small cases manage decent cooling before. The biggest problem is that, with a full ATX board, the power supply has to be placed on the front panel. Depending on where it’s placed, either the GPU or the CPU will have significantly less cooling potential.
Torture GPU
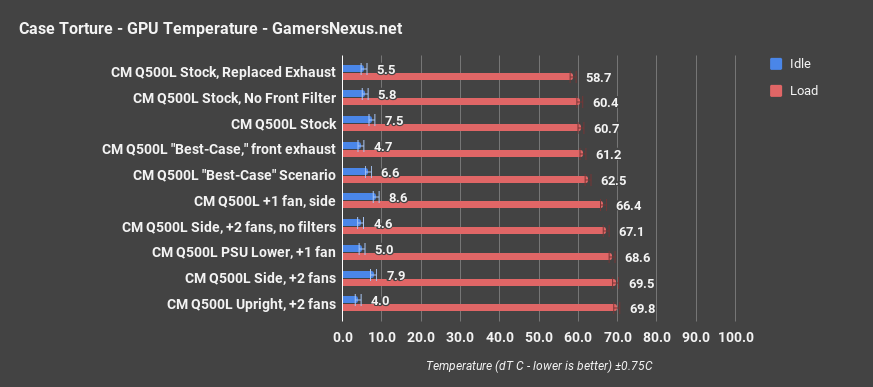
Three of the four hottest GPU tests were also the tests where an intake fan was placed on the bottom of the case, pointed directly into the GPU cooler where the GPU die is located. In fact, of the ten torture passes we ran in different configurations, six of the seven worst GPU dT results were with a fan added specifically to benefit the GPU. Common sense dictates that these should be the coolest results, especially with the case on its side; however, with a positive pressure setup in such a small case, a problem develops with where the hot air goes. We initially thought that maybe the loose bottom filter was allowing the bottom intake fan to recirculate hot air from inside the case rather than pulling air through the filter, but removing it only lowered thermals by a couple degrees. In terms of both temperature and average frequency, the best result was achieved by just replacing the stock exhaust fan and leaving the rest of the case stock. Our observation is that this is a mixture of problems: We have a scenario where a tall GPU is butted-up against the side panel on one side, the other side of the card is against a power supply, and so the air wants to escape out the rear PCIe slot and into the PSU. The air hitting the power supply will get recirculated into the GPU fans, causing the video card to pull in its own hot exhaust and recycle it. There isn’t enough exhaust away from the card to keep ambient intake low, and so we hit a runaway scenario where thermals keep climbing as the card throttles. There isn’t enough exhaust to balance all the hot intake.
One key observation is that in the tests where a fan was added to the front panel, aimed so that it would push air front-to-back underneath the GPU and the case was laid on its side, CPU dT lowered while GPU dT rose. In the stock configuration, the CPU cooler and exhaust fan draw hot air away from the GPU and out of the case, worsening CPU temperatures in the process. When a decent intake fan is added, the case goes from negative pressure to positive.

Comparatively, the Q500L does poorly on our charts. Even when we tried hard to get it to do well, it just didn’t rank well in the stack, and is one of the worst cases we’ve worked with.
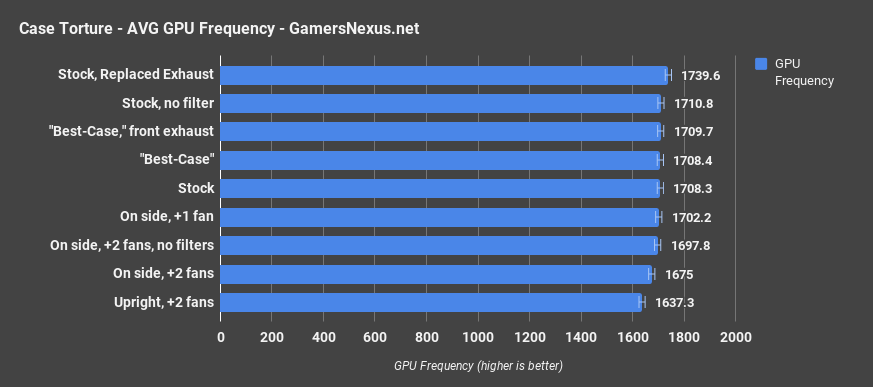
This chart of average GPU frequency tells more of the story: We were hitting 84C on the card regularly with our joint thermal torture, which means dropping clocks to keep temperatures at 84C. Performance starts to fall off as a result of this. There’s clearly an exhaust problem, based on this odd lineup, and we are also dealing with issues of the CPU airflow and GPU airflow more directly impacting each other than in other cases we’ve worked with. This is due to the smaller interior and obstructions scattered throughout the case. You could brute-force things to make it work, like by blasting the GPU fan speed at 90% and using a CLC for the CPU, but they will still cool comparatively worse to other cases and will also become much louder.
Firestrike
We normally run only one Firestrike test in the stock case configuration, but since the stock configuration of this case caused our CPU to overheat so much, we decided to try one more batch. The stock configuration resulted in a GPU dT of 60.7 degrees Celsius over ambient, which is a number that practically ties it with the Antec P8 and among the hottest cases on the chart. It’d be difficult for a case to score a GPU dT higher than this: the GPU we use for testing downclocks in an attempt to maintain a max temperature of about 84C, and it usually does so successfully in the Firestrike tests (but not always in the torture test). If you had doubts about previous results because of how stressful the tests are, realize that Firestrike is essentially a gaming workload – this is gaming performance, and so we’d be dropping frequency and framerate even with a game workload. CPU dT in this test was 45.2 degrees over ambient--we normally don’t comment on CPU temperature at all for this test, but the only other case that had a CPU dT over 40C with Firestrike was the Walmart case. The SL600M is up there, demonstrating limitations with its design, but it makes up for it with the best GPU thermals.
Blender
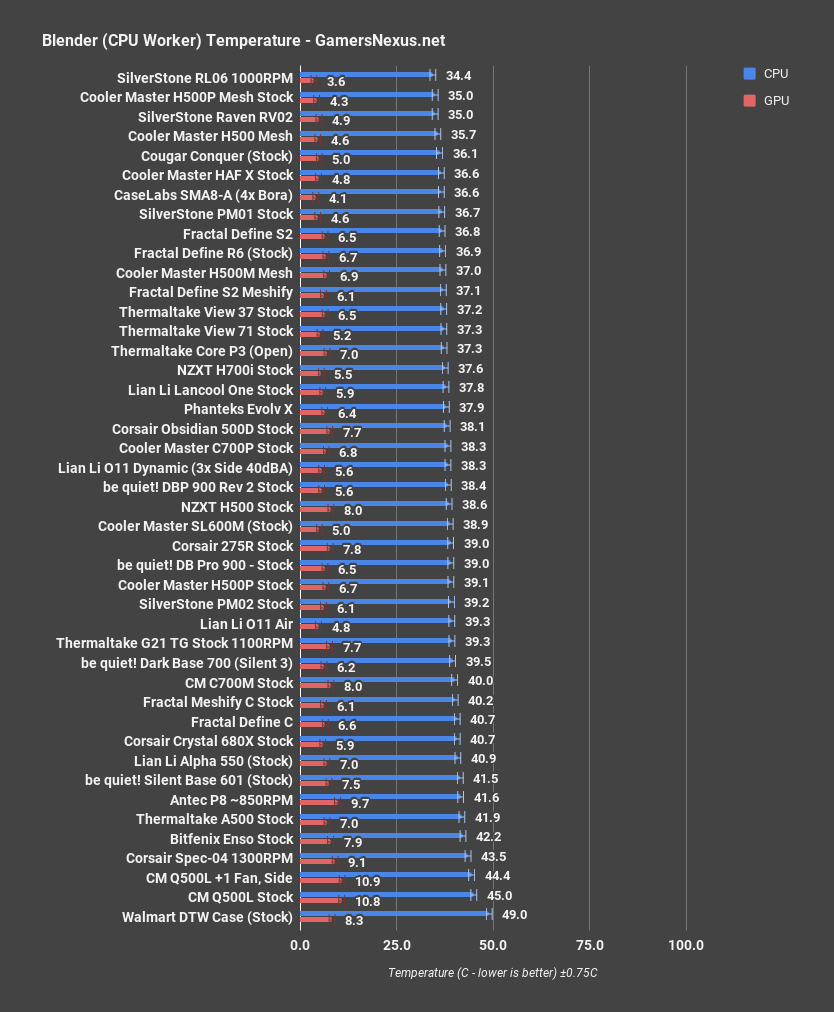
Blender CPU rendering resulted in a CPU dT of 45C, higher than any case except the Walmart one. The additional fan had a negligible effect with a 44.4C CPU dT.
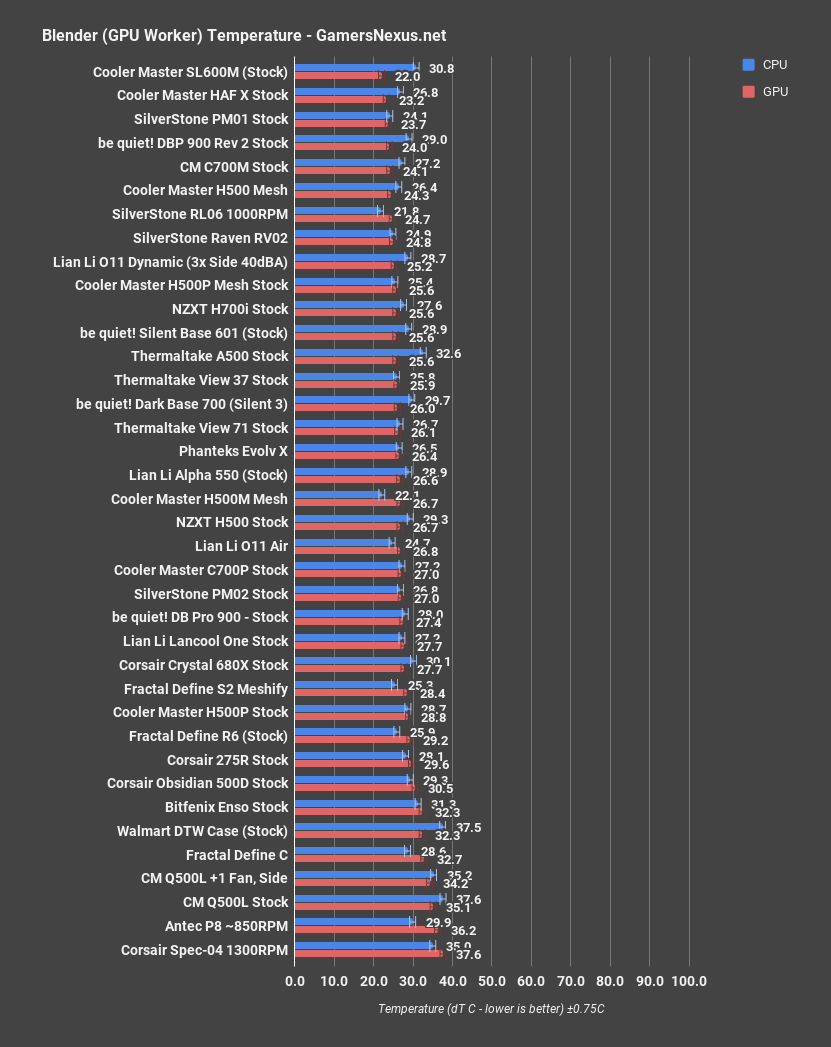
GPU rendering averaged a GPU dT of 35.1C dT, but there are a couple cases on the chart that were hotter: the Antec P8 again, and the Corsair Spec-04. The additional fan lowered GPU dT by about one degree, but that isn’t enough to beat out any of the other cases.
Noise
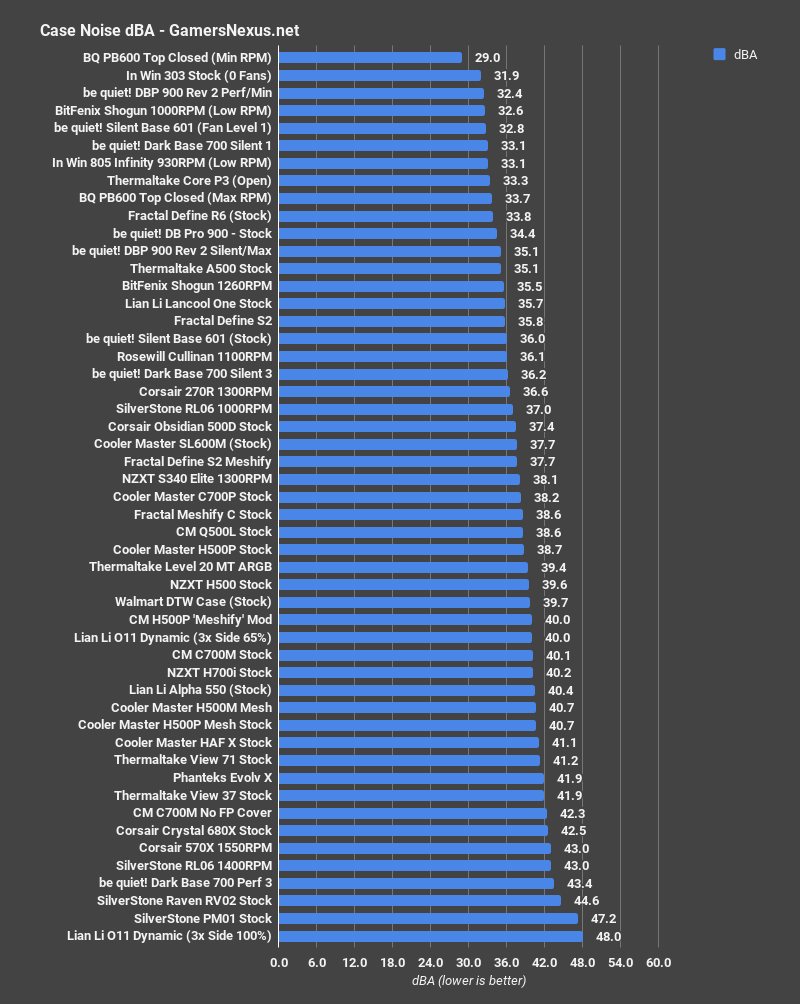
Noise levels for this case aren’t useful for strict comparison to the other cases on the chart because we had to use a different power supply, and the PSU fan is front and center on the case, which strongly affected the results. Under load the little Enermax fan brought the system up to 51.4dBA. The idle number is closer to being a fair comparison, and 38.6dBA would put it just about average. That’s with only one fan, though, positioned at the very rear of the case and as far as possible from the dB meter. There’s no noise dampening in this case, and the limited size and cooling capacity means that without liquid cooling most builds will have some small and noisy fans running at relatively high RPM.
Conclusion
The Q500L brings all the advantages and disadvantages of a small form factor case to ATX systems. The main selling point of the Q500L is that it supports full-size components in a package that was specifically designed for smaller systems, and it does do that. It’s small. Cooler Master has filled a niche with a very inexpensive case that requires minimal retooling on their part since it uses an existing chassis, and they’ll continue to do so, since any future Q series cases will be exactly the same size externally and be compatible with the same parts, like the Q300P upgrade kit, although we’ve expressed our opinion on that sort of thing before. It’s hard to criticize a $60 case strongly when it has a specific purpose and accomplishes that purpose, although the price of at least one additional fan should be tacked on.
On the other hand, all the fiddliness of SFF builds--lack of clearance, cramped space for building, limited space for radiators, poor airflow--is present in this case. Its flexibility is its saving grace, because there’s always a chance that there’s some configuration we didn’t consider that would magically fix performance: as Cooler Master says themselves, “thermal performance is dependent on the build itself.” The vast majority of the time, it would make more sense to buy a cheap ATX case for an ATX system, or to buy a case this size for a SFF system. The case this size for a SFF system is called the Q300L, and it’s at least $10 cheaper, although we can’t speak to its performance.
It’s likely that users building in this case will consider a small PSU, GPU, CPU cooler, or some other concession to the limited size of the case. At that point, there should be some serious consideration of just building an actual SFF system. Especially with a mini-ITX motherboard, there’s no point at all to buy this instead of the Q300L.
Editorial, Testing: Patrick Lathan
Host, Test Lead: Steve Burke
Video: Josh Svoboda, Andrew Coleman