The Versa J24 TG RGB Edition is a budget case from Thermaltake. Our understanding is that the J22/J23/J24/J25 are basically the same chassis with the same number of fans and different front panels, but trying to remember Thermaltake case SKUs is a great way to go crazy. The sample sent to us for review is specifically the RGB edition and not the newer ARGB edition, which may or may not have been a mistake on Thermaltake’s part, but saving $10 over an extra vowel is a win in our book.
The case interior is just big enough to fit an ATX motherboard with little room to spare on any side, but there are adequate cutouts along the front edge to route all the cables. The case is about as small as it can be without entering Q500L territory, almost exactly the same dimensions as the Meshify C but slightly longer. Cable management room is understandably restricted. There is space under the PSU shroud, but users with one or more 3.5” drives will struggle to find a place for power cables. The HDD cage can be removed or shifted 2.5cm back towards the rear of the case, a welcome change from budget cases that usually rivet the HDD cage in place.
GN Case Testing Bench (Sponsored by CableMod)
| Component | Courtesy Of | |
| Video Card | MSI GTX 1080 Gaming X (OC Mode) | MSI |
| CPU | Intel i7-6700K @ 4.4GHz | GamersNexus |
| CPU Cooler | MSI Core Frozr L | MSI |
| Motherboard | MSI Z170A Gaming M7 | MSI |
| Memory | Corsair Vengeance LED 32GB 3200MHz | Corsair |
| SSD | Samsung 850 EVO 120GB | Samsung |
| PSU | Corsair RM650x | Corsair |
| Cables | CableMod Pro Mesh Cables | CableMod |
| Case | This is what we're testing! | - |
The video card is configured to run at 55% fan speed at all times.
Prior to load testing, we collect idle temperature results for ten minutes to determine the unloaded cooling performance of a case's fans and air channels. Thermal benchmarking is conducted for 1400 seconds (23 minutes), a period we've determined sufficient for achieving equilibrium. The over-time data is aggregated and will occasionally be compiled into charts, if interesting or relevant. The equilibrium performance is averaged to create the below charts.
Load testing is conducted using Prime95 LFFTs and Kombustor “FurMark” stress testing simultaneously. Testing is completely automated using in-house scripting, and executes with perfect accuracy on every run.
We recently validated our test methodology using a thermal chamber, finding our approach to be nearly perfectly accurate. Learn more here.
The top of the PSU shroud is fully ventilated and includes two mounting points for 2.5” drive sleds, which can also be placed behind the motherboard. That’s where we installed ours, because the mounts on the PSU shroud don’t line up with any cable cutouts. To be usable at all, the SATA cables would need to be plugged directly into the motherboard instead of being routed neatly under the shroud.
The only major fit and finish issue with the case was that it only had seven motherboard standoffs installed and no spares. We’ll give Thermaltake the benefit of the doubt and assume this was a QC problem, but the manual confirms that there aren’t any extra standoffs included in the parts kit in case this happens. Missing two of nine standoffs with a full-sized ATX motherboard means that some part of the board is going to flex unavoidably when components are installed. We have dozens of extra standoffs lying around, but this could be a real inconvenience for first-time system builders.
The steel side panel is held on with metal tabs, a mechanism as annoying as it is old. It’s the kind with loops instead of fragile little hooks, at least. The glass side panel is much better, with a couple of metal strips glued to the edges that hook over the chassis and are secured with thumbscrews at the back. This is probably cheaper than drilling holes in the glass panel for thumbscrews, and although relying on glue is less secure, it’s easier to use as well.
The front panel is covered with the same pill-shaped ventilation holes as on the Core G21, but backed with a sheet of foam to filter out dust. The effectiveness of the filter is slightly undercut by a cutout under the front panel which allows air directly into the fans, but since the fans are mounted nearly flush with the front panel, most air is still pulled through the front of the case. The resemblance of the front panel to the G21’s is ominous: we criticized that case for using multiple redundant filters that choked off airflow. The J24’s approach makes more sense, but it also blocks off a lot of the incoming air, as we’ll discuss in the thermal section below. The top of the front panel is decoratively narrowed in a way that seems like it would prevent mounting 140mm fans, but the panel is still 140mm wide at its narrowest point, although the 140mm fan mounts don’t extend all the way to the top of the case.
The fan LEDs are controlled externally by a button on the front of the case labelled “R,” originally for reset but now for RGB. The power and RGB switches are under either side of a single plastic button, which is a bad choice and one that can’t be saving Thermaltake much money or time. It’s not as bad as having the power and reset switches under the same button, as was the original intention, but it’s still going to be annoying to hit the wrong switch in the dark.
The fans use the same five-pin connector that we’ve seen and complained about in the past with Lian Li cases, since they can’t connect to anything except the hub that ships with the case. Thermaltake’s fan hub is extremely simple, to the extent that it doesn’t have any way to actually control the speed of the fans, which therefore run at full RPM with no way to control their speed short of soldering together a 4-pin adapter. The connections on the hub are tailored exactly to the fans that ship with the case and there are no spare plugs.
The J24 ships with four fans, a massive improvement over the G21’s single fan despite our hangups about how they’re connected and controlled. The three intake fans are RGB (not ARGB, that’s a different case SKU) and can accept lighting input directly from the fan hub or passed through from a compatible motherboard. The foam filter does have an interesting softening effect on the lighting compared to a more typical mesh filter, but the metal and plastic elements of the front panel also obscure the fans a good bit. The front of the case theoretically supports up to 360mm radiators, but only tubes-up, and there may be clearance issues with the HDD cage unless it’s moved back or taken out. Ignore any marketing photos with a radiator mounted at the top of the case: Thermaltake doesn’t even try to claim that the top mount supports radiators in their spec sheet, since there’s only about 3cm of space between the motherboard and the case. There’s room for one 120mm rear radiator and one 240mm front radiator without any crowding.
Thermals & Noise
We followed the standard test suite for the J24 with just a couple of exceptions. We gave up almost immediately on trying to noise normalize the system, since the rear fan is the only one that can be controlled and is the quietest of the four. The front fans are not cross-compatible with the Lian Li 5-pin fan controller we have despite using the exact same connector, and if users can’t practically lower the fan speed, there’s no point in us testing that scenario. We also added a test with the foam filter layer removed to see how much it restricted airflow, and one final test with the rear exhaust fan controlled via a motherboard header instead of the fan controller. We won’t discuss that one below because the thermal results were the same within half a degree.
CPU Torture

Thermal results will start with just the Versa J24 case results, then we’ll expand the charts. The CPU torture average temperature was 57.1 degrees Celsius over ambient, which lowered massively down to 44.4 degrees delta T with the front panel taken removed, a reduction of about 13 degrees Celsius. The intake fans don’t deal well at all with the task of drawing air through the foam filter and the front panel, but if they’re unrestricted, they do an excellent job of pushing air through the case. Leaving the front panel on and removing just the foam layer confirmed this, with a CPU dT of 48.8 degrees Celsius over ambient, almost as good as with no panel at all. Users who aren’t averse to cleaning their cases should definitely consider removing the dust filter, as these fans aren’t particularly good with static pressure performance.
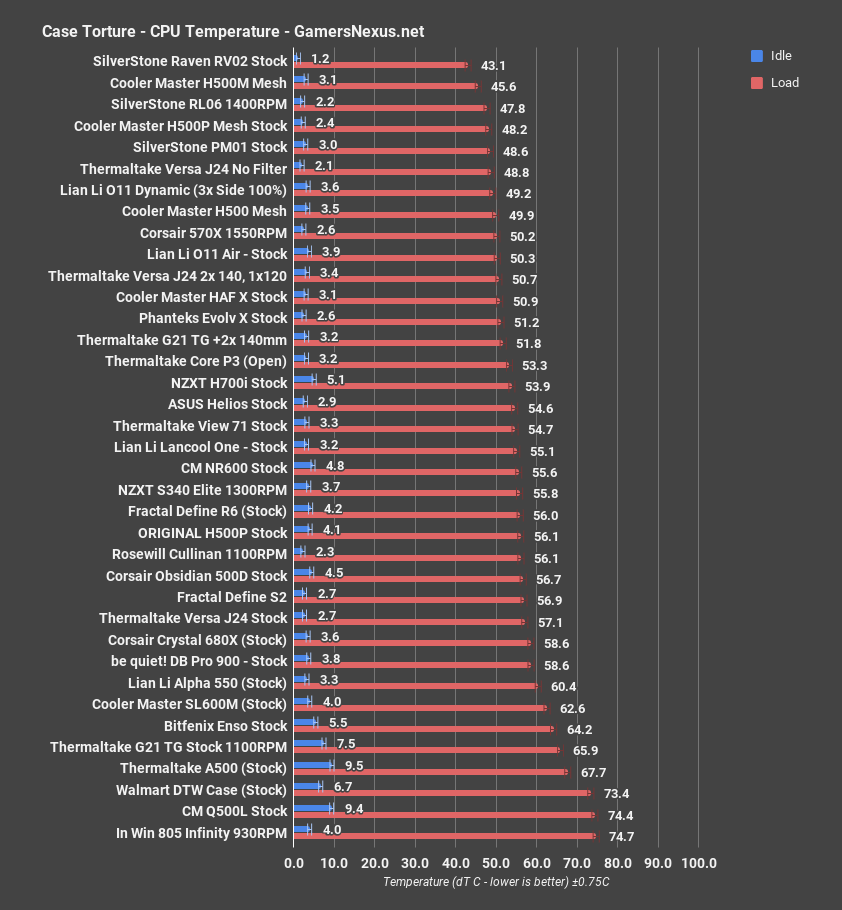
Comparatively, 57.1 degrees stock isn’t a completely terrible score to begin with, close to stock Define S2 levels of performance, but it is on the warm end of the scale and is especially warm for the fan count. It’s certainly not as good as we’d expect a mesh-fronted case with four stock fans to be. The G21 with two 140mm intake fans added (in addition to the stock 120mm exhaust fan) placed 51.8 degrees dT in this test, and the J24 would be right alongside it if it had either a less restrictive filter or fans with higher static pressure. If you’re willing to remove the front filter, performance improves significantly and scales toward the very top-end of the chart.
GPU Torture
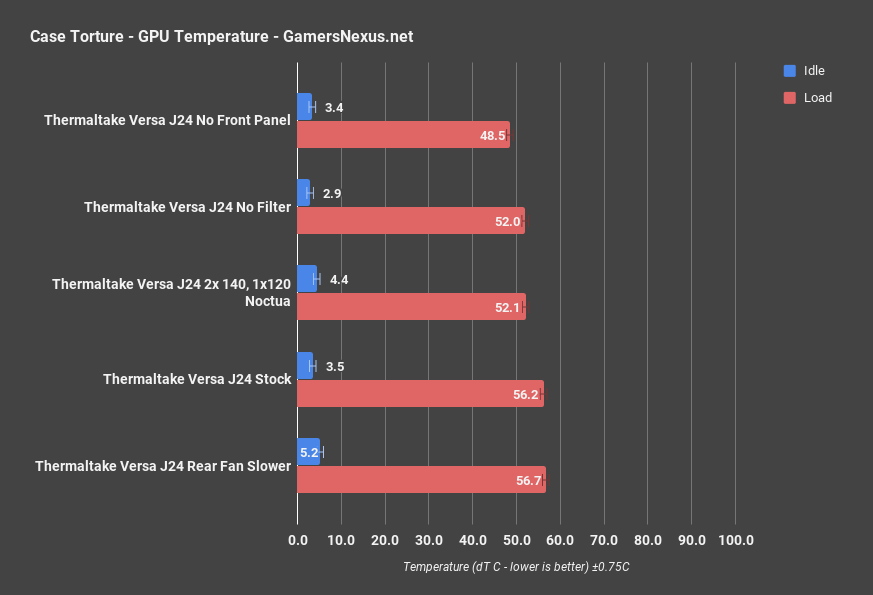
GPU thermals for just the J24 are next. GPU temperature was 56.2 degrees on average in the torture test, and it too got much cooler with the front panel removed, averaging 48.5 degrees over ambient. This also gives us an additional clock increase in boosting behavior. The ventilated PSU shroud matters more here than it typically does, since much of the incoming air from the lowest intake fan is directed into the PSU shroud and has no place to exit other than upwards into the GPU cooler. Removing the front filter and keeping the front panel landed at the midpoint between the two results, at 52 degrees average. Again, removing the foam filter layer is a valid option for users who don’t mind cleaning their GPU fans more often than usual.
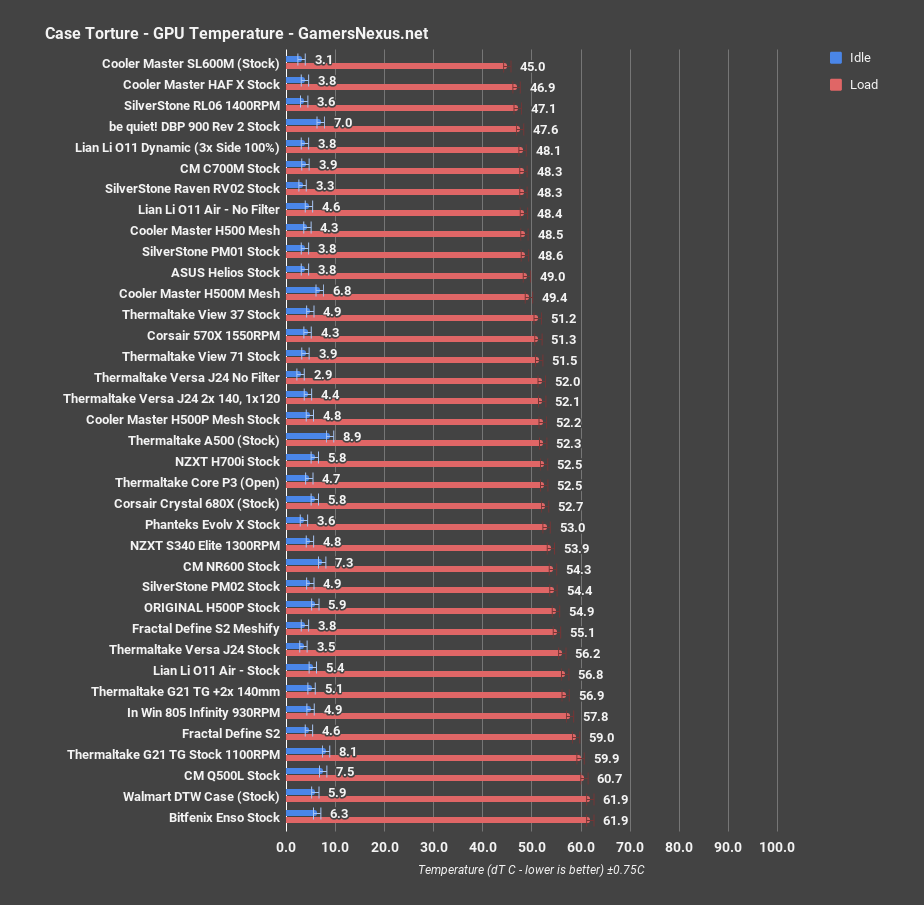
56.2 degrees over ambient is comparatively worse than the CPU temperatures were, on the level of the stock Define R6 and definitely hotter than it could be. The G21 with two added fans also did nearly the same here, resulting in 56.9 degrees delta T over ambient, but we’d like to see the J24 closer to something like the Silverstone RL06. 52 degrees without the filter does put it on the level of the stock H500P Mesh.
3DMark
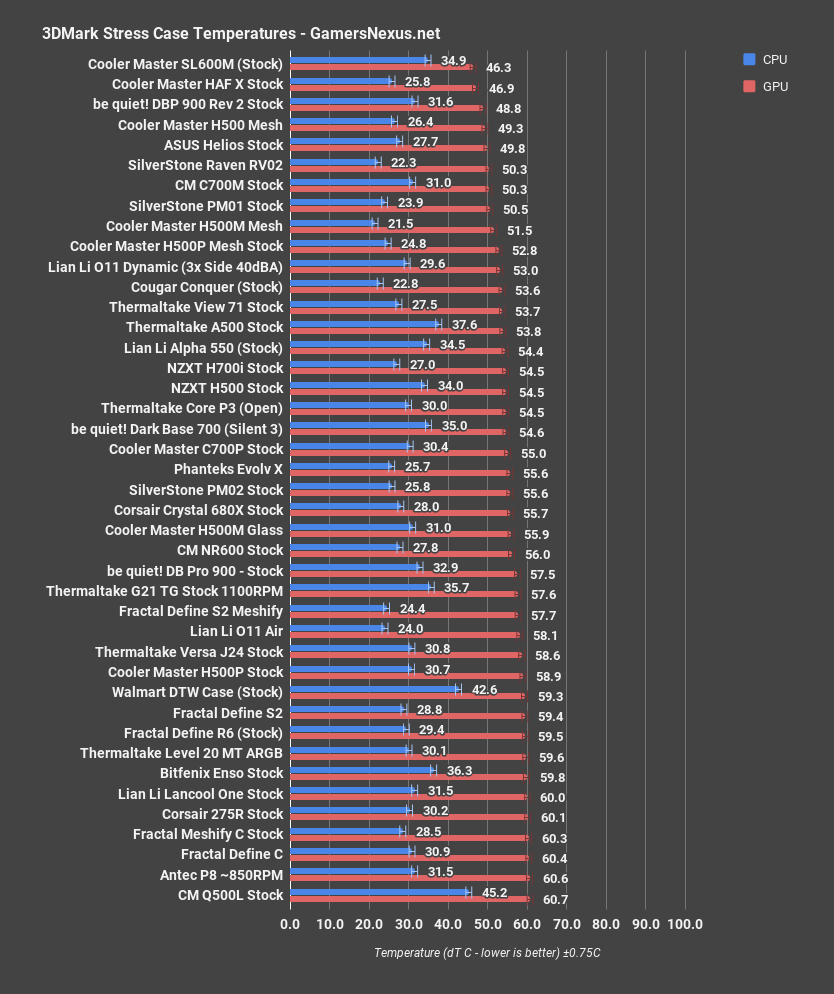
The Firestrike Extreme stress test raised GPU dT slightly above the torture test’s result to 58.6C, putting it among the results of cases where the GPU hits 82-83 degrees and downclocks to maintain its temperature. It’s not the worst GPU temperature we’ve seen with this bench, but it absolutely qualifies as warm, and it would be better if the filter weren’t so restrictive. We can’t make our usual comment about adding a fan to better cool the GPU either, since Thermaltake has already added as many fans as possible to the bottom of the case. You’d just be replacing fans, at this point.
Blender
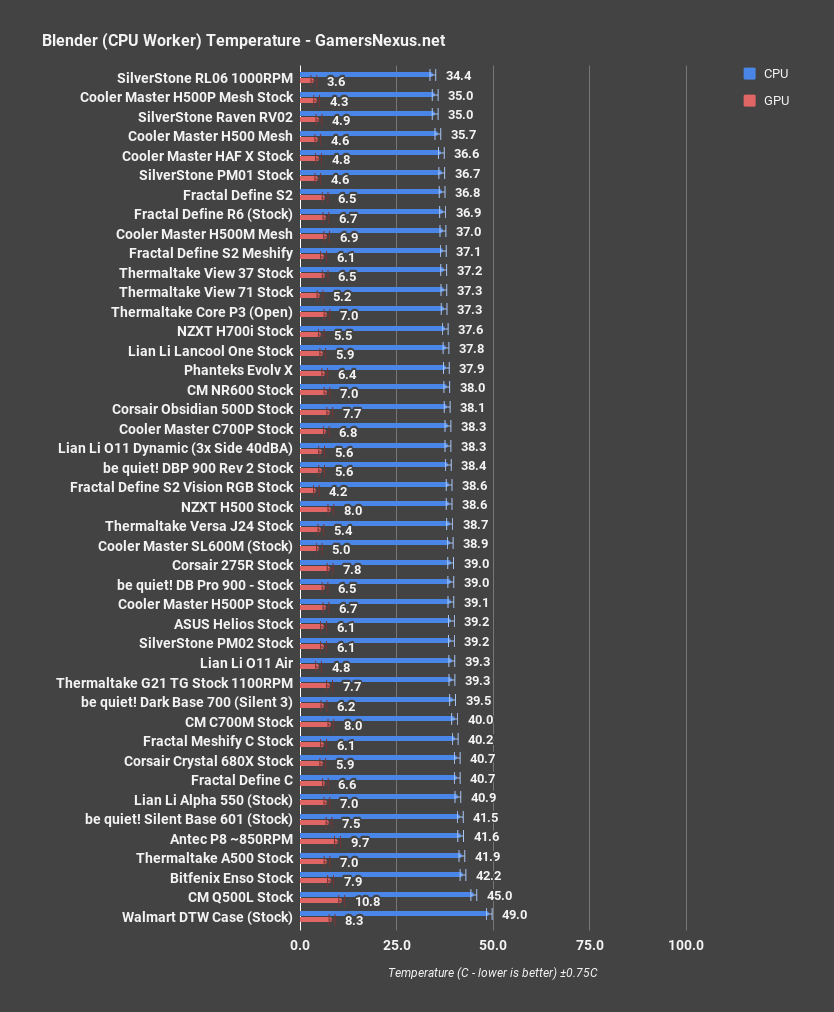
Blender rendering on the CPU averaged 38.7C dT, still in the middle of the chart and next to the Define S2 Vision and stock NZXT H500. If a case is going to be running 3-4 fans at full speed at all times no matter what, it should at least be cooling exceptionally well. It’s not that the case performs badly stock, it’s that it should be doing better, and it can be.
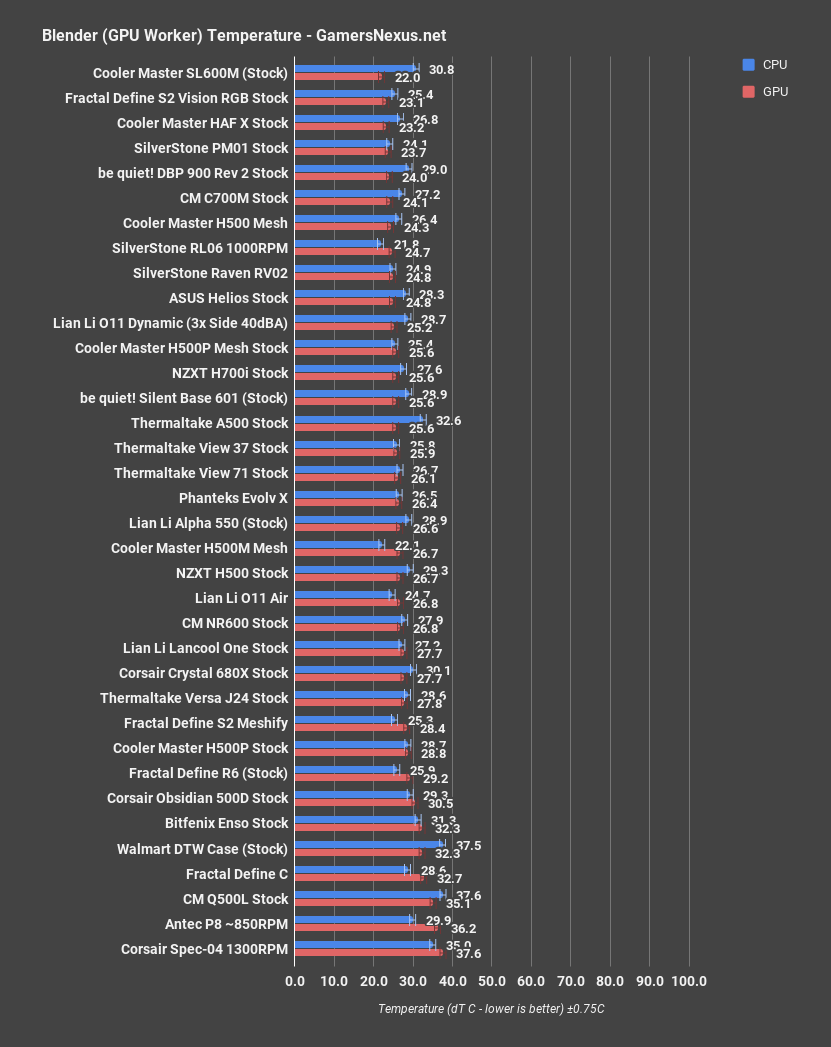
Rendering on the GPU averaged 27.8C GPU dT, equivalent to the Lancool One, a case it feels like we haven’t mentioned in months. The bottom of the case is about as good as it can be for GPU cooling with the constraints of case size, having a PSU shroud, and having an HDD cage, but it’s let down by the front panel.
Noise

We measured the J24 at 39.5dBA. Again, there’s no way to control three of the four fans in this case, and the fourth one can’t be controlled either unless it’s plugged into the motherboard. That means 39.5dBA is going to be the approximate noise level of any average air-cooled system under load in this case, unlike the rest of the cases on our chart, which could be run quieter if the user chose to turn the fans down. 39.5dBA is fairly good for this quantity of fans in a mesh-fronted case, but since it won’t ever get any quieter than that, this is definitely a case for users that plan to use headphones.
Conclusion

It might not sound like it, but we like this case. It’s currently $90 on Newegg and $80 from other outlets, with Amazon also selling the J24 RGB. The ARGB version is on sale for $90 on Newegg as well, but the upgrade isn’t worth it. $80 is a good price for a case with four fans, a tempered glass panel, and a mesh front panel. The case is also unusually compact, making it interesting for at least one other reason than its price. The foam filter in the front panel doesn’t work well with the fans that Thermaltake supplied, but removing the foam isn’t hard, and Thermaltake is at least making an effort to improve cooling by including so many fans and mounting them right up against the front panel. This enclosure is a good option for budget PCs without much liquid cooling, as long as the dust filter is removed. The next step up would be something like a Fractal Meshify C, which runs around the same price but requires buying one or two additional case fans to perform on the same level.
Editorial, Testing: Patrick Lathan
Test Lead: Steve Burke
Video: Andrew Coleman