Gigabyte Z270X Aorus Gaming 7 Review – The Impact of Motherboards on Temperatures
Posted on
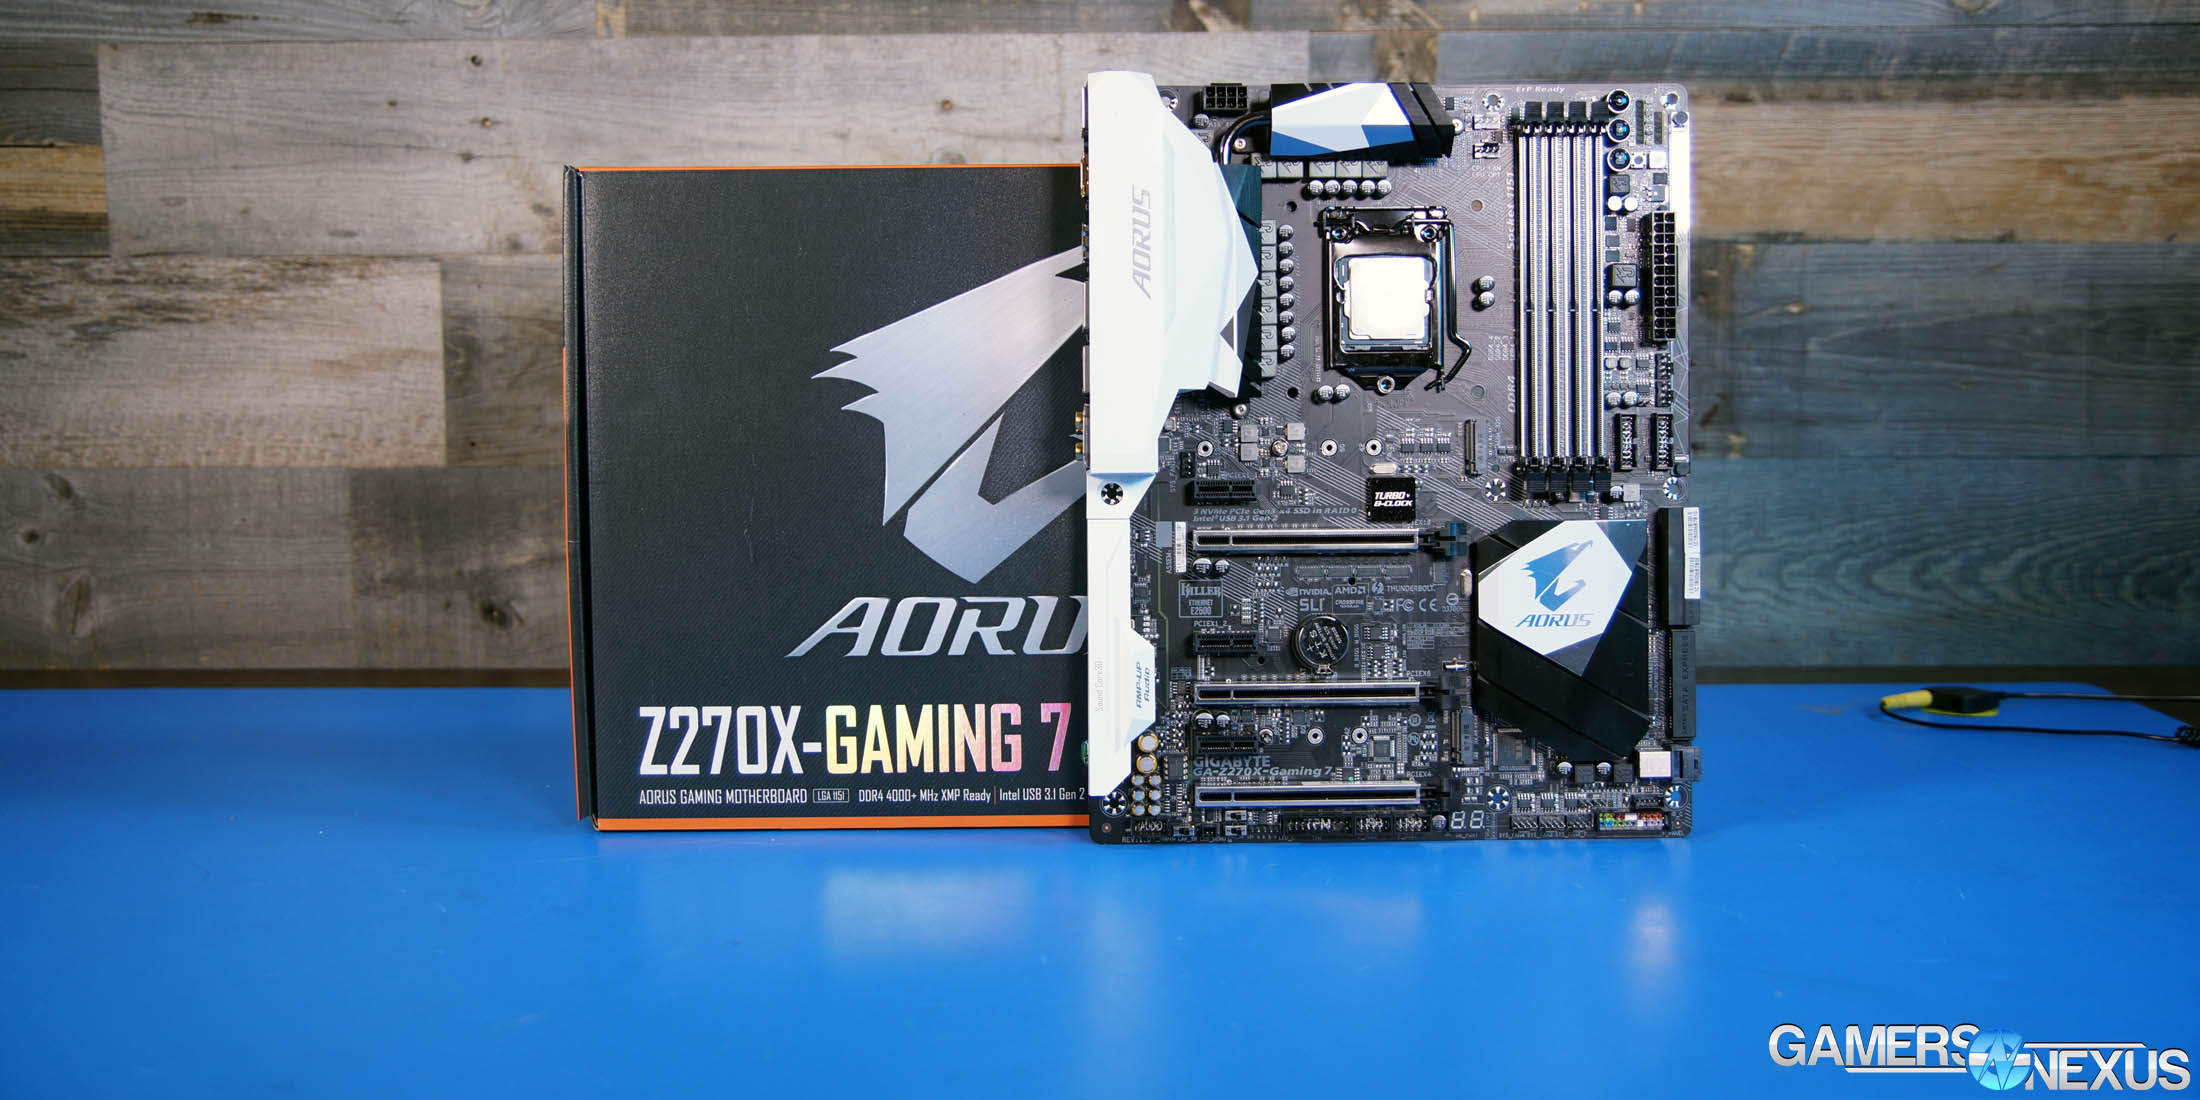
Gigabyte’s Z270X Aorus Gaming 7 motherboard was the first to host our Intel i7-7700K Kaby Lake CPU that we reviewed. The board also forced us to try a few different motherboards for our Kaby Lake CPU thermal benchmarking, because the initial numbers were astronomically high. We’ll get to that later.
Gigabyte’s newest rendition of its Gaming 7 line places the Z270 7th Gen chipset on the motherboard, alongside the RGB LEDs expected of the company’s “Aorus” brand. The board bills itself a rather high-end solution – at least, before venturing into extreme OC territory – and does so under a $240 banner. Also on our bench the next two weeks, the MSI Gaming Pro Carbon (Z270) and MSI Tomahawk (Z270) were used as a point of comparison against the Gaming 7. As Kaby Lake and the i7-7700K are brand new, the three boards are all we’ve used from the 200-series chipsets thus far.
(UPDATE: We talk about Auto vCore issues in this review. Please note that Gigabyte has since updated its BIOS to fix these problems. Learn more here.)
We worked with Buildzoid of Actually Hardcore Overclocking to analyze the VRM and overclocking capabilities of this motherboard (his full video will land on our channel in a few days), then coupled that with our explorative testing of UEFI, temperatures, and overall functionality of the board. This review of the Gigabyte Aorus Gaming 7 looks at temperatures, voltage, overclocking performance, PWM fan headers, and overall value of the motherboard.
The motherboard should be up for sale on January 5. You will be able to find it here once that happens.
Gigabyte Z270X Aorus Gaming 7 Specs
(Above: Video review, but also some RGB LED demonstrations)
To quickly recap everyone on the chipset specs, it’s looking like the changes from Z170 to Z270 are relatively minor – it’s mostly a matter of expanded HSIO lanes and newfound support for Intel Optane.
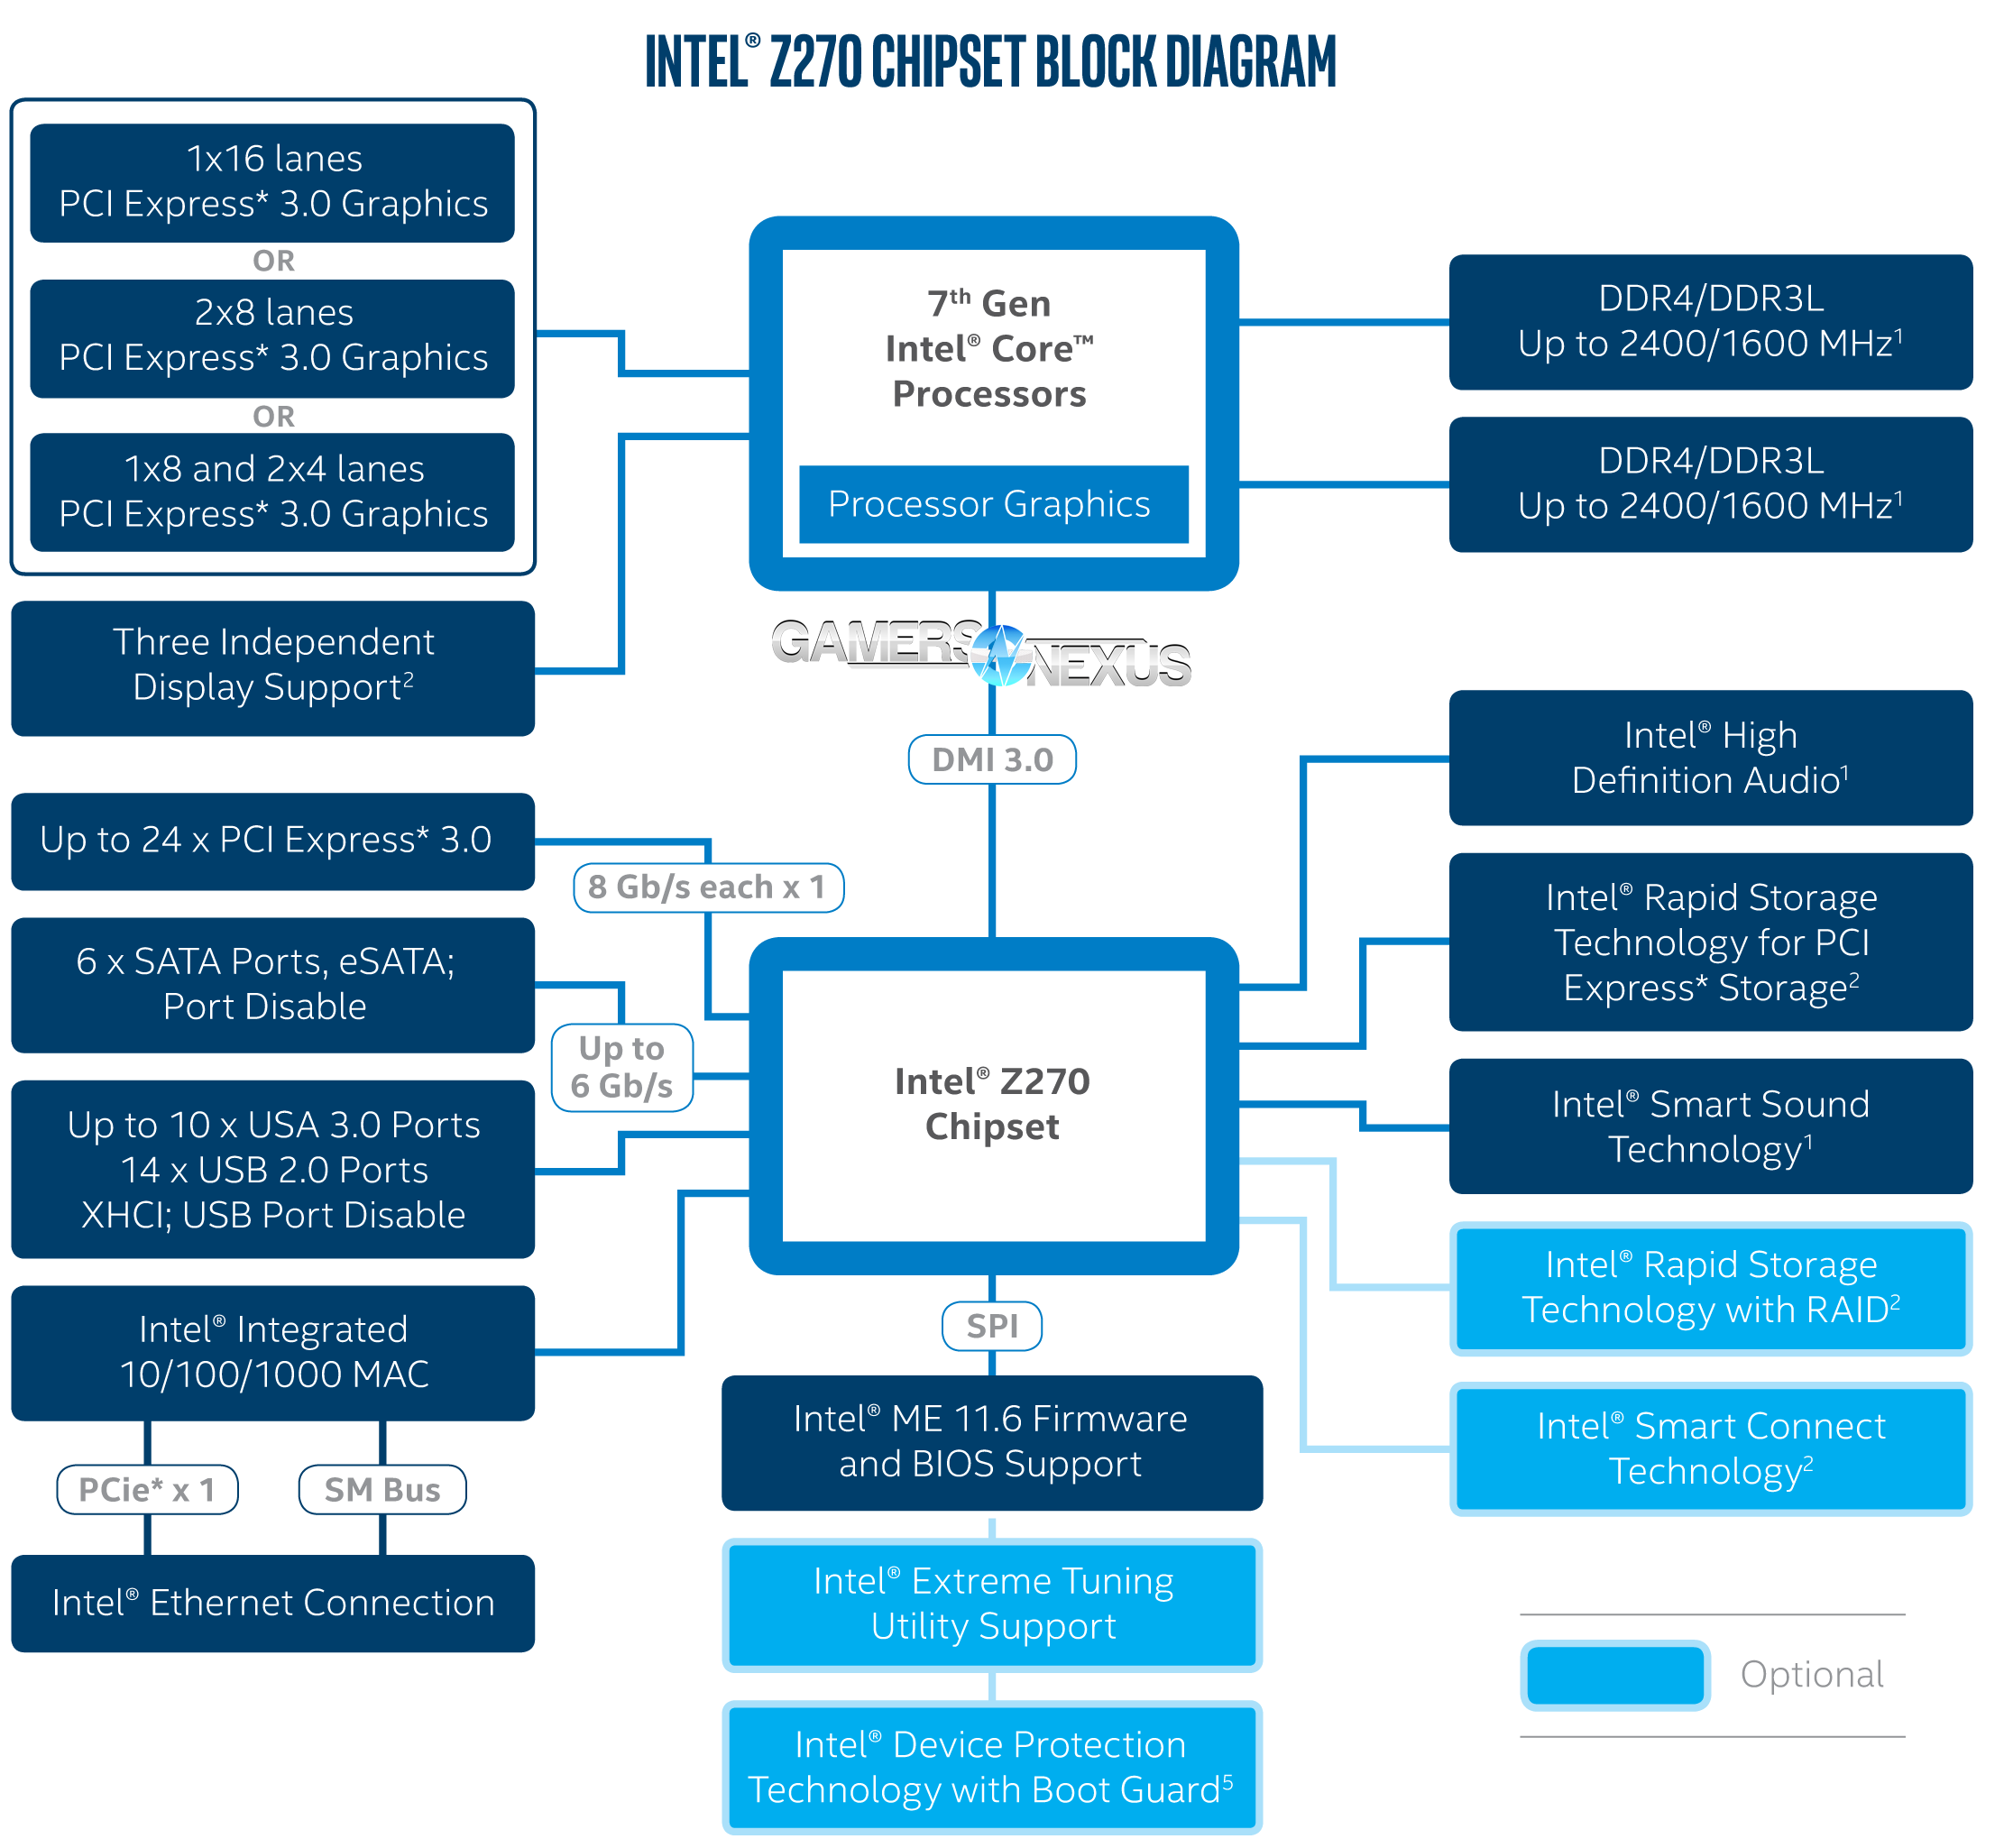
Here’s a look at the block diagram for Z270. Ignoring Intel’s typo (“USA” ports), Intel’s main change has been adding four more HSIO lanes to the chipset. This allows for a maximum of 30 high-speed IO devices.
Here is an excerpt from our i7-7700K review with more chipset information (or just check Page 2 of that article):
The 200-series push for Kaby Lake chipsets increases HSIO lane availability to 30 total lanes on both the H270 and Z270 chipsets, marking the first time that Z and H models are at parity for total high-speed I/O availability. This doesn’t change the fact that, as always, Z allows for overclocking where H does not – but the difference caused by HSIO lane differences is gone.
Z270 supports a total of 24 PCI-e 3.0 lanes (to H270’s 20), in addition to the lanes peeled off of the CPU for graphics devices. As a reminder, chipset PCI-e lanes are not treated in the same way as CPU PCI-e lanes. Aside from originating from a different physical location on the motherboard, the chipset lanes also can only be peeled-off in groups of 4 (x4), so multi-GPU configurations relying on the chipset for a third or fourth GPU will operate only in x4.
Instead, these lanes are intended to be used for other high-speed devices that operate on the PCI-e bus, like M.2 PCI-e SSDs, NVMe drives, or AICs in the lower PCI-e slots.
And a table to help clarify hard numbers versus the 100-series (6th Gen) chipsets:
Intel Z270, H270, & B250 Chipset Differences (Kaby Lake)
| Z270 | Z170 | H270 | H170 | B150 | H110 | |
| HSIO Lanes | 30 | 26 | 30 | 22 | 18 | 14 |
| Chipset PCI-e Lanes | x24 3.0 | x20 3.0 | x20 3.0 | x16 3.0 | x10 3.0 | x6 2.0 |
| PCI-e 3.0 Config | 1 x16 2 x8 1 x8 + 2x4 | 1 x16 2 x8 1 x8 + 2x4 | 1 x16 | 1 x16 | 1 x16 | 1 x16 |
| CPU Overclocking | Yes | Yes | No | No | No | No |
| Memory Channels | 2 | 2 | 2 | 2 | 2 | 2 |
| DIMMs per Channel | 2 | 2 | 2 | 2 | 2 | 1 |
| Native SATA III Ports | 6 | 6 | 6 | 6 | 6 | 4 |
| Max USB Ports | 14 | 14 | 14 | 14 | 12 | 10 |
| Max USB3.0 Ports | 10 | 10 | 8 | 8 | 6 | 4 |
| Intel SRT | Yes | Yes | Yes | Yes | No | No |
| RAID 0/1/5/10 | Yes | Yes | Yes | Yes | No | |
| Independent Displays (IGP) | 3 | 3 | 3 | 2 | 3 | 2 |
As for the total HSIO lane count, as with previous generations, this is something that motherboard manufacturers have some hand in allocating. A board designer could choose to allocate most of the lanes to SATA, or to additional Gigabit Ethernet ports, or additional USB3.x ports – these are high-speed I/O interfaces and protocols, and these are what receive the lane assignment from the PCH.
Aorus
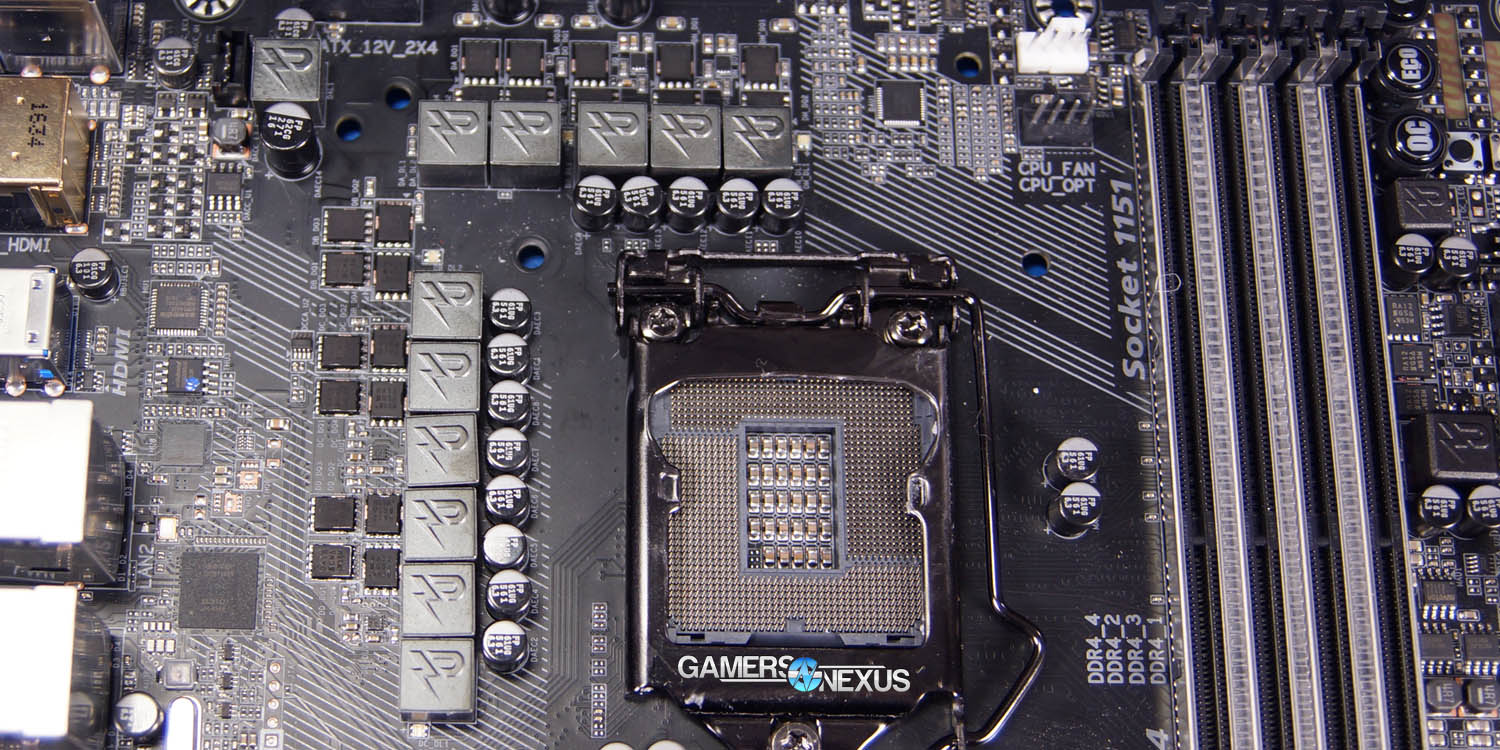
Gigabyte’s board carries the “Aorus” badging because it is LED-enabled, so you get your up-and-coming RGB LED placement all over the board. We don’t generally get excited about LEDs, but if that’s your thing, then this board does have it. Interestingly, they’ve got LED arrays between each RAM slot, which is kind of neat, and there’s a laser-etched acrylic plate on the right-side of the motherboard for further lighting effect. The plate can be replaced with other designs, if desired, and seems to radiate a soft glow of light when configured to shorter wavelength colors.
LEDs are placed along the core VRM, the PCIe slots, and the audio panel. Gigabyte has white IO and audio shields (purely cosmetic) that also bear the LED backlight. This is all controllable through Gigabyte’s software.
Board Layout
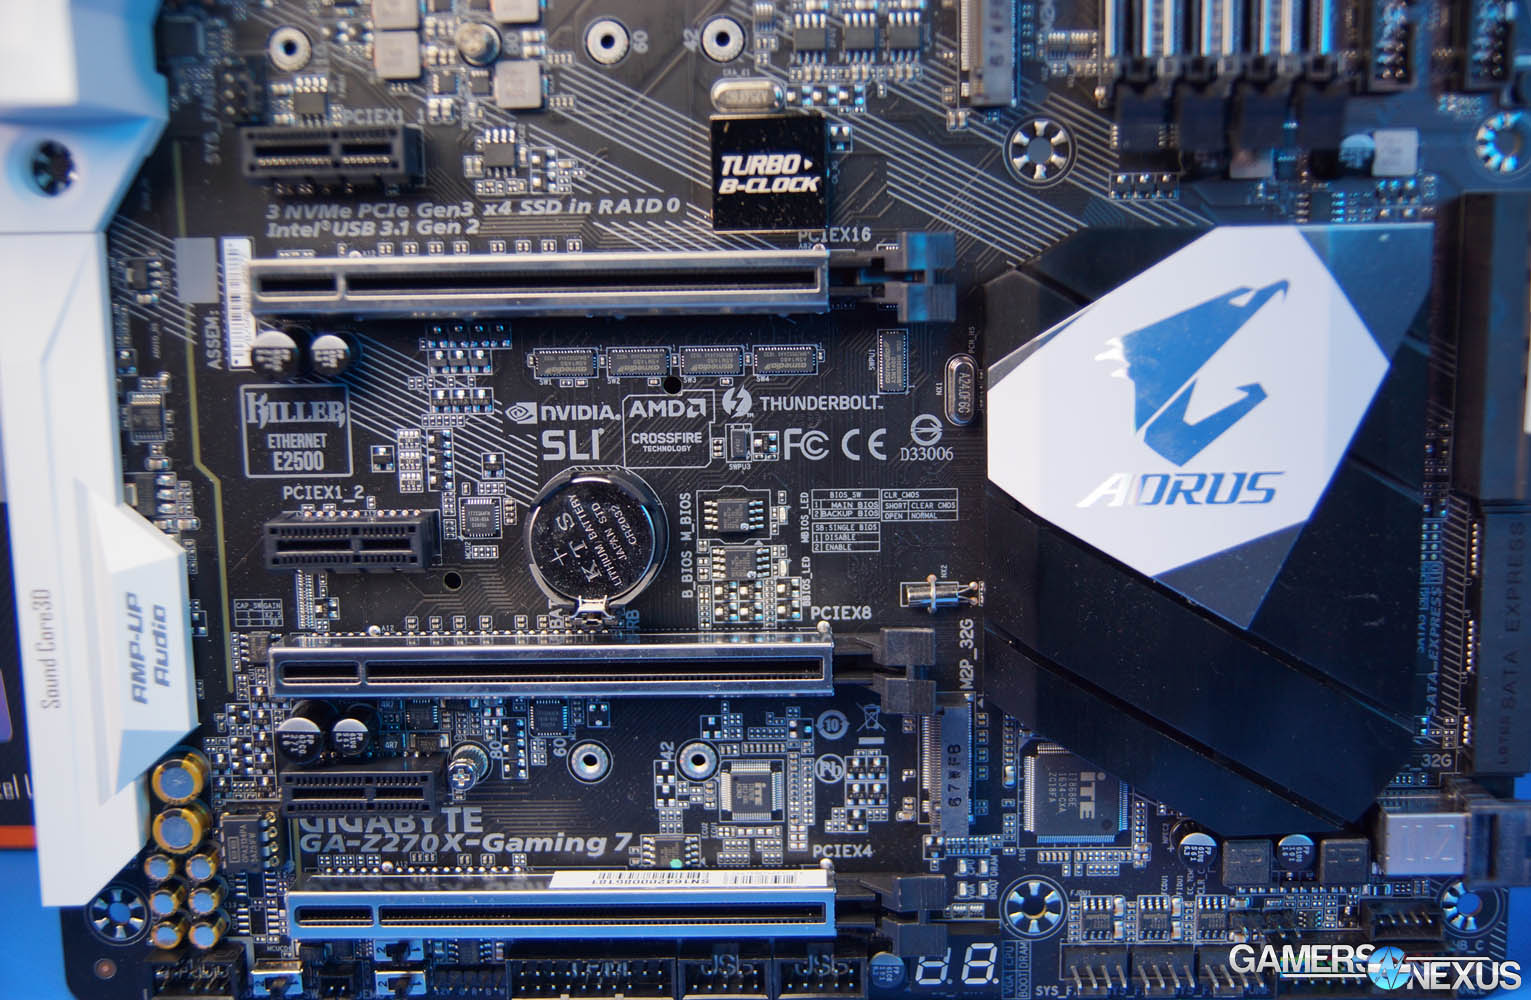
Getting back to more mission-critical things, board layout includes multi-BIOS with two different firmware chips. A toggle switch bounces between them, and additional cap_sw toggles can be used to regulate gain of audio output.
Moving along the board, there are buttons present for power, pre-overclock application, and ECO mode. The latter two require Gigabyte’s software to use. And ECO mode doesn’t seem to do a whole lot, but Gigabyte’s got issues with voltage and power draw, anyway. That’s still forthcoming.
Troubleshooting features include additional LEDs with clearly legends for diagnostics, alongside the expected seven segment display. We’re big fans of Gigabyte’s legend layout and placement, as it mostly eliminates the need to reference a manual. While praising minor things, Gigabyte has also placed the CMOS battery low enough that it avoids setting up residence under the GPU – something that most boards seem to do, with two-slot cards – and is more accessible for quick clears. You’ll still have problems with three-slot cards, to be fair.
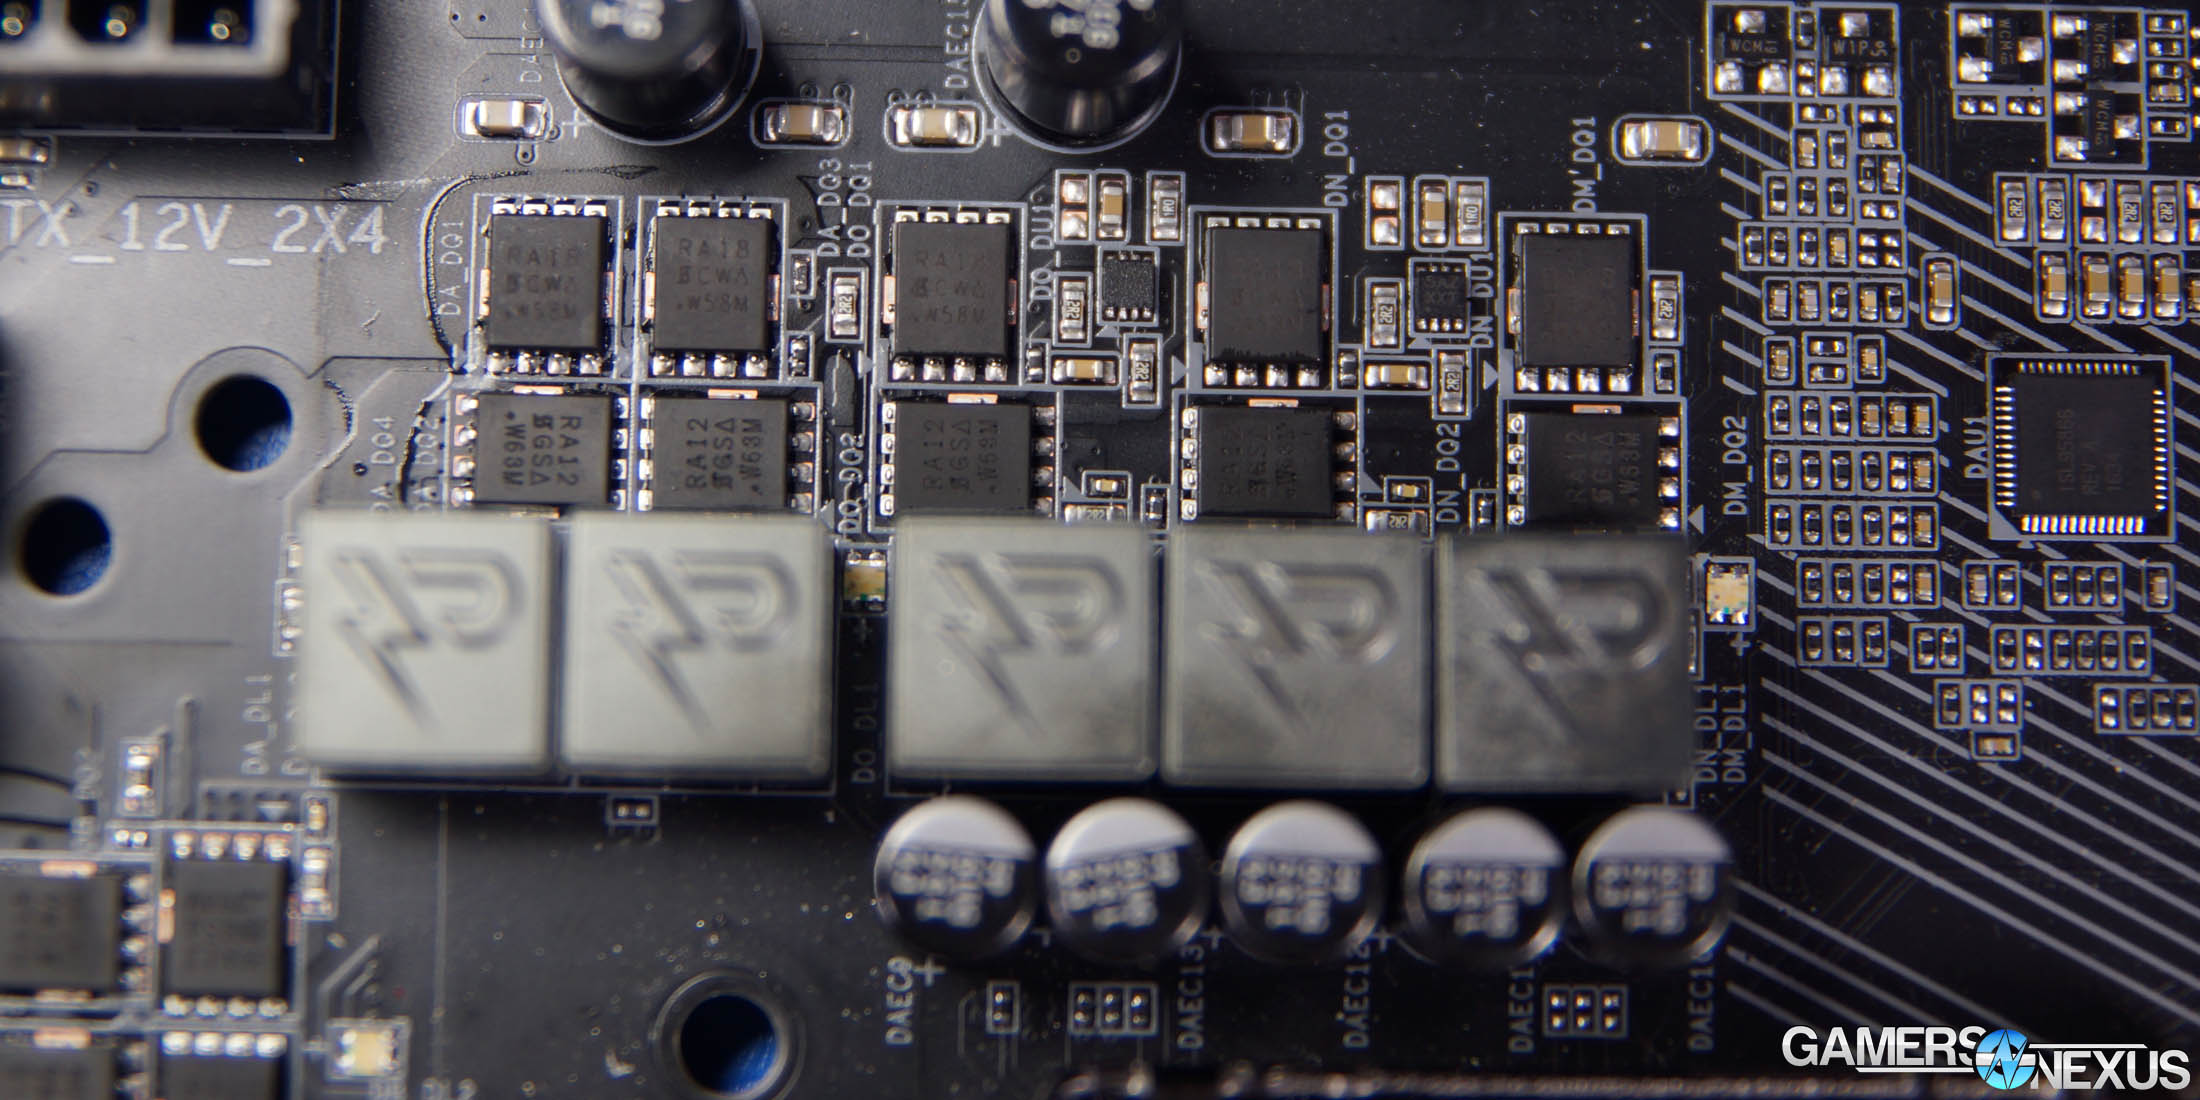
Initial VRM Analysis
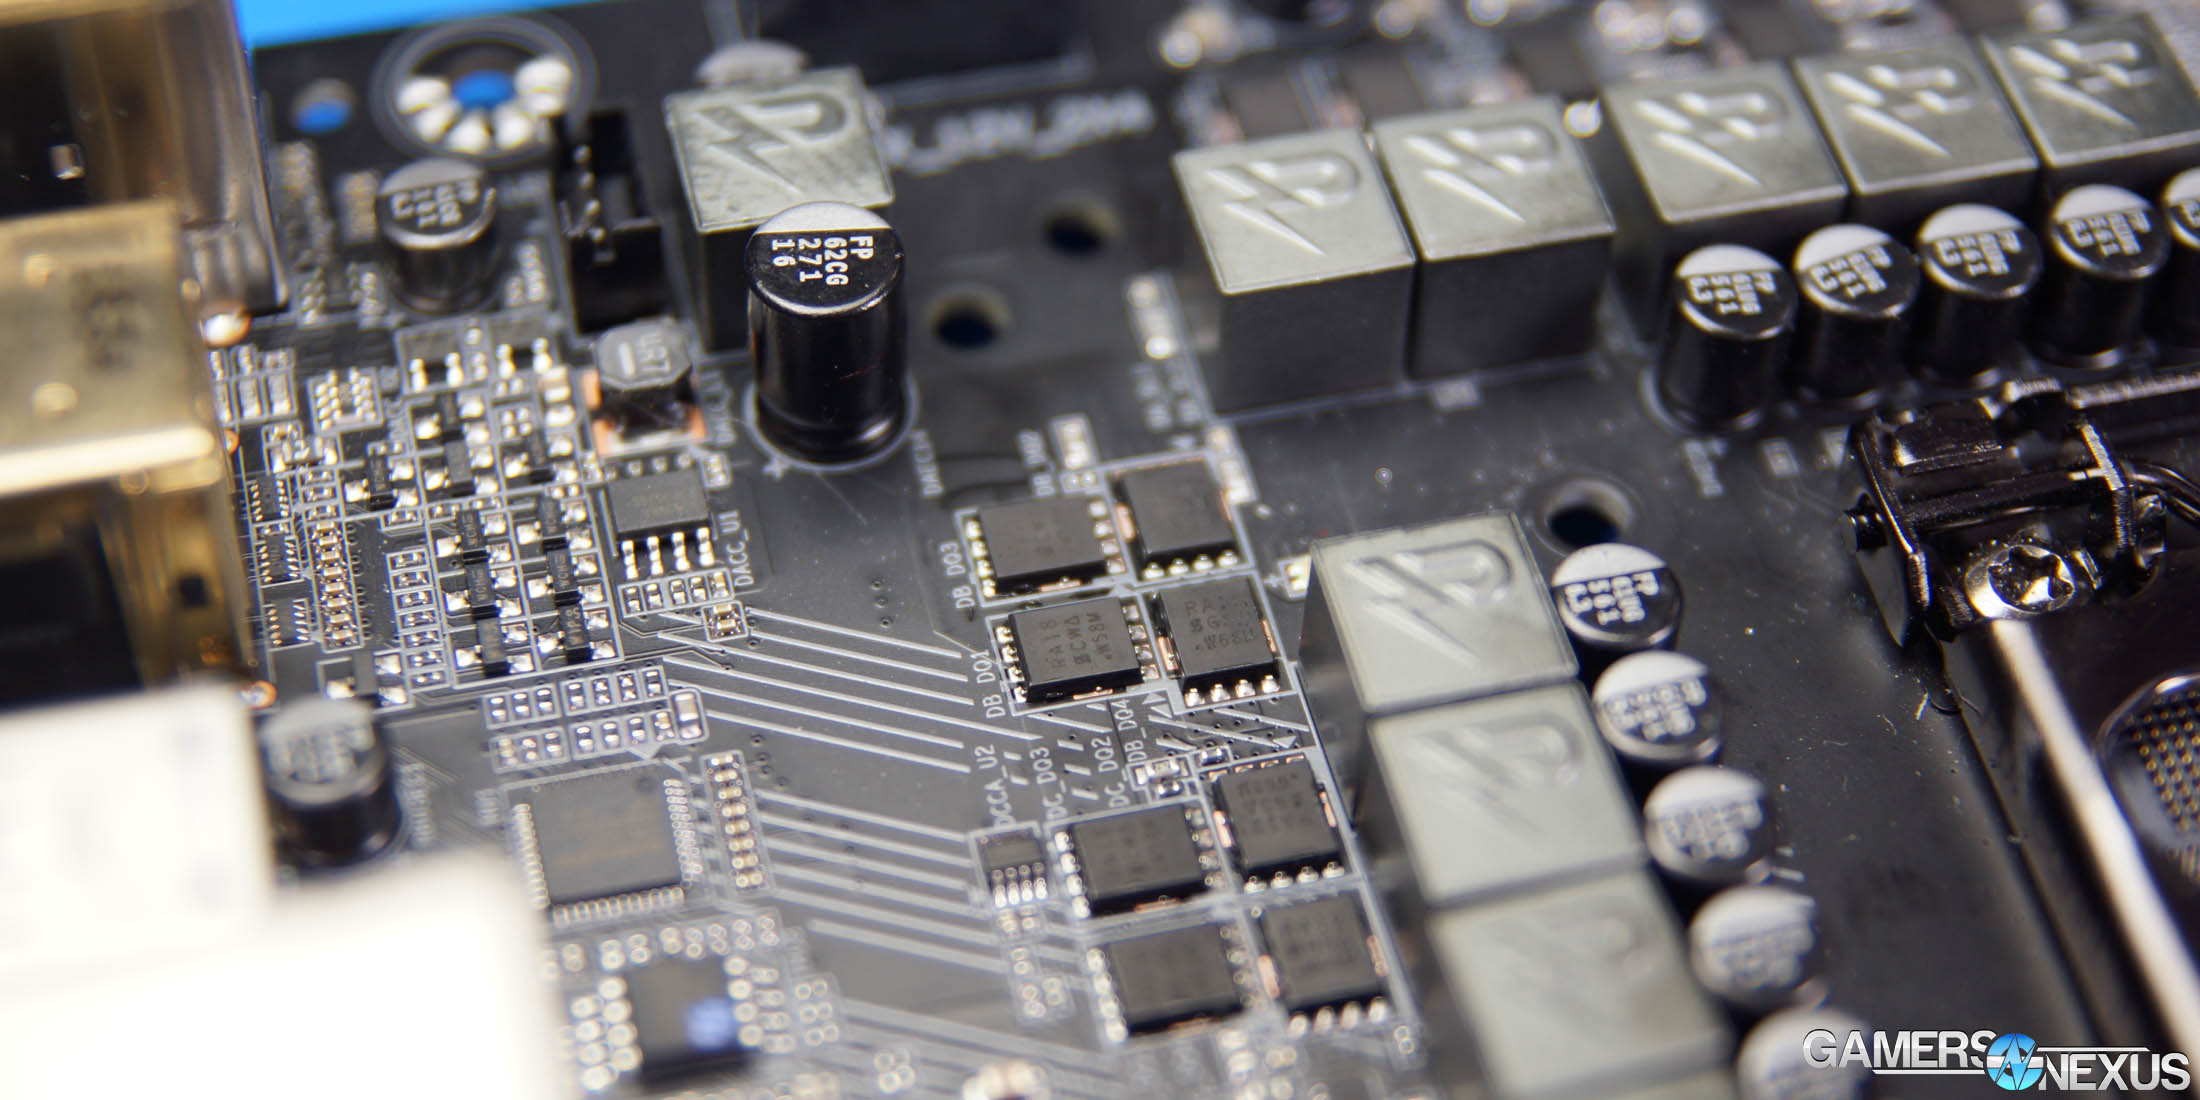
As for the VRM, we spoke to Buildzoid of Actually Hardcore Overclocking about this, and used a multimeter to probe resistance between the various contact points on the back-side of the board. Using deductive reasoning and non-zero resistance values, we believe that Gigabyte is using what appears to be an 8+3-phase VRM, with 8 phases for core and 3 phases for the GPU.
For now, the basics are that the 8+3 setup appears to be doing some sort of trickery. Our current theories are that Gigabyte is either switching on 2 phases at a time or is using doublers. Buildzoid’s final analysis will go live on our YouTube channel this week (subscribe for that), for those curious about the deeper electrical workings of Gigabyte’s Gaming 7 motherboard.
(Below: Choke measurement points)
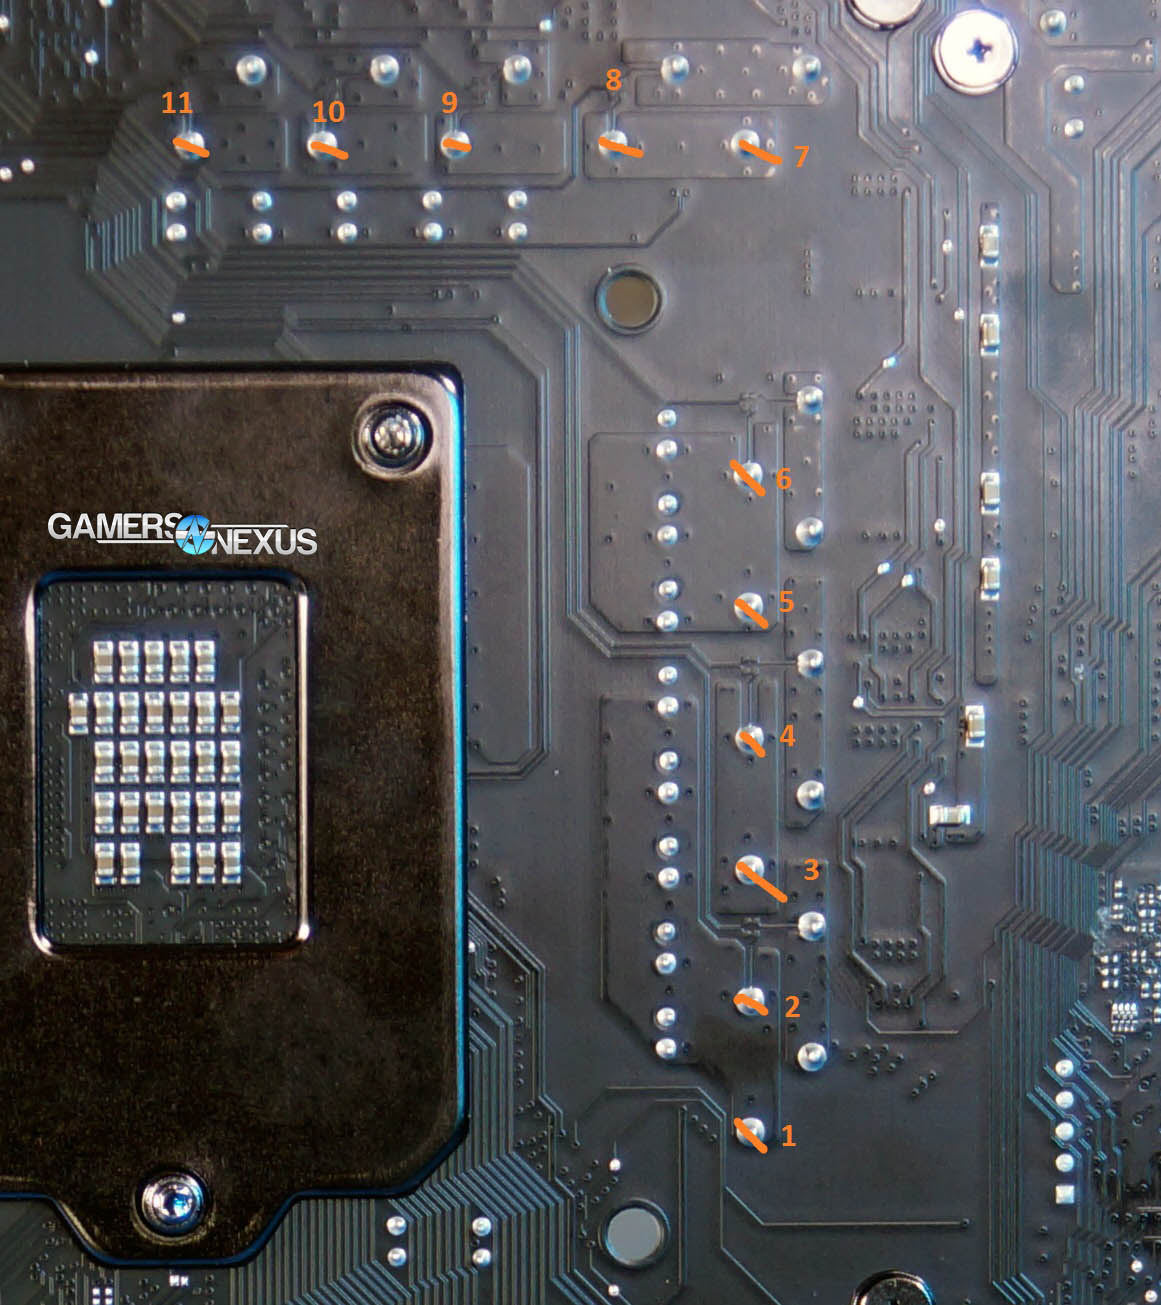
VCCSA and VCCIO are using minor VRMs elsewhere on the board from the core VRM.
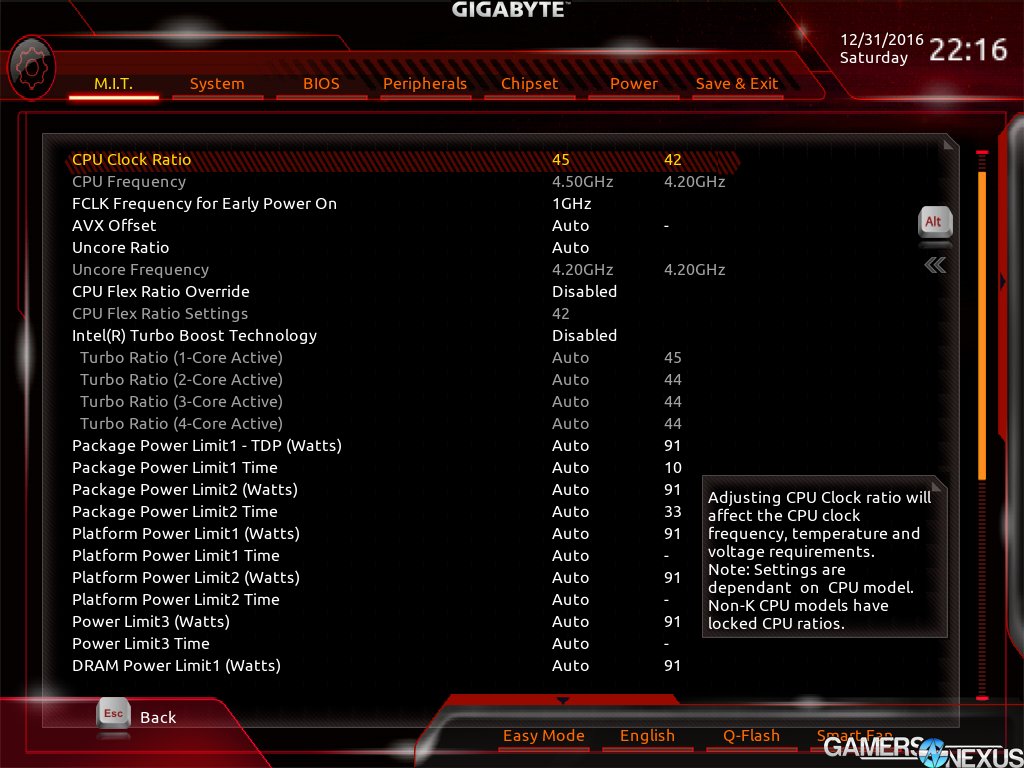
This isn’t a real 8-phase, but it also doesn’t really matter for Skylake and Kaby Lake – and Kaby Lake is basically Skylake, just with a taller fin height and widened gate pitch. Unless venturing into more extreme territory, most overclocking endeavors will do just fine with this setup. Automatic overclocking presets (titled “CPU Upgrade” in BIOS) will effortlessly jump clock-rate to around 5.0GHz without any manual effort, though we’d strongly encourage manual tuning for better accuracy and lower vCore.
Regardless, at 125C, the VRM should handle well over 200A on vCore, with the GPU VRM capably handling 80A and up at 125C. This is assuming a pretty safe 500KHz switching frequency, though most boards are closer 200-300KHz. That’d give you a bit more headroom, if assuming a lower value.
Voltage Discussion
We mentioned voltage issues earlier, and that was also covered in our Kaby Lake review when demonstrating thermal performance of the 7700K on both MSI and Gigabyte motherboards.
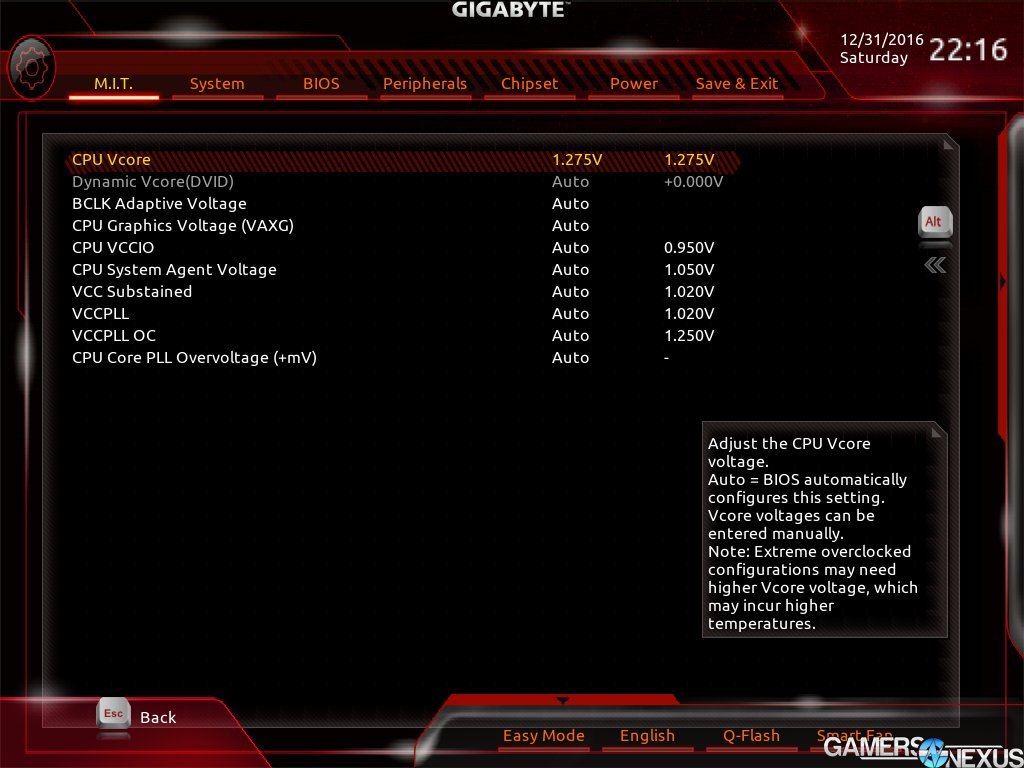
Normally, VID is supposed to be read off the CPU – the CPU asks for a voltage, and the motherboard complies. It seems that Gigabyte has a BIOS-side issue with their voltage supply, as we’re reading voltages way more than what’s necessary to operate at stock CPU settings.
This is something we’ve already communicated with Gigabyte and Intel, but haven’t yet received resolution for the problem. Here’s a reprint of our charts used in the 7700K review:
Note that all these first tests use the same settings: EIST off, Turbo off, frequency fixed to 4.5GHz on all CPUs, and CStates off. This helps control results by eliminating unpredictable fluctuations in frequency through Turbo functions. Fan and pump speeds are at maxed settings, so ~1800RPM on 2x 140mm Aer-P fans with the Gen5 Asetek pump fully loaded.
| Intel i7-7700K @ 4.5GHz EIST 0, Turbo 0, CStates 0 | |||
| GamersNexus.net | Gigabyte G7 Auto | MSI Pro Carbon Auto | Gigabyte G7 Manual vCore |
| vCore (v) | 1.356-1.404 (auto) | 1.28-1.32 (auto) | 1.188-1.275 (manual) |
| CPU PKG (C) | 94 | 82 | 70 |
| Core 0 (C) | 94 | 82 | 70 |
| Core 1 (C) | 91 | 79 | 69 |
| Core 2 (C) | 94 | 78 | 70 |
| Core 3 (C) | 90 | 76 | 68 |
| Ambient (C) | 21.3 | 21 | 22.2 |
| Liquid TMP (C) | 29 | 28 | 28 |
| PKG PWER (W) | 133-135 Max 138.06 | 101-104 Max 111.28 | 101 Max 115.15 |
For the first test, we’re focusing on the Gigabyte Z270 Gaming 7 motherboard being tortured with large Fourier transforms for half an hour. The i7-7700K is constantly in the 90C range, occasionally hitting 94C. Ambient was 21-22C for all these tests, so our temperature range is roughly +/- 1C. Active logging was performed with logging thermometers and thermocouples to ensure accuracy of ambient.
This was the first board we tested, so the immediate concern was that Kaby Lake would run way too hot. With the same stock configuration on the Gigabyte Gaming 7 board, a $50 Be Quiet! Dark Rock 3 air cooler was hitting 100C routinely, resulting in throttles upwards of 200MHz. Our Asetek 570LC fat 120mm cooler with Gentle Typhoon fan also was approaching 100C.
Clearly, something seemed wrong. Further investigation revealed that the motherboard was pushing voltages as high as 1.404v at times, which is wholly unnecessary. The MSI Z270 Gaming Pro Carbon motherboard, meanwhile, produced an auto-configured voltage of about 1.28v to 1.32v, with a corresponding temperature range of 80-82C max. This is with a package power that’s reduced around 27W from Gigabyte’s, but with exactly the same frequency performance.
We then dropped the Gigabyte board down to 1.275v manually, giving it a range of 1.188 to 1.275v. This brought temperature down from 94C max to about 70C max, or a 24C difference (same configuration, test platform, and ambient) as a result of better, manual vCore control. This is less an Intel problem and more of a Gigabyte problem. We have been in communication with all three motherboard vendors since our temperature testing began (about 1-2 weeks ago), and have made Gigabyte aware of the issue. Fortunately, the unnecessarily high auto voltage is something that is resolvable through firmware updates. If Gigabyte got ahead of the game, they may be able to roll-out BIOS patches prior to board shipment – but we’re not sure right now, and certainly can’t rely on that.
This mystery solved, the next question pertained to Skylake. We wanted to know whether Kaby Lake has any meaningful temperature change versus Skylake, particularly the i7-6700K.
| Intel i7-7700K & i7-6700K @ 4.5GHz EIST 0, Turbo 0, CStates 0 | ||||
| GamersNexus.net | Intel i7-7700K | Intel i7-6700K | Intel i7-6700K | Intel i7-7700K |
| MSI Pro Carbon Auto | MSI M7 Auto | MSI M7 Manual vCore | Gigabyte G7 Manual vCore | |
| vCore (v) | 1.28-1.32 (auto) | 1.32 (auto) | 1.188-1.275 (manual) | 1.188-1.275 (manual) |
| CPU PKG (C) | 82 | 72 | 64 | 70 |
| Core 0 (C) | 82 | 70 | 63 | 70 |
| Core 1 (C) | 79 | 72 | 64 | 69 |
| Core 2 (C) | 78 | 68 | 61 | 70 |
| Core 3 (C) | 76 | 68 | 61 | 68 |
| Ambient (C) | 21 | 22.4 | 21 | 22.2 |
| Liquid TMP (C) | 28 | 29 | 29 | 28 |
| PKG PWER (W) | 101-104 Max 111.28 | 119W Max 133.39 | 113-116 Max 124.86 | 101 Max 115.15 |
Gigabyte, with auto settings and an otherwise out-of-box configuration, is pushing 1.404v to the CPU during load. This is absolutely unnecessary. We’re able to sustain the same 4.5GHz clock by manually tuning vCore down to around 1.18v, without any instability issues, demonstrating that Gigabyte’s voltage-frequency table is overambitious in what it’s supplying to the core.
The downside is that the “auto” configuration – meaning fresh out of box – drives up temperature. Running an unnecessarily high voltage for a stock CPU increases our thermals by upwards of 12C when compared to the out-of-box settings of the MSI motherboard. That’s enough to push a stock 7700K up to 94C when on an open-air test bench with a Kraken X62 280mm liquid cooler. At max RPM. In a case, forget it – CPU PKG temperature will be through the roof, and it’s entirely because of the overkill vCore on the reference table. With a Be Quiet! Dark Rock 3 air cooler, we were around 100C and experiencing thermal throttling.
The reason this is happening is almost entirely attributable to Gigabyte’s BIOS, which is running a voltage of about 1.4 just for a 4.2-4.5GHz clock. MSI’s, on the other hand, sits at around 1.32v. With manual tuning, GN was able to run just fine at ~1.188-1.275v with a stock i7-7700K.
We’re also pushing more wattage to the CPU as a result of Gigabyte’s configuration, landing the CPU at 133 to 138W, where MSI’s lower vCore auto settings land us at around 100 to 111W.
If we look again at the temperatures and voltages, we were able to get the CPU, as mounted on the Gigabyte board under test, down to a way more acceptable 70C with a manually adjusted voltage of 1.88 to 1.275.
To recap, that’s a 24C reduction in temperatures just by fixing Gigabyte’s poorly configured BIOS voltage table. Fortunately, this is something that Gigabyte can fix with a BIOS update, and something we’d expect them to do soon. We have made both Intel and Gigabyte aware of this situation, and expect resolution… eventually.
Really, the takeaway here is that you should just check the voltage and manually adjust as necessary, if buying this board. Or any other board, for that matter – it’s just good practice to verify that the vCore settings make sense, even without overclocking. If you’re running a stock Kaby Lake CPU, don’t let the board push 1.3 to 1.4v through vCore. Easily resolved, though you absolutely should not have to fix that, particularly on a $240 “premium” motherboard.
Let’s move on to UEFI, something that Gigabyte does a lot better once moving past vCore.
Gigabyte Aorus Z270X Gaming 7 UEFI Walkthrough
The options overall are what you’d expect from a Gigabyte board; any owner of high-end Z170 or even Z97 Gigabyte motherboards should recognize the UEFI.
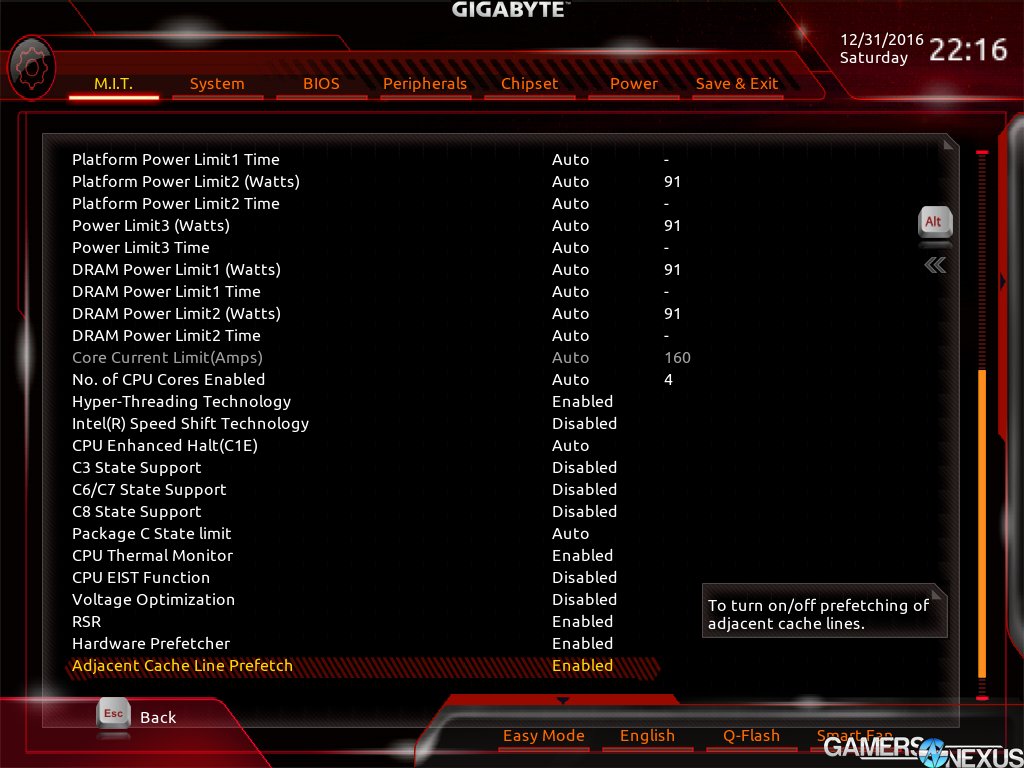
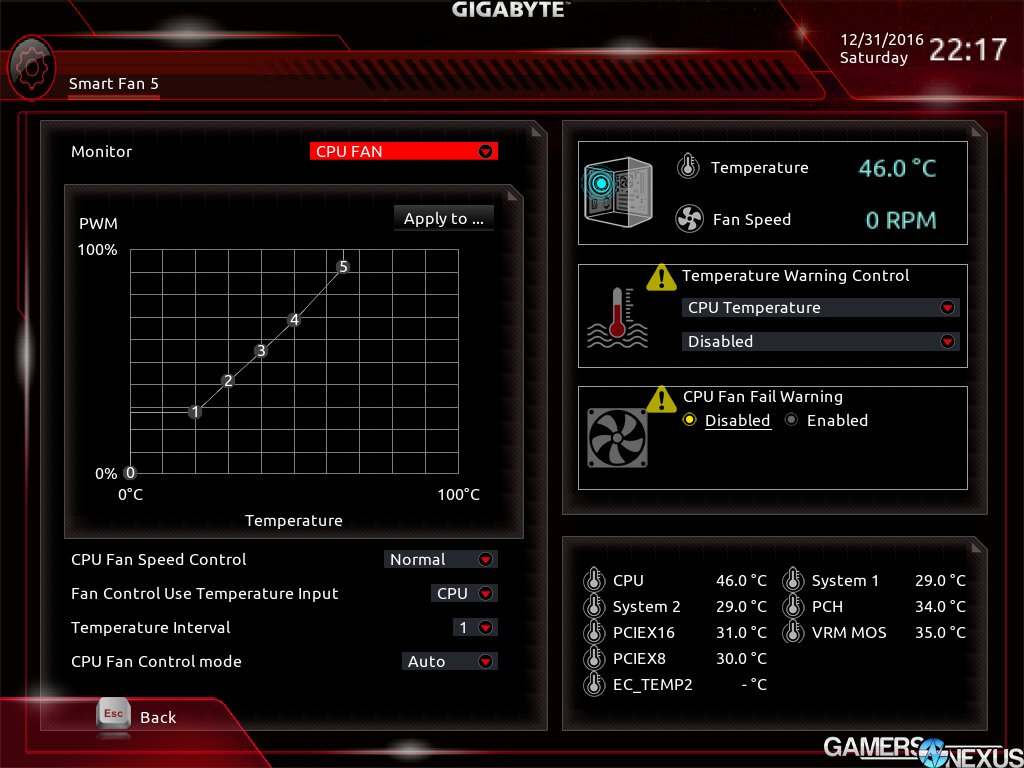
There are a few newer options: AVX tuning for overclocking is nice for more particular tuners, as is the presence of VCCPLL overclocking for users of LN2. Gigabyte has also resolved issues with PWM not working properly. Unlike some previous Gigabyte motherboards, the Z270X Gaming 7 actually uses a PWM signal rather than direct voltage control for fan speed adjustment. This is important for users of maglev fans or fan splitter hubs. Good on Gigabyte for fixing that.
Speaking of fans, the board does make abundant use of full PWM 4-pin headers, which is always nice to see. We can also appreciate that there’s support for upwards of 2A throughput on the hybrid fan headers, with OCP available. There are a few additional pin-outs that are designated as pump headers, useful for isolating cooling solutions by label.
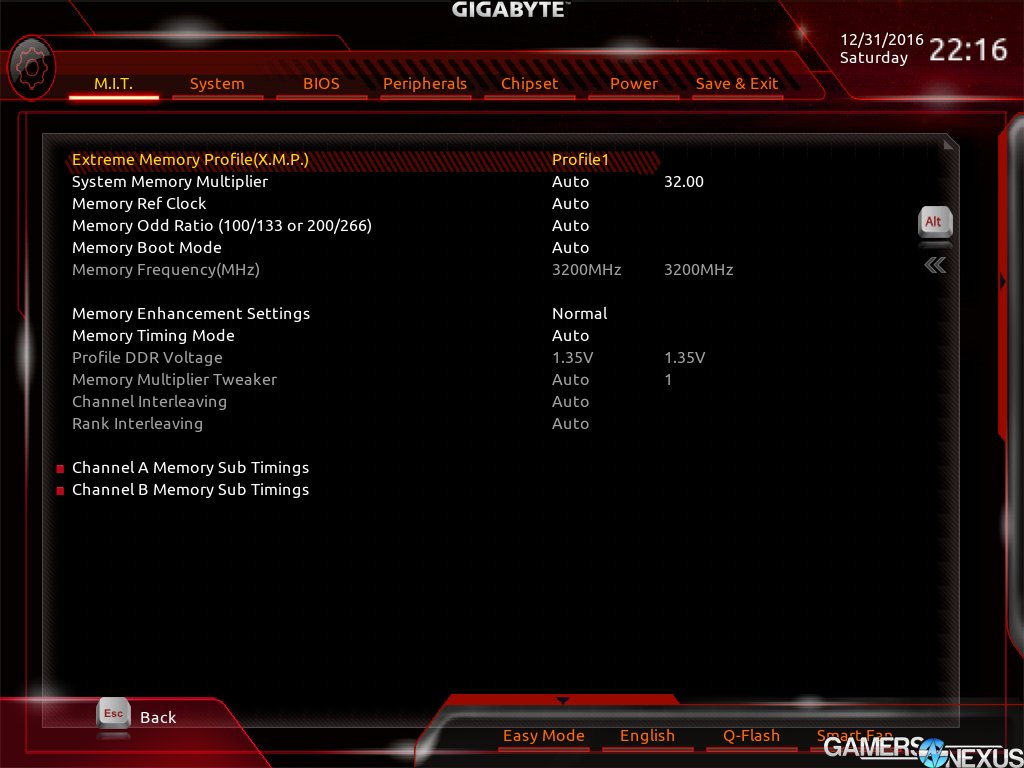
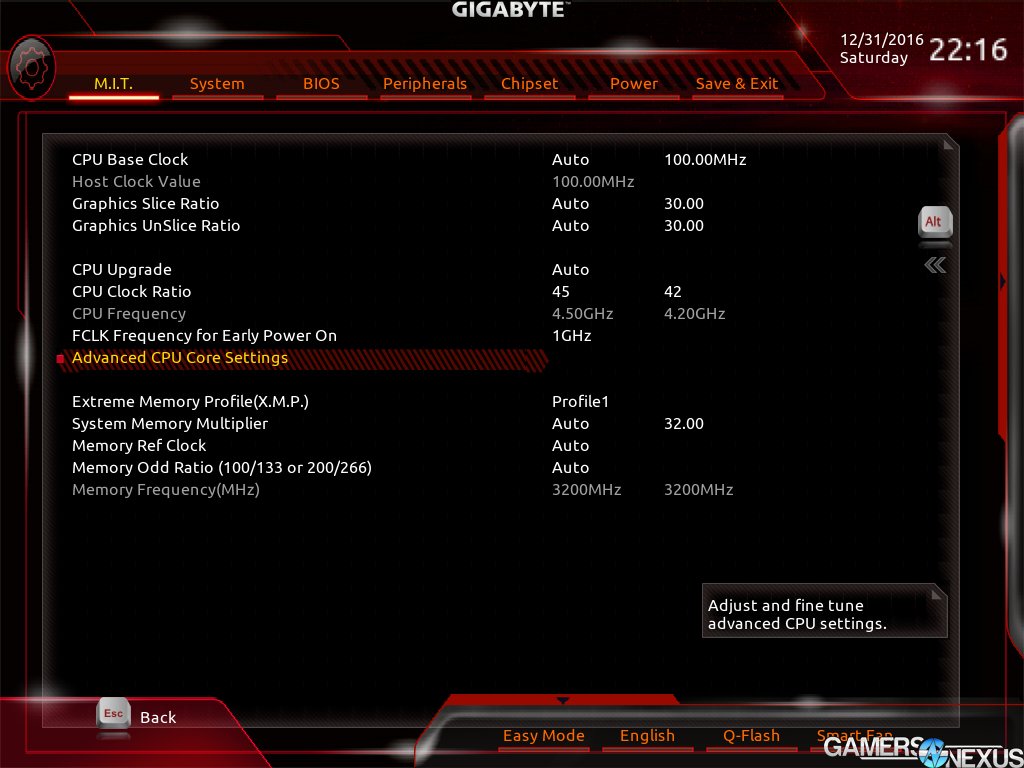
Gigabyte also released a pre-production BIOS fix that resolved early memory overclocking issues, so achieving 3200MHz XMP is trivial with the new Z270 board. That will be included on all shipping boards.
To disclose preferences for sake of this section: Everyone at GN is of an older school train of thought with BIOS. For our use, it’s all keyboard – and we also prefer non-graphical BIOS screens when possible, since the menus clutter and obfuscate the options that we want to get to.
That said, Gigabyte’s mouse movement is annoying in its VBIOS – movement is mostly along the X and Y axes, and the mouse is cumbersome to use. To quote Buildzoid, “if you’re going to add a mouse, at least make sure it works.” Thankfully, Gigabyte has left their interface as similar to legacy BIOS as possible – there aren’t as many unnecessary graphics and embarrassing speedometer knobs as MSI uses, for instance.
The option nesting is fairly sensible and navigation overall, other than the mouse, isn’t too bad.
Conclusion: Gigabyte Gaming 7 Motherboard Needs Work and a Price Drop
The Gigabyte Z270X Aorus Gaming 7 is an acceptable motherboard, if fixing the vCore issue. That one issue is a huge point of concern, though, because the vast majority of system builders will never think to check whether auto voltages are incinerating the CPU. Maybe a few of them check for temperatures and find high operating ranges, and then invest in a better cooling setup – but again, this is more a fault of the motherboard and its vCore than the CPU. We did see a 6-7C delta between Kaby Lake and Skylake, sure, but that’s exacerbated by Gigabyte’s 20C higher-than-necessary temperatures as a result of a 1.4v vCore.
We wouldn’t recommend paying more than $170-$180 for the board; max, maybe $200. The $240 asking price is far too high. Ignoring the voltage issue, it’s not a bad board – but it’s not good enough to justify a higher price than $170-$200. Most of what you’re paying for is going to be underutilized overclocking features, most likely, and extreme overclockers should likely drift toward something like an ROG board or XPOWER board, anyway.
The LEDs are cool and the software is OK, but considering that competing boards in the ~$165 range also have RGB LEDs, it’s a tough sell (like the Gaming Pro Carbon, and others, we’re sure). The VRM doesn’t inspire excitement in any way to justify that extra cost, either.
Gigabyte has done well to be forward thinking with liquid cooling on other members of its family, and it’s doing reasonably well to pull off RGB LEDs in the flooded RGB device market, but the board needs to come down in price. Regardless, at least vCore is resolvable through BIOS pushes. The board looks brilliant, visually, and has a mostly complete feature set overall. The abundance of PWM fan headers is a pleasant surprise -- but no matter how hard we try to justify the board, it’s just a matter of getting the price to match.
Editorial: Steve “Lelldorianx” Burke
Video: Andrew “ColossalCake” Coleman
VRM Analysis: Buildzoid of Actually Hardcore Overclocking