Although it may feel like one GTX 1080 Ti isn’t too different from the next, that’s only “true” when comparing the least meaningful metric: Framerate. Once we’ve established a baseline framerate for the actual GPU – that is, GP102 – there’s not going to be a whole lot of difference between most partner cards. The difference is in thermals and noise, and most people don’t go too in-depth on either subject. For our testing, we look at thermal performance on various board components (not just the GPU), we look at noise, and we look at noise-normalized thermal performance (every card at 40dBA) for cooling efficiency testing.
EVGA’s SC2 Hybrid is an SC2 in every aspect except for cooling. The PCB is the same, the clocks are the same, and so the gaming performance is the same. For this reason alone, there’s no point to testing FPS. If framerates are all you care about, check our SC2 review.
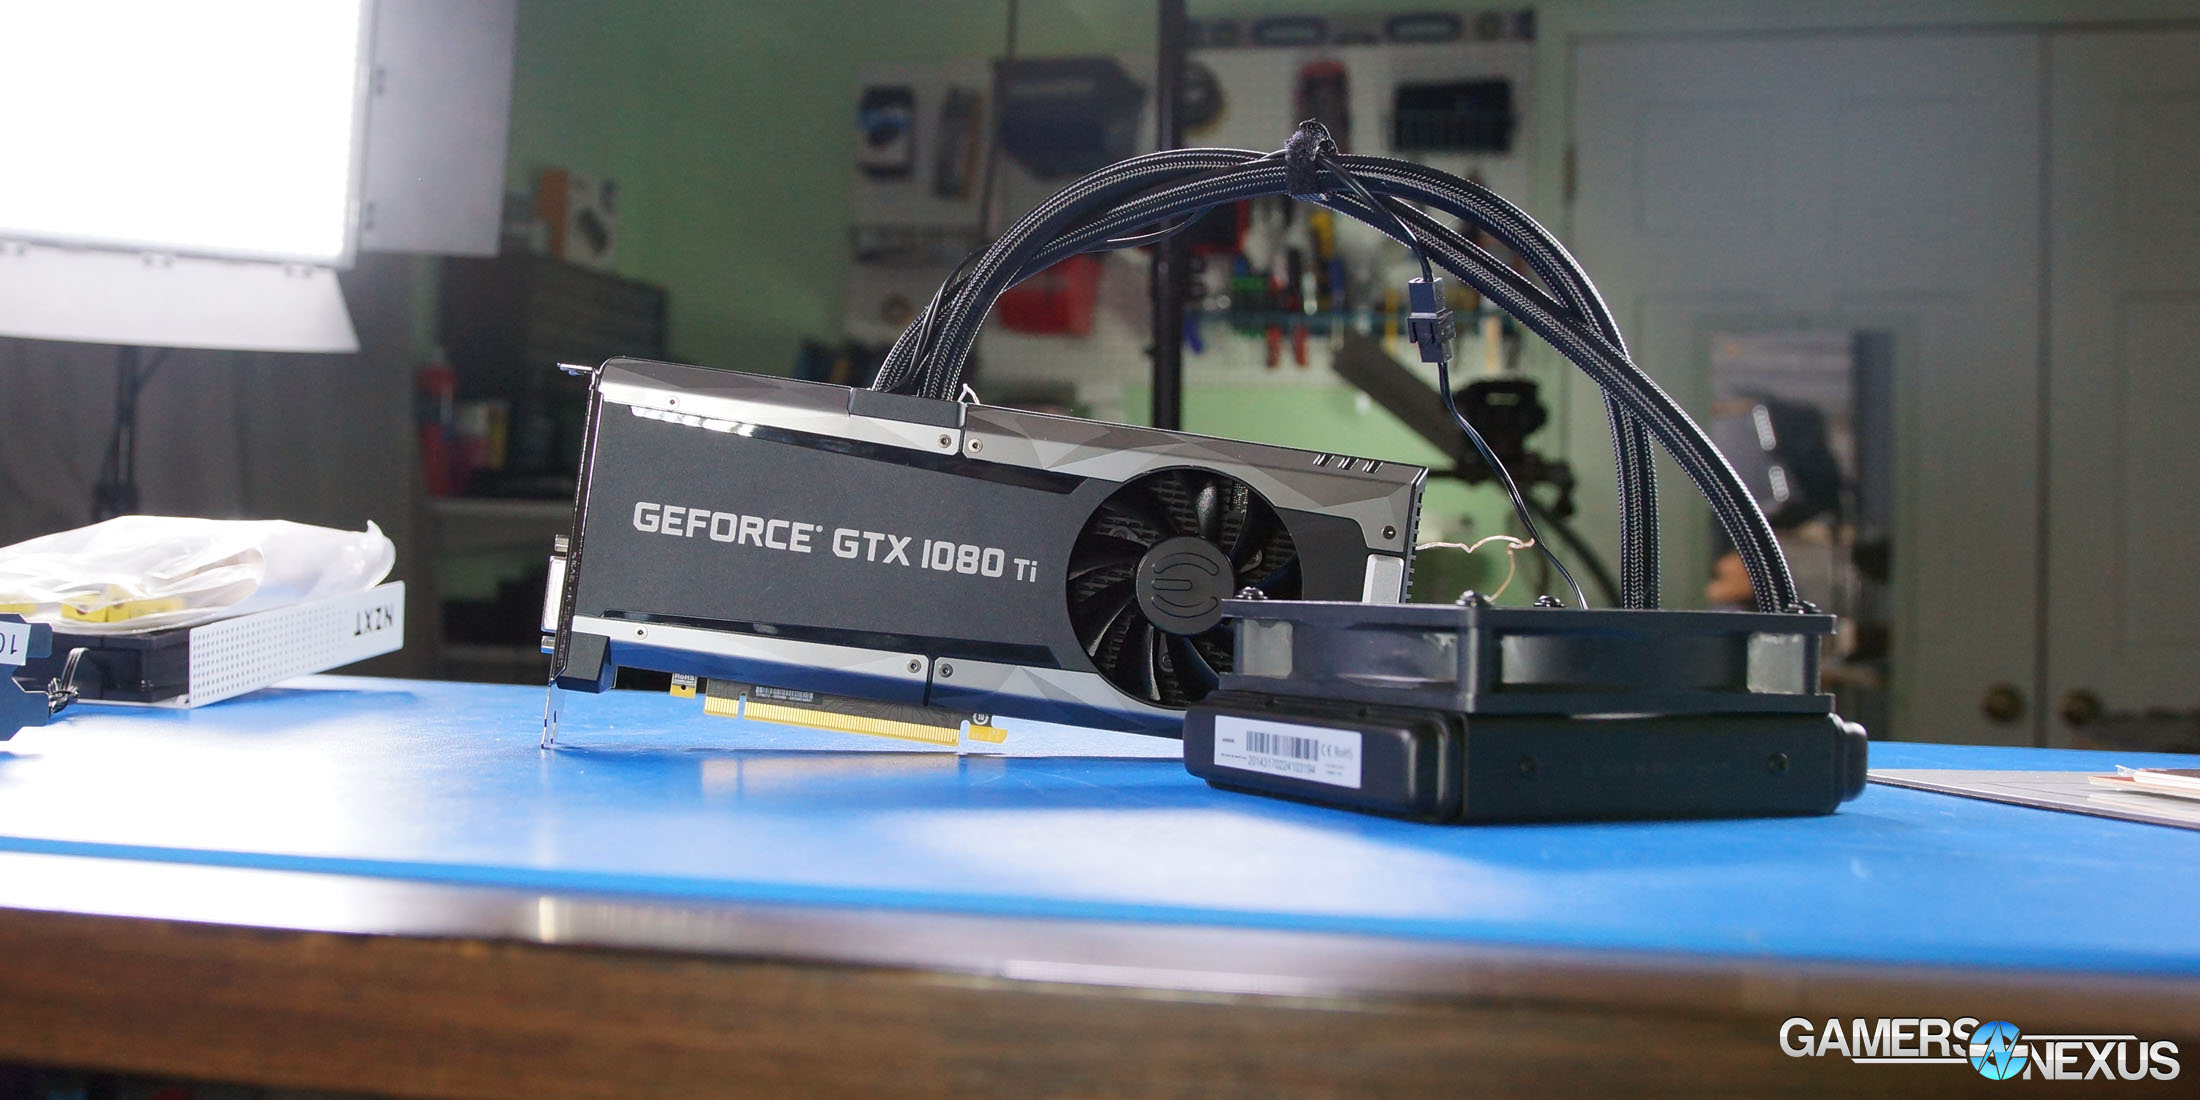
EVGA 1080 Ti SC2 Hybrid Internals
Here’s a look at the card (from our tear-down video):
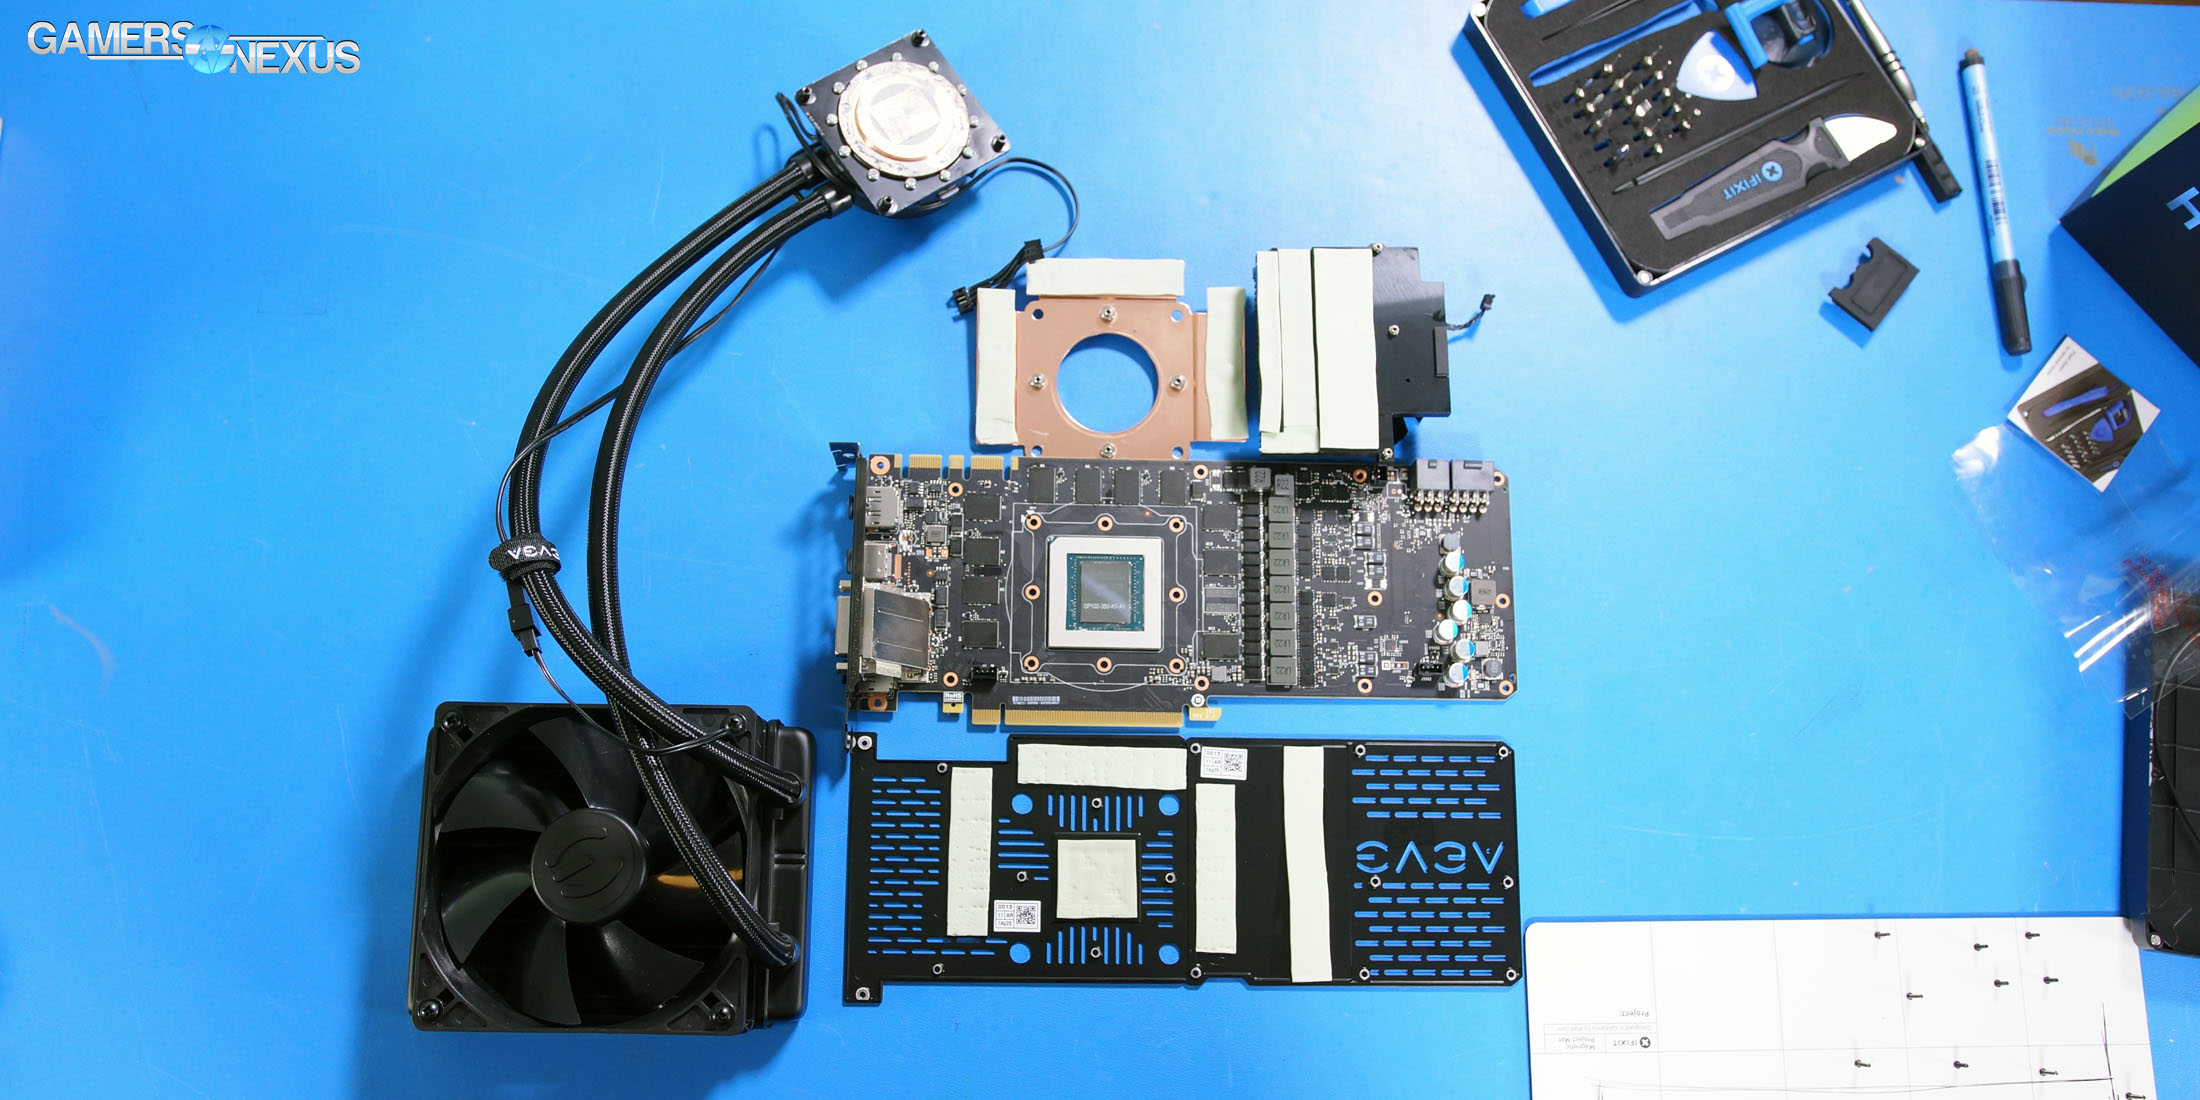
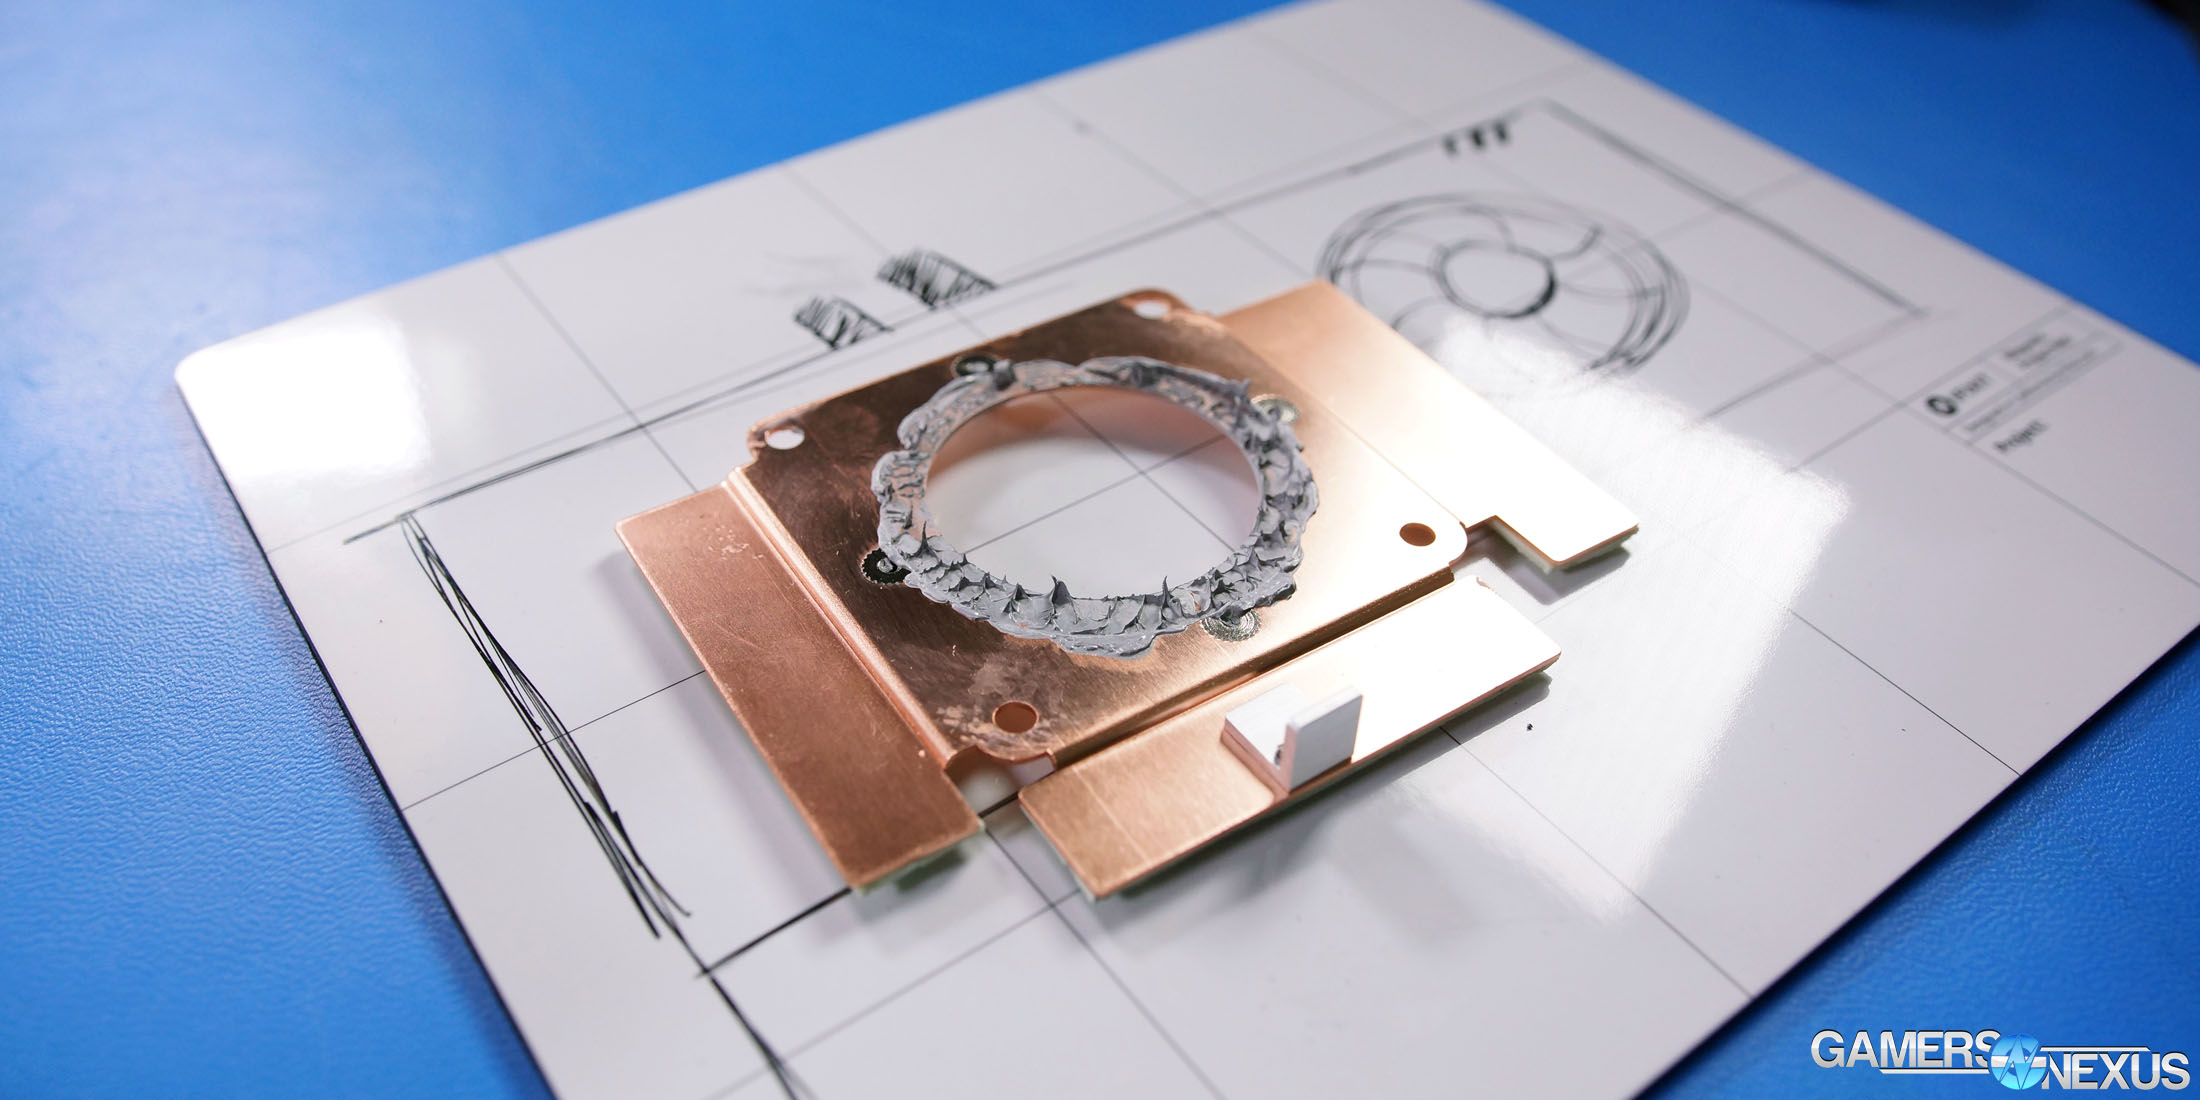
This isn’t entirely new construction, though EVGA did somewhat recently make the move to start including copper coldplates for VRAM cooling. This adds an extra ~15W to the heat load, but cools the VRAM modules significantly better than without the plate. We have testing using both ICX sensors and our thermocouples, for those curious about the impact of this copper plate. The plate contacts the CLC coldplate, using a thick layer of thermalpaste between the two copper surfaces and ultimately sinking to the liquid cooler.
For VRM cooling, EVGA is using an aluminum heatsink and spreader that contacts the inductors and FETs directly via thermal pad. A small back-swept blade fan is mounted atop the aluminum heatsink. This fan is capable of 0RPM when VRM component temperatures are low enough (seems to be below ~55~60C), but will often keep its RPM low enough that the noise output is effectively 0 – the radiator fan will run louder. More on that shortly.
GPU Testing Methodology
For our benchmarks today, we’re using a fully rebuilt GPU test bench for 2017. This is our first full set of GPUs for the year, giving us an opportunity to move to an i7-7700K platform that’s clocked higher than our old GPU test bed. For all the excitement that comes with a new GPU test bench and a clean slate to work with, we also lose some information: Our old GPU tests are completely incomparable to these results due to a new set of numbers, completely new testing methodology, new game settings, and new games being tested with. DOOM, for instance, now has a new test methodology behind it. We’ve moved to Ultra graphics settings with 0xAA and async enabled, also dropping OpenGL entirely in favor of Vulkan + more Dx12 tests.
We’ve also automated a significant portion of our testing at this point, reducing manual workload in favor of greater focus on analytics.
Driver version 378.78 (press-ready drivers for 1080 Ti, provided by nVidia) was used for all nVidia devices. Version 17.10.1030-B8 was used for AMD (press drivers).
A separate bench is used for game performance and for thermal performance.
Thermal Test Bench
Our test methodology for the is largely parallel to our EVGA VRM final torture test that we published late last year. We use logging software to monitor the NTCs on EVGA’s ICX card, with our own calibrated thermocouples mounted to power components for non-ICX monitoring. Our thermocouples use an adhesive pad that is 1/100th of an inch thick, and does not interfere in any meaningful way with thermal transfer. The pad is a combination of polyimide and polymethylphenylsiloxane, and the thermocouple is a K-type hooked up to a logging meter. Calibration offsets are applied as necessary, with the exact same thermocouples used in the same spots for each test.
Torture testing used Kombustor's 'Furry Donut' testing, 3DMark, and a few games (to determine auto fan speeds under 'real' usage conditions, used later for noise level testing).
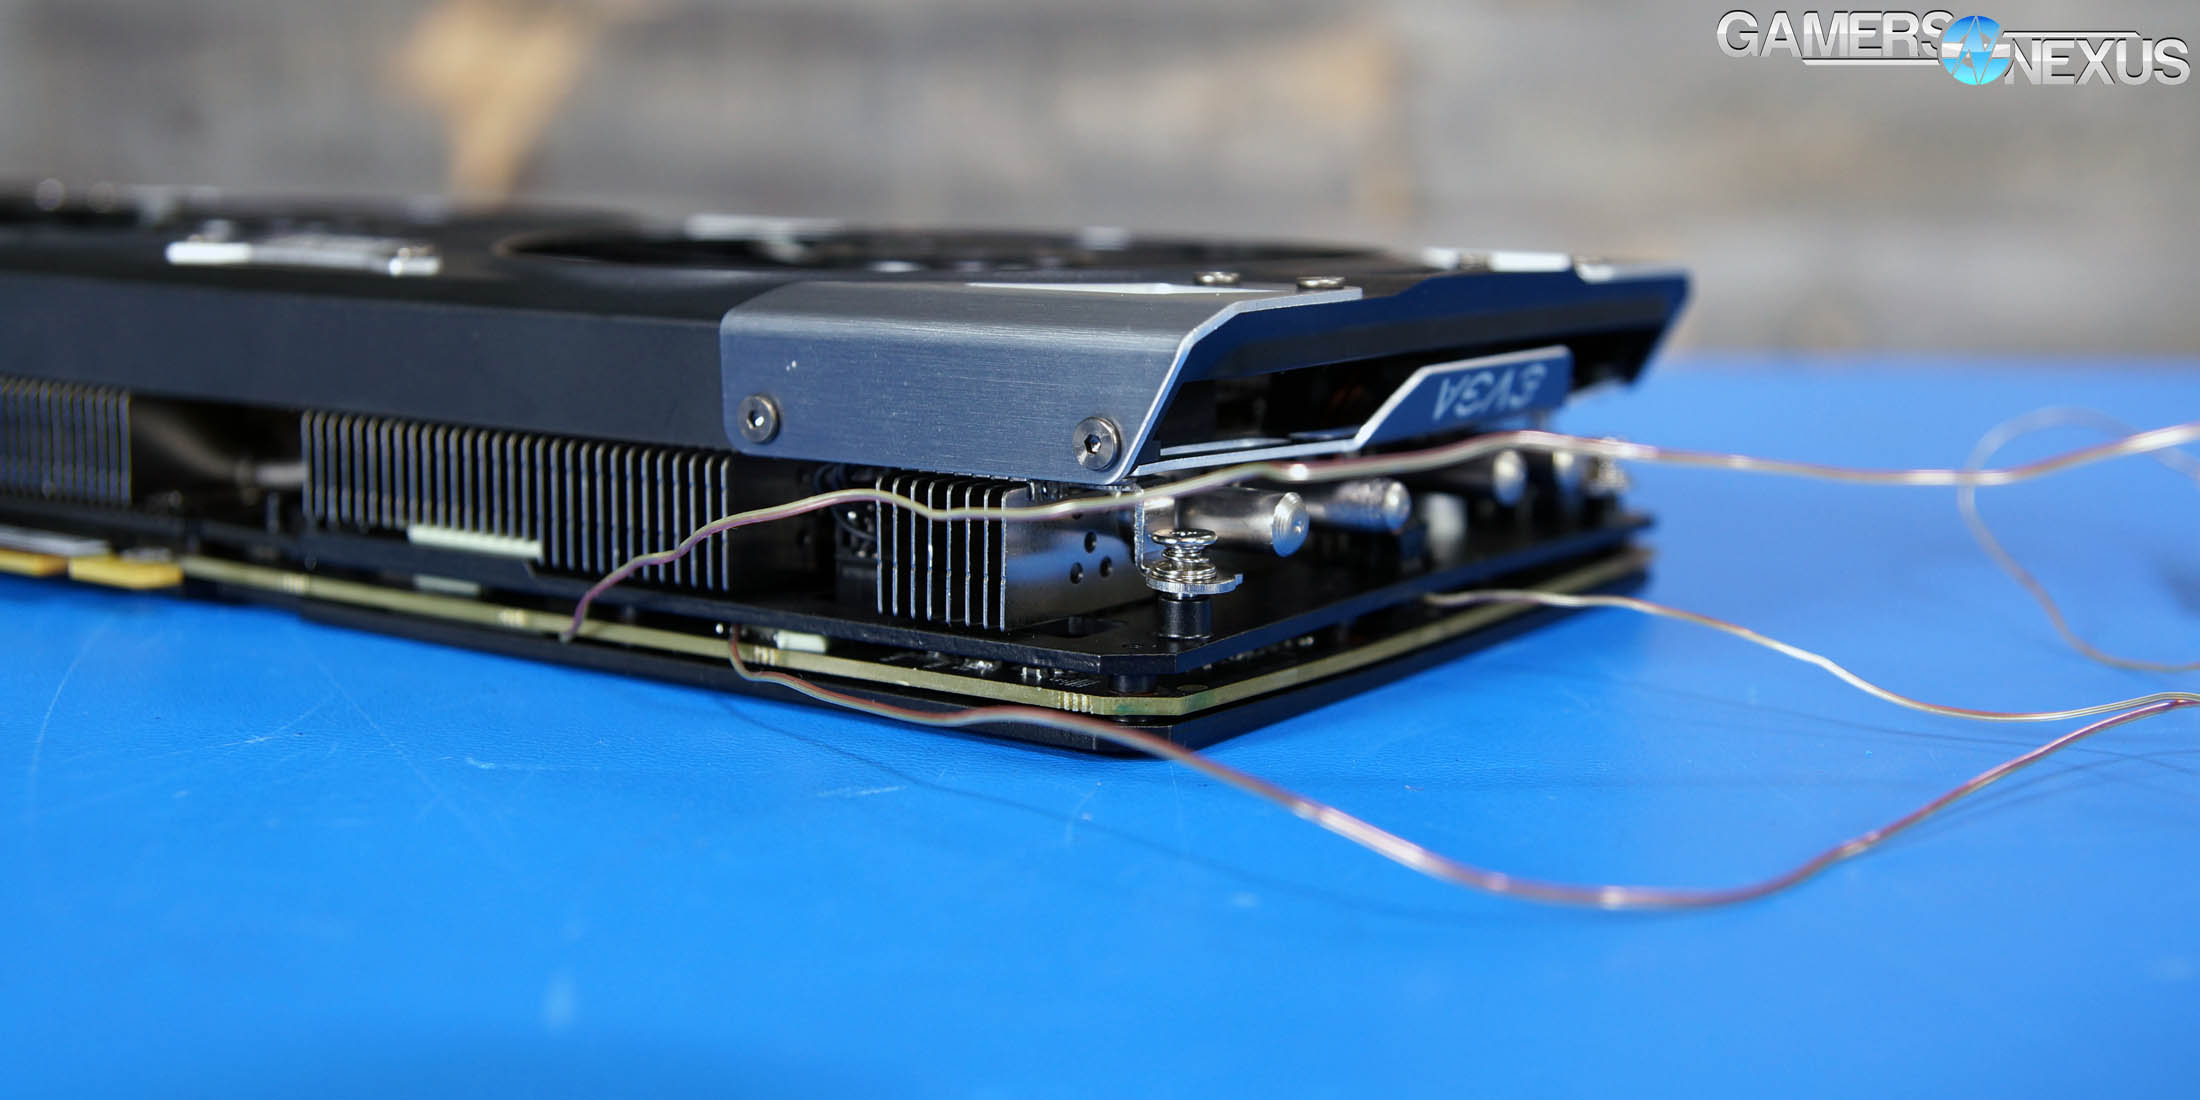
Our tests apply self-adhesive, 1/100th-inch thick (read: laser thin, does not cause "air gaps") K-type thermocouples directly to the rear-side of the PCB and to hotspot MOSFETs numbers 2 and 7 when counting from the bottom of the PCB. The thermocouples used are flat and are self-adhesive (from Omega), as recommended by thermal engineers in the industry -- including Bobby Kinstle of Corsair, whom we previously interviewed.
K-type thermocouples have a known range of approximately 2.2C. We calibrated our thermocouples by providing them an "ice bath," then providing them a boiling water bath. This provided us the information required to understand and adjust results appropriately.
Because we have concerns pertaining to thermal conductivity and impact of the thermocouple pad in its placement area, we selected the pads discussed above for uninterrupted performance of the cooler by the test equipment. Electrical conductivity is also a concern, as you don't want bare wire to cause an electrical short on the PCB. Fortunately, these thermocouples are not electrically conductive along the wire or placement pad, with the wire using a PTFE coating with a 30 AWG (~0.0100"⌀). The thermocouples are 914mm long and connect into our dual logging thermocouple readers, which then take second by second measurements of temperature. We also log ambient, and apply an ambient modifier where necessary to adjust test passes so that they are fair.
The response time of our thermocouples is 0.15s, with an accompanying resolution of 0.1C. The laminates arae fiberglass-reinforced polymer layers, with junction insulation comprised of polyimide and fiberglass. The thermocouples are rated for just under 200C, which is enough for any VRM testing (and if we go over that, something will probably blow, anyway).
To avoid EMI, we mostly guess-and-check placement of the thermocouples. EMI is caused by power plane PCBs and inductors. We were able to avoid electromagnetic interference by routing the thermocouple wiring right, toward the less populated half of the board, and then down. The cables exit the board near the PCI-e slot and avoid crossing inductors. This resulted in no observable/measurable EMI with regard to temperature readings.
We decided to deploy AIDA64 and GPU-Z to measure direct temperatures of the GPU and the CPU (becomes relevant during torture testing, when we dump the CPU radiator's heat straight into the VRM fan). In addition to this, logging of fan speeds, VID, vCore, and other aspects of power management were logged. We then use EVGA's custom Precision build to log the thermistor readings second by second, matched against and validated between our own thermocouples.
The primary test platform is detailed below:
| GN Test Bench 2015 | Name | Courtesy Of | Cost |
| Video Card | This is what we're testing | - | - |
| CPU | Intel i7-5930K CPU 3.8GHz | iBUYPOWER | $580 |
| Memory | Corsair Dominator 32GB 3200MHz | Corsair | $210 |
| Motherboard | EVGA X99 Classified | GamersNexus | $365 |
| Power Supply | NZXT 1200W HALE90 V2 | NZXT | $300 |
| SSD | OCZ ARC100 Crucial 1TB | Kingston Tech. | $130 |
| Case | Top Deck Tech Station | GamersNexus | $250 |
| CPU Cooler | Asetek 570LC | Asetek | - |
Note also that we swap test benches for the GPU thermal testing, using instead our "red" bench with three case fans -- only one is connected (directed at CPU area) -- and an elevated standoff for the 120mm fat radiator cooler from Asetek (for the CPU) with Gentle Typhoon fan at max RPM. This is elevated out of airflow pathways for the GPU, and is irrelevant to testing -- but we're detailing it for our own notes in the future.
Game Bench
| GN Test Bench 2017 | Name | Courtesy Of | Cost |
| Video Card | This is what we're testing | - | - |
| CPU | Intel i7-7700K 4.5GHz locked | GamersNexus | $330 |
| Memory | GSkill Trident Z 3200MHz C14 | Gskill | - |
| Motherboard | Gigabyte Aorus Gaming 7 Z270X | Gigabyte | $240 |
| Power Supply | NZXT 1200W HALE90 V2 | NZXT | $300 |
| SSD | Plextor M7V Crucial 1TB | GamersNexus | - |
| Case | Top Deck Tech Station | GamersNexus | $250 |
| CPU Cooler | Asetek 570LC | Asetek | - |
BIOS settings include C-states completely disabled with the CPU locked to 4.5GHz at 1.32 vCore. Memory is at XMP1.
We communicated with both AMD and nVidia about the new titles on the bench, and gave each company the opportunity to ‘vote’ for a title they’d like to see us add. We figure this will help even out some of the game biases that exist. AMD doesn’t make a big showing today, but will soon. We are testing:
- Ghost Recon: Wildlands (built-in bench, Very High; recommended by nVidia)
- Sniper Elite 4 (High, Async, Dx12; recommended by AMD)
- For Honor (Extreme, manual bench as built-in is unrealistically abusive)
- Ashes of the Singularity (GPU-focused, High, Dx12)
- DOOM (Vulkan, Ultra, 0xAA, Async)
Synthetics:
- 3DMark FireStrike
- 3DMark FireStrike Extreme
- 3DMark FireStrike Ultra
- 3DMark TimeSpy
For measurement tools, we’re using PresentMon for Dx12/Vulkan titles and FRAPS for Dx11 titles. OnPresent is the preferred output for us, which is then fed through our own script to calculate 1% low and 0.1% low metrics (defined here).
Power testing is taken at the wall. One case fan is connected, both SSDs, and the system is otherwise left in the "Game Bench" configuration.
Continue to Page 2 for thermals, noise, & the conclusion.
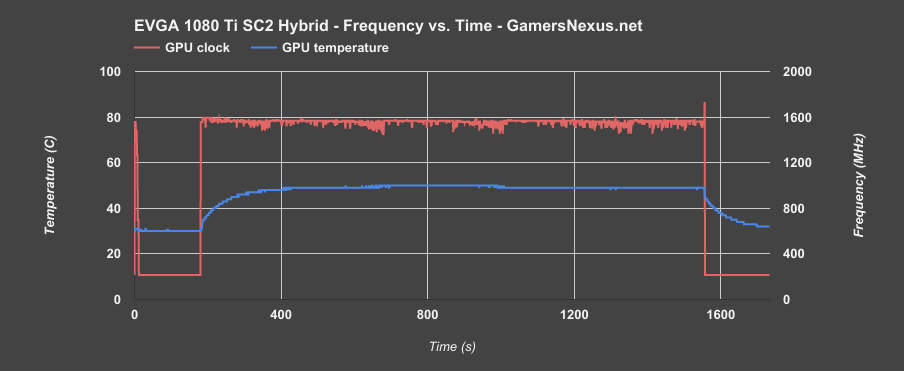
EVGA 1080 Ti SC2 Hybrid Frequency vs. Temperature & Time
Almost every time we look at one of these cards, we’ve shown the impact on frequency by using a cooler more capable than some of its competition. In this case, we see frequency remains relatively stable, with minimal drop in clock-rate from the start point. There are a few hiccups at times, but nothing out of the ordinary for GP102. Frequency as a whole remains near-constant, and so will provide smoother and more predictable frametime performance.
Note, as always, that this chart is generated under a power virus scenario. That means that the frequency curve will appear lower than it would in a gaming workload. The clock is enumerated differently under power virus workloads, as the point is to generate maximum power throughput and stress, not to maximize the clock.
EVGA SC2 vs. SC2 Hybrid
The SC2 and SC2 Hybrid are easily compared, given that their thermistors are located in the same places – though we did place our own thermocouples on each card in addition to EVGA’s NTCs. Our ability to compare these two cards directly is in contrast to the FTW3, which is not comparable in PWR component readouts given its completely different power design and NTC location on the board.
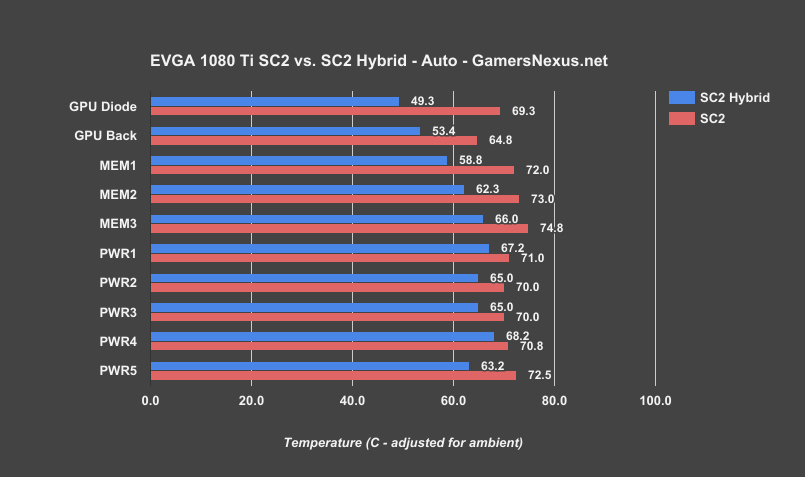
EVGA’s doing better with this generation of Hybrid cooling, and seems to have learned that running 100% radiator fan speeds at all times is not actually necessary. That’s reflected in these results, where we don’t see quite as big of a thermal improvement as in previous generations – but that’s because the noise levels are actually tolerable. This has been EVGA’s biggest weak point for a long time now, and they’re working to resolve the noise output while still meeting expectations thermally. The SC2 Hybrid looks to be about at the right place, ranking 20C lower than the SC2 in GPU diode readings, about 13C lower on MEM1, 10C on MEM2, and 9C on MEM3, with power component temperatures also down across the board.
SC2 Hybrid Noise-Normalized Performance at 40dBA
Because we take thermals a lot more seriously than is common, it’s worth reminding everyone that we’re using thermocouple readers for a few things here: one is to validate the NTC readings, but another is to log room ambient, intake, and exhaust temperatures actively. We then apply a modifier to the values to normalize for ambient, but we’re not presenting them as a hard dT over ambient value here just because it’s easier for everyone to follow in this particular chart.
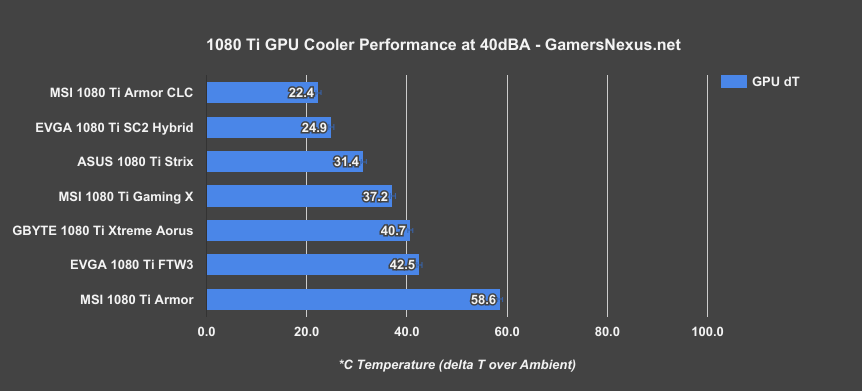
We’re moving now to our noise-normalized charts, where we configure the cards to run at a 40dBA output. This helps understand cooling efficiency per card, rather than just its stock performance. Stock performance, of course, is highly variable and will hinge completely on whether the manufacturer built for noise or for thermals. Here, we’re looking at strictly the cooling efficiency at a fixed noise output; we’re not normalizing for power, but perhaps in a future test.
Starting with GPU numbers, the EVGA 1080 Ti SC2 Hybrid is the second coolest on our charts, operating a sustained 24.9C delta T over ambient. This places the card about 20C cooler than the FTW3 ($780) – though the FTW3 had some testing caveats that we detailed in our unveiling of this method, primarily that we configured the fans to asynchronous speeds. The Xtreme Aorus card is nearby, with the Gaming X ($750) still showing the prowess of MSI’s Twin Frozr dual-air cooler design. ASUS keeps hold of the “best efficiency for an air cooler” title, and is outranked by about 6C with EVGA’s SC2 Hybrid. The Armor is the worst card we’ve tested when air cooled, but its Gaming X PCB makes it an excellent candidate for H2O. The Armor CLC uses a 570LC and Gentle Typhoon fan, but there’s something more important: EVGA is sharing its liquid cooling solution with a copper plate that conducts from the VRAM, increasing the heat load relative to the constant heat dissipation. We are increasing our heat load by approximately 15W by doing this.
But that’s just the GPU.
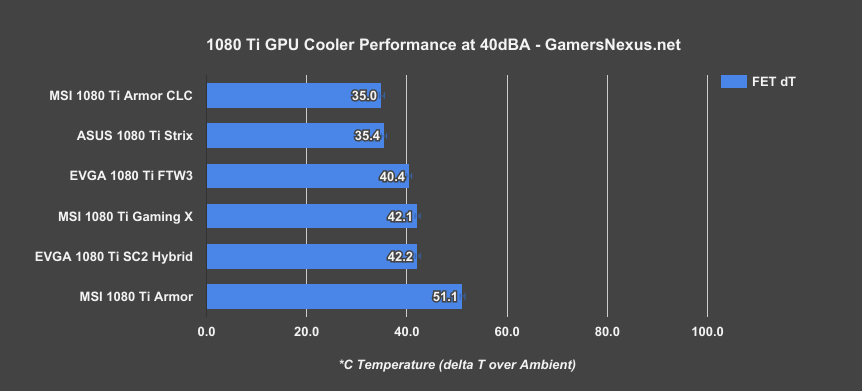
Moving now to power component temperatures, we see the SC2 runs a warmer VRM target than its neighbors, at 42.2C delta T over ambient. This is near the Gaming X and FTW3. This is another situation like the FTW3 review, where we could have configured the VRM fan to run faster while the radiator fan could run slower, but we ultimately decided to follow EVGA’s own fan curve. That curve dictated roughly a 28% VRM fan RPM under load, which fit well with our 70% radiator fan RPM for a 40dBA output. Performance is neither impressive nor bad. We are way within spec for these FETs, even measuring an effective case temperature.
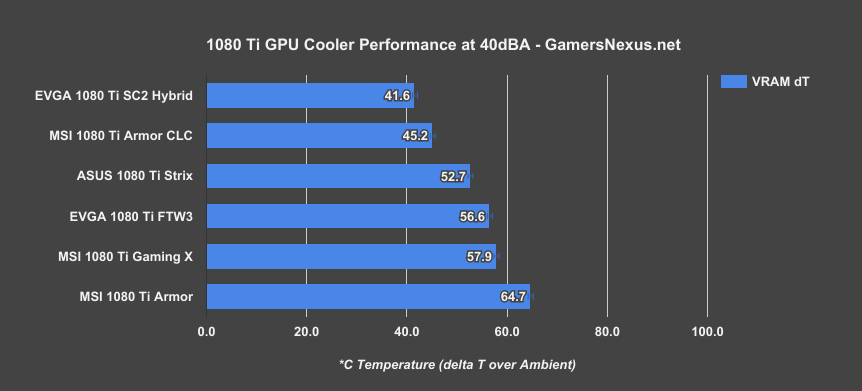
Finally, here’s a look at VRAM. The SC2 Hybrid manages to keep the lowest VRAM temperature, largely thanks to EVGA’s decision to cool the VRAM via copper plate that contacts the CLC.
EVGA 1080 Ti SC2 Hybrid A/B VRAM Plate Test
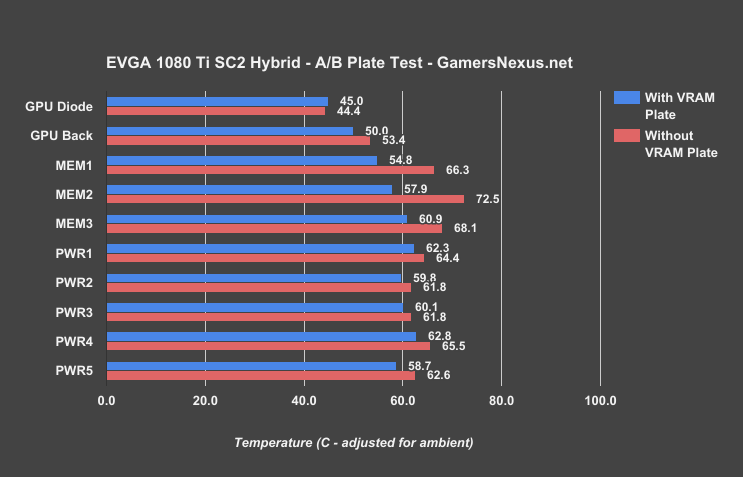
But we were curious about the impact of the copper plate at all, and so ran some A/B tests with it removed. The radiator fan was configured to 100% for these, with the VRM fan at 28%.
Our difference in GPU temperature is within our error bars, and so is effectively identical. The rest of the temperatures see a hike, particularly for the memory. The copper plate improves performance from 66C to 55C on MEM1, from 73C to 58C on MEM2, and from 68C to 61C on MEM3. Power follows this trend, just to a lesser degree.

Finally, here’s a look at the noise output versus various RPMs on the radiator and VRM fans. Under auto settings, the EVGA card tends to stick just under or right around 40dBA, +/- 3dBA depending on load. We still think EVGA could improve their noise with these cards, but it does start to enter territory where your temperatures run higher for lower noise, and that might not reflect well in less scrupulous reviews or with more casual users.
Conclusion: Is the 1080 Ti SC2 Hybrid Worth It?
As stated clearly in the video, our conclusion with this card is simple: It’s $810, which means a lot of people are immediately priced-out. And that’s fine, because if what you want is strong gaming performance, that can be had with EVGA’s $720 SC2 Black (or almost any other non-Armor card, for that matter). The extra expense on something like the SC2 Hybrid is only ever worth it if noise is high on the list of concerns. For someone seeking a high-performance system with low noise, we’d suggest the following: Buy an SC2 Hybrid or similar liquid-cooled solution, then swap radiator fans and plug directly into the motherboard. At this point, configure the fan speed in BIOS to something between 40% and 70%, then let it sit there forever.
EVGA has gotten a lot better with its fan profile management on these cards. They’re no longer blasting the fan at 100%, but it’s still loud as it slaves to liquid temperature in the pump block, and that’s sort of a useless thing to do. That said, it’s the best they’ve got given that Asetek ultimately limits EVGA, here. The end result is a GPU radiator fan that’s often at 70-80% and a VRM fan that’s often at 28%, resulting in a dBA range of ~40~43dBA. Because the GPU is still plenty cool, you could manually drop fan RPM (and increase temperature a bit) to get below 40dBA. Thermals will still be perfectly fine, but noise will now be a consistent, unchanging frequency and a lower decibel output. That’s how these cards are supposed to be used.
EVGA could still improve some things, but a lot of those won’t change until after the generational jump to Asetek 6th Gen. Until then, we’d like to see the company lengthen the fan cable included with the radiator fan, that way users can manually route it to the board (rather than ditching it), if desired. Or just include an extension cable, maybe.
Otherwise, it’s a well-built card – it’s just not worth it for the vast majority of buyers. For folks who are very focused on low noise and high-performance cooling, this is potentially a worthwhile investment.
Editorial: Steve Burke
Video: Andrew Coleman