We’ve covered one of Thermaltake’s Level 20 cases before, specifically the small form factor VT, which sought to bring the ultra-expensive Level 20 line down to ‘normal’ consumers. The Level 20 MT is a mid-tower in the same style, pairing rounded silver edges with flat tempered glass panels to equate “class,” or something, while overlooking some basic design concepts. We’re specifically reviewing the Level 20 MT ARGB, which comes with three 120mm ARGB intake fans at the front.
The front panel is restrictive, with tiny 1cm strips of mesh on either side of the glass section. Deceptively, these strips aren’t in the path of airflow and don’t act as filters. There isn’t any filtration at all in front of the fans, which instead pull air through the narrow gaps behind the edges of the front glass panel. There’s also a wider gap hidden at the bottom of the front panel, typical for cases with sealed designs like this.
Thermaltake Level 20 MT Specs
Dimensions (L x W x H): | 18.54” x 8.0” x 17.9” / 471 x 204 x 455 mm |
Maximum GPU Length: | 260mm(With radiator on the right side) ; 366mm(Without radiator on the right side) |
Maximum CPU Cooler Height: | 170mm |
Maximum PSU Length: | 170mm |
Case Type: | Mid Tower |
Color: | Black |
Case Material: | SPCC Side Panel: 4mm Tempered Glass x 2 (Left & Front) |
Internal 2.5”/ 3.5” Drive Bay: | (Accessible) 1 x 2.5’’(HDD Bracket); 2 x 2.5”; (Hidden) 2 x 3.5’’ or 2.5”(HDD Cage); 1 x 2.5”(HDD Bracket) |
Expansion Slots: | 7 |
I/O Port: | USB 3.0 x 2, HD Audio x 1, RGB Switch x 1 |
Pre-installed Fans: | (Rear)120 x 120 x 25 mm fan x1; (Front) 120 x 120 x 25mm Addressable RGB fan x3 |
Air Cooling: | Front: 3 x 120mm Top: 2 x 120mm, 1 x 140mm Rear: 1 x 120mm Right Side(In front of M/B Tray): 2 x 120mm Bottom: 2 x 120mm (on the power cover) |
Liquid Cooling: | Front: 1 x 360mm Rear: 1 x 120mm Right Side(In front of M/B Tray): 1 x 240mm |
The front panel is restrictive, with tiny 1cm strips of mesh on either side of the glass section. Deceptively, these strips aren’t in the path of airflow and don’t act as filters. There isn’t any filtration at all in front of the fans, which instead pull air through the narrow gaps behind the edges of the front glass panel. There’s also a wider gap hidden at the bottom of the front panel, typical for cases with sealed designs like this.
The rest of the Level 20 MT seems to be an attempt to make-up for the closed-off front. There are cutouts big enough for two fans on the steel right-side panel of the case, so that extra intake fans or a radiator could be installed, as long as the graphics card isn’t too long. This intake is filtered, unlike the front. There are also fan mounts along the top of the PSU shroud, which is definitely a desirable feature and should allow for much better GPU air cooling. A bottom-to-top airflow pattern is additionally encouraged by a vent at the top of the case: however, since the bottom of the case is almost entirely sealed, any fans mounted here will have to pull air from the front panel.
There’s almost no room at all for cables. We’re used to removing unused hard drive bays as a matter of convenience, but in this case, it was a necessity. It’s hard to imagine where cables could possibly go with two hard drives installed under the shroud. There’s already very little clearance between the side panel and the chassis, and since part of the side of the case is taken up with the vents, there’s even less area available for them. This also makes it difficult to get the steel side panel in place, since it’s the old-fashioned kind with a steel lip at the front and tabs along the top and bottom that don’t want to slide in if the panel is even slightly bowed out.
The fan controller is the biggest sticking point with this case, for a couple of reasons. For one, it partially blocks the cable cutout that we would have otherwise used for the 24-pin power cable. That can be solved by unscrewing the controller and reinstalling it once the cable is through, but it’s frustrating to have it in the way at all. It also has the same weakness that Lian Li’s 550X controller did, in that it uses special 5-pin connectors for combined fan and RGB signals so that the fans can’t be plugged into standard headers. These connectors do cut down on cable clutter, but at a cost: unlike Lian Li’s controller, there’s no PWM cable, so there’s no way whatsoever to control the speed of the three front fans other than soldering together an adapter. There are cables for external RGB control, and some credit is due here--there are adapters for ASUS, MSI, and Gigabyte pinouts, so the ARGB aspect should work well. The rear exhaust fan is non-RGB and just uses a standard 3-pin plug, which means that it can’t be connected to the controller and set to the same speed as the other fans. Normally that would be a negative, but the other problems mentioned previously cancel it out.
The lack of fan speed control is a big oversight, especially for anyone hoping to install a radiator behind these fans, because the single locked RPM is low. A 360mm radiator can indeed be wrangled into place at the front of the case, as long as it can fit in the 13.2cm wide gap in the PSU shroud. It would also have to be installed tubes-up to fit, which we don’t recommend for long term use with a CLC.
Almost everything mentioned so far in this review is negative, so it’s worth taking a moment to clarify that we don’t hate this case. The look, the build quality, and the ease of installation are fine but unremarkable. It’s in an unfortunate position where the features of the case that stick out happen to be flaws.
Case Testing Methodology
GN Case Testing Bench (Sponsored by CableMod)
| Component | Courtesy Of | |
| Video Card | MSI GTX 1080 Gaming X (OC Mode) | MSI |
| CPU | Intel i7-6700K @ 4.4GHz | GamersNexus |
| CPU Cooler | MSI Core Frozr L | MSI |
| Motherboard | MSI Z170A Gaming M7 | MSI |
| Memory | Corsair Vengeance LED 32GB 3200MHz | Corsair |
| SSD | Samsung 850 EVO 120GB | Samsung |
| PSU | Corsair RM650x | Corsair |
| Cables | CableMod Pro Mesh Cables | CableMod |
| Case | This is what we're testing! | - |
The video card is configured to run at 55% fan speed at all times.
Prior to load testing, we collect idle temperature results for ten minutes to determine the unloaded cooling performance of a case's fans and air channels. Thermal benchmarking is conducted for 1400 seconds (23 minutes), a period we've determined sufficient for achieving equilibrium. The over-time data is aggregated and will occasionally be compiled into charts, if interesting or relevant. The equilibrium performance is averaged to create the below charts.
Load testing is conducted using Prime95 LFFTs and Kombustor “FurMark” stress testing simultaneously. Testing is completely automated using in-house scripting, and executes with perfect accuracy on every run.
We recently validated our test methodology using a thermal chamber, finding our approach to be nearly perfectly accurate. Learn more here.
Thermals & Noise
We’ve made testing cases without their front panel part of the standard test suite now, so that we can have an understanding of how much they’re bottlenecking performance. Other than that, the only additional test we performed was to move the upper and lower intake fans over to the side intake vent. This actually caused some air to exit through the front panel, which doesn’t hurt performance but is a waste of air that should instead be flowing backwards through the case.
Realistically, the options for improving airflow are limited. It’s nice that Thermaltake has included so many fans, but it makes it less likely that customers will want to add additional ones, so we only used the stock fans for testing. We could emulate Lian Li’s O11 Dynamic by completely sealing the front panel and putting two fans on the side intake, but then we wouldn’t be showing any ARGB fans through the front panel, which is a major selling point of the case. Even moving two to the side intake and leaving one in the front is pushing the boundaries of what a user that cares about the appearance of their PC would do. We could leave the three LED intake fans in place to keep air from leaking out the front and install fans in the side intake, but at that point there would be six case fans running just to get an acceptable amount of air moving.
CPU Torture
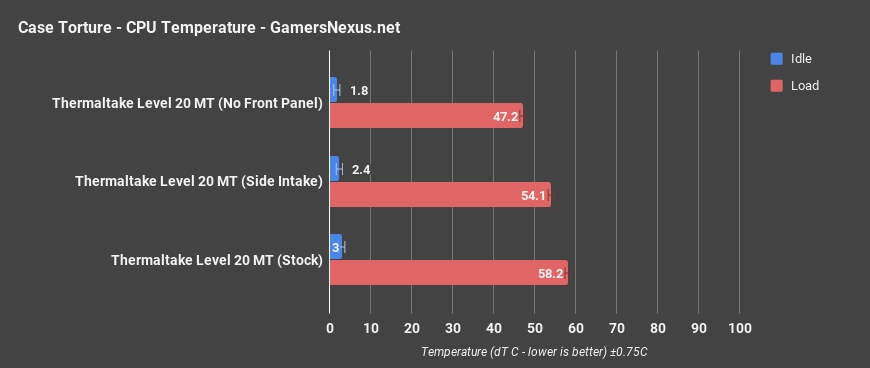
Before looking at comparative data, we’ll look at just the Level 20 MT. CPU temperature in the torture test was 58 degrees Celsius over ambient for the stock configuration, but dropped significantly -- by about 11 degrees -- by removing the front panel. We’d like to see this closer to the 6-7-degree mark. It’s natural that a front panel will inhibit cooling, but there are reasonable levels of inhibition. Despite the air escaping from the front, moving the two fans to side intake lowered temperature by roughly 4 degrees, down to 54.1 degrees over ambient. Removing the front panel completely was a more significant improvement, down to 47 degrees. The side vent can be used to mitigate limitations of the front panel while still enabling that ARGB front look.
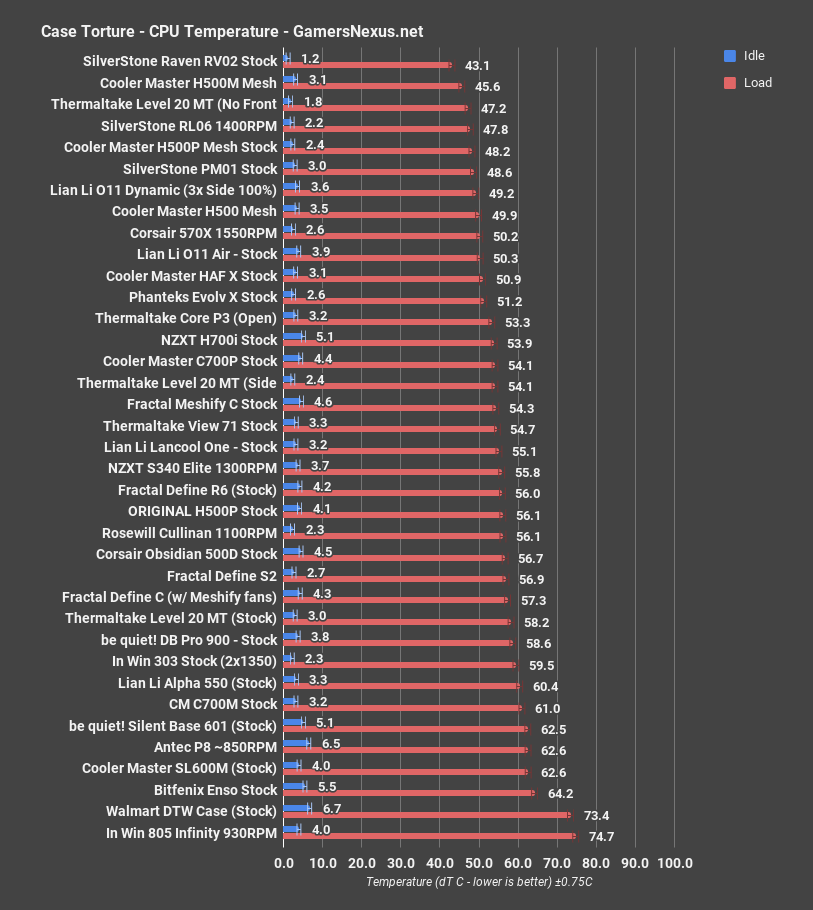
58 degrees over ambient is relatively warm for the CPU when compared to the rest of the cases on our chart, but it’s not yet in runaway thermal territory. It’s on the level of the Dark Base Pro 900 (version 1), similar to the stock Define C and Define S2, and a bit better than the Alpha 550 and In Win 303. Compared to a previous Thermaltake case, it does worse than the View 71. Regardless of whether or not the intake fans are blocked, the 120mm exhaust fan is decoupled from the fan controller and therefore capable of running at its full 1400RPM in the MT, which keeps temperatures from spiralling out of control.
GPU Torture
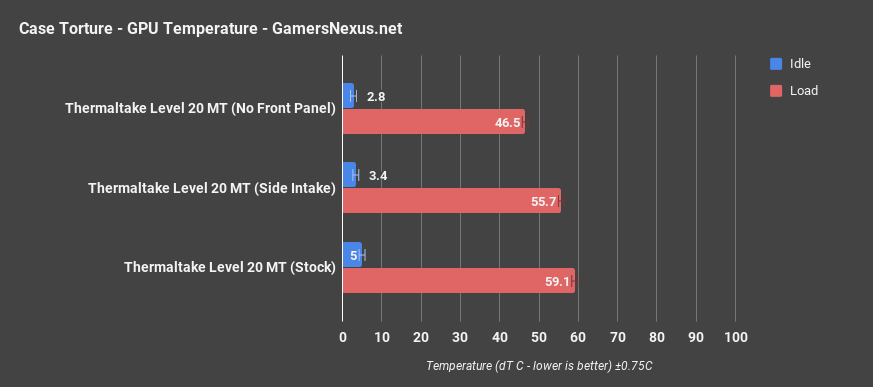
Moving on to GPU testing, we saw a stock GPU torture result of 59 degrees over ambient, seeing benefit from the side intake fans with a reduction to 56 degrees over ambient. As GPUs are heavily reliant upon their thermal performance, every few degrees puts us closer to higher clocks. Removing the front panel caused an even bigger drop in temperature on the GPU than it did on the CPU, down to 46.5 degrees over ambient. In the stock configuration, it seems likely that the intake fans are biased slightly towards the GPU since the largest available inlet for air is at the bottom of the front panel, but the rear exhaust fan primarily benefits the CPU. Any benefit to the GPU is by way of removing radiative heat off the backplate.
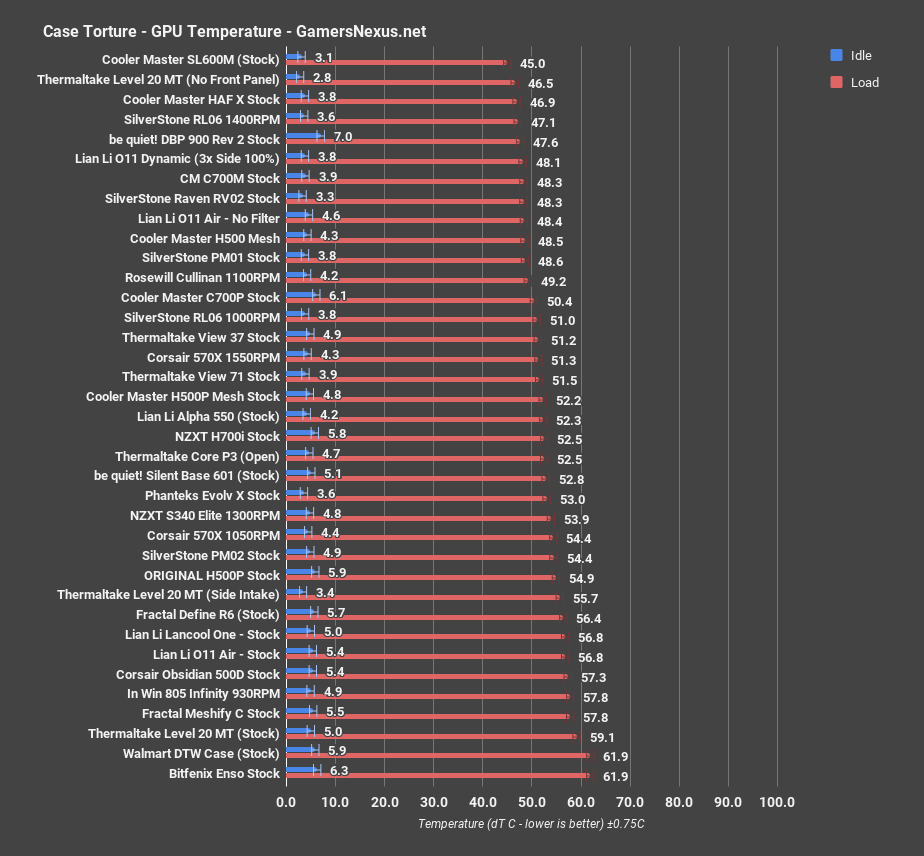
Here’s the comparative chart. GPU temperatures aren’t the hottest we’ve ever recorded, but they are nearly the warmest among the sampling of cases on our chart. The Bitfenix Enso and Walmart cases chart higher, for what that’s worth, but 59 degrees is about as hot as our GPU can get before throttling to keep itself cool. Nearby contenders would include the Lian Li O11 Air, which functionally requires removal of the dust filter to actually allow airflow. Another nearby item is the In Win 805 Infinity, one of the worst-performing cases on our charts as it has literally 0 front airflow. This isn’t great positioning for the MT. Going to side intake reduces thermals to a point of competing with the Define R6 and original H500P. Not great.
3DMark

3DMark raised temperatures slightly higher than torture testing did. It equals the Bitfenix Enso in this test, which is an unpleasant place to be. The perforations in the top of the PSU shroud might help a little to alleviate thermal concentration, but our PSU shroud was crammed full of cables and a hard drive cage that blocked air coming from the lowest intake fan.
Blender
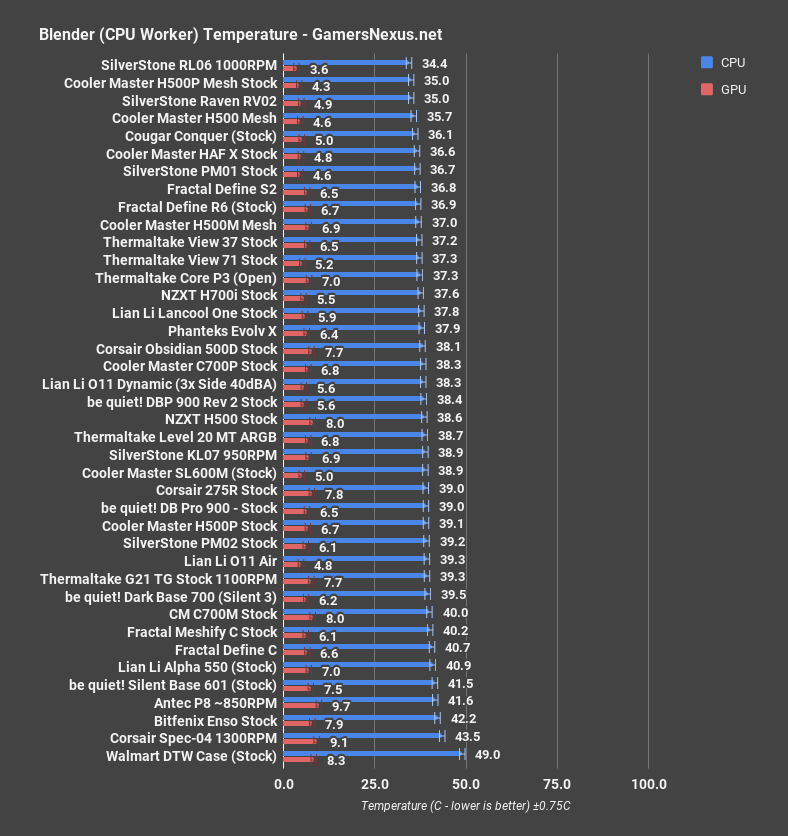
Blender CPU rendering ran with an average CPU temperature of 38.7C dT. Without the additional stress of the torture workload and with relatively little heat being generated by the GPU, this CPU temperature fits comfortably into the middle of the chart between the NZXT H500 and Silverstone KL07.
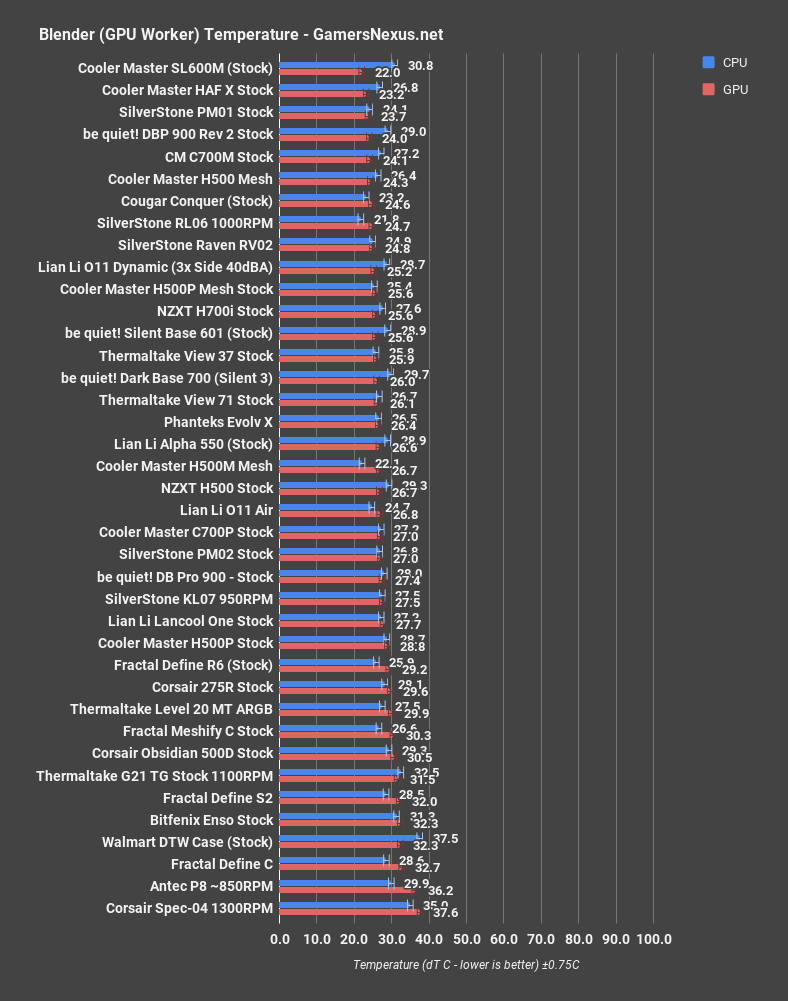
GPU rendering averaged 29.9C GPU dT, also a better temperature relative to other stock cases than was indicated by the torture test. The stock configuration isn’t so bad for lighter workloads, where the trickle of air is still sufficient to drive heat out of the case.
Noise

39.4dBA isn’t excessively loud, but it is when you keep in mind that every other stock case test is performed with the fans running at full speed. There’s only one speed that the three intake fans can run at, and that speed isn’t ideal for either noise or airflow.
Conclusion
$90 is a sensible price for a case with three ARGB fans and two glass panels assuming basic design tenets are followed. Thermaltake isn’t trying to rip anyone off, but the case is let down by the design of the front panel. If there were a larger air gap and a filter over the fans, it would be fine, and if the fans could be controlled at all or even if some 5-to-3-pin adapters were included, it would be fine. Neither of those are things that Thermaltake cheaped out on, they’re just facets of the design where form took priority over function, despite possibilities existing for both simultaneously. It’s becoming popular to have LED fans behind a tempered glass panel in the front of cases, but if the fans can’t pull air then they’re only there for decoration, and there are cheaper ways to put LEDs in a front panel.
The case is overall disappointing at its price-point.