The NZXT H700i mid-tower is the largest of NZXT’s new H-series lineup, which also includes the H400i micro-ATX and H200i Mini-ITX enclosures. Visually, the H700i is a successor to the popular S340 and S340 Elite--sharp edges, smooth surfaces, and a prominent cable management bar are familiar features, but various updates and the new NZXT “smart device” set it apart.
There’s one strip of LEDs mounted on PCB at the top of the case and an additional 12” flexible magnetic strip in the accessory kit. The original plan was apparently to have two strips preinstalled, but this way the user can decide where to place the second one. Lighting is controlled by the smart device, which also attempts to control fan RPM-to-noise/thermals response curves. These curves are better set manually by the user, as we’ll discuss later.
In this review of the NZXT H700i case, we look at thermal performance, acoustics, build quality, and the “smart” device.
NZXT H700i Case Specs
Dimensions | W: 230mm H: 494mm D: 494mm (without feet) W: 230mm H: 516mm D: 494mm (with feet) |
Material(s) | SECC Steel and Tempered Glass |
Weight | 12.27 kg |
Motherboard Support | Mini-ITX, MicroATX, ATX and EATX(Up to 272mm or 10.7-inches) |
I/O Ports | 2 x USB 2.0 2 x USB 3.1 Gen 1 1 x Audio/Mic |
Filters | Front and PSU Intake |
Smart Device | 3 x Fan channels with Max 10W per channel output* 1 x RGB LED port support up to 4 x HUE+ LED strips or 5 x Aer RGB fans Built-in noise detection module *Note: If a splitter is used, fan control is regulated depending on the fan connected to the 4-pin port. Do not use low-noise adapters. |
Expansion Slots | 7 |
Drive Bays | 2.5”: 7 3.5”: 2+1 |
Radiator Support | Front: 2 x 140 or 3 x 120mm with Push/Pull Top: 2 x 140 or 3 x 120 |
Fan Support | Front: 3 x 120/2 x 140mm (3 Aer F120 Case Version included) Top: 3 x 120/2 x 140mm Rear: 1 x 120/1 x 140mm (1 Aer F140 Case Version included) |
Fan Specs | Aer F120 (Case Version) Speed: 1200 + 200 RPM Airflow: 50.42 CFM Noise: 28 dBA Bearing: Rifle Bearing Aer F140 (Case Version) Speed: 1,000 + 200 RPM Airflow: 68.95 CFM Noise: 29 dBA Bearing: Rifle Bearing |
Clearance | Cable Management: 18-22mm GPU Clearance: Up to 413mm CPU Cooler: Up to 185mm Front Radiator: 60mm Top Radiator: 30mm Reservoir & Pump: Up to 224mm (Along cable bar) |
Warranty | 2 Years |
Model Number | CA-H700W-WB |
EAN | 5060301693849 |
UPC | 815671013538 |
System Requirements | PC with open internal USB 2.0 port and Windows® 10 operating system recommended. Internet connection is needed to download CAM. Some CAM features require Internet access, a valid email address and acceptance of our current Terms of Service. |
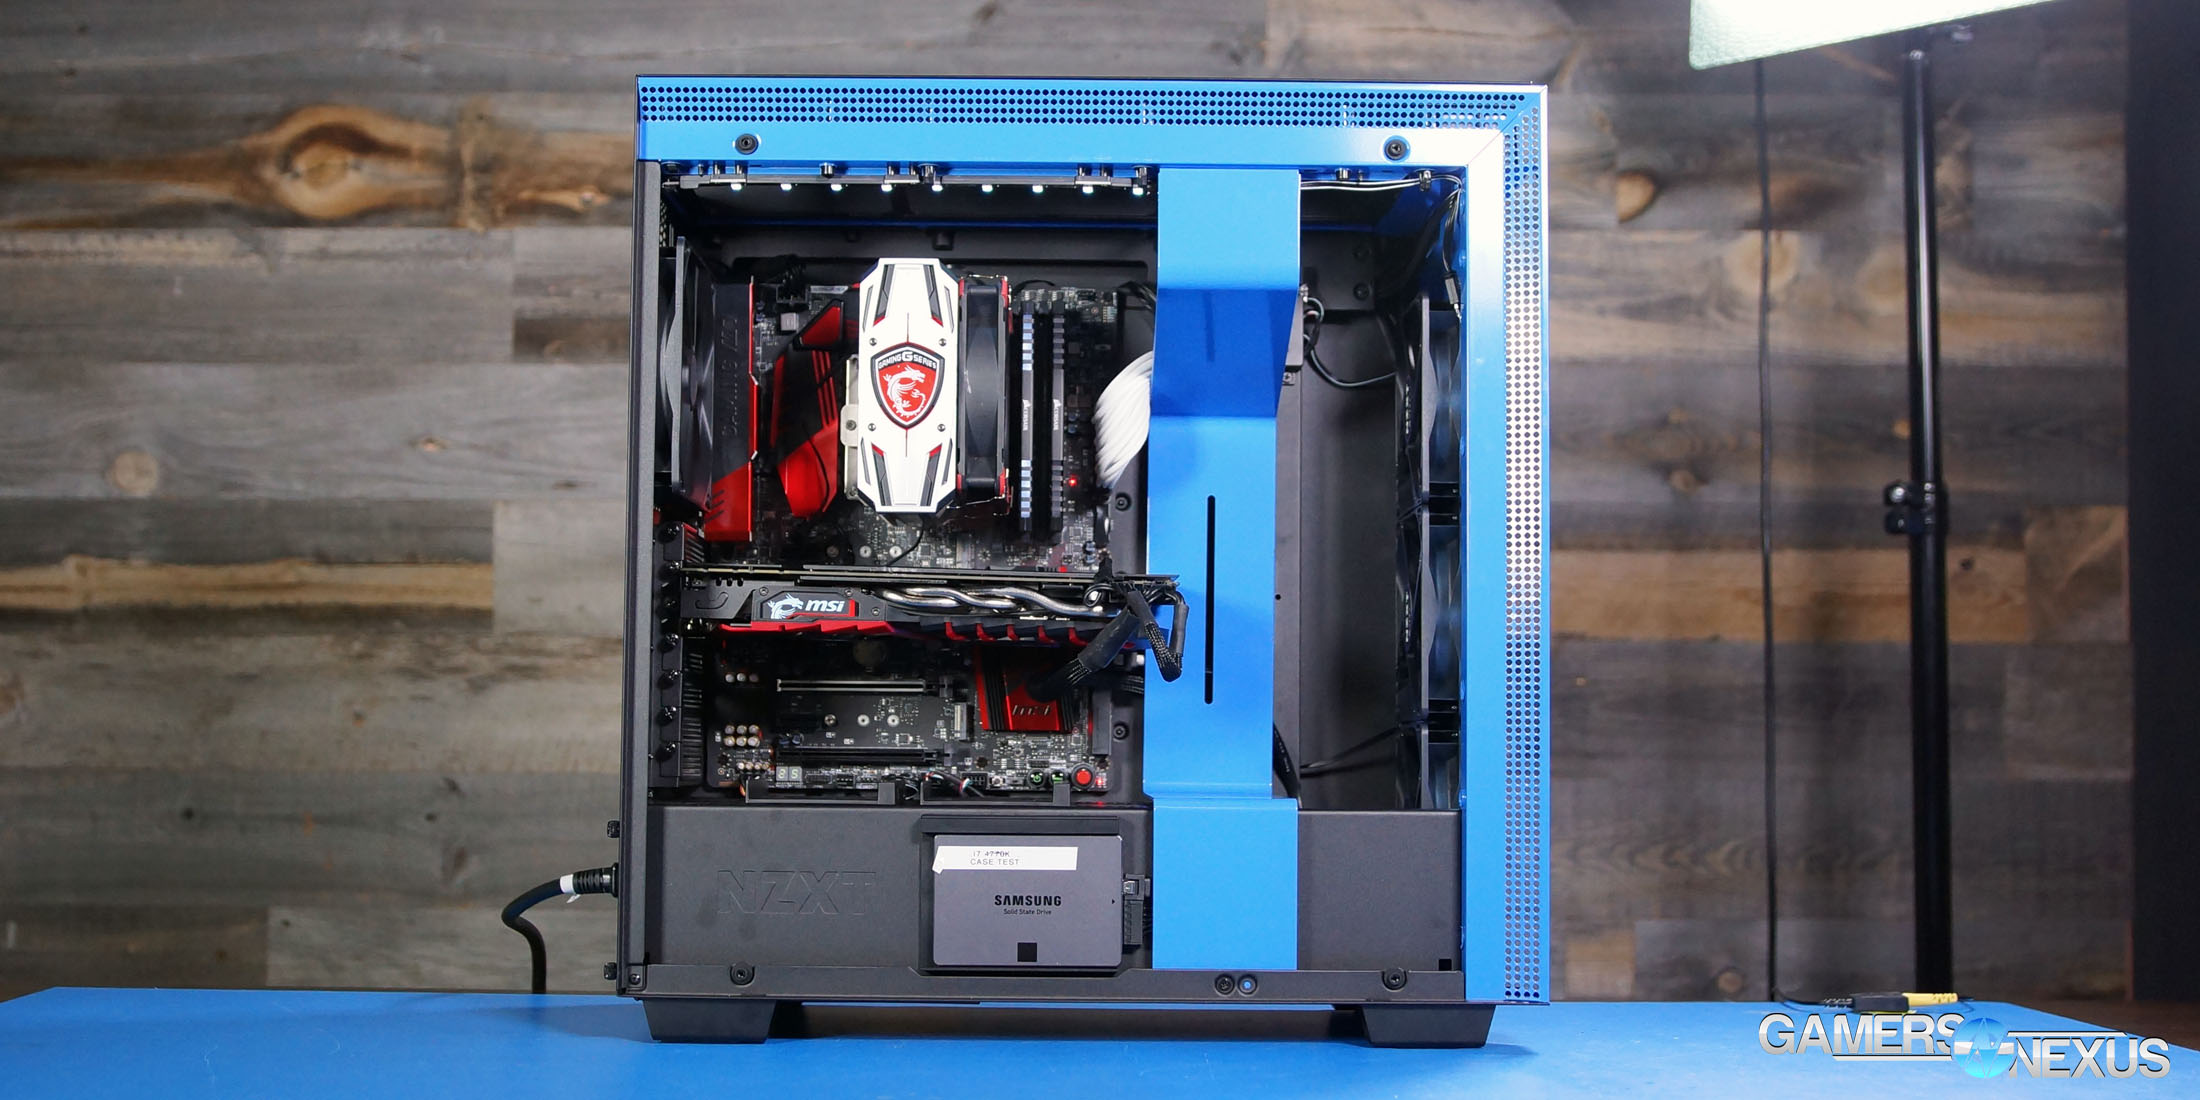
The Build
(Section by Patrick Lathan)
As always, NZXT has taken particular care with cable management. There are “cable channels” all over the back of the motherboard tray, which are sections of removable plastic track with integrated velcro ties. They work well to hold the profusion of front I/O and smart device cables that are included with the case, and they continue to work well once the PSU cables are routed through them. The one downside is that since the velcro loops are screwed into the case, it’s better to thread cables through them rather than plugging everything in and wrapping it up with straps later.
There’s also a small chunk of plastic innocently labeled “designated cable router” that looks suspiciously like a Puck, but fortunately, it’s removable. (We’re joking -- it’s a brilliant, small demonstration of attention to detail.)
The cable management bar is just as good an idea as it was back when we first reviewed the S340, but the H700i’s iteration is a little more artistic. The bar sticks closely to the shroud and interior of the case, except where it angles outwards at the top to allow room for the smart device--maybe a little too closely. Where the S340’s bar bowed outwards to allow room for the ATX power cable, the H700i’s bar has two centimeters of clearance, and we had to route our power cable upwards to find room. This isn’t a major issue at all, but the S340’s cable bar was more practical for our test system. The H700i’s bar is attached with three screws and can either be shifted forwards about 1.25cm or completely removed.

The steel side panel is ridiculously easy to open (in a good way). There’s a single button on the back of the case that controls two spring-loaded catches, which allow the panel to simply fall out when they’re released. This is partly due to the good cable management, which makes it unnecessary to lock down every side of the panel to compress rogue cables. The glass is held in by a screw at each corner, and although there are no special catches at the bottom, it’s inset so that it can’t fall out easily during installation. Screws are a reliable way to secure tempered glass, but with so much effort put into the steel side panel’s quick release button, we’d like to see something similar on both sides.
Unlike the S340 Elite, which is basically an S340 with a glass panel added, the H700i has been built around tempered glass from the start. We thought the Elite was a well-priced upgrade when we reviewed it, but criticized it for having barely any front intake thanks to a side panel that extended all the way to the front of the case. This was Steve’s suggestion in that review:
“Here’s how we’d instantly improve the S340 Elite: Shorten the glass side panel so that it doesn’t protrude beyond the PSU shroud. Then, stick the front steel panel onto an underlying frame with mesh, and cut a grill into the side of the new front panel. This gives a 1” depth from the front panel to the interior, and now we can actually use a middle fan for intake without being utterly pointless.”
The H700i has those improvements. The front and top panels are still solid sheets of steel, but there are strips of ventilation on each side. NZXT is serious about cooling this case: there are four fans included, three 120mm intakes and one 140mm exhaust, and the smart device has capacity to plug in five more (nine total, divided between three channels). Even if it didn’t have the extra ventilation, the H700i would do better the S340 Elite in our tests just through sheer number of stock fans.
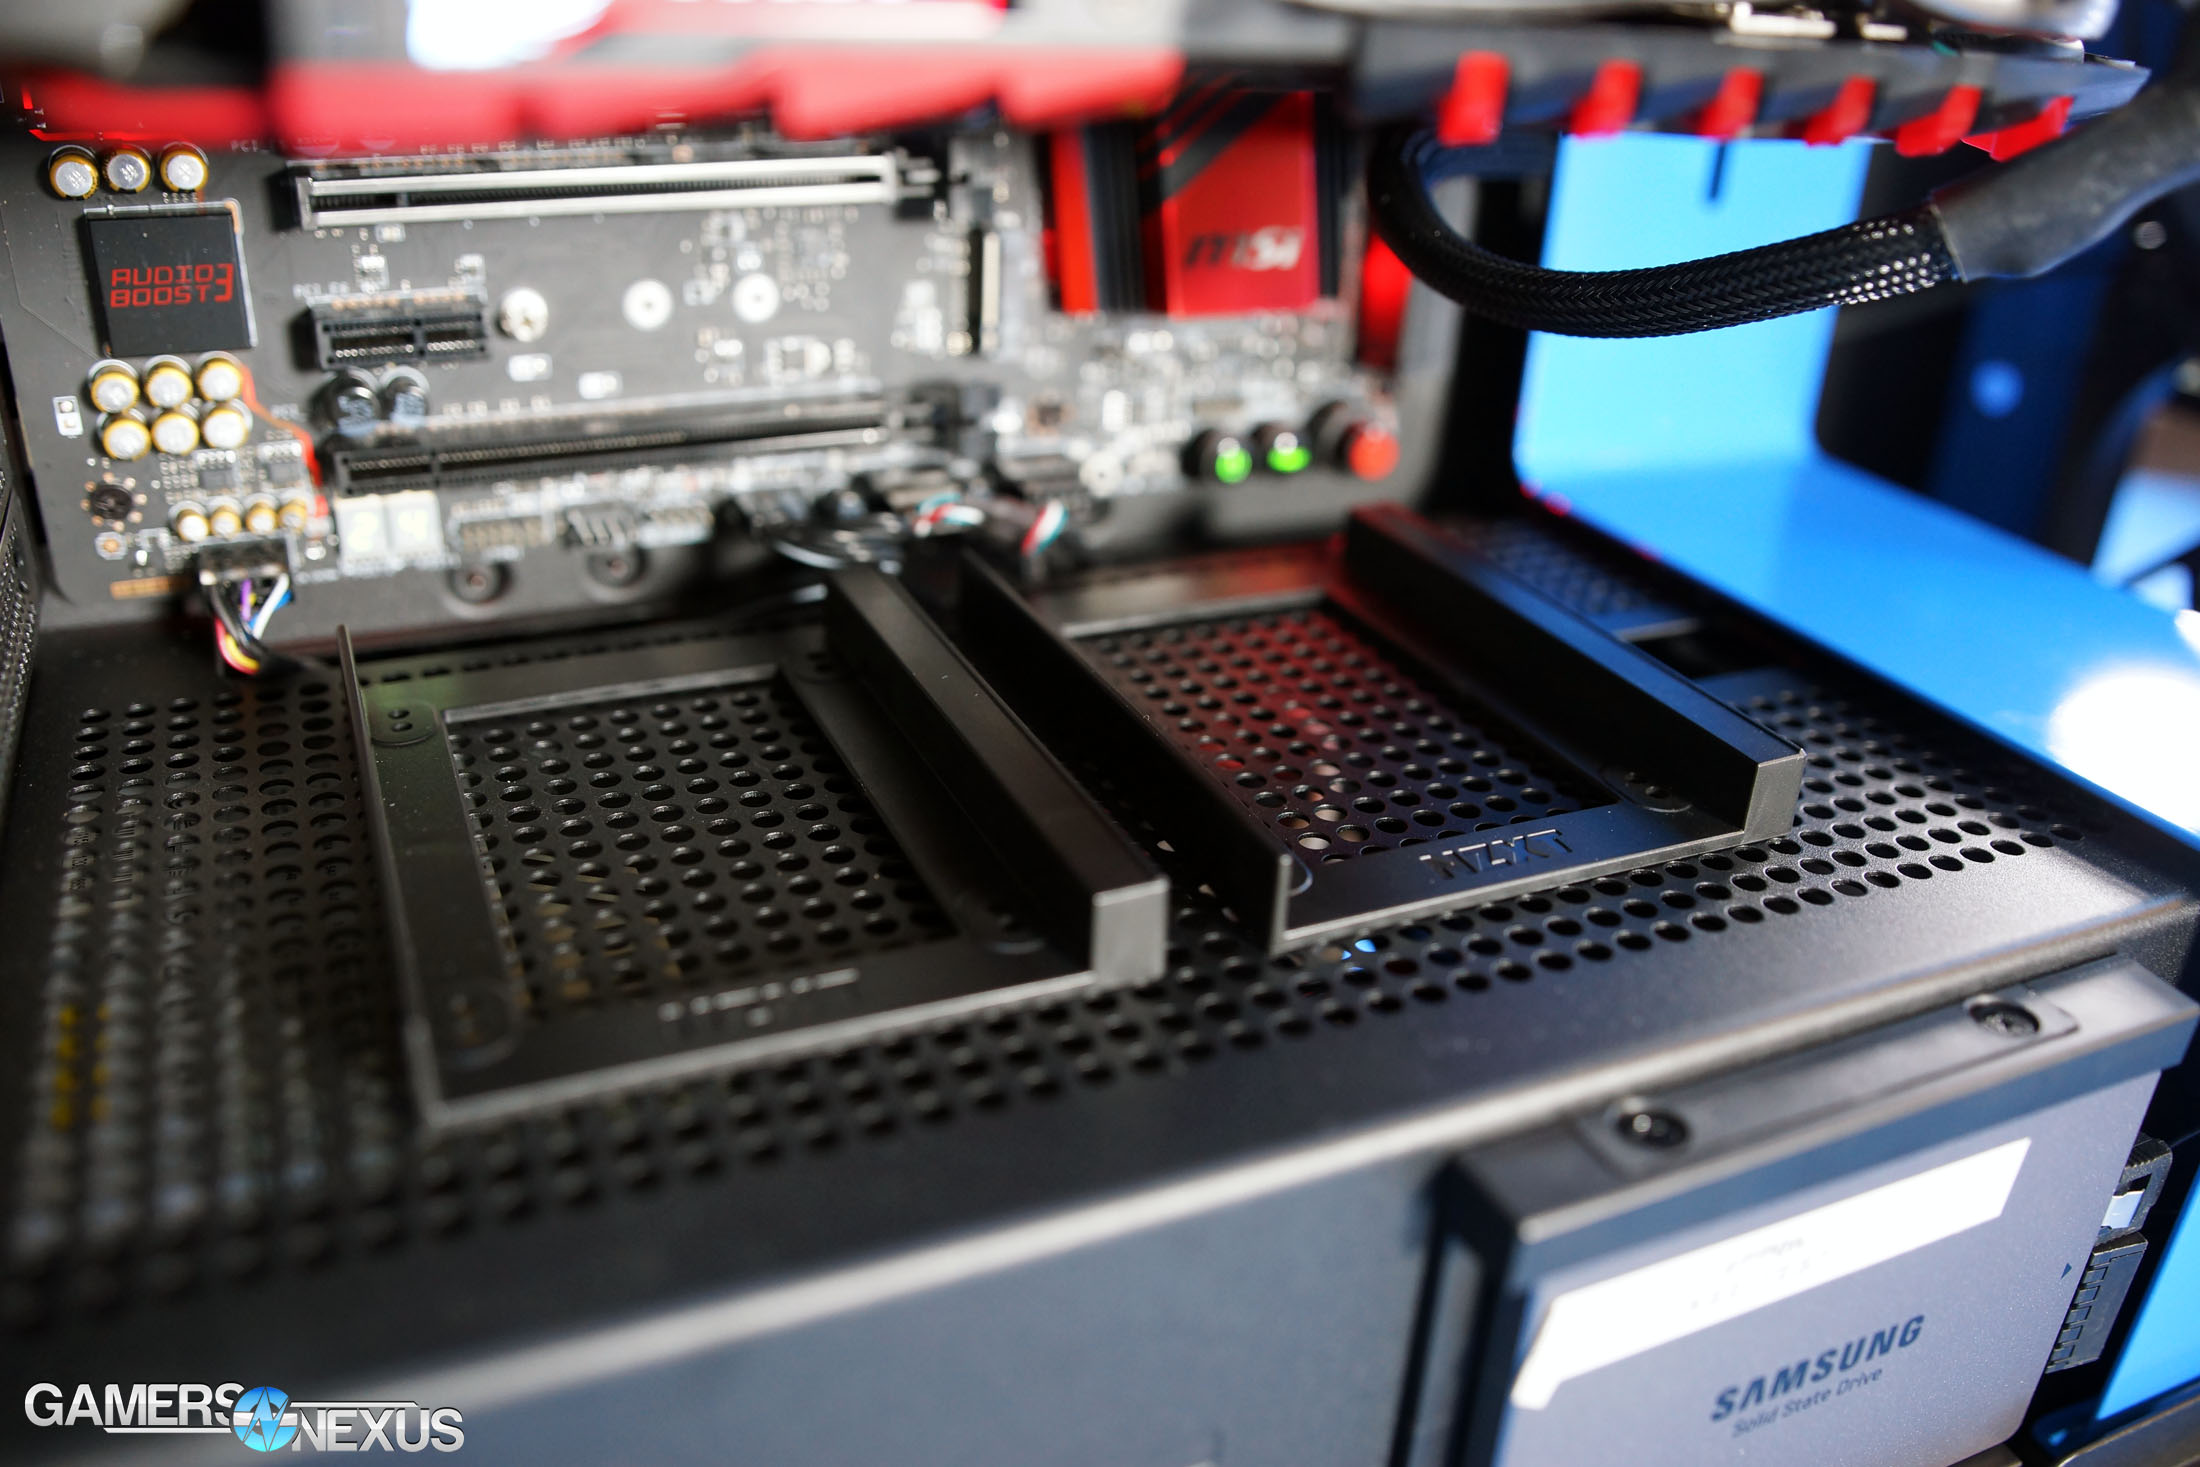
The PSU shroud is heavily vented. Whereas the S340 had some angled vents cut into the shroud to scoop air from the lowest intake fan into the case, the H700i simply has a big hole, large enough to allow air to flow freely into the interior of the case rather than the PSU (which can cool itself just fine). In addition, the whole surface of the shroud is perforated, which serves the dual purpose of allowing more air to move through the bottom of the case and providing mounting points for the SSD trays.
There are three 2.5” bays included with the case that can snap into the front or top of the PSU shroud with spring-loaded catches, as well as two more standard screw-in bays behind the motherboard. Two 3.5” bays are stacked on top of each other underneath the shroud, and one or both can be removed.
Smart Device
(Section by Patrick Lathan)
The smart device is a major selling point of the H-series, and presumably makes up a good chunk of the $200 price. It’s hard to tell how much, since it isn’t sold separately, but it combines functions of NZXT’s Grid+ and HUE+ controllers, each of which go for around $30.
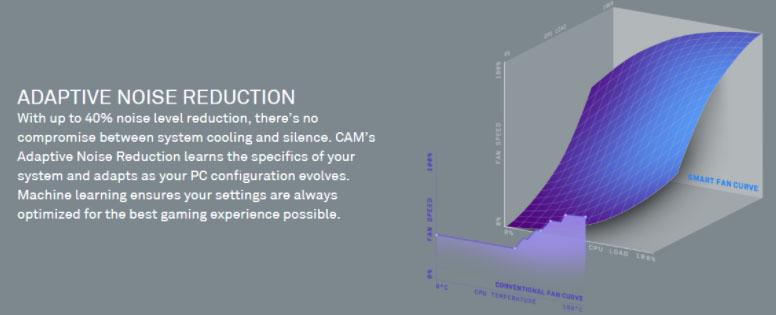
It controls one channel of lighting (with individual control over each LED) and three channels of fan speed via the familiar CAM interface, and introduces the new “Adaptive Noise Reduction” feature. This is intended to use machine learning to find the optimal noise/cooling balance, the results of which we’ll discuss below.
What does it mean?
There are no external fan or lighting controls built into the case, which means functionality is dependent on either using CAM or plugging everything into the motherboard and ignoring the smart device. We had to choose the second option for our thermal testing, because after setting a fixed 100% profile in CAM, fan RPM would abruptly drop for no reason within ten minutes. The login prompt on the smart device tab (logging in is necessary for adaptive noise reduction but not lighting or fan control) is placeholder text in the publicly available non-beta version we used for testing, and the app gives the overall impression of being a work in progress. That’s not the kind of impression that a computer case should give.
Not So Smart
(Opinions by GN’s Steve)
In reality, the Smart Device is a tragic addition to an otherwise phenomenal case. NZXT has taken the core competency of a case company -- making a box to put a computer in -- and has overreached in desperate attempt to further integrate the controversial CAM software into yet more devices. The software isn’t even complete -- this is what happens when accessing the smart device page when not logged in:

And that’s just one, insignificant piece.
To explain how the smart device works, because NZXT’s UI & UX trips over itself during the explanation, it’s something like this:
- Stage 1: You calibrate idle performance (acoustic vs. thermals), after which CAM prompts the user to play a game.
- Stage 2: CAM hasn’t told you to stop playing the game and hasn’t told you to move on to the next step -- it just does, which is “calibration.” You should close all other applications during the calibration phase. CAM fires-off its own CPU stresser (without telling you) and modulates fan RPM response to determine the best curve. Allegedly.
- Stage 3: The final stage, and the one where your new fan curve is tested.
Here’s the thing, the stages work like this:
Idle: Idle performance is only measured when CPU load is between 0-10%. If you’re at 11%, the program freezes and waits til you’re below 10%.
Load: The software analyzes load performance only when between 35-65% CPU load. It does not work outside of this range.
Stress: Above 90% only.
Here’s the trouble, then: During one stage of the software, we ended up stuck (waited more than 2 hours) until human interference, because CAM was generating an 80% load. 80%, as you may have noticed, is neither between 35-65% nor above 90%; it falls outside of all measurable, acceptable ranges by CAM. Further inspection revealed that Windows and other applications (monitoring utilities, for one) would generate another 10% of load. In those few, scattered instances, the CAM software would progress -- 80% CAM load + 10% Windows/background load would get us over 90%, and so count toward calibration.
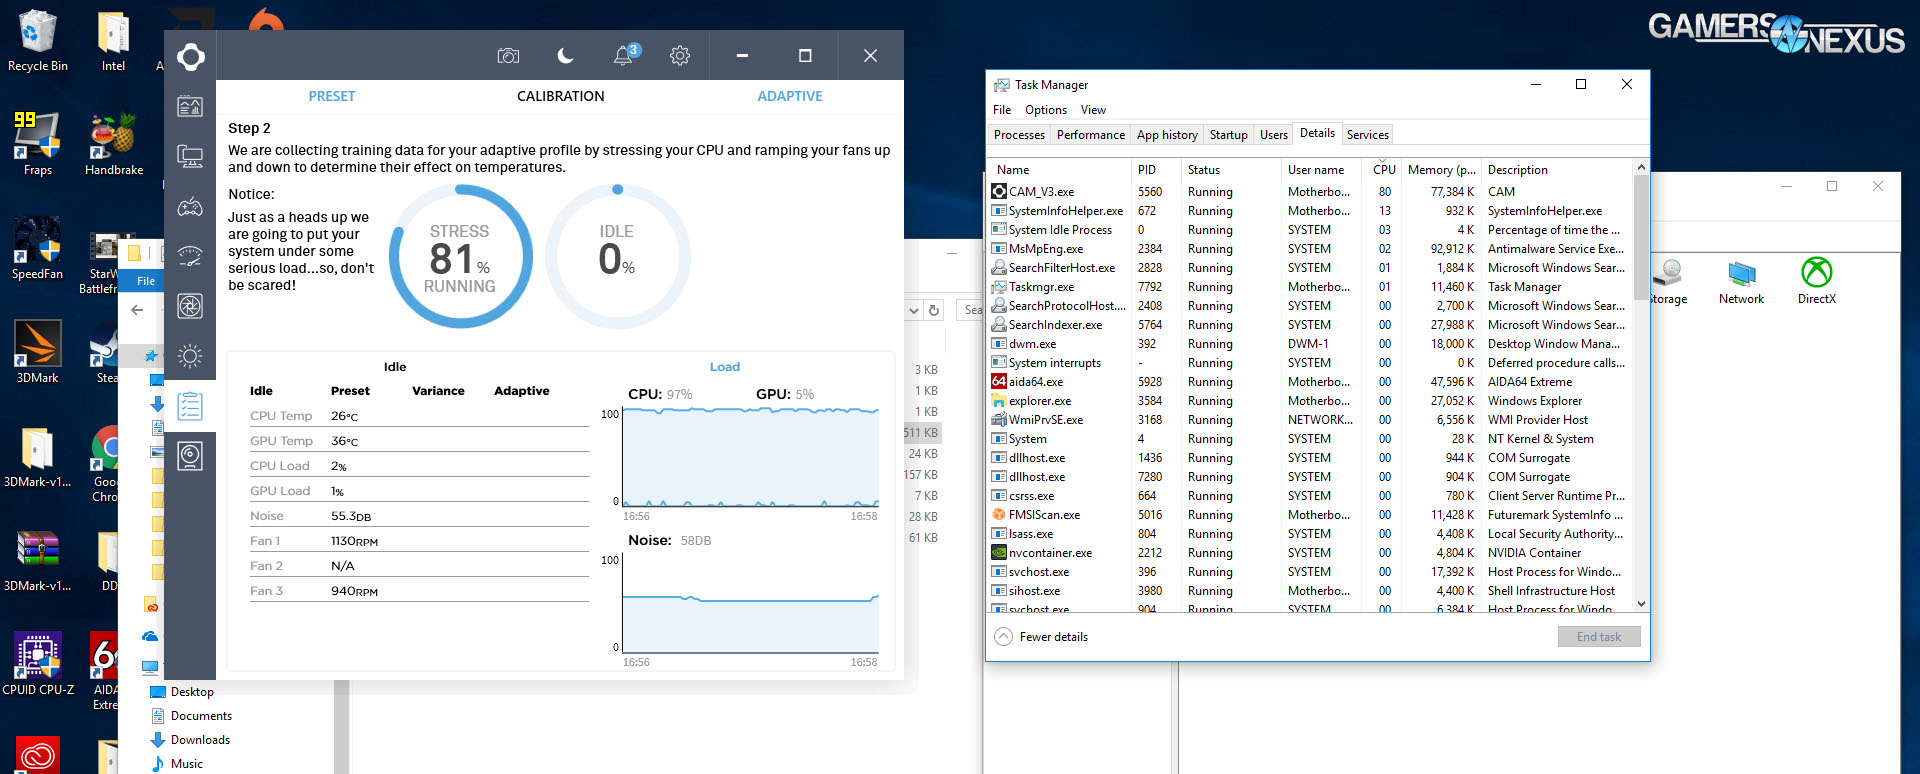
Above: It started making some actual progress once SystemInfoHelper pitched in. Until then, we were at 80% from CAM, and that was about it -- no progress.
In other instances, comically, CAM would sit at 6-8% utilization during the idle test period -- this was coupled with Windows processes and services, obviously, which combined to ~11-13%. By CAM’s definition, that’s not idle. This is on a 6700K, mind you.
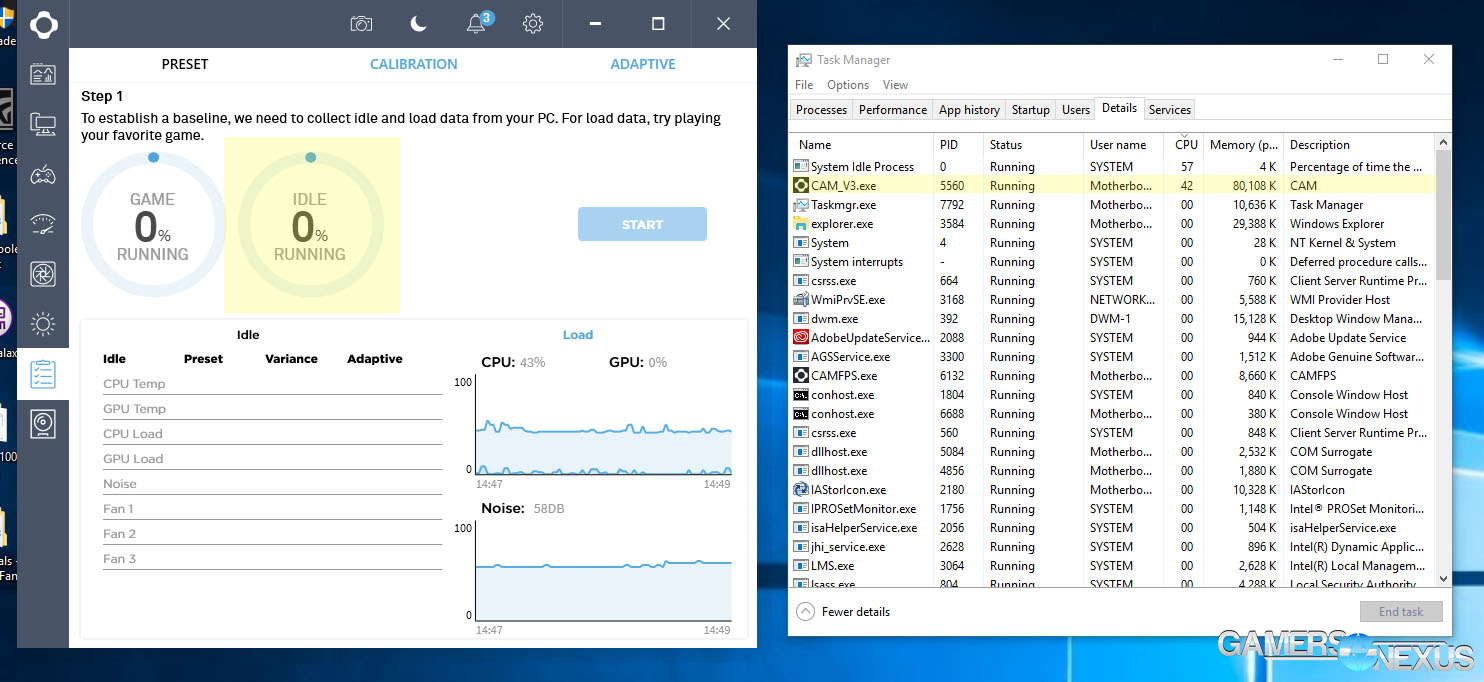
Above: CAM is running an "idle" test. It's also consuming 42% of the CPU, and so it can't progress in the idle test.
To get the smart device to properly work, we had to sit there and manually open or close software based on stage (and the stage doesn’t tell you if it’s currently checking for “load” or “stress” -- you just guess). All totaled, we spent about 6 hours on this “smart” fan curve, something that we could have configured more competently in less than 30 minutes, cloud or not.
In testing, the smart devices get a big, fat “DNF”: It did not finish any testing in the 6 hours of on/off time we allotted it before giving up on the feature. Instead, we used our normal testing approach, bagging the smart device and writing it off as a poorly implemented, overreaching attempt at doing something genuinely unique; instead, NZXT should have focused on what it does well, which is nearly every single other feature of this case. That’s all tragically and woefully overshadowed by known-buggy CAM software (with placeholder text, no less -- fitting of a $200 purchase), and by a dysfunctional machine learning wannabe.
Case Testing Methodology
We tested using our new Skylake case test bench, detailed in the table below. This particular configuration is brand new with the launch of the 570X & 270R. Results on this test platform cannot be compared to previous case benchmark results, as the platform has completely changed.
Conducting thermal tests requires careful measurement of temperatures in the surrounding environment. We control for ambient by constantly measuring temperatures with thermocouples and laser readers. We then produce charts using a Delta T(emperature) over Ambient value. This value subtracts the thermo-logged ambient value from the measured diode temperatures, producing a delta report of thermals. AIDA64 is used for logging thermals of silicon components, including the GPU diode.
All case fans are manually configured to their maximum throughput using BIOS, then we configure to an RPM closer to 1050 for a universal "quiet" testing. If a fan controller is present, we opt-in and test on multiple settings. This forces testing of case fan performance in addition to the case's air channeling and airstream design. This also ensures minimal variance when testing, as automatically controlled fan speeds can reduce reliability of benchmarking. The CPU fan is set to 1100RPM (constant) for consistency, and the CPU is overclocked to 4.4GHz with a vCore of 1.272V (constant). C-States and power saving states are disabled.
| Component | Courtesy Of | Price | |
| Video Card | MSI GTX 1080 Gaming X (OC Mode) | MSI | $640 |
| CPU | Intel i7-6700K @ 4.4GHz | GamersNexus | $300 |
| CPU Cooler | MSI Core Frozr L | MSI | TBD |
| Motherboard | MSI Z170A Gaming M7 | MSI | $180 |
| Memory | Corsair Vengeance LED 32GB 3200MHz | Corsair | $200 |
| SSD | Samsung 850 EVO 120GB | Samsung | N/A |
| PSU | Corsair RM650x | Corsair | $100 |
| Case | This is what we're testing! | - | - |
The video card is configured to run at 55% fan speed at all times.
Prior to load testing, we collect idle temperature results for ten minutes to determine the unloaded cooling performance of a case's fans and air channels. Thermal benchmarking is conducted for 1400 seconds (23 minutes), a period we've determined sufficient for achieving equilibrium. The over-time data is aggregated and will occasionally be compiled into charts, if interesting or relevant. The equilibrium performance is averaged to create the below charts.
Load testing is conducted using Prime95 LFFTs and Kombustor “FurMark” stress testing simultaneously. Testing is completely automated using in-house scripting, and executes with perfect accuracy on every run.
We recently validated our test methodology using a thermal chamber, finding our approach to be nearly perfectly accurate. Learn more here.
Thermals & Noise
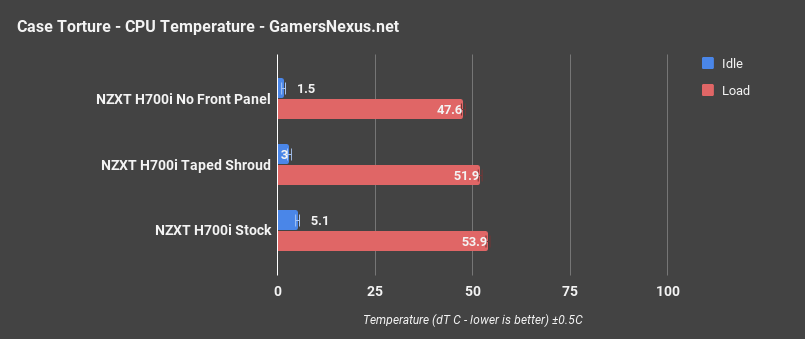
NZXT H700i Only: CPU Torture Comparison
NZXT H700i CPU Torture Thermal Benchmarks vs. H500P, S340 Elite, RL06, More
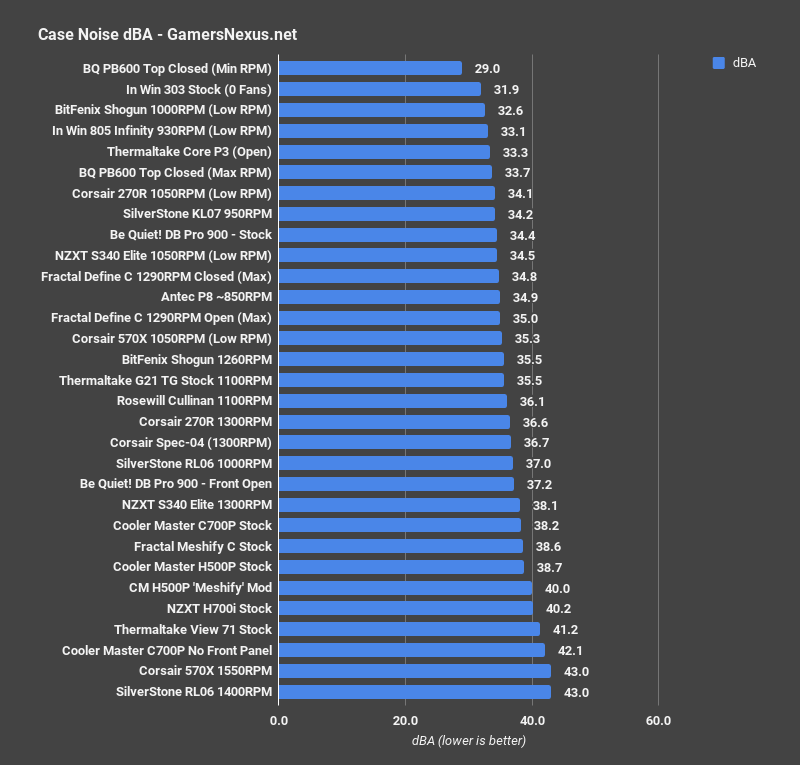
Starting our testing with only the H700i benchmarks, the stock case operates at 54C delta T over ambient. Removing the front panel entirely only reduced temperatures by 6.3C. This shows that, relative to what its fans are capable of, NZXT is relatively close to its maximum potential with its current panel design. The only way to significantly improve would be mesh, clearly, but the side intakes are wide enough to breathe, and the interior of the front panel is bezeled in a way that gives the fans some additional room to circulate air. For perspective, our mesh mod of the H500P allowed us to drop about 6-8C off the stock temperatures, so NZXT’s case is right in-line with that fixed variant.
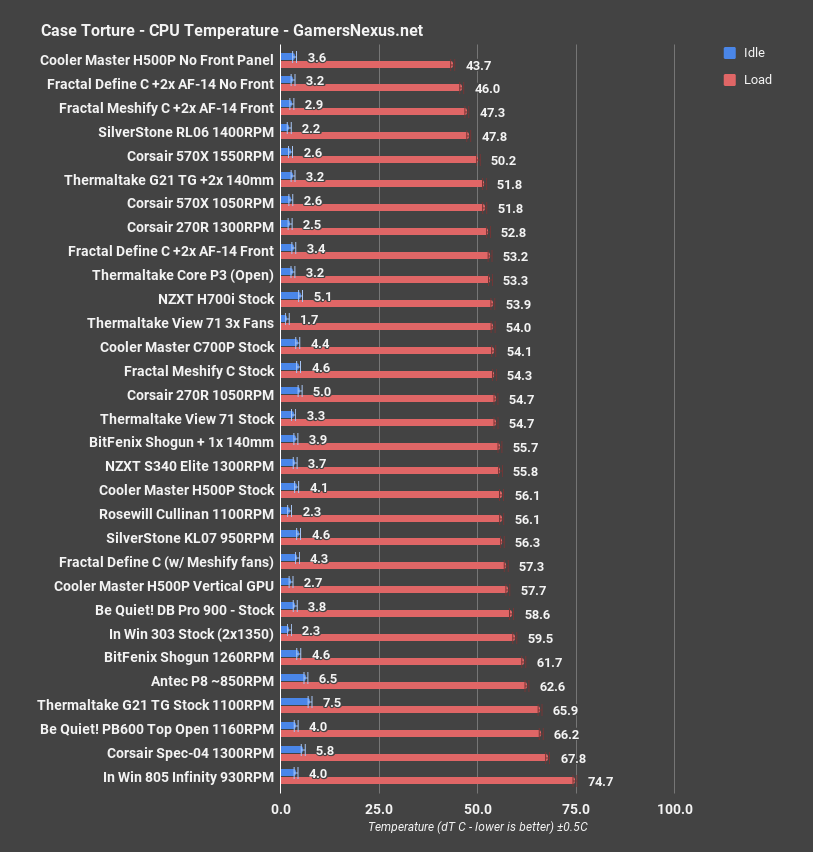
Comparatively, torture test thermal results position the stock H700i toward the top quarter of cases, functionally equivalent to the Thermaltake View 71, CM C700P, and Core P3. We’re at about 54 degrees Celsius over ambient with the H700i, about 6-7 degrees warmer than the SilverStone RL06 Chart Champion. Adding two AF-14 fans to the Meshify puts it atop the charts. Again, these are additions, not stock configurations – but show the potential of a mesh design. As shown in the previous chart, NZXT has done well to get close to its maximum cooling potential when eliminating the front panel, a far cry from the 10-12C gap of the panel-less H500P. The H500P operates a 56.1C CPU load temperature here, over ambient, but drops to become the coolest case on the bench when its front panel is removed – down to 43-44C. That’s the difference of panel design. NZXT’s H700i, although not claiming to be a high-airflow case like the H500P, does manage to leverage most of its front fan cooling potential with the bowed-out interior of the front panel and wide intake meshing.
NZXT H700i Only: GPU Torture Test
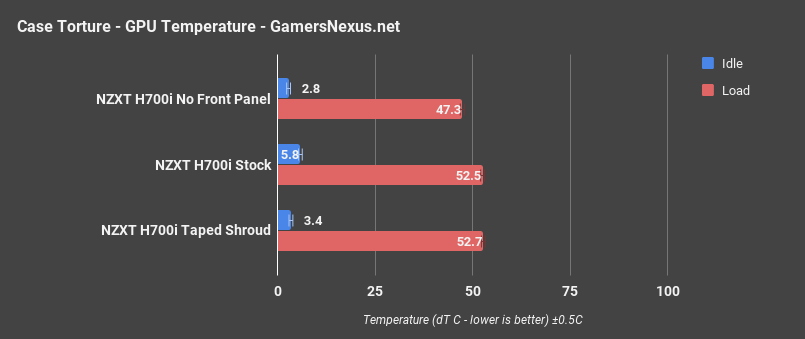
For GPU thermals, we start with torture thermals consisting only of the H700i. The case exhibited only a 5-6C reduction from removing the front panel, and taping over the PSU shroud’s ventilation did not create any meaningful change in performance.
NZXT H700i GPU Torture Comparison
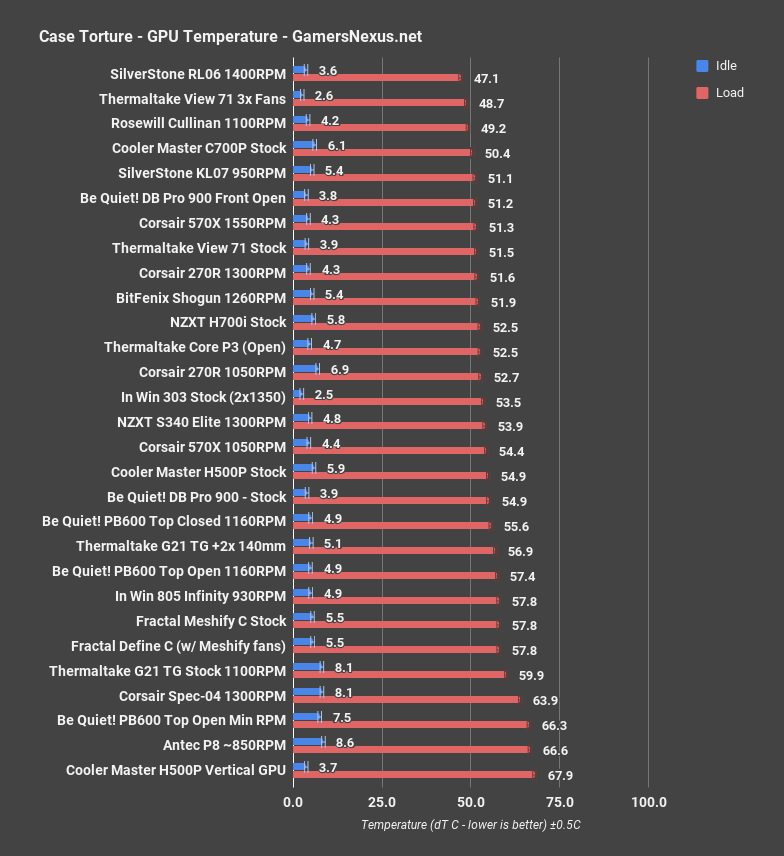
GPU temperatures are also comparatively good-to-average, depending. The H700i is positioned at about 52.5C delta T for the GPU temperature, positioning it between the Shogun and S340 Elite. We already know that the venting in the PSU shroud isn’t directly beneficial to our GPU thermals with this card, but it could help with other devices, and will certainly aid in hard drive cooling and overall airflow throughout the case. No need to fully compartmentalize the PSU and its cables.
NZXT H700i 3DMark Benchmark

3DMark has the H700i toward the top of our newer benchmarks, operating at 53.7C GPU temperature during the gaming simulation, or 27C CPU temperature. This positions it in second for our new 3DMark test.
NZXT H700i Blender Benchmark


Blender provides a real-world rendering test. For Blender rendering on the CPU, our CPU temperatures land at 37.6C for the H700i, ranking it fourth, with the P3 and View 71 functionally equivalent in performance. The RL06 maintains its first-place lead.
GPU rendering has the H700i in second, behind only the RL06, and shows everything operating well within acceptable conditions.
NZXT H700i Noise Test
Total system noise is expectedly uninteresting, with the H700i toward the worse end of our chart. The case roughly matches the GN Meshify version of the H500P, marked at 40.2dBA for total system noise. This is the result of sticking four fans into a case and opening-up airflow a bit.
Conclusion: Make It Dumber
(Opinion section by GN’s Steve)
The NZXT H700i is a brilliantly designed, well-executed case which is brought down by its attempt at expanding the case’s purpose horizontally. The case tries to be more than it is, or ever can be. The fact of the matter is that this case, no matter how smart it is, will almost assuredly not know better how to configure a GPU fan curve than the stock VBIOS (unless the manufacturer of the card is incompetent), and it’s probable that the user could more quickly configure a system-wide fan curve than the smart device. Even if the thing works properly and finishes within its one-hour target window, which it doesn’t, we’d be able to get it all configured in thirty minutes. And it’s be custom-tuned to that user.
CAM does some pretty stupid things, like throw arbitrary errors about system component temperatures which are completely acceptable:
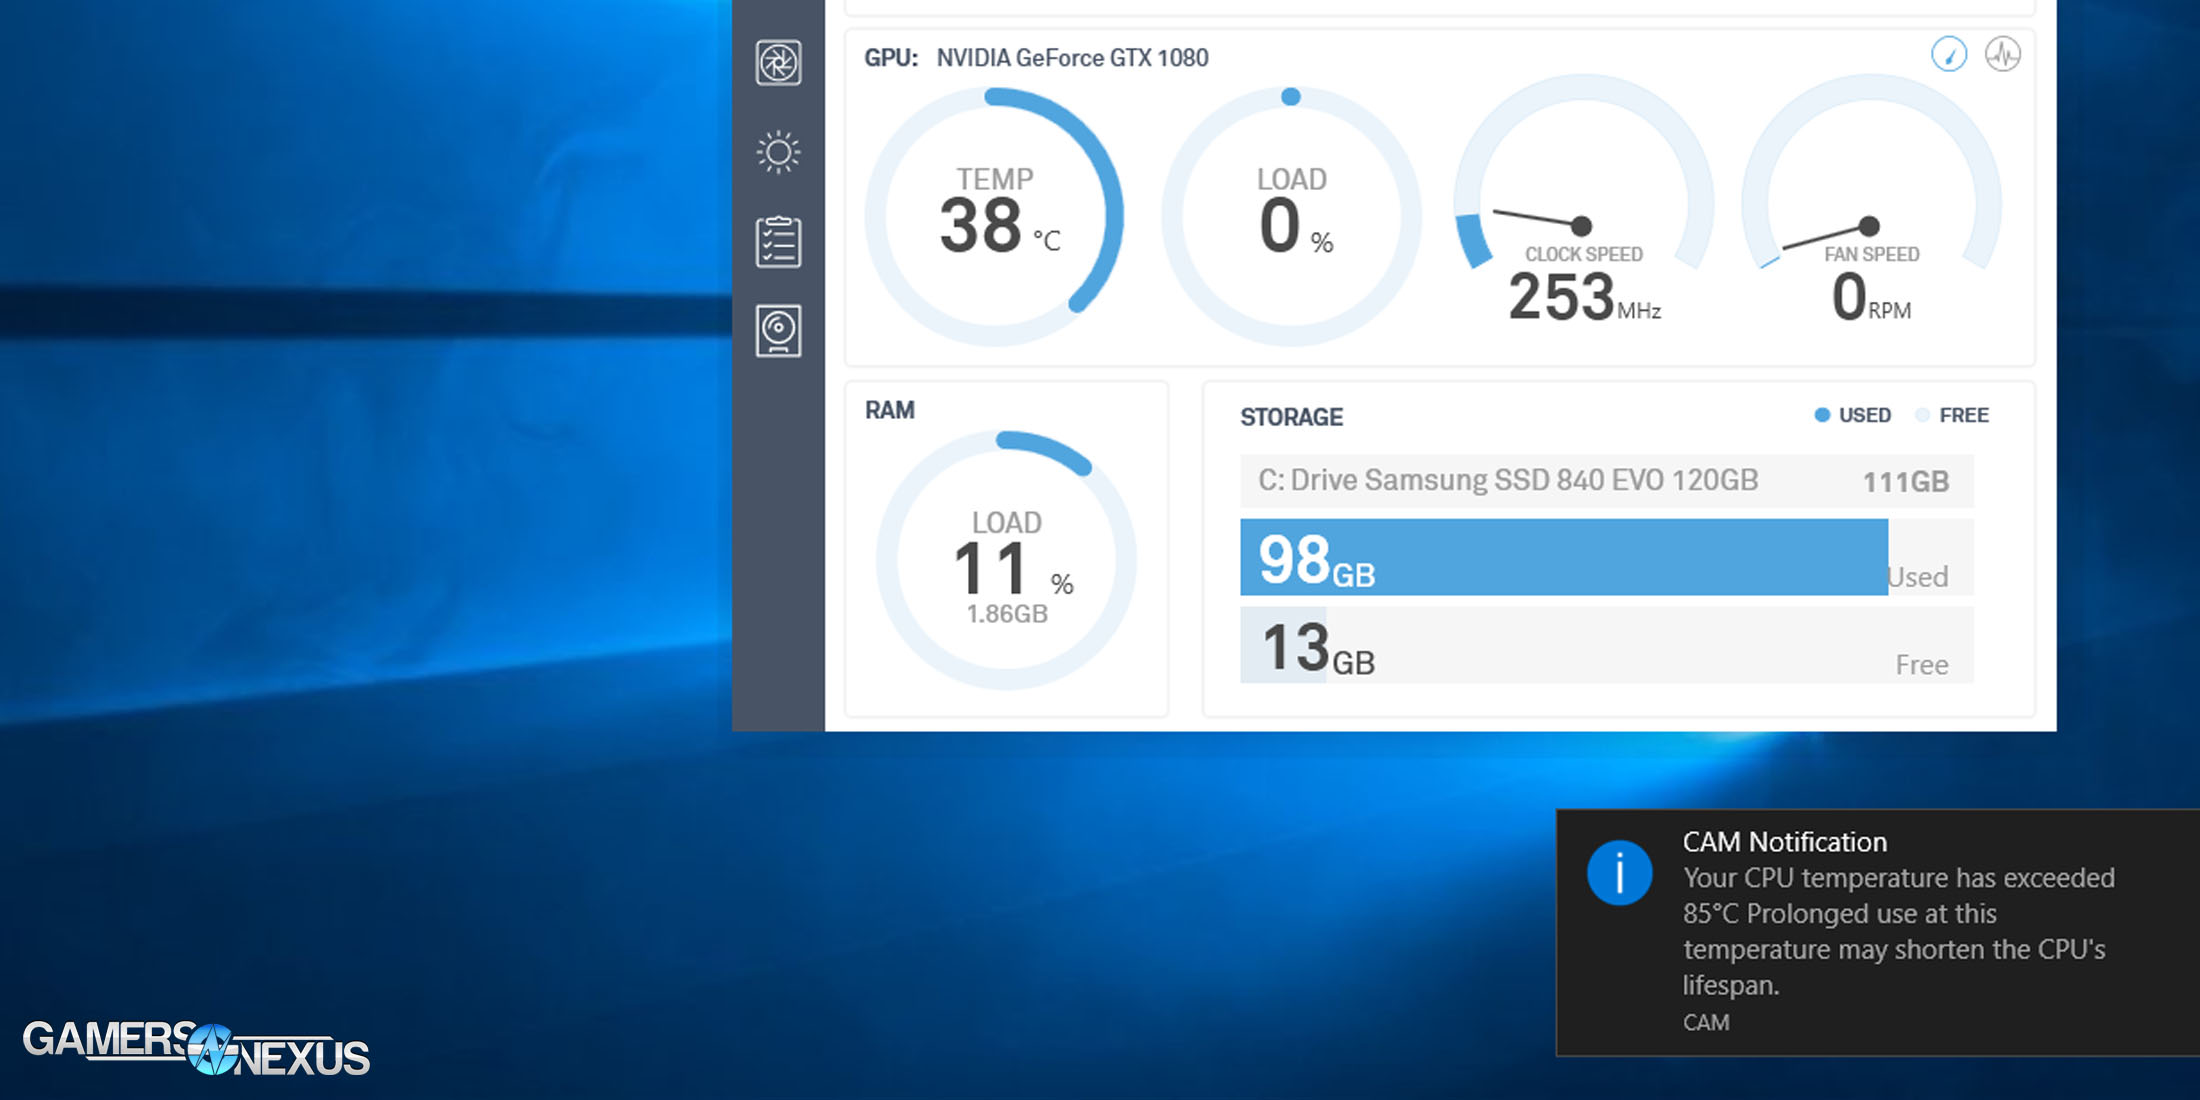
It’s as if no research went into the warnings, and if a company can’t recognize that 85C is a perfectly acceptable operating temperature for an LGA115X CPU, we’re not sure that we trust them to recognize a good fan/temperature curve.
Do yourself a favor: Disconnect the smart device, plug everything into the motherboard, and do it yourself. It’s a frustrating, buggy, dysfunctional mess, and should have never been included with the case. The smart device casts a gloomy shadow over an otherwise market-dominating design. NZXT’s designers did well to build a case which brilliantly manages cables, integrates detail-oriented features, and fits together flushly. The rear panel eject button is a small, mechanically rewarding feature that further reinforces this point. The case cools reasonably; it’s not the best, obviously, but it also doesn’t claim to offer “high airflow,” and its panel build quality far-and-away exceeds the recently launched H500P. While beating it, if marginally. Removing the front panel only improves thermals ~6C, which means that NZXT is operating near its maximum cooling potential for the stock fan configuration -- the panel is well-designed and breathes reasonably, considering how the case is marketed.
We cannot say enough good things about the overall build quality and attention to detail within the case; unfortunately, we also can’t say enough bad things about the smart device, which plays the role of foil to the case.
NZXT should drop the smart device, should consider dropping the HUE integration (you already sell a HUE -- why not just keep selling it as an add-on?), and should list the case at $120-$150. At $150, the competition is the CM H500P. The H700i wins every time in that battle.
Editorial, Testing: Patrick Lathan & Steve Burke
Video: Andrew Coleman