Cooler Master’s H500M is the 18th addition to our “Cases Named H500” chart. The H500M was shown at CES 2018, and follows-up the initial H500P, the H500P Mesh, and the unrelated H500 and H500i cases from NZXT. This is Cooler Master’s high-end solution, shipping at $200 and including user-swappable glass or mesh front panels, with the mesh panel pre-installed in a default configuration. Today, we’re reviewing the Cooler Master H500M enclosure.
Cooler Master’s H500M officially launches for product availability to consumers in the second week of June, just after Computex ends, and carries an MSRP of $200. For clarity, this is a different product than the H500P Mesh that we previously reviewed, although it does ship with a mesh front by default. The H500M also includes a swappable glass front, and otherwise primarily differentiates itself with additional gloss and ARGB support and controllers.
From the ARGB side, software is still to come, and immediate compatibility includes ASUS motherboards. Cooler Master is working with other vendors on further integration. For our purposes today, we’re more focused on overall build quality and thermal performance; besides, we’ve got Computex and flights to Asia breathing down our necks, so we’ll stick with what we’re good at.
Cooler Master H500M Build Quality
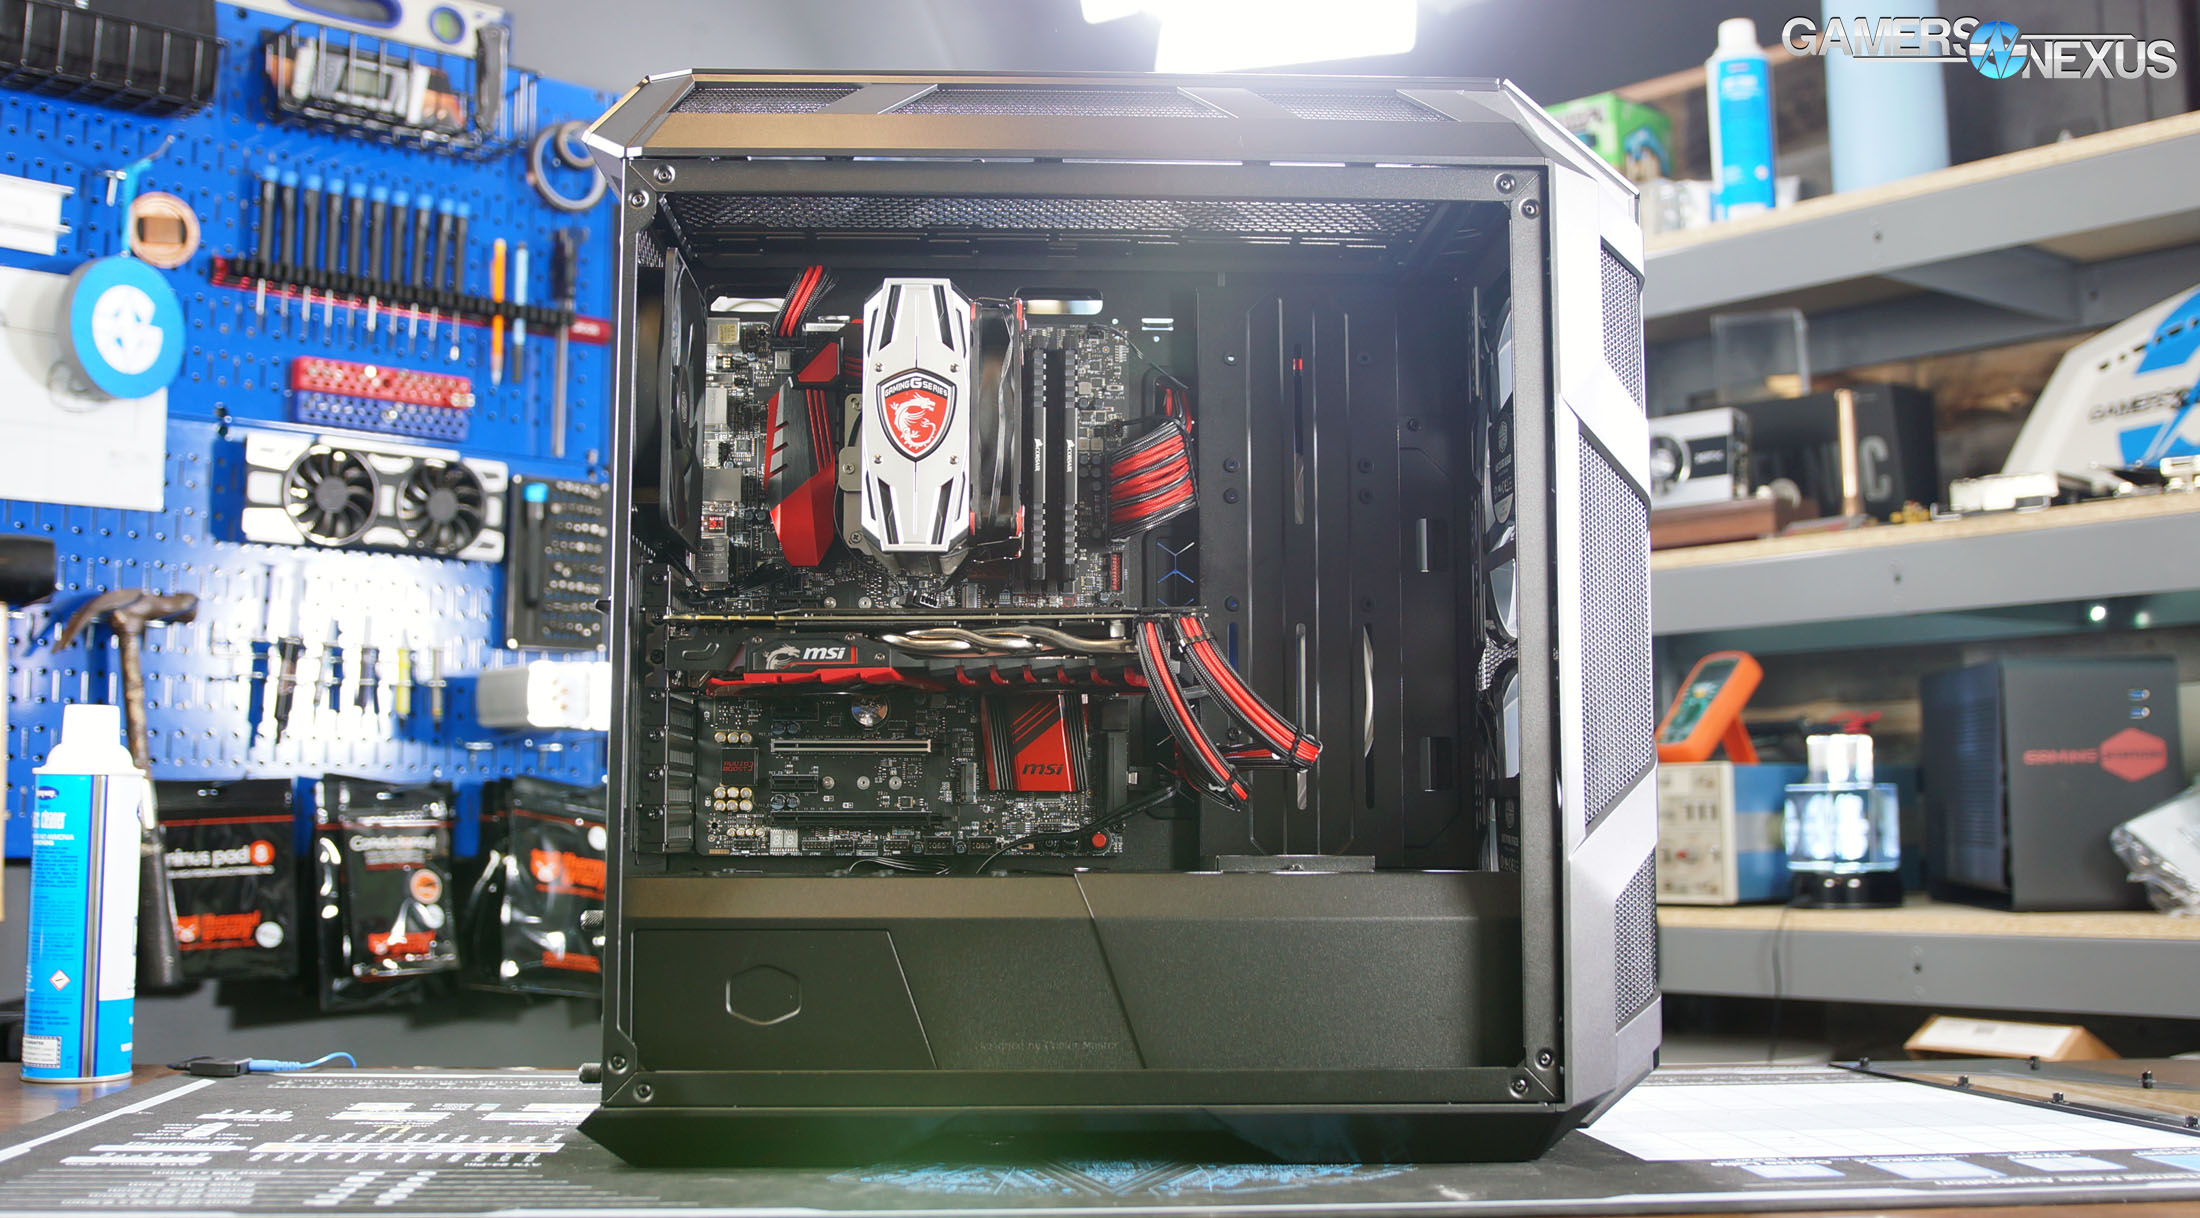
In terms of build quality, the H500M is a mix of the original H500P and the buffed-up H500P Mesh. Both side panels are now tempered glass, whereas the previous rendition of the case used a steel right side panel. Cooler Master has added to its arsenal of steel panel cable covers, including an additional rear-side shroud with an ARGB controller mounted to the panel. Technically, it’d be possible to hide almost every cable in the backside – though we have always found these panels difficult to work with when stacking thick PSU cables, and so typically forgo their use.
Building in the H500M is every bit the same as building in the H500P and H500P Mesh, aside from additional cables for ARGB support and an additional metal shroud. Everything else remains identical. Internally, there’s enough space to trivially assemble a system quickly. The entire PSU shroud is removable now – front and back – and most of the same upgrades from the H500P Mesh found their way onto the H500M. That includes a security screw for the top panel, located in the back, a tightly-mounted front panel, and easier PSU access. Originally, Cooler Master wasn’t sure about how many of these upgrades would make it into the H500M, but it looks like they went ahead and employed most of them anyway. These are all well-implemented features and upgrades over the original H500P, and we think the case remains reasonably accessible while also preventing disintegration in the hands of the user.
We only have a few remaining complaints on the ease-of-use side of things, and those are all easy enough to work around. The side panels still use flathead screws, for instance. This isn’t the biggest problem, but our philosophy is that a case vendor shouldn’t be mandating tools that no other component uses. Not a single other component uses flatheads to install, and so we disagree with this approach. A case’s job is to streamline installation and the build process, and using flatheads is an unnecessary hurdle that could be easily resolved with hand-tight screws or Phillips heads; alternatively, a more unique mounting mechanism could be employable, like the O11 Dynamic’s or the H500 from NZXT.
Not a big deal, though, and certainly not a deal-breaker. Separately, we continue to find the rear cable shrouds more inhibiting to the building process than helpful. They’re not quite forgiving enough to easily fit and route thick cable bundles and require more disassembly to start the building process. Besides, a glass right-side panel is typically desirable to show off excellent cable management or custom sleeving. If the glass side panel is just a window to a bunch of steel plates, there’s really no point – you’re just looking at steel through a glass window. Might as well just look at a steel panel instead, as it’s functionally the same, cheaper, and easier to put together. The case is modular, so the user does ultimately have control over what’s shown, but that modularity isn’t free. All those pieces of steel cost money.
Other key differences versus the H500P Mesh include the front panel, where the interchangeable option influences how that panel is installed. On the H500P Mesh, there’s a full extra inch of front panel mesh coverage over the 200mm fans, whereas the H500M reduces its mesh exposure to the fans by an inch. The H500M’s side panels jut out slightly over the very border of the 200mm fans as a means to help offset the choking effect of glass installed in the front.
Case Testing Methodology
GN Case Testing Bench (Sponsored by CableMod)
| Component | Courtesy Of | |
| Video Card | MSI GTX 1080 Gaming X (OC Mode) | MSI |
| CPU | Intel i7-6700K @ 4.4GHz | GamersNexus |
| CPU Cooler | MSI Core Frozr L | MSI |
| Motherboard | MSI Z170A Gaming M7 | MSI |
| Memory | Corsair Vengeance LED 32GB 3200MHz | Corsair |
| SSD | Samsung 850 EVO 120GB | Samsung |
| PSU | Corsair RM650x | Corsair |
| Cables | CableMod Pro Mesh Cables | CableMod |
| Case | This is what we're testing! | - |
The video card is configured to run at 55% fan speed at all times.
Prior to load testing, we collect idle temperature results for ten minutes to determine the unloaded cooling performance of a case's fans and air channels. Thermal benchmarking is conducted for 1400 seconds (23 minutes), a period we've determined sufficient for achieving equilibrium. The over-time data is aggregated and will occasionally be compiled into charts, if interesting or relevant. The equilibrium performance is averaged to create the below charts.
Load testing is conducted using Prime95 LFFTs and Kombustor “FurMark” stress testing simultaneously. Testing is completely automated using in-house scripting, and executes with perfect accuracy on every run.
We recently validated our test methodology using a thermal chamber, finding our approach to be nearly perfectly accurate. Learn more here.
Cooler Master H500M Benchmark – CPU Thermals (Torture)
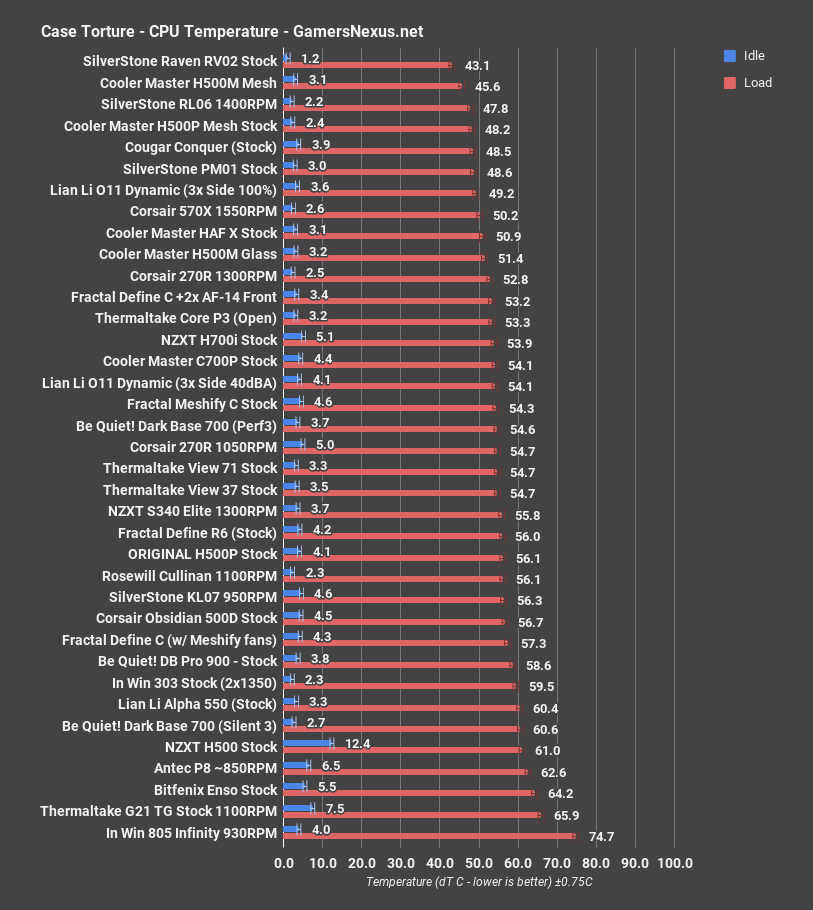
Using our torture test and looking at comparative data, the H500M case performs within 2.5 degrees of the H500P Mesh enclosure, with the H500P Mesh’s CPU temperature at 48 degrees over ambient. The H500M Mesh lands at 45.6 over ambient. We are technically outside of our accepted margin for test error, but when also factoring-in that the 200mm fans were not the exact same make – and therefore have different PWM-to-RPM response – we can say that these two are outside of our ability to determine a meaningful difference.
Comparatively, then, this puts the H500M as between the leading SilverStone RV02 and RL06 cases – a commendable position on the stack. The H500M Mesh is also approximately 10-11 degrees cooler than the original H500P stock case. The H500M with a glass front still operated reasonably, maintaining about 51 degrees over ambient, or comparable to the HAF X. As a reminder, the HAF X didn’t have a fan directly across from the CPU, and so was limited more in CPU cooling abilities than GPU. The H500M Glass versus H500M Mesh differences amount to about 5-6 degrees, significantly better than the original H500P acrylic. We believe this to be a result of the widened side ventilation and the slight front coverage of the new front panel.
Cooler Master H500M Benchmark – GPU Thermals (Torture)
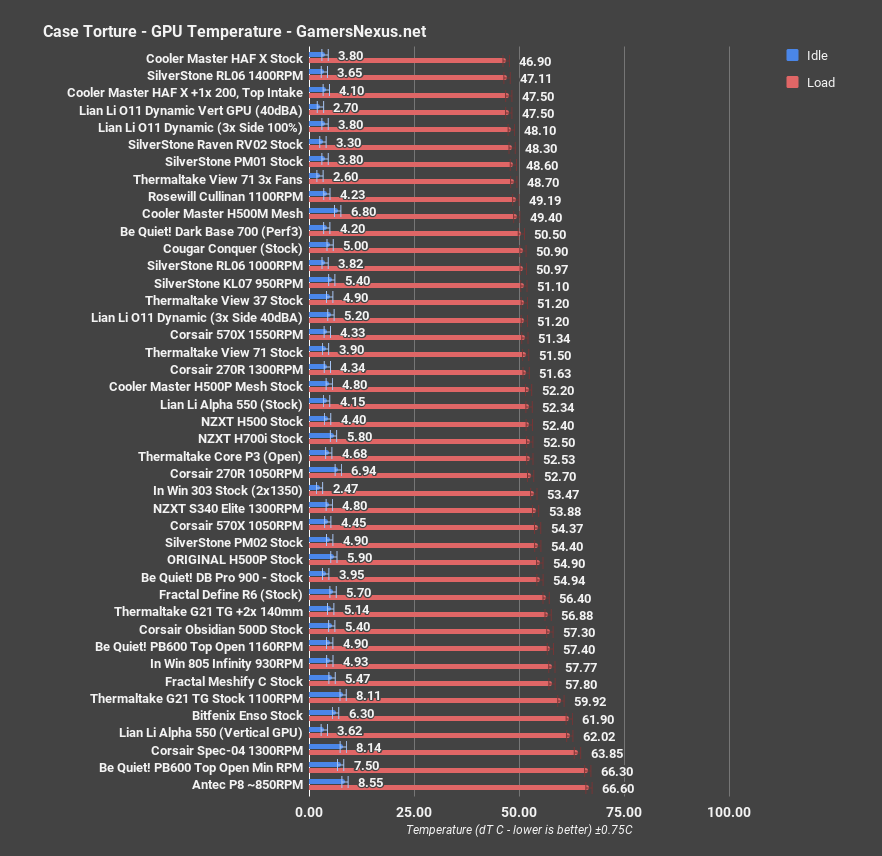
Moving on to GPU thermals in the same torture run, the H500M Mesh operated a 49.4-degree over ambient result, certainly commendable against the stack. The H500P Mesh operated at 52 degrees over ambient, producing a close enough result that we can’t determine how much is attributable to design differences versus fan differences. The H500M Mesh operates similarly to the Rosewill Cullinan, RL06, and View 71 with 3 fans.
Cooler Master H500M Benchmark – 3DMark

For 3DMark, our gaming stand-in, we measured the H500M Mesh GPU temperature at 52 degrees, which places it right around the PM01 and RV02. Considering that the PM01 and RV02 were two of our best-performers ever tested, this is an exceptional result that puts Cooler Master in good standing on the charts. It’s within about 1 degree – our variance – of the H500P Mesh, and maintains rank in the top 5 cases.
Swapping mesh for glass results in a couple-degree increase, as expected, but nothing too dramatic
Cooler Master H500M Benchmark – Blender CPU

For Blender CPU thermals, we measured the H500M Mesh configuration at 37 degrees over ambient during CPU rendering, about 2 degrees warmer than the H500P Mesh. Given that we did not use the same exact fans between the cases, and that we have some tolerance for error, it is difficult to determine whether this 2-degree swing is a result of fan variance or actual panel and case design differences. The H500M Mesh performs similarly to the View 71, Define R6, and PM01 for CPU thermals during rendering. We would consider this to be good overall CPU cooling performance for the H500M.
Cooler Master H500M Benchmark – Blender GPU
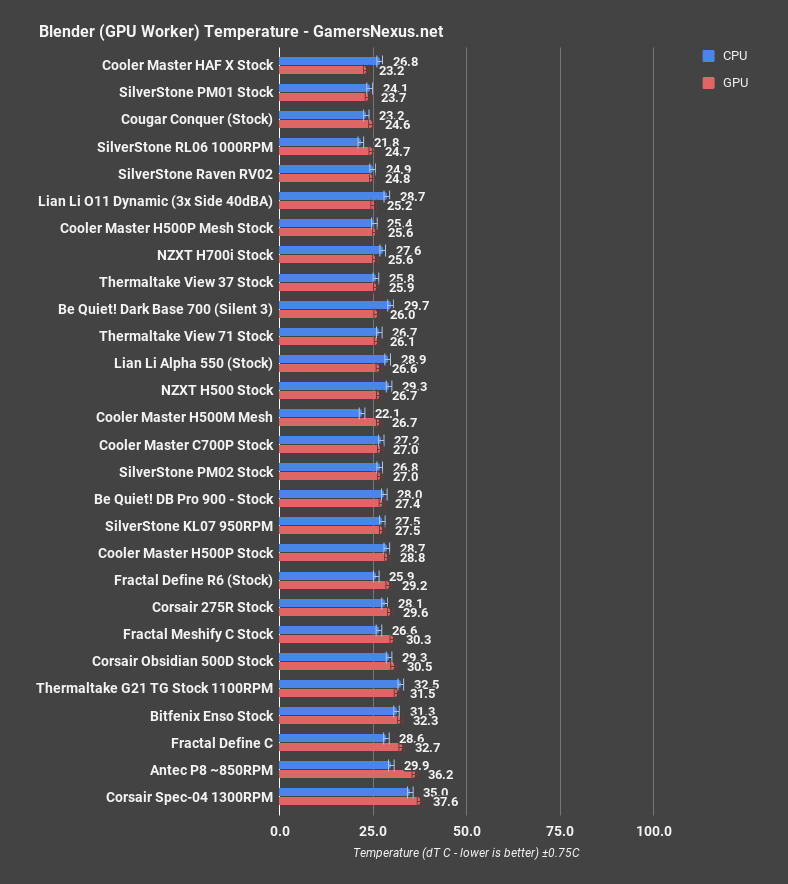
GPU rendering with Blender positioned the H500M Mesh at 30.1 degrees over ambient.
Cooler Master H500M Noise Benchmark
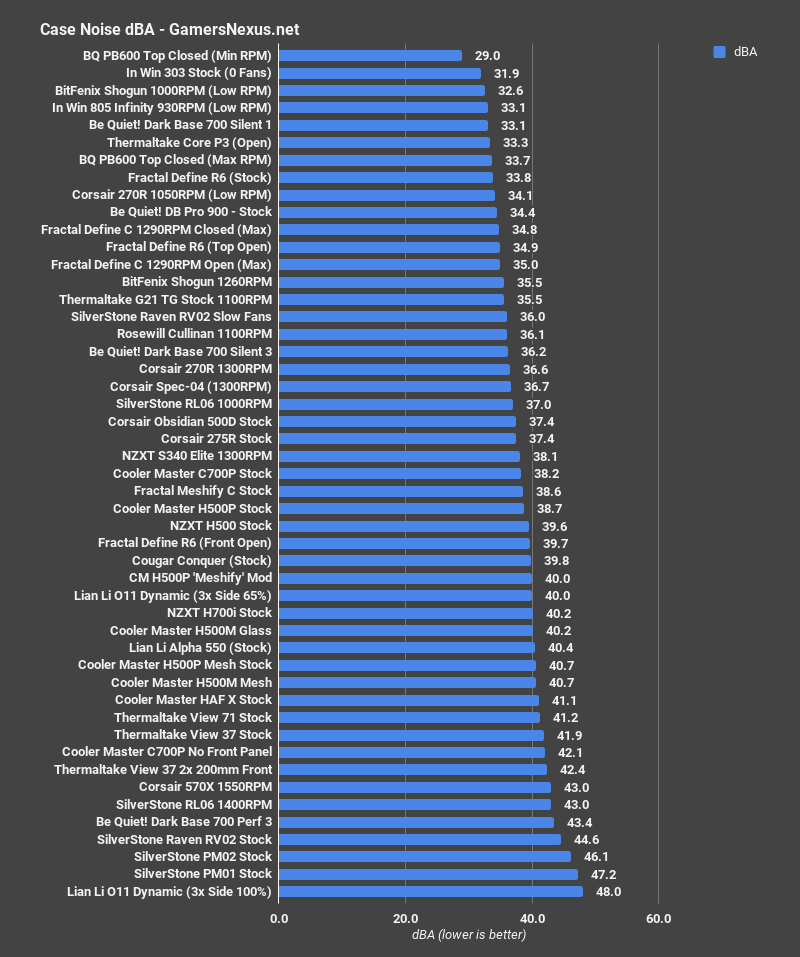
For noise levels, the Cooler Master H500M Mesh measured at 40.7dBA total system noise, equivalent to the H500P Mesh’s 40.7dBA output. Swapping for glass doesn’t change much, producing a 40.2dBA measurement. That lands us as comparable to the stock H700i or H500P Meshify mod that we made last year. Remember, decibels are logarithmic, so every 10-dBA change is roughly perceived as a 2x increase in noise to a human, per sound engineers we’ve spoken with. 3dBA starts to get noticeable. Anything short of that is debatable.
Conclusion
We still really like the H500P Mesh, and we still dislike the original H500P. At this point, the H500P Mesh lands at around $150 and, if you like its look and want 200mm fans, it’s one of the better options at its price point. It’s not really the kind of case where you want to replace the stock fans. They’re expensive, and they’re also half the look of the case. We can recommend the H500P Mesh at its price-point, and have no serious concerns with its overall quality or performance.
That mostly stands true for the H500M, too, as it includes all the same upfits as the H500P Mesh, but also includes addressable RGB LEDs and a swappable glass front. An extra $50 is asking a lot, though. Basically, if you’re uncertain between the two, the question to ask (yourself) is whether you’d pay $50 for more RGB LED controls. If that answer is “uhh, no,” then skip the H500M and get the H500P Mesh or a competitor. We discussed alternatives to the H500P Mesh in our H500P Mesh review. If the answer is “yes,” well, the H500M is a case that has overall reasonable build quality (aside from one panel that squeaks like a Motel 6 bed) and has reasonable airflow.