If you went through our original H500P review and addressed each complaint one by one, the result would be the H500P Mesh, Cooler Master’s new mesh-fronted variant of the (formerly) underwhelming HAF successor. We previously built our own Cooler Master mesh mod, and the performance results there nearly linearly mirror what we found in Cooler Master’s actual H500P Mesh case.
In our Cooler Master H500P Mesh review, we’ll run through temperature testing (thermals), airflow testing with an anemometer, and noise testing. Additional quality analysis will be done to gauge whether the substantial issues with the original H500P front and top panels have been resolved.
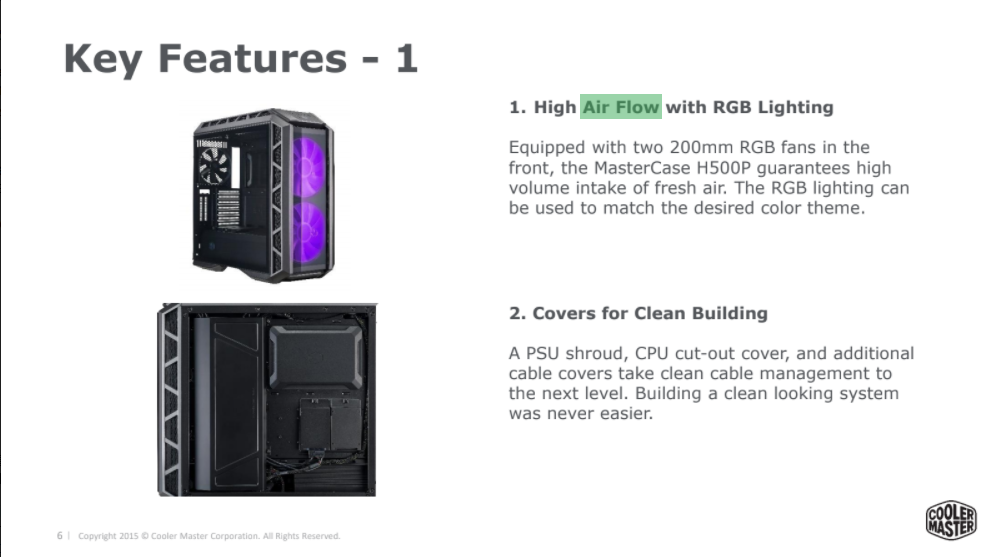
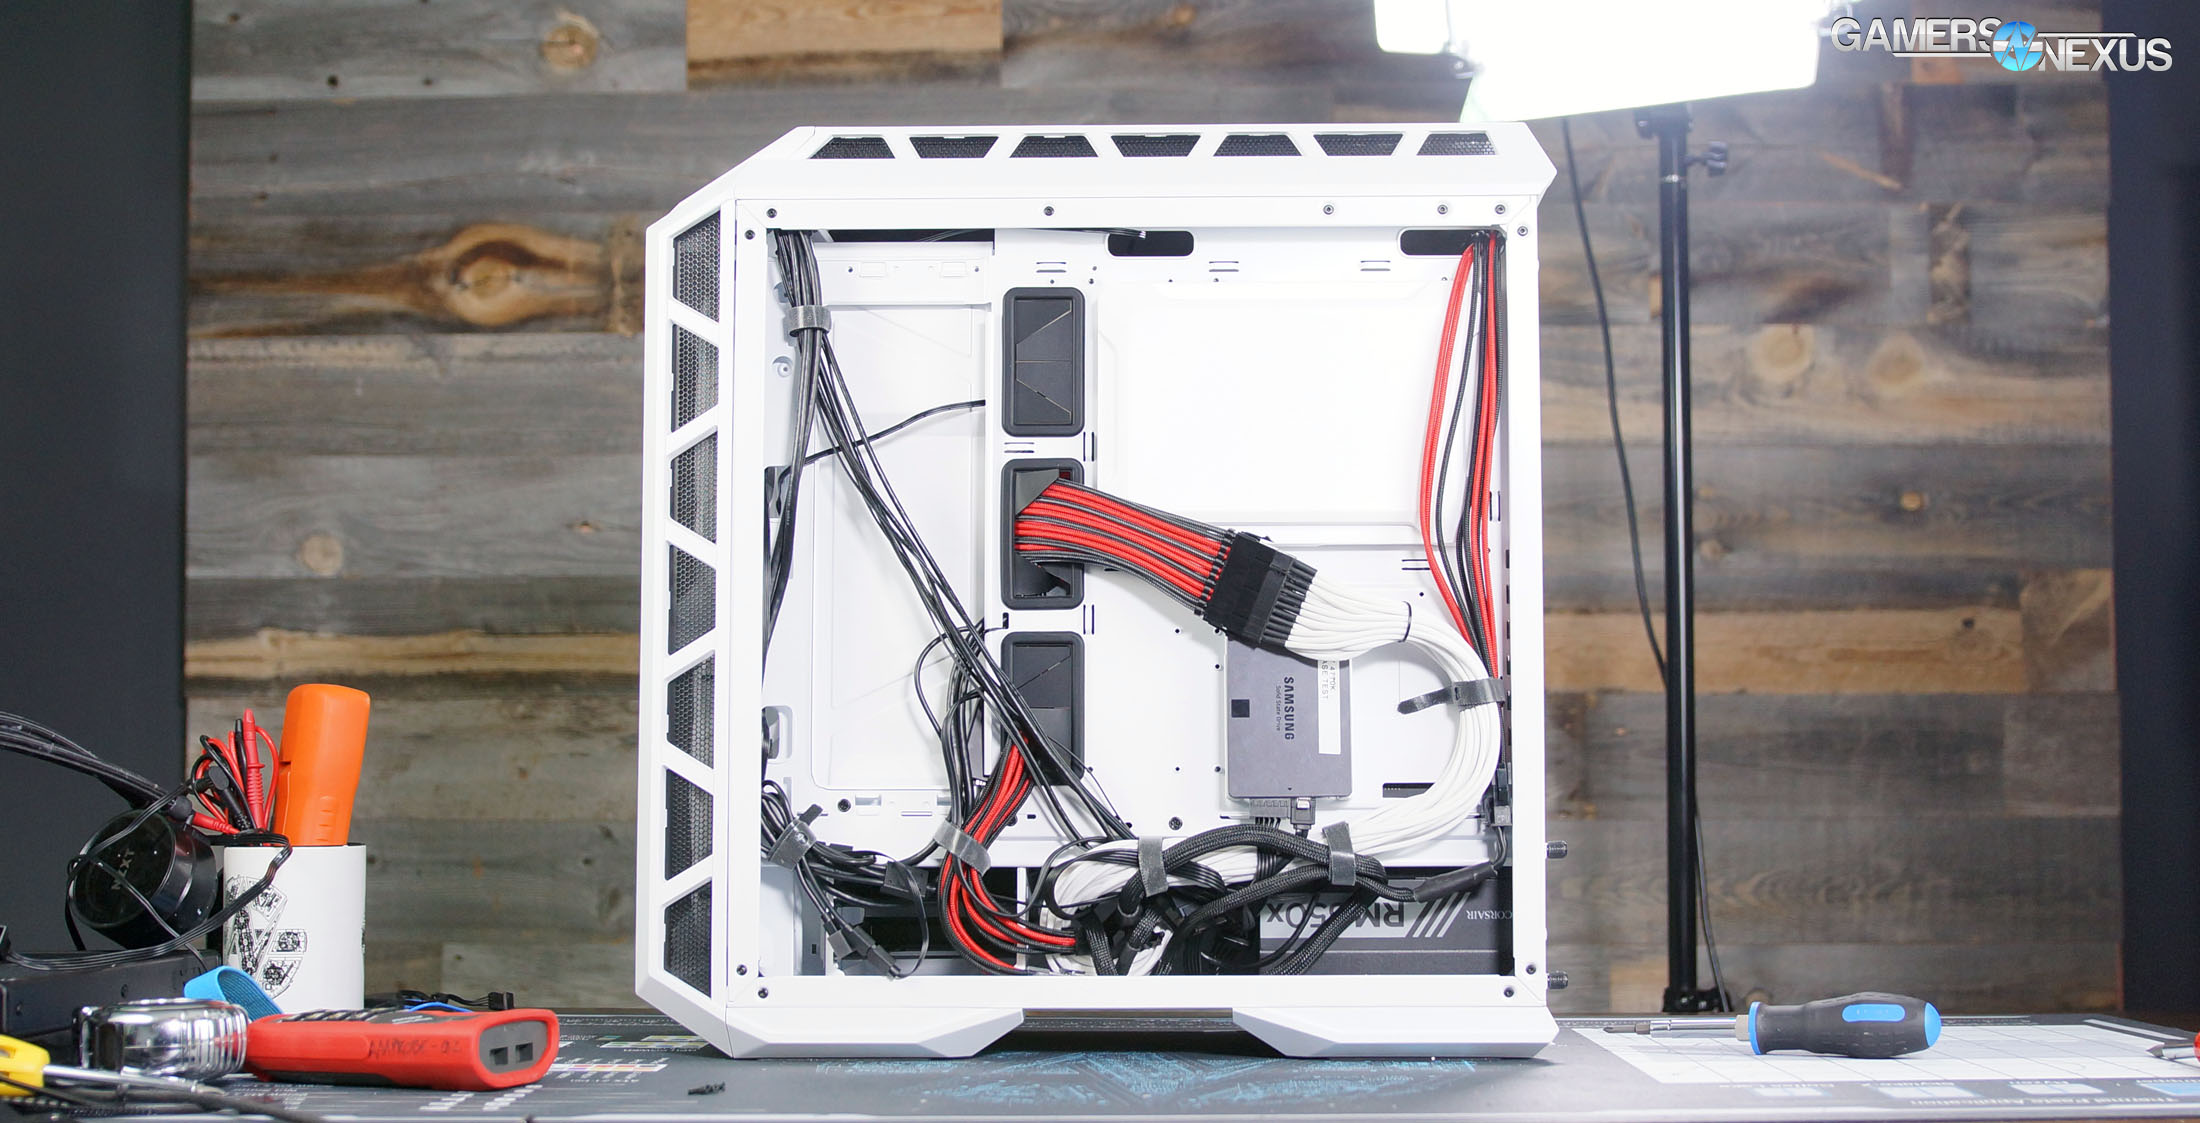
As this case is the same barebones chassis as the original H500P, we encourage you to read that review for more detailed notes on the build process. The focus here is on airflow, thermals, noise, and external build quality or other resolutions. As a reminder, the original marketing advertised “guaranteed high-volume airflow,” and suggested to reviewers that the case was a high-airflow enclosure with performance-oriented qualities. That, clearly, was not true, and was what resulted in the lashing the H500P received. Honest marketing matters.
(Above & Below: H500P original marketing materials sent to reviewers, pre-mesh version).
To quickly recap our CES coverage, we know that: (1) the front panel is now attached via clip, and the front panel also fits on the old case; (2) the top panel is now fixed with a screw, and no longer flies off easily; (3) the PSU is now inserted via cage, and the shroud no longer requires removal; (4) the front is mesh and has a fine dust filter; (5) the glass side panel no longer wobbles. These are the primary changes to the case, and all ones which we pointed out or wanted in our initial review. Cooler Master has theoretically done well to listen here, though we must point-out that we purchased the case ourselves. After our last review, Cooler Master seems to have lost the interest to work with us. We find this deeply disturbing, as it builds an atmosphere of fear where reviewers may become timid to call-out poor products. We bought a $3,000 Titan V, so it should be evident that we have no such concern of buying our own review products or going it alone -- but it is an unhealthy atmosphere to try and shape media coverage by barring critical sites for the process. This is something we will explore in more depth in a separate piece. For today, we’re focusing on the case as a product, not the company as a politicized entity.
H500P Mesh - Problems Solved
Airflow: This is the obvious one, and the results are in the thermal section below. Mesh is what Cooler Master’s fancy 200mm LED fans deserve. The acrylic panel in the front of the case has been replaced by metal mesh with another fine mesh screen backing it, almost exactly the same as in the HAF X that we revisited. The filter layer concerned us, because it’s not strictly necessary and could restrict airflow. We removed it for some thermal tests to see whether it actually does (again, check the section below), but we wouldn’t recommend doing this--it’s glued in place, and it won’t look as good after it’s been peeled off once.
Loose Panels: Everyone that’s followed our H500P coverage has seen the clip of all the panels falling off as Steve picks it up, but that’s no longer an issue. The plastic latches all seem stiffer, and there’s an additional latch at the top of the front panel that must be depressed in order to remove it. If it’s not pressed down, the panel’s locked in place. On the top panel, there’s been a screw added to the back that must be removed in order to take the panel off.
The tempered glass panel is still held in by a rotating latch that functions in the same way, but has been adjusted to hold the panel in place much more tightly. This might be how it was supposed to work all along. We mentioned in the original review that the panel is pressed against the side of the case rather than set into the chassis, and that’s still true, but it was only a concern because the panel was able to rattle side-to-side.
Seems Flimsy: With the age of LAN parties over, the durability of PC cases is mostly a matter of personal perception rather than practicality. That said, the original H500P felt unpleasantly flimsy: the plastic panels were thin and creaked when flexed, the acrylic was thin, and overall the materials didn’t feel like they matched the price. The H500P Mesh replaces one of the acrylic panels with metal mesh, and there’s an additional plastic support behind the front panel.
PSU Installation: This was an annoyance, but one with a clear solution that Cooler Master has now implemented. Installing a PSU originally required unscrewing and removing both sections of the PSU shroud since there’s not enough clearance to slide it in otherwise. That method is still possible, but a removable PSU bracket has been added to the back of the case so that it can be slid in from the back, which only requires undoing two thumbscrews.
RGB Controller: There was no hardware control for the RGB LED fans in the H500P. Users without RGB headers on their motherboard would therefore be stuck. Cooler Master now ships the simplest possible single-button controller that can be plugged into the fans, which is exactly the right choice: it’s not permanently built into the front I/O, it’s cheap, and it provides support for anyone using an older motherboard.
Remaining Problems
The only annoyance that remains from our original H500P coverage is the fact that the side panel must be opened with a tool. There’s just one tiny latch holding it in place, but it’s too tight to be unscrewed by hand. Every time we needed to adjust something for a test, we had to go find a screwdriver or a flat piece of metal. Given how improved the latch is overall, it seems fair to let this one slide. We also dislike that the panel mount only has a single quarter-turn location where it locks, but this isn’t a big deal.
The H500P Mesh isn’t completely meshified, and the acrylic top panel remains basically unchanged: a sealed plastic sheet on top and mesh vents on the sides. In our opinion, this isn’t actually a problem--we’ve seen improvements in the past where sealed top panels encourage a better airflow pattern. The top acrylic actually helps in positive pressure air-only systems, as it prevents (1) leakage of clean intake through the top, prior to reaching the CPU cooler, and (2) recirculation of warmed GPU air into the CPU. This is a performance problem for users planning to install a top radiator or move the 200mm fans to the top of the case, but for anyone on air, it’s better thermally (in most situations) and better for dust management. YMMV depending on configuration.
We didn’t mention it in the previous review, but the cable management bar didn’t do much for us. There is a generous count of cable tie points in the case, but it’d be nice if some of them were on that bar--as it is, it’s much easier to tie cables elsewhere and use other cutouts. We didn’t even use the panel that screws on behind the motherboard tray because, frankly, it’s a pain in the neck. It only really helps if you route things along the bar, and again, there’s not much reason to.
Vertical GPU mounting is still inconvenient with our large GPU and CPU heatsinks. As always, vertical GPU mounts shouldn’t be used with air cooling anyway, because of the limited room between the fans and a glass insulator destroys clock performance. Perhaps Cooler Master is doing everyone a favor by restricting compatibility with the taller PCBs.
Other Changes
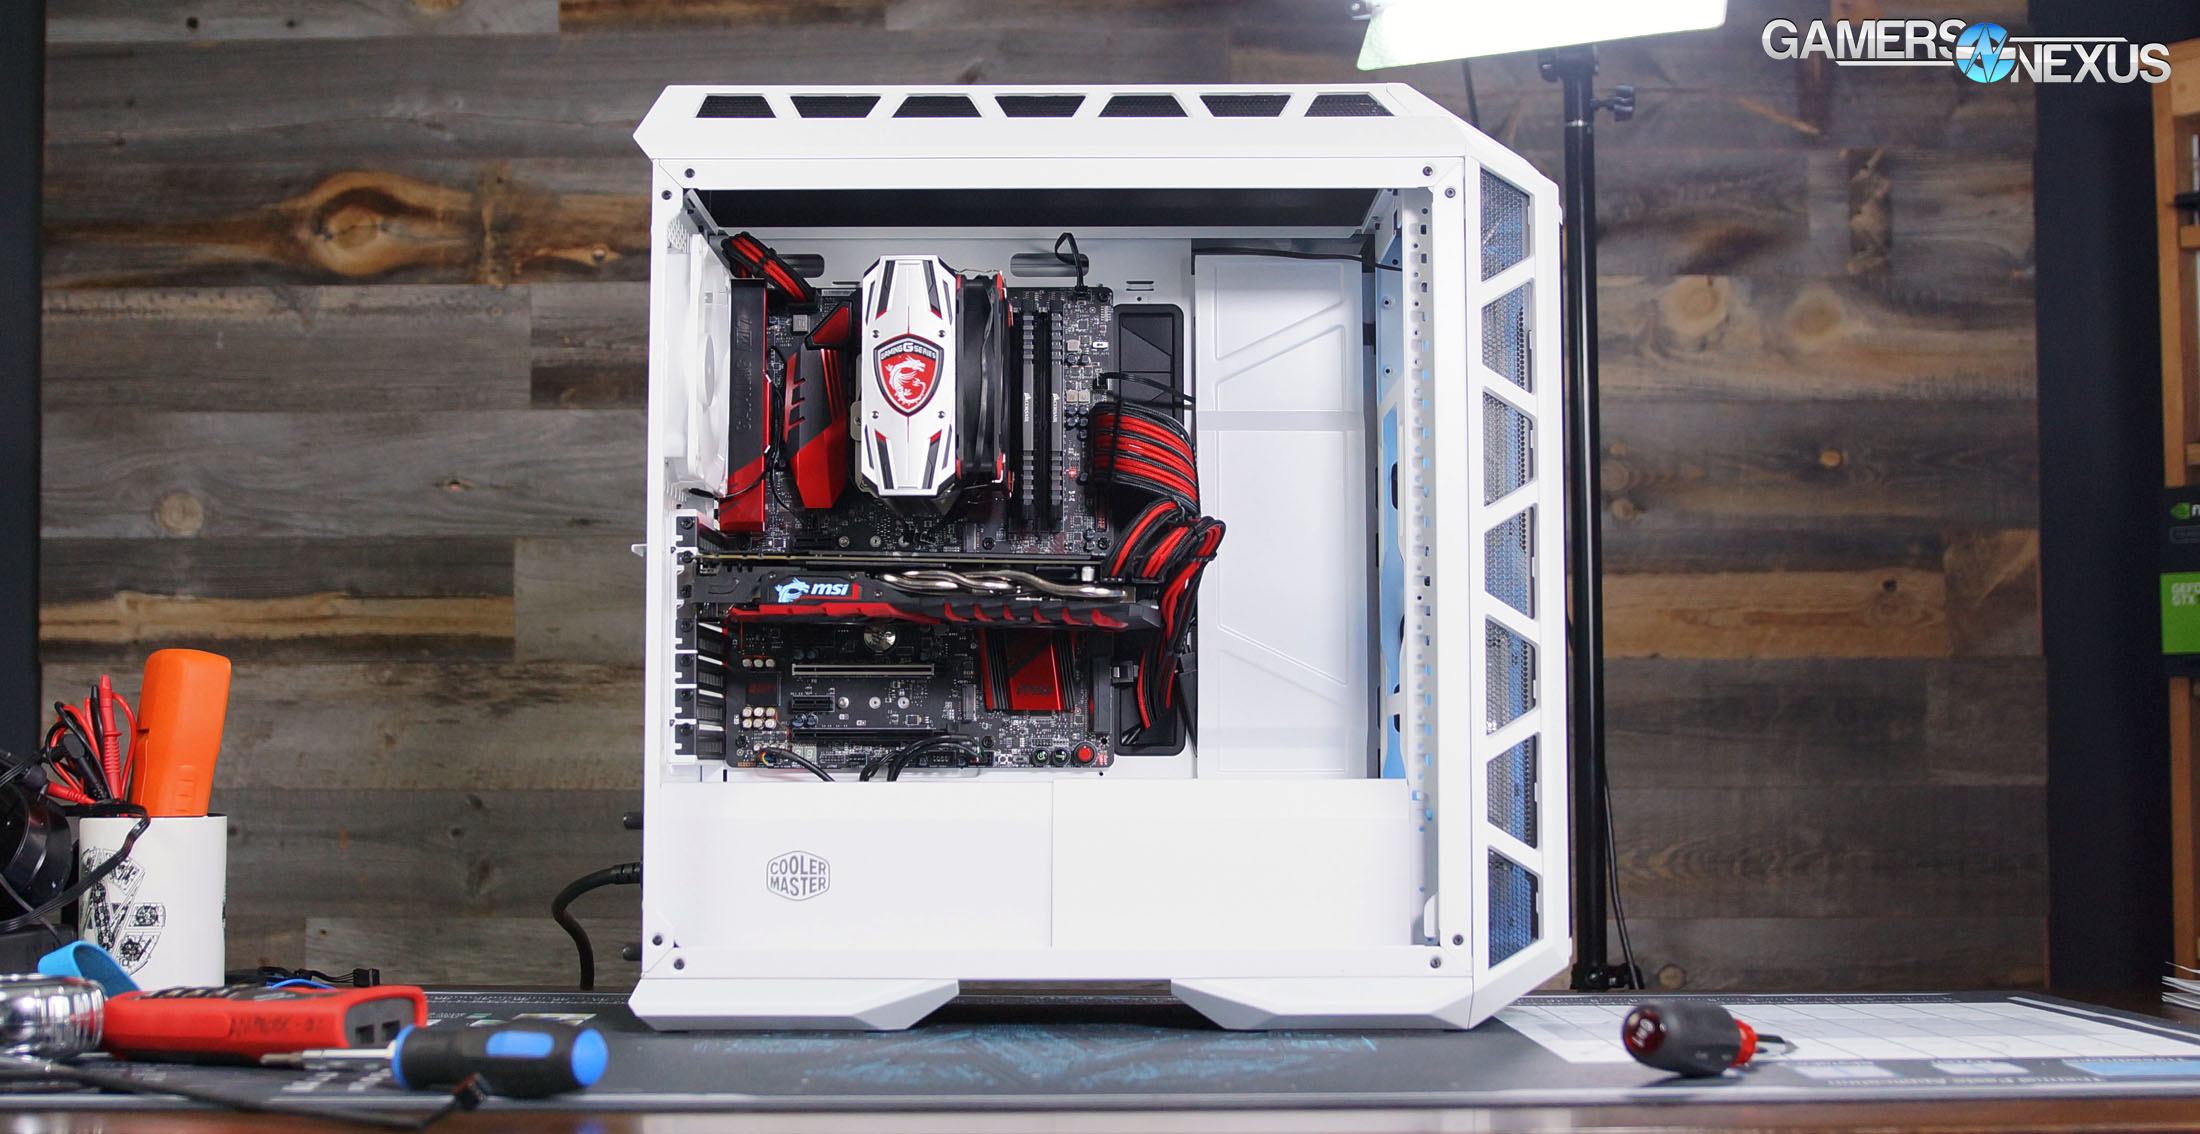
The color scheme of our review sample is almost pure white, and it’s well done. The color matching is good, many plastic trim elements are included, and even the rear exhaust fan is completely white. Oddly, the metal fan frame at the top of the case is still painted black. It’s barely visible, but elements behind the motherboard that are 100% hidden are white.
Case Testing Methodology
We tested using our new Skylake case test bench, detailed in the table below. This particular configuration is brand new with the launch of the 570X & 270R. Results on this test platform cannot be compared to previous case benchmark results, as the platform has completely changed.
Conducting thermal tests requires careful measurement of temperatures in the surrounding environment. We control for ambient by constantly measuring temperatures with thermocouples and laser readers. We then produce charts using a Delta T(emperature) over Ambient value. This value subtracts the thermo-logged ambient value from the measured diode temperatures, producing a delta report of thermals. AIDA64 is used for logging thermals of silicon components, including the GPU diode.
All case fans are manually configured to their maximum throughput using BIOS, then we configure to an RPM closer to 1050 for a universal "quiet" testing. If a fan controller is present, we opt-in and test on multiple settings. This forces testing of case fan performance in addition to the case's air channeling and airstream design. This also ensures minimal variance when testing, as automatically controlled fan speeds can reduce reliability of benchmarking. The CPU fan is set to 1100RPM (constant) for consistency, and the CPU is overclocked to 4.4GHz with a vCore of 1.272V (constant). C-States and power saving states are disabled.
GN Case Testing Bench (Sponsored by CableMod)
| Component | Courtesy Of | Price | |
| Video Card | MSI GTX 1080 Gaming X (OC Mode) | MSI | $640 |
| CPU | Intel i7-6700K @ 4.4GHz | GamersNexus | $300 |
| CPU Cooler | MSI Core Frozr L | MSI | TBD |
| Motherboard | MSI Z170A Gaming M7 | MSI | $180 |
| Memory | Corsair Vengeance LED 32GB 3200MHz | Corsair | $200 |
| SSD | Samsung 850 EVO 120GB | Samsung | N/A |
| PSU | Corsair RM650x | Corsair | $100 |
| Cables | CableMod Pro Mesh Cables | CableMod | $50-$100 |
| Case | This is what we're testing! | - | - |
The video card is configured to run at 55% fan speed at all times.
Prior to load testing, we collect idle temperature results for ten minutes to determine the unloaded cooling performance of a case's fans and air channels. Thermal benchmarking is conducted for 1400 seconds (23 minutes), a period we've determined sufficient for achieving equilibrium. The over-time data is aggregated and will occasionally be compiled into charts, if interesting or relevant. The equilibrium performance is averaged to create the below charts.
Load testing is conducted using Prime95 LFFTs and Kombustor “FurMark” stress testing simultaneously. Testing is completely automated using in-house scripting, and executes with perfect accuracy on every run.
We recently validated our test methodology using a thermal chamber, finding our approach to be nearly perfectly accurate. Learn more here.
Thermals, Airflow, & Noise
We tested a few primary configurations for thermal benchmarking. The test configurations included a stock test, a stock test with the primary dust filter meticulously removed, a test with the entire front panel removed, and a vertical GPU test. These mirror the tests we ran on the original H500P enclosure, though we did eliminate some of the bonus tests we ran on the original case. One such eliminated test was the internally-fixed 140mm fans, which were used to determine whether a static pressure limitation inhibited the original case. Now, with a mesh front and under the focus that buyers of this case primarily want those 200mm fans, we’re entirely driving efforts toward validating stock 200mm fan performance.
We’re starting with an airflow test. This testing uses a high-end anemometer that has been placed in a fixed position behind the top front intake fan. All panels are closed during the test, with a small crack in the top panel for the anemometer hotwire cable to pass through. This test will give us an air speed measurement to determine objectively, without any thermal testing required, how well the various panel configurations perform. Our thermals should follow these numbers in a non-linear, but relatively evenly scaled fashion. Testing is with fans at max speed.
Cooler Master H500P Mesh Airflow Testing
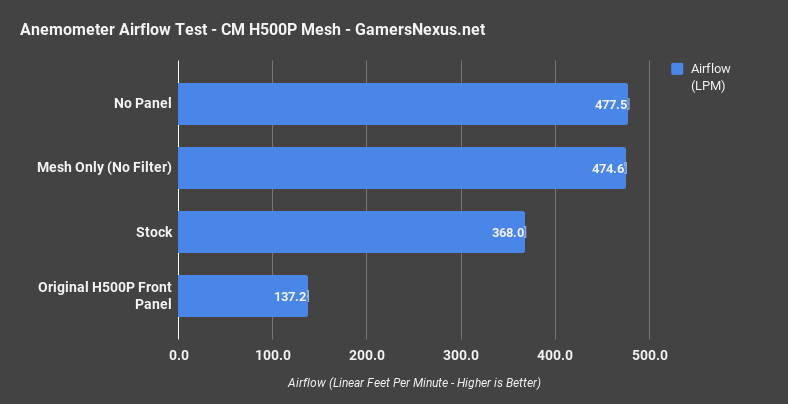
With the stock configuration of the Cooler Master H500P Mesh, we measured airflow at 368 linear feet per minute, averaged over the test period. This is a stark contrast to Cooler Master’s original H500P; replacing the H500P Mesh panel with the H500P panel and changing nothing else, we measured 137LPM of airflow with the old case front panel. The panel fits perfectly, by the way, though you’d need to cut the clip on the new panel to fit the old case.
Removing the panel entirely shows us the maximum airflow given our point of measurement and the fans included: 477.5LPM for that, with a mesh-only measurement at 474.6LPM. This measurement is for removal of the dust filter, which still impedes airflow notably, but the thermal difference is minimal (see below); however, the mesh itself (non-filter) does not impede airflow. Cooler Master has done a good job to ensure that the mesh doesn’t significantly impede airflow on the chassis, and has minimized the filter’s impedance.
Note that LPM measurements are highly volatile, depending on where you measure against the fan. Because these are relative, they can be compared to each other. If other outlets attempt anemometer readings, note that they would likely measure in different locations and with different tools. This kind of testing is difficult to do accurately even within one information source.
Cooler Master H500P vs. Mesh CPU Thermals
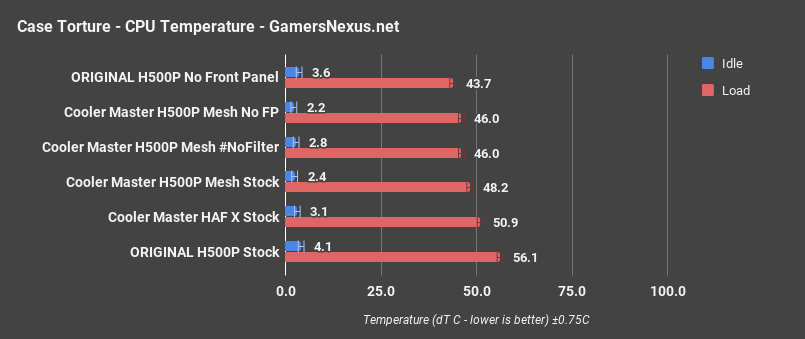
Time to move on to thermals. For this first chart, we’re looking at only the Cooler Master HAF series products for CPU torture thermals. The original Cooler Master H500P under stock configuration measured at 56 degrees Celsius over ambient, one of the worst marks on this chart -- about 5 degrees warmer than the Cooler Master HAF X from 2010. The H500P Mesh, stock, operated at about 48 degrees over ambient fo rthe CPU, an improvement of approximately 8 degrees Celsius. This is in-line with our own observed 8C improvement from our DIY Mesh H500P project from months ago, and nearly perfectly follows that data.
Removing the dust filter from the H500P Mesh resulted in a 46 degree measurement, an improvement of only 2 degrees Celsius -- just outside of margin of error. Cooler Master’s dust filter does not significantly impede airflow, and we’d recommend leaving it in. Proving that Cooler Master’s mesh (separate from the filter) isn’t impeding airflow meaningfully, our panel-less test has us within margin of error of the test barring the filter -- also 46 degrees over ambient. Idle temperatures are 0.6 degrees lower in the panel-less test, but this is within margin of error. In A/B testing, removing the filter results in functionally equivalent performance to removing the panel. The mesh doesn’t harm performance, and the filter barely does. We get a 2-degree boost over stock.
The original H500P charted higher when removing the front panel entirely, but this is within variance of being a completely different set of fans. Fans have a lot of variance between them, and our original H500P appears to have fans that spin a bit faster, therefore causing the performance disparity between the panel-less tests. This difference is resultant of being different fan units.
Cooler Master H500P Mesh CPU Temperature (Comparative)
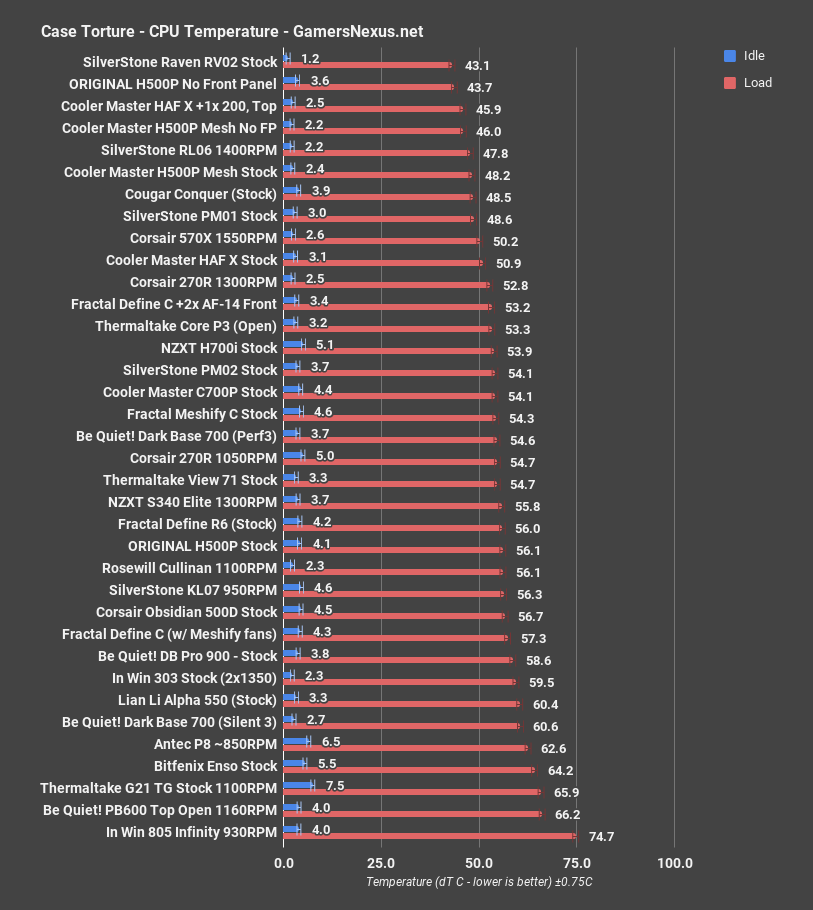
Comparatively, CPU thermals land the stock H500P Mesh at 48 degrees, placing it just behind the anointed SilverStone RL06 enclosure. This is where the H500P always belonged -- near the top of the chart. Cooler Master has now landed in the Top 5 or 6 cases on the chart, depending on how you tally them up. Comparatively, the original H500P fell toward the bottom of the charts, down near the Fractal R6 -- a silence-focused case -- and not distant from the Dark Base Pro 900, also silence-focused. This is a marked improvement for Cooler Master. Thus far, they have resolved our thermal concerns.
Cooler Master H500P Mesh vs. Stock GPU Torture
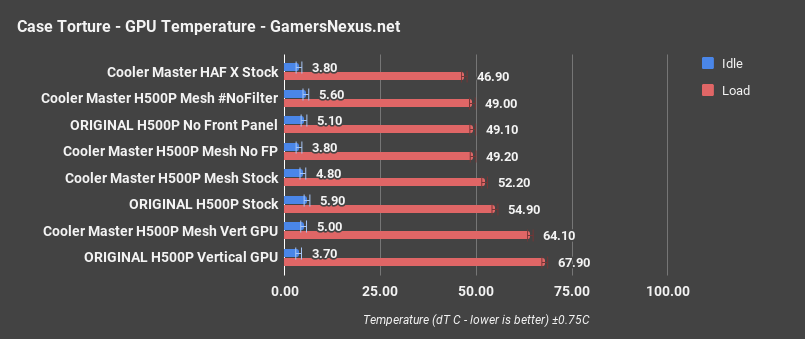
Moving on to GPU thermals with only the H500P on the charts, the HAF X outperforms all modern iterations as a result of its side-mounted intake fan. The original H500P enclosure operated the worst performance, at 55 degrees Celsius over ambient. This was bad enough to enter territory of clock drops from Pascal temperature control. The H500P Mesh operated at 52.2 degrees over ambient when stock, or 64.1 with the vertical GPU -- still the worst possible configuration, as we’re both against the glass and against the tower cooler. You’d need a reference-sized card with an open loop to really benefit from this configuration; still, it’s a 3-degree improvement over the original H500P vertical GPU, at 68 degrees -- well into hard throttling territory.
Removing the panel or the filter produced, once again, equivalent results to one another. We are well within error margins for each. Taking the 49 degree panel-less figure against the stock Mesh case, we’re different about 3 degrees -- not bad at all, considering the filter density. For the original case, we saw an improvement of approximately 6 degrees on the GPU by removing the panel in this test.
Cooler Master H500P Mesh GPU Torture (Comparative)
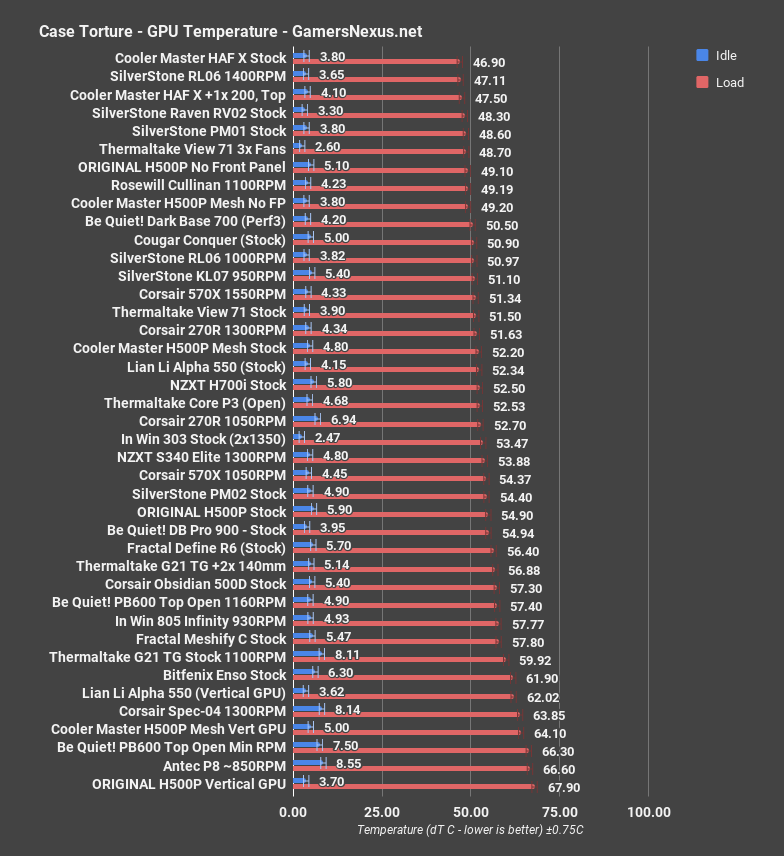
Comparatively, the HAF X still sits atop its throne on our GPU thermal charts, plotting at 47 degrees over ambient -- within margin of error of the RL06. The original H500P performed equivalently to the silence-focused Dark Base Pro 900, despite high airflow marketing. The Mesh case lands between the Corsair 270R and Lian Li Alpha 550. Performance is acceptable -- certainly better. It’s not as impressive of an uplift as we saw with CPU thermals, but it is most certainly an uplift. Limitations here stem from dead zones on the fan aligning with GPU intake, the PSU shroud, and the insulating capabilities of the glass panel. Overall, it’s much improved, but there’s room to go further.
Cooler Master H500P Mesh 3DMark
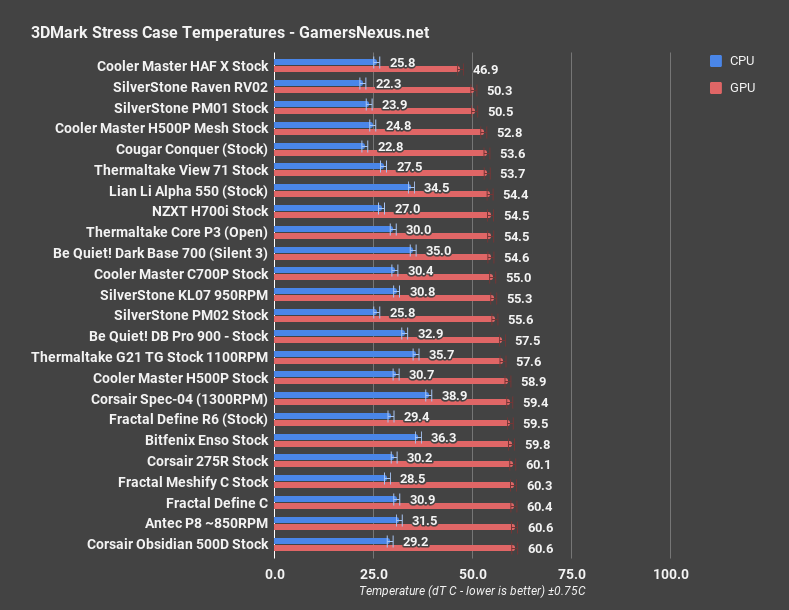
The 3DMark Firestrike Extreme stress test pushed average GPU dT to 52.8C, within margin of error of the torture test dT. The stress test generally causes a higher GPU dT than the torture test, but the Mesh remained impressively cool, much better than its stock predecessor’s 58.9C dT. The cases on our chart that beat 52.8C dT in this test are the PM01, RV02, and HAF X, all notoriously well-cooled cases. The Mesh is definitely no HAF X, especially in terms of GPU cooling, but at least it seems like part of the same family.
Cooler Master H500P Mesh Blender
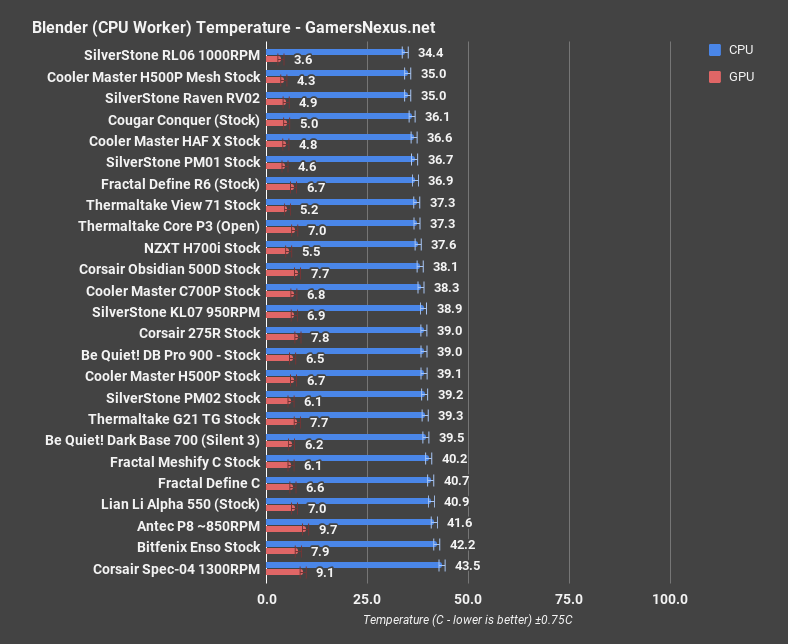
Blender rendering on the CPU averaged a CPU dT of 35C, one of our coolest scores thus far. That’s tied with the RV02 and within margin of error of the all-time best RL06 at 34.4C dT. It did undercut the HAF X’s average by 1.6C, thanks to more direct airflow across the CPU cooler. In the stock configuration with air coolers, having a partially-sealed acrylic top panel helps direct air pressure in a helpful direction rather than out of the top of the case.
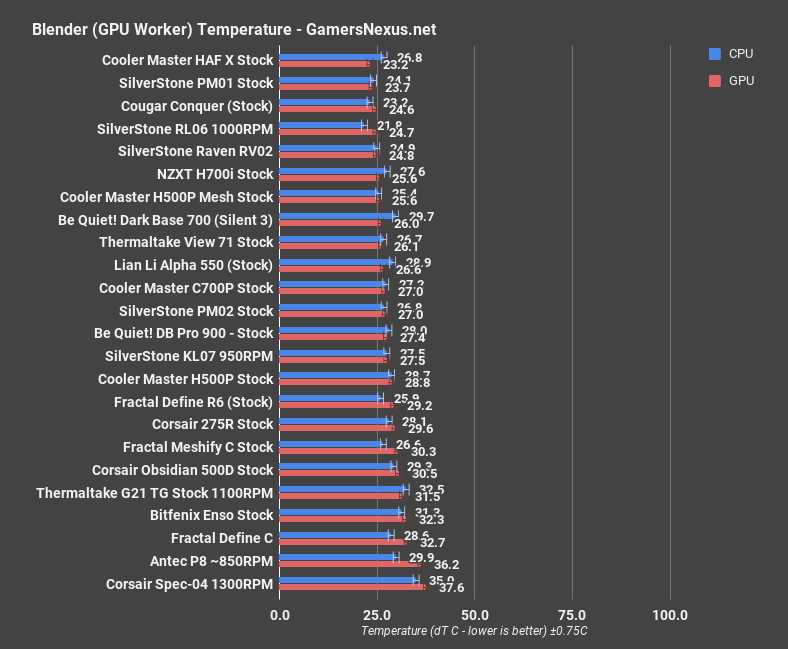
Rendering on the GPU, GPU dT averaged 25.5C. That’s not quite as competitive as the CPU temperatures, but still good--the RL06 and RV02 beat it here, as did the Cougar Conquer, PM01, and HAF X, all of which are well-ventilated cases known for their cooling. For a case with a full PSU shroud limiting airflow at the bottom of the case, that’s impressive.
Cooler Master H500P Mesh Noise
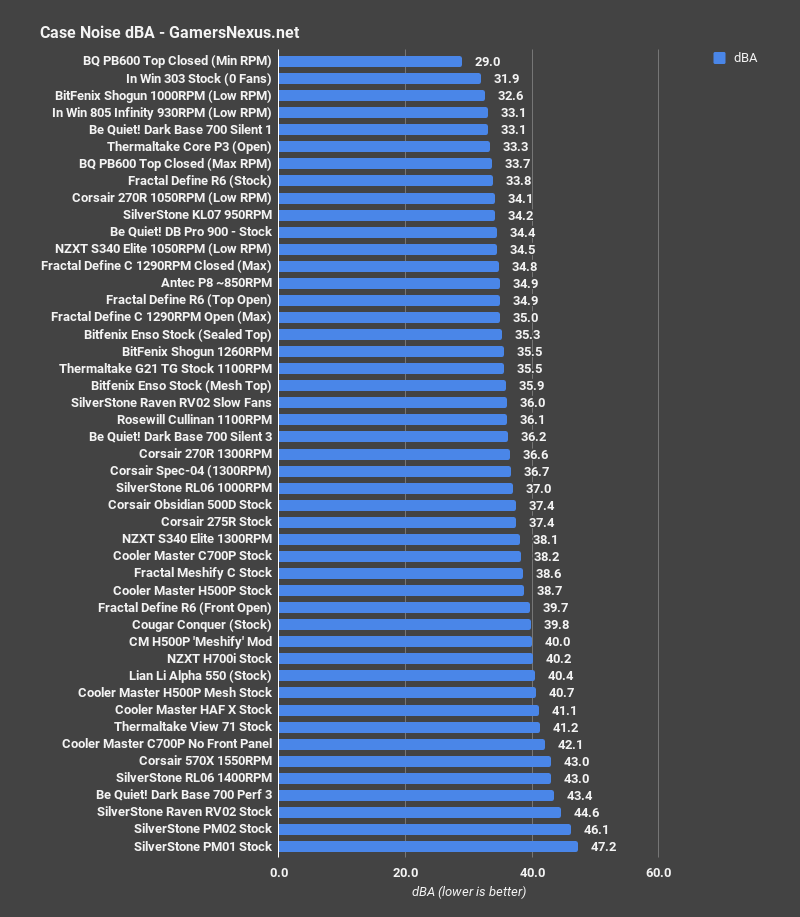
Exchanging the sealed acrylic front panel for an open mesh one puts the H500P Mesh at 40.7dBA, just a bit louder than the original’s 38.7dBA and roughly equivalent to our 40dBA “Meshify” mod. It’s an acceptable tradeoff, but the 200mm fans continue to be louder than we’d expect, since the major benefit of large fans is quieter operation. Noise levels in the Mesh are comparable to the stock Lian Li Alpha or Cooler Master’s own stock HAF X.
Conclusion: Credit Where it’s Due, But
In contrast to Cooler Master’s struggle with accepting that their product improved by way of criticism, we are happy to note that the H500P Mesh has been heavily improved over the original product. Oddly, no one would ever know that, as there’s presently (at time of writing) only one outlet with a review online -- Cooler Master didn’t sample many people for the H500P Mesh, and particularly seemed to cut-off critical reviewers.
Regardless of Cooler Master’s petty squabbles, we are happy to announce that the H500P Mesh has resolved all of our major, deal-breaking points of criticism. Case airflow has objectively improved (many times over -- from 137LPM to ~360LPM), thermal performance has significantly improved (mirroring our H500P Meshify mod), and acoustics aren’t much different for it. There are still minor grievances, but nothing that should stop anyone from buying the case. At least, nothing on a product level.
Cooler Master has done well to listen to criticism and respond with a product that is where the original should have landed. This case is now among the chart-toppers for CPU cooling performance, and airflow has improved markedly. Job well done, Cooler Master.
What concerns us, however, is the construction of an atmosphere where reviewers are intimidated to cast a critical eye upon a product. Although we see blacklisting as a challenge to work harder, other media operations aren’t in the same position to risk relationships. If a company behaves vindictively and cuts sampling, that company is building a sphere of reviewers it feels it has influence over. Cooler Master doesn’t want reviewers to work on its product, we think, it wants “influencers” to work on its products. Cooler Master’s product update has silenced its most critical reviewers -- us -- with improvements. That’s something the company should be proud of and want to share; instead, their actions have painted the company a portrait of either cowardice or pettiness, and the former doesn’t make much sense as the product is legitimately good.
We’ll leave this here for now, though. Although it is disturbing, toxic behavior to cut contact with critical reviewers, and bad for the consumer, we do want to focus on the product for today. On that front, Cooler Master has done a decent job with the Mesh. We can genuinely recommend it at its price-point, assuming you’re good with the more subjective elements (the looks -- which are up to you). We also have no quarrel with condemning Cooler Master’s behavior through this process.
To Cooler Master: Job well done on the product. We’ll buy your next ones and make sure you can keep the trend. Cases are cheap.
Editorial, Testing: Steve Burke & Patrick Lathan
Video: Andrew Coleman