The Cooler Master SL600M was one of the most promising cases we saw at Computex 2018, using CM’s now-familiar 200mm fans in a bottom-to-top airflow configuration. Although the “chimney effect” and “stack effect” are genuine insofar as their physical existence, the usefulness of natural convection processes fades when confronted with high CFM, directional fans. Hot air does rise, of course, but air blasted through a fan goes wherever you want it. In this regard, we are not firm believers in the “chimney effect” as a marketing characteristic for computer cases -- not unless those are passively cooled, anyway -- even still, the last case we tested with a similar configuration was the RV02, which remains one of the best cases we’ve tested thermally.
These improvements are for other reasons, not because the heat is rising. It’s because the air path is superior, and placing several large fans at the bottom of a case (given sufficient distance from the table) can cool parts faster. The path to the GPU is shorter, and so cooler air is hitting the video card fans faster.
Cooler Master’s SL600M ends up at around $200, and enters a market with more competitors at its price class than is typical: The NZXT H700i, Cooler Master’s own H500M (or H500P Mesh), and the Phanteks Evolv X are all relatively recent contenders in this arena.
Today, we’re reviewing the Cooler Master SL600M for thermals, acoustics, build quality, and value.
Cooler Master SL600M Specs & Price
Product Name | MASTERCASE SL600M |
Available Color | Silver, Black |
Materials | Body: Steel Front Panel: Aluminum Top Panel: Aluminum Left Side Panel: Tempered Glass Right Side Panel: Steel |
Dimensions (L x W x H) | 544 x 242 x 573mm |
Motherboard Support | Mini ITX, Micro ATX, ATX (EATX* support up to 12" x 10.7", will limit cable management features) |
Expansion Slots | 7 + 2 (Support vertical graphics card installation) |
Drive Bays | 5.25": 0 Combo 3.5" / 2.5" : 4 SSD: 4 |
I/O Panel | Power LED Color: White HDD LED Color: White USB Ports: USB 3.1 Type C x 1, USB 3.0 Type A x 2, USB 2.0 Type A x 2 Audio In / Out: 1x 3.5mm Headset Jack (audio+mic) & 1x 3.5mm Mic Jack Reset Switch: N/A Fan Control: 4 step slide, 4pin PWM x 4 |
Pre-installed Fan(s) | Top: N/A Front: N/A Rear: N/A Bottom: 200mm PWM Fan x 2 (Speed: 400~800RPM / Connector: 4Pin) |
Fan Support | Top: 120mm x 3 or 140mm/200mm x 2 Front: N/A Rear: N/A Bottom: 120mm x 3 or 140mm/200mm x 2 |
Radiator Support | Top: 120mm, 140mm, 240mm, 280mm, 360mm (maximum thickness clearance 43mm) Front: N/A Rear: N/A Bottom: 120mm, 140mm, 240mm, 280mm, 360mm (maximum thickness clearance 72 mm when the GFX is installed in the vertical position) |
Clearances | CPU Cooler: 191mm PSU: 200mm GFX: 318mm |
Dust Filters | Bottom |
Power Supply Support | Front Top Mount, ATX |
MSRP | $200 |
Cooler Master SL600M Build
The interior of the SL600M is as bare as possible to allow air to travel upwards.
Both the bottom and top of the case have removable fan mounts, although the bottom mount is larger and a bit more difficult to remove. The manual depicts installing a radiator and intake fans on top of this mount and just leaving the two 200mm bottom intake fans in place, which is possible, but we’d consider moving the large fans to the top of the case in such a configuration to better allow for high pressure on the radiator. The case legs are extra long to allow clearance for bottom intake, and the bottom of the chassis is lifted 5.5cm off of the table surface. There’s support for 360mm radiators at the top or bottom, but installing a full-length radiator means that the PSU cover can’t be extended to its full length, which in turn means more restricted cable management.
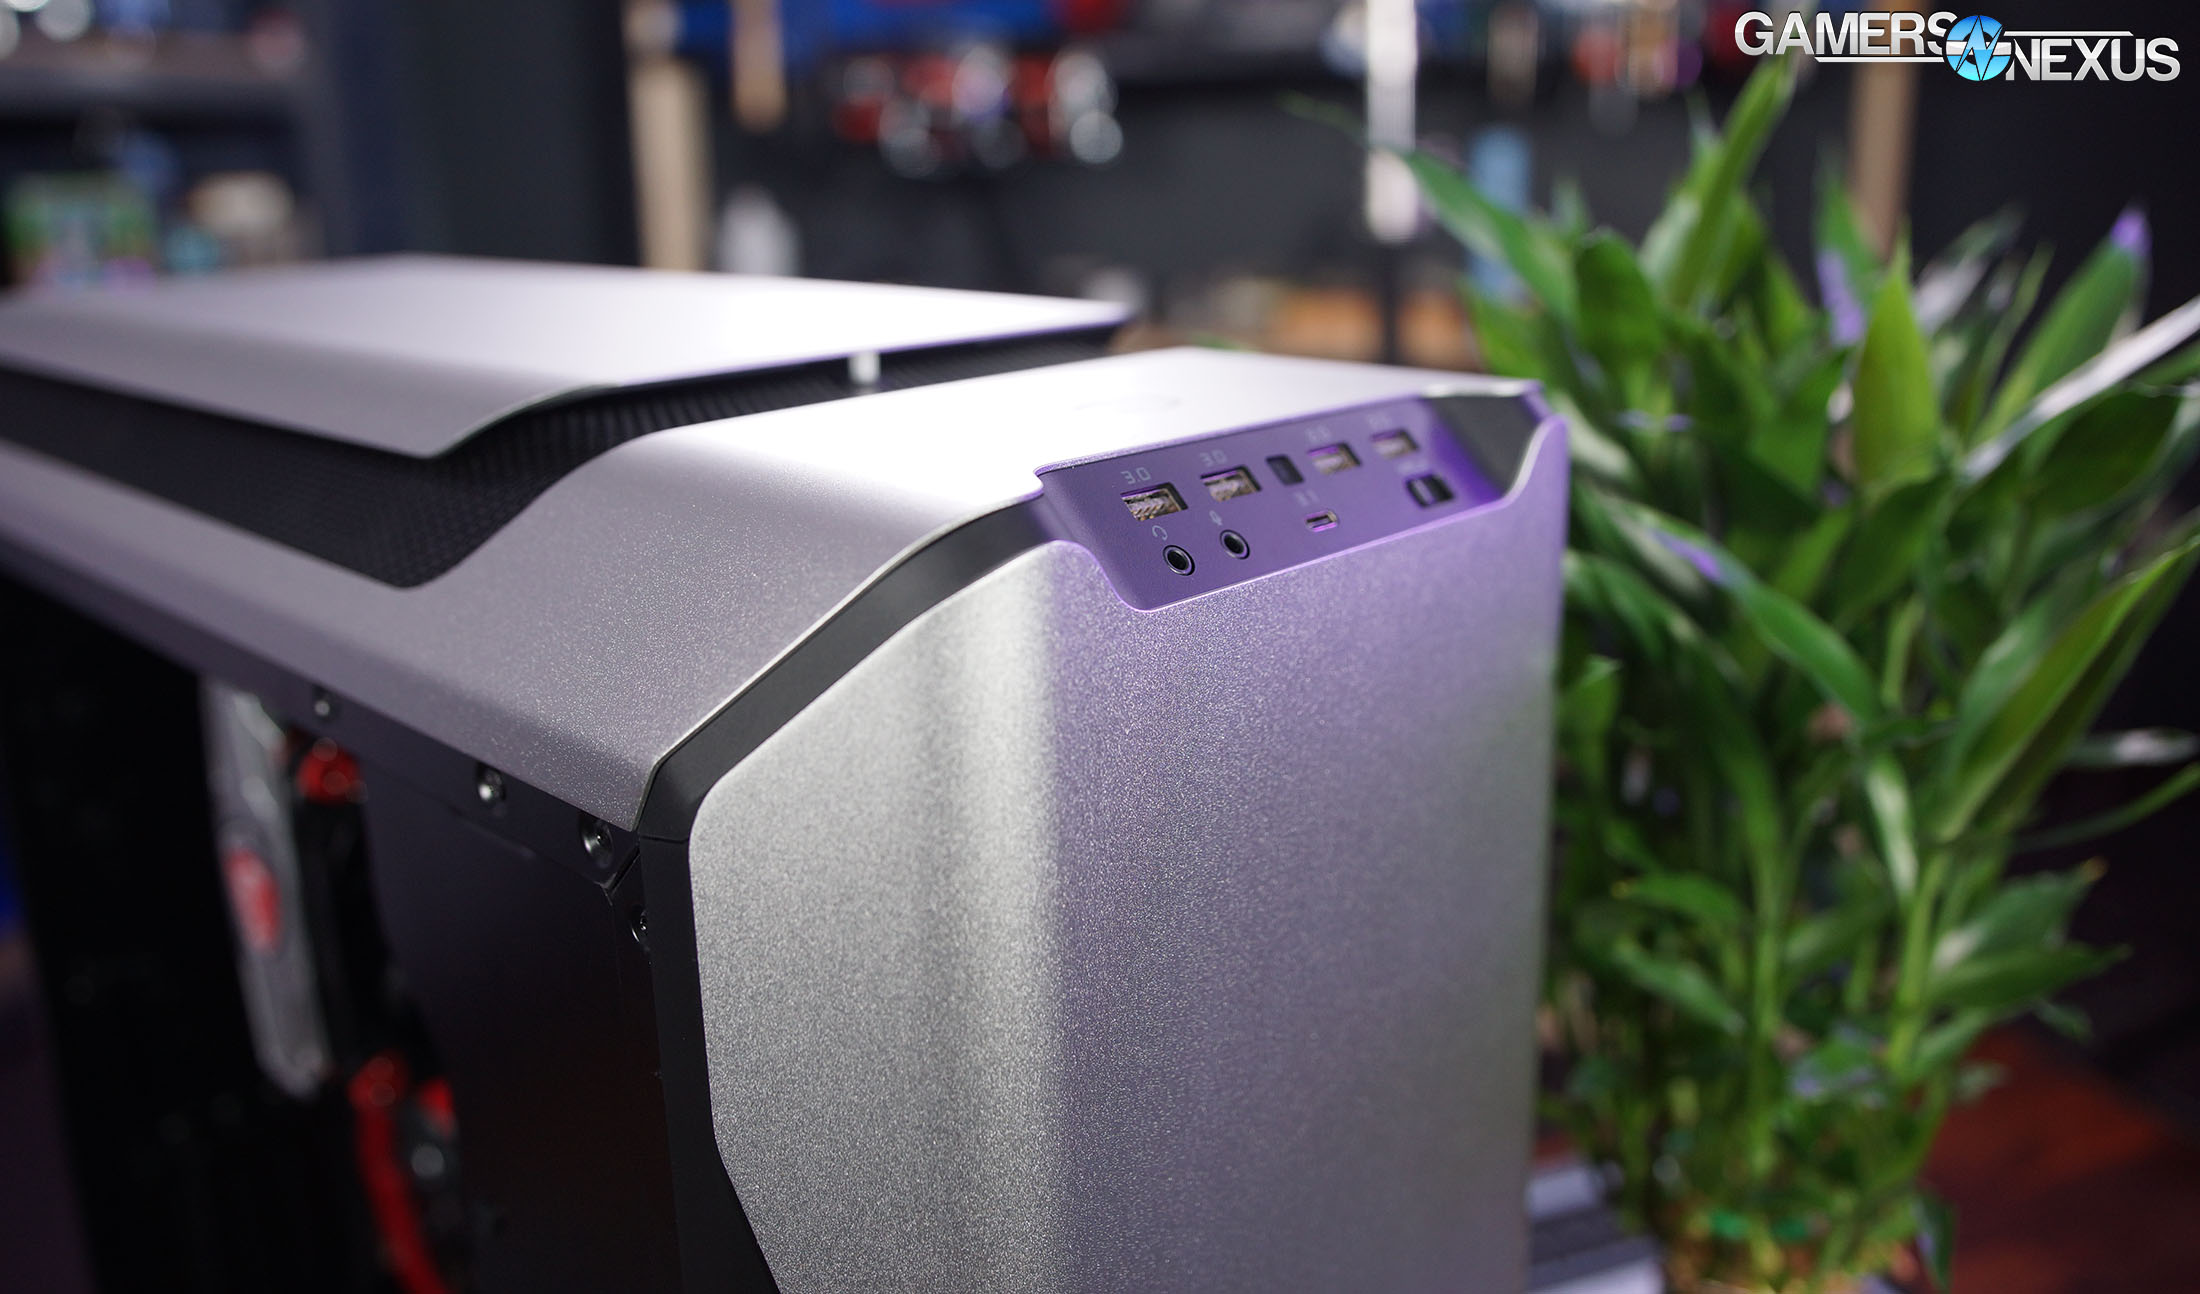
The front panel USB ports illuminate with white LEDs when a proximity sensor is tripped. It’s definitely overkill, but it could still be helpful for finding the ports in a dark room. We were able to activate the sensor from nearly 30 inches away, so there’s a good chance the LEDs will just stay on during normal use.

The normal SSD mounts behind the motherboard work fine, but the combination 3.5”/2.5” mounts could clutter the interior depending on where they’re installed. Sticking them on the inside of the front or back panels are good options, but putting them on the bottom of the case and obstructing the intake fans is not.
The metal plate on the top of the case is pressed into place with metal pins inserted into rubber washers. The plate can be lifted out and then rested on the posts so that there’s some extra room for airflow while preserving the overall look of the case, or taken off completely. It’s nice to see Cooler Master offering an option (again) for better cooling, even if strictly looks-focused users may not take advantage of it.
The front of the case is dedicated to housing the PSU and is unventilated. The back of the case is also sealed as tightly as possible, and both decisions are intentional: CM wants air to enter the bottom of the case and exit the top with as few complications as possible. The aluminum front plate is secured to the underlying frame with screws, but unfortunately a couple of these screws didn’t make contact in our sample and the plate was loose. There was also a small piece of plastic broken off from the inside of the panel, so it’s possible this was shipping damage.
The floor is lava in the SL600: there’s no PSU shroud at the bottom, which would be the usual spot to hide extra cables, and there are 400mm of spinning fan blades instead. The PSU is housed in a two-part cover at the front of the case which can be adjusted to take up more or less space. We have a lot of loose cables in our case review system, so we set it to the maximum possible size and still found it a little cramped. Cooler Master did a good job of providing plenty of tie points along the front and bottom edges of the case, but this case still requires more care than usual in strapping down every loose end to get the side panel on.
One very minor point related to the PSU placement is that there is no easily accessible power switch on the case. The SL600M uses an internal extension cable to reach the PSU like the Dark Base Pro 900 did, but the DBP added a secondary power switch to the rear of the case since the real PSU switch was inaccessible.
Case Testing Methodology
GN Case Testing Bench (Sponsored by CableMod)
| Component | Courtesy Of | |
| Video Card | MSI GTX 1080 Gaming X (OC Mode) | MSI |
| CPU | Intel i7-6700K @ 4.4GHz | GamersNexus |
| CPU Cooler | MSI Core Frozr L | MSI |
| Motherboard | MSI Z170A Gaming M7 | MSI |
| Memory | Corsair Vengeance LED 32GB 3200MHz | Corsair |
| SSD | Samsung 850 EVO 120GB | Samsung |
| PSU | Corsair RM650x | Corsair |
| Cables | CableMod Pro Mesh Cables | CableMod |
| Case | This is what we're testing! | - |
The video card is configured to run at 55% fan speed at all times.
Prior to load testing, we collect idle temperature results for ten minutes to determine the unloaded cooling performance of a case's fans and air channels. Thermal benchmarking is conducted for 1400 seconds (23 minutes), a period we've determined sufficient for achieving equilibrium. The over-time data is aggregated and will occasionally be compiled into charts, if interesting or relevant. The equilibrium performance is averaged to create the below charts.
Load testing is conducted using Prime95 LFFTs and Kombustor “FurMark” stress testing simultaneously. Testing is completely automated using in-house scripting, and executes with perfect accuracy on every run.
We recently validated our test methodology using a thermal chamber, finding our approach to be nearly perfectly accurate. Learn more here.
Cooler Master SL600M Thermals & Noise Testing
Cooler Master mentions the “Chimney Effect” multiple times in their marketing material. The idea is that since hot air naturally rises, it’s better to push air bottom to top rather than front-to-back. The foundation for this is fact, but it is overcome by the power of forced airflow. As we discussed in the RV02 review, it really doesn’t matter, because PC cases are tiny metal boxes covered in fans that completely upset natural convection. As with the RV02, we tested this by flipping the case onto its front panel and seeing whether that changed anything. Even if it doesn’t, that doesn’t mean that the layout isn’t beneficial for other reasons. It’s just not that specific reason of hot air rising.
We also tested with the top panel popped-up, the top panel removed, and in the vertical GPU configuration. We chose to utilize the SL600M’s “rotatable PCI bracket window” to mount the GPU as close to the motherboard as possible for optimal airflow. There are two slots that are already vertical in the stock configuration, appropriate for liquid cooled cards, but otherwise rotating the bracket window is a better and functionally identical choice. The main advantage of using the stock vertical slots is that it also allows installing PCI devices in the normal horizontal slots, whereas rotating the window means that every usable expansion slot is vertical and requires a riser cable. For the best thermals, it would be ideal to rotate our CPU cooler so that it lines up with the case airflow. We decided to rotate our cooler from its standard configuration to do a pass of vertical orientation on the cooler as well, but note that we had to change our memory due to clearance issues with the cooler rotated this way. This will not affect the thermal results in a major way, fortunately, but is a temporary change of configuration that we need to note.
We will be using our standardized test configuration in the ancillary benchmarks, cooler oriented front-to-back, and will use the vertical cooler orientation only for the CPU and GPU torture tests.
CPU Torture
Let’s start with just the SL600M’s CPU thermals, then look at comparative data. We have a lot of benchmarks for different configurations here, including a best-case configuration with the cooler oriented vertically with a vertical GPU below it.

CPU torture testing with the fully stock configuration brought CPU temperature to 62.6 degrees Celsius over ambient. Flipping the case onto the front panel and negating the supposed chimney effect actually brought the temperature down a bit, falling to 59.2 degrees over ambient. This is just outside of our error tolerances. The temperature decrease is a change in impedance to the now-front panel: rather than pulling from a tabletop, the 200mm intake fans were pulling from open air. That’s not a huge difference, though, and if anything, it suggests that Cooler Master provided sufficient clearance at the bottom of the case to prevent any major problems. Well done by CM there. Popping the top panel up had approximately the same benefit to CPU cooling with a dT of 59.3 degrees Celsius, while removing it completely slightly lowered it again down to 58.2 degrees delta T. It was the vertical GPU test that provided the most benefit for once, ranking the lowest CPU temperature of our tests at 55.5 degrees. This is because mounting the GPU vertically moves it out of the way of incoming air, which is more easily able to travel up to the CPU cooler and out of the top of the case. Air can get around both sides of the video card. Keep in mind that all of these tests we just named were with the cooler in our standard position, front-to-back. We then ran two sets of tests with the cooler removed and re-applied each time, with new paste each time, and with a curing period between those tests. We validated that the data was accurate by comparing the runs to each other and our baseline performance. The new tests were with the cooler vertically oriented. In this configuration, the tower cooler is breathing air in straight from the GPU exhaust. Despite seemingly being superior, it actually ends up worse: We’re at 64.6 degrees over ambient, approaching the 90s when considering a 22-degree room temperature, and that drops to 62 degrees with the cover removed. We ran this test again and validated the results.
If you’re wondering why it’s behaving like this, it’s fairly straight forward: Although the case would theoretically benefit from the cooler being oriented vertically – something that Cooler Master also suggests – the reality is that the cooler is now breathing in open-face card exhaust directly. Previously, that exhaust only radiated toward the fin stack, where the higher pressure of the CPU fan would push the radiative heat away from the cooler and toward the back of the case, where it eventually drafted up and out. An open-face video card cooler is the most common, and those coolers exhaust air out of the finstack. It is getting the full exhaust of the video card, rather than whatever drifted around to the front of the cooler previously.
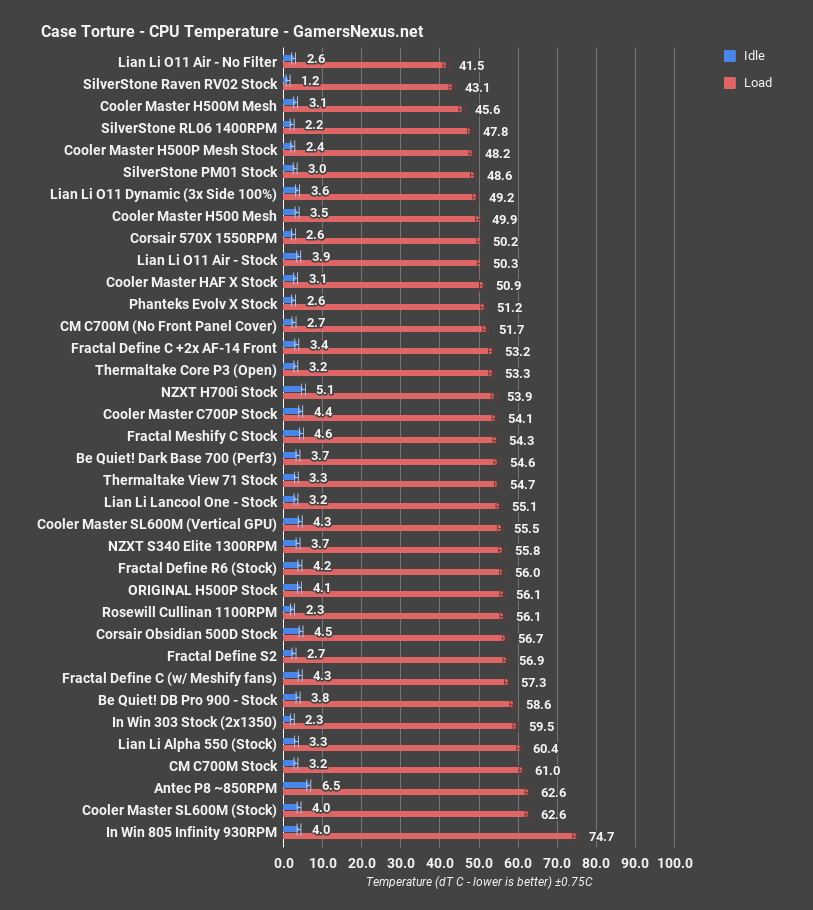
Back to the comparative data: As it is, with our configuration, the stock CPU temperature is just bad. It’s equivalent to the Antec P8, a case with the cooling capacity of a toaster. Even opening or removing the top panel still leaves the SL600M at the upper end of the chart. The twist is that with the GPU mounted vertically, CPU temperatures become more acceptable, closer to the stock Lancool One. There are a few reasons for this performance: The CPU is now the most distant device from the fans. Rather than a typical configuration, where the air hits the CPU and GPU at roughly the same time, we’ve got a configuration that creates a much shorter distance to the video card. That card also obstructs air intake to the CPU, particularly if it’s a longer card. The CPU is left with breathing in warmed radiative heat off of the GPU backside and circulating heat from the GPU.
GPU Torture
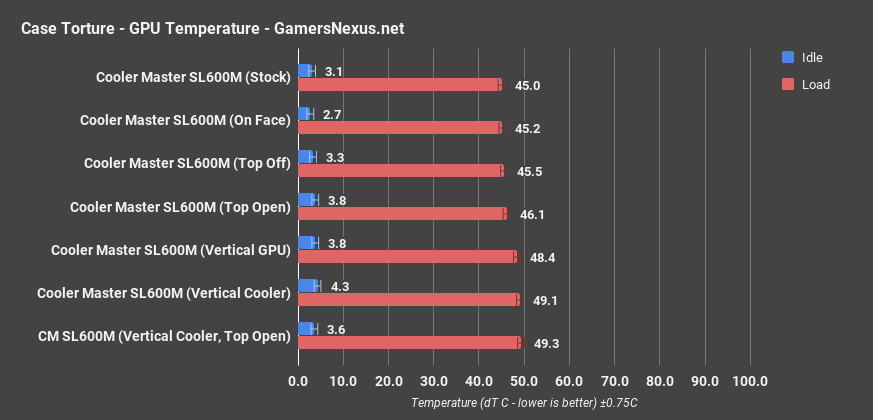
Stock GPU temperature was 45 degrees Celsius over ambient when loaded. This changed to 45.2 degrees delta T when the case was flipped onto its front, and is well within margin of error: the intake fans blast the GPU cooler equally well regardless of the case orientation, and hot air rising really has nothing to do with this behavior. Opening the top panel without taking it off resulted in a temperature of 46.1 degrees, which is within margin of error and test variance. There is functionally no difference for GPU cooling, which makes sense when considering the proximity to the bottom. This is reinforced by looking at the top removal data, where a 45.5-degree result tells us that these do not meaningfully affect GPU performance. We knew mounting the GPU vertically would hurt thermal performance somewhat because it would no longer be directly facing the intake fans, but the jump to 48.4C dT is reassuringly minor, and it seems plenty of air still makes its way into the cooler.
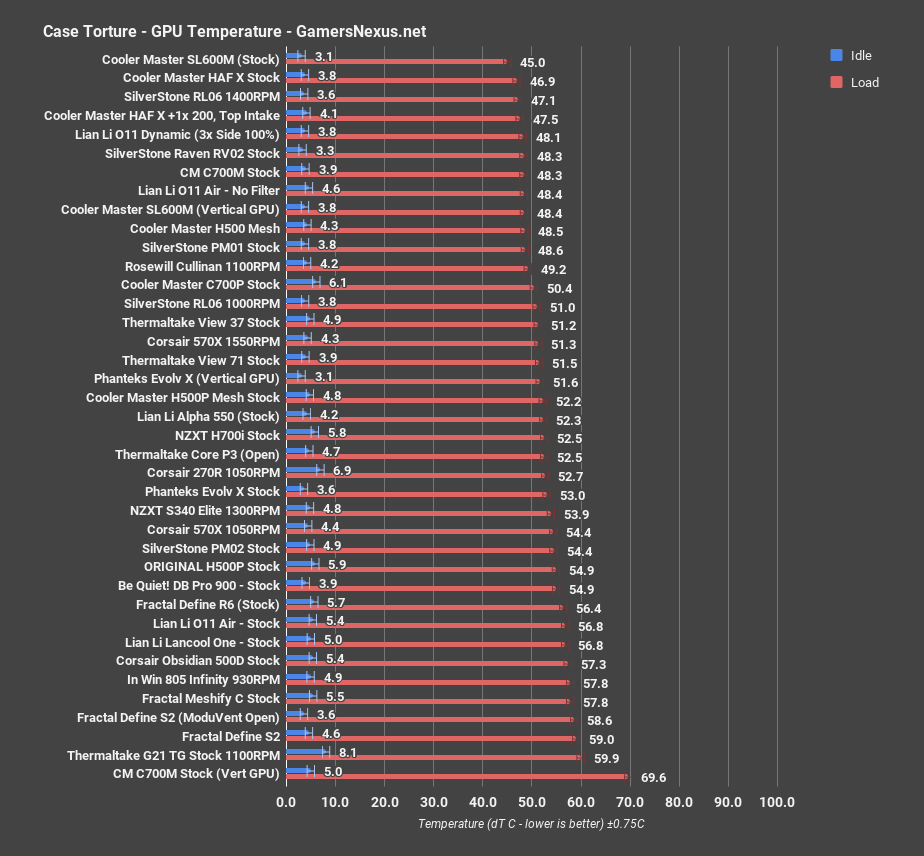
Comparatively, the stock GPU result in the SL600M is a new best on our chart, thanks to the extremely direct cooling from the bottom intake fans. The vertical GPU temperature, though slightly worse, was still among the best results we’ve seen. That means that using the vertical expansion slot closest to the motherboard is still great for GPU cooling and does a decent job at allowing CPU cooling, so we’d definitely recommend this layout for systems using air cooling that don’t need any non-GPU PCIe cards installed.
Firestrike
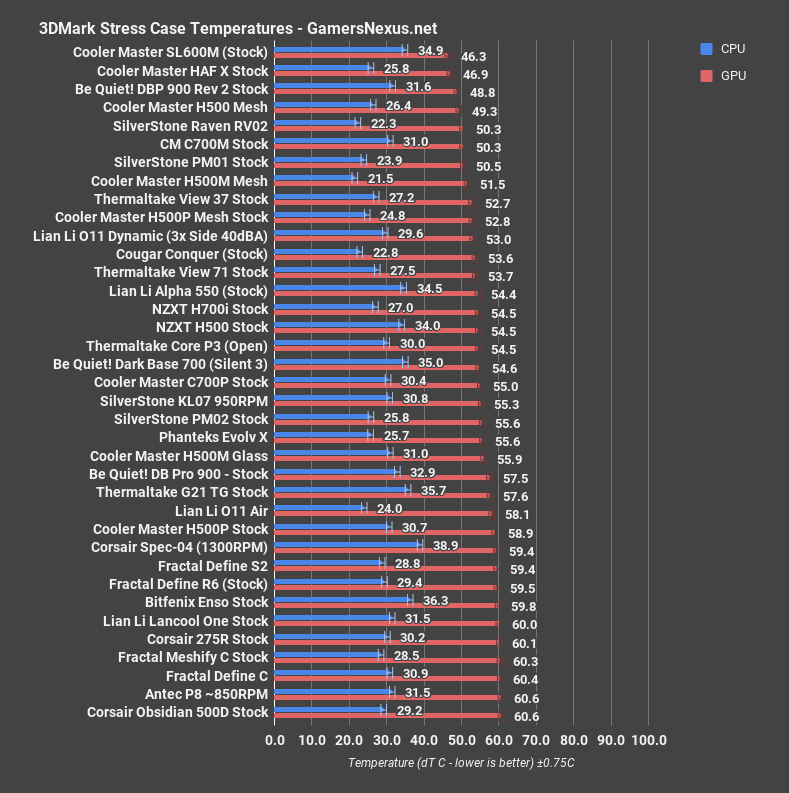
Using our standardized setup, Firestrike GPU temperature was just slightly above torture thermals, averaging 46.3 degrees Celsius over ambient. That’s again technically better than any case on the chart, although the HAF X is close enough as to make no difference. CPU temperature during the test was 34.9, which is pretty high for a benchmark that doesn’t put any serious load on the CPU. That’s close to Bitfenix Enso territory. The case is simultaneously the best and the worst on this chart.
Blender

The Blender CPU render test raised CPU temperature to 38.9 degrees over ambient under a reasonable workload. The relative performance was better than it was during the torture test because the GPU doesn’t generate as much heat, but it’s still on par with the mediocre Silverstone KL07 in performance. This test does confirm that the main problem with CPU thermals isn’t the heat that it generates, it’s the heat the GPU generates that isn’t being circulated out because the airflow path is blocked. Again, the vertical GPU mount helps to solve this and is illustrated in our earlier charts.
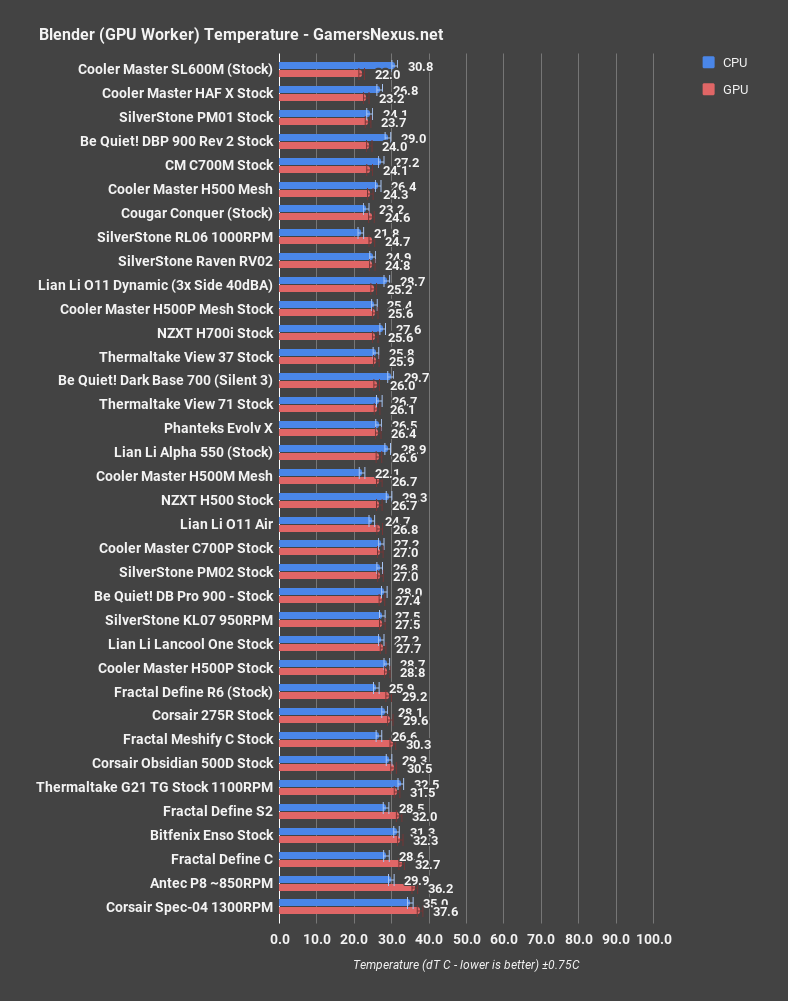
The GPU render averaged 22.1C dT on the GPU, a full degree below the previous best dT in the HAF X. The HAF X’s CPU dT during this test was 26.8C, however, while the SL600M’s was 30.8C.
Noise
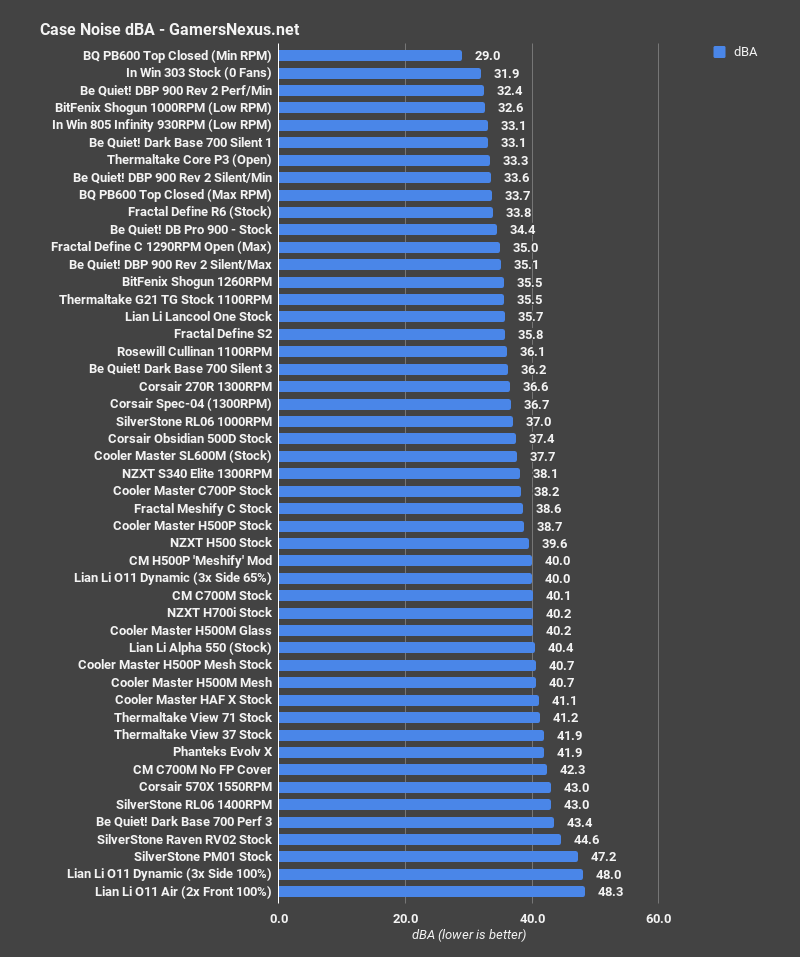
With the fans at max speed, the SL600M reached 37.7dBA. Given the cooling performance, that’s relatively good, around the Obsidian 500D or S340 Elite. The size of the 200mm fans gives the case an advantage in this area, as does placing the fans on the bottom of the case and completely sealing the panel that faces the user. Cooler Master’s own H500, H500P, and H500M cases use the same fans, but are all marginally louder because of their layouts.
Conclusion: SL600M vs. Evolv X, H500M, etc.
According to Cooler Master’s ads, the SL600M is intended to keep “both professionalism and performance intact while also taking on noise reduction and airflow.” That’s a decent description of what it is--it’s definitely a case that’s focused on looking good, but it also has very interesting performance characteristics. The case manages to simultaneously be both the best and worst case on the charts, and in tests where performance was poor, it could be overcome with careful parts selection. Cooler Master now makes the case with the best GPU cooling performance on our charts, for which it deserves accolades; the video card is inches away from 200mm fans, both of which have sufficient airflow at the bottom of the case. Cooler Master’s stubbornness to create a closed front panel has worked here, as they opened up the bottom for better intake than can be achieved in most front panels. Job well done and criticism well-played by Cooler Master.
The CPU thermals are dismal at times, which is the only major downside. To overcome this, we would suggest brute-forcing a CLC solution or more carefully managing airflow paths when selecting tower coolers. Be aware of memory clearance if intending to mount in bottom-up configuration, and also be aware of the video card’s fin direction to avoid spitting hot air straight into the tower cooler.
Cooler Master has a few key areas of improvement:
- There needs to be a remote PSU switch on the back of the case. There is an extension cable running to the PSU (front-mounted), and that extension could do with an in-line toggle for the PSU. At present, if you need to hard toggle the PSU, you’ll have to unbuild part of the system.
- The PSU could use better access to air.
- The rear of the case should be opened up. We know that CM wants strict bottom-to-top airflow, but a rear slot for a 120mm or 140mm fan (potentially pre-configured to intake, not exhaust) would do wonders for CPU performance.
With the right layout, the interior of the SL600M can act like a wind tunnel while staying quiet. With the wrong layout, you’ll hotbox the CPU -- but have no fear for the GPU, as it’ll remain well-cooled in most configurations. Just don’t smash it against the glass.
Editorial, Testing: Patrick Lathan
Editorial, Test Lead: Steve Burke
Video: Andrew Coleman