The Thermaltake Level 20 RS ARGB is part of a small resurgence of Cooler Master HAF-esque cases that have come out in the wake of the H500P, with the two big 200mm RGB front intake fans that were distinctive of that case. We’re not going to try to pick apart Thermaltake’s naming conventions this time, so we’ll just say that although the chassis clearly reuses tooling from some earlier case, it’s not the Level 20 MT that we reviewed in 2018. This Level 20 uses mesh.
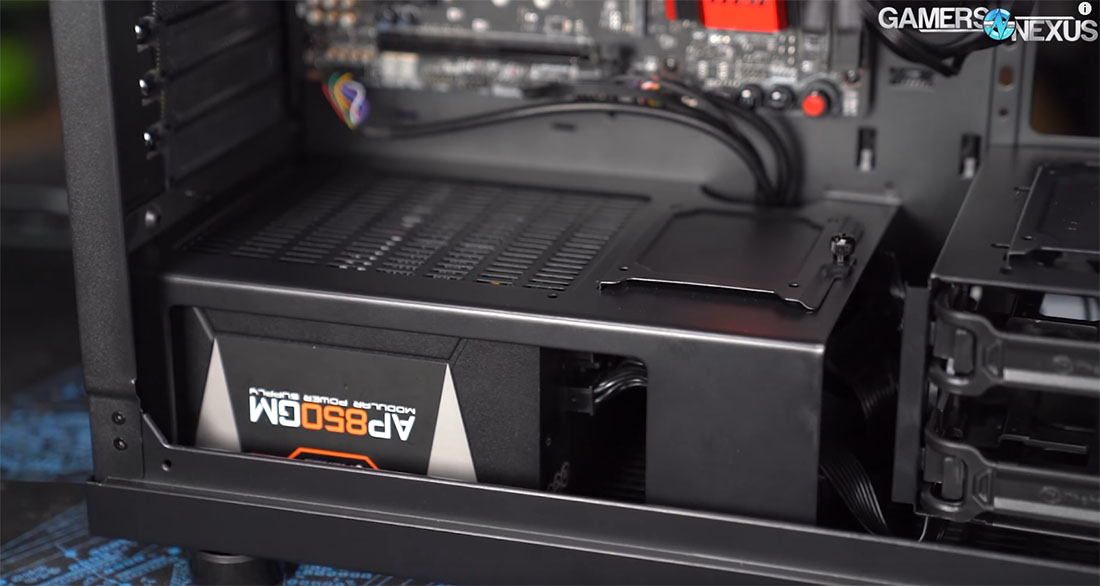
As we’ve mentioned in past reviews, we’re getting a little tired of power supply shrouds, so it’s a pleasant change to see a case with a half-shroud that’s removable. There are only two screws that hold it in place, so it’s very easy to take out, although putting it back in requires lining up some delicate metal tabs just right. That matters here, since the space under the PSU shroud can’t be accessed from the motherboard side of the case as it usually can. Instead, users must remove the shroud, install the PSU from the interior of the case, thread cables behind the motherboard tray, and replace the shroud if desired. That makes it somewhat odd that the PSU can be inserted from the rear of the case as well--it’s a good feature, but it’s redundant here.
Thermaltake Level 20 RS Specs
DIMENSION (H X W X D) | 524 x 240.8 x 553 mm (20.62 x 9.4 x 21.77 inch) |
NET WEIGHT | 12.23 kg / 26.96 lbs. |
SIDE PANEL | 4mm Tempered Glass x 2 |
COLOR | Exterior & Interior: Black |
MATERIAL | SPCC |
COOLING SYSTEM | Front (intake) : 200 x 200 x 30mm Addressable RGB fan (Fixed 600rpm, 29.2dBA) x 2 Rear (exhaust) : 120 x 120 x 25 mm fan (Fixed 1000rpm, 16 dBA) |
DRIVE BAYS -ACCESSIBLE -HIDDEN | 2.5” x 2 or 3.5”x 2 (HDD Rack) 2.5”x 1(HDD Bracket); 2.5” x 2 or 3.5” x 1(HDD Bracket) |
EXPANSION SLOTS | 8 |
MOTHERBOARDS | 6.7” x 6.7” (Mini ITX), 9.6” x 9.6” (Micro ATX), 12” x 9.6” (ATX) |
I/O PORT | USB 3.0 x 2, USB 2.0 x 2, HD Audio x 1, RGB Button x 1 |
PSU | Standard PS2 PSU (optional) |
FAN SUPPORT | Front: 3 x 120mm, 3 x 140mm, 2 x 200mm Top: 3 x 120mm, 2 x 140mm, 1 x 200mm Rear: 1 x 120mm |
RADIATOR SUPPORT | Front: 1 x 280mm, 1 x 360mm Top: 1 x 280mm, 1 x 360mm Rear: 1 x 120mm Right: 1 x 360mm (Without HDD Rack) |
CLEARANCE | CPU cooler height limitation: 172mm VGA length limitation: 282mm(With HDD Rack) 400mm(Without HDD Rack) PSU length limitation: 220mm |
The ARGB lighting is one of our least favorite aspects of this case. Our case testing system doesn’t have any RGB headers on it and we wouldn’t want to pollute it with bloatware even if it did, so we only ever use built-in RGB lighting controls for our case reviews, and the built-in lighting on the Level 20 RS kind of sucks. The animated patterns aren’t smooth at all at lower speeds, and although the solid colors and faster animations look fine on the fans, the slightly off-center labels make them look unpleasantly wobbly no matter what. The only other lighting in the case is a weird little strip (WLS™) across the top of the front panel. The whole thing seems like an afterthought, which is reinforced by (as usual) repurposing what was clearly a reset button as a makeshift RGB control button and the fact that the RGB controller itself slapped in the path of an important cable cutout. Points awarded for including an RGB controller, points awarded for having preset patterns as well as accepting ARGB control from the motherboard, points deducted for being bad. The controller uses nonstandard connections that combine RGB and fan power into one header, so there’s no way to control fan speeds, since the controller only takes input for the LEDs. At least the rear exhaust fan is a normal 3-pin design and can be connected to something else for control.
We’ve long ago ceased to test vertical GPU layouts in standard mid towers, since the conclusion is invariably that it’s a bad idea with air-cooled cards. That said, the Level 20 RS has the best possible version of the vertical layout, where the entire block of expansion slots can be rotated sideways, meaning the card can be mounted as close to the motherboard (good) or the side panel (bad) as desired. This does also mean that if one AIC is installed vertically, all AIC cards must be installed vertically, but it’s better than mashing the GPU intake fans against a glass panel and overheating.
There are some major assembly issues with the small metal mesh sections of the top panel. The corners aren’t fully seated into the plastic housing, which seems more an issue of overly-elaborate design than lack of care. Removing the top panel and examining its interior reveals that each of the rounded corner pieces is a separate piece that’s screwed into the main panel during assembly, with tool marks revealing just how much manual labor it takes to get everything fit together properly. The whole thing is vastly over-complicated in service of nothing. At least all the decorative flanges and ribs make the panels fairly solid and inflexible. The front of the top panel has two big divots taken out of it where the power buttons and USB ports are located, but this is a decorative choice rather than a functional one. The top radiator mount is needlessly obstructed by this--although the rails on the chassis extend all the way to the front of the case, they’re partially covered by the extremely large I/O housing. We would much prefer a more conventional layout with the I/O in the place of the WLS™.
Filtering in the Level 20 RS is overkill, something we’ve been complaining about with Thermaltake cases for several years running. The top panel is mesh, the front panel is mesh, all the little nooks and crannies around the sides are mesh--they’ll do a fine job of filtering dust on their own. That’s apparently not good enough for Thermaltake, and they’ve sandwiched a second filter layer inside the panels. We removed this layer for one of the thermal tests shown later in this review, but it certainly isn’t designed to be removable. Combining restrictive filters and fans with extremely low static pressure is a bad idea, and that’s what happens with 200mm fans. Double-mesh for filtration can be excusable, but the case needs to be designed around it -- shoving 200mm fans in, which are naturally low static pressure in PC applications, means that you’re especially limited where 120s might be acceptable. The one filter that IS designed to be removable is on the bottom of the case, but it ejects from the rear, making it inconvenient to pull out if the case is backed up against a wall.
Side panel attachment is good: it’s simple, both sides are identical and interchangeable, and there are no holes drilled through the glass. We wish the thumbscrews on the back were captive, and we wish they didn’t come from the factory torqued down so hard that we couldn’t unscrew them without a driver, but that’s par for the course by now. Everyone does it -- especially NZXT -- but their recommended solution is to yank hard. To each their own. The top and front panels of the Level 20 RS require a concerningly sharp yank to get off, but as a consequence they fit tight and flush. Be warned, we now know from experience that the handle at the bottom of the front panel is close enough to ground level that grasping it and pulling will skin some knuckles. This handle is also an unfiltered hole in the front panel, which is mostly blocked by the 200mm stock fans but will cause problems with dust ingress if smaller fans are used.
Radiator mounting on the top of the case is extremely flexible, to a fault. There are nine rows of screw holes next to each other so that fans and radiators can be offset various distances from the motherboard, but that leaves only 4.5cm of clear, contiguous space between the rails to push air through. The front panel suffers from the same problem to a lesser degree, so that much of the rear surface of the big 200mm intake fans are blocked by the chassis. The case will indeed fit a 360mm radiator at the top, but it requires either removing the front I/O assembly or just leaving that end of the radiator unsupported. Mounting at the front of the case is more straightforward, but installing a radiator will require mounting the fans on the outside of the chassis (like the stock fans are) or removing the HDD cage. The stock 200mm fans should NOT be installed on a radiator, so users who install a front radiator may want to move the stock 200mm fans to the top--but only one 200mm fan can fit here, again thanks to the intricate design of the top panel. Keen-eyed readers and viewers may have noticed that Thermaltake not only claims support for 360mm radiators at the top and front of the case, but also the “right,” by which they mean the rails that are meant for mounting the HDD cage. There is no path to the exterior of the case from this location and no ventilation whatsoever, so it should go without saying that putting a radiator here would be monumentally stupid. We can only assume Thermaltake copy/pasted the spec sheet for a case with a side vent and forgot to backspace that line--seriously, that’s possible. Under no circumstances should anyone install a radiator there.
This is a large chassis, one that was originally designed to fit 5.25” drives, and there’s plenty of wide, flat space in front of the motherboard. We’d like to see Thermaltake tap a couple extra screw holes and list compatibility with EEB boards, but it would require some rearrangement of the HDD cage mounting holes, so it’s understandable why they didn’t bother. The HDD cage, or “HDD rack” as Thermaltake calls it, can be installed at four different heights. The bottom mounting location makes the most sense for keeping the case tidy, but repositioning the cage may help clear space for installing radiators correctly with tubes down. We haven’t seen any extra HDD racks for sale, so as far as we’re aware the two bays that come with the case are what you get, which is a bummer for anyone that wants to use more than three HDDs.
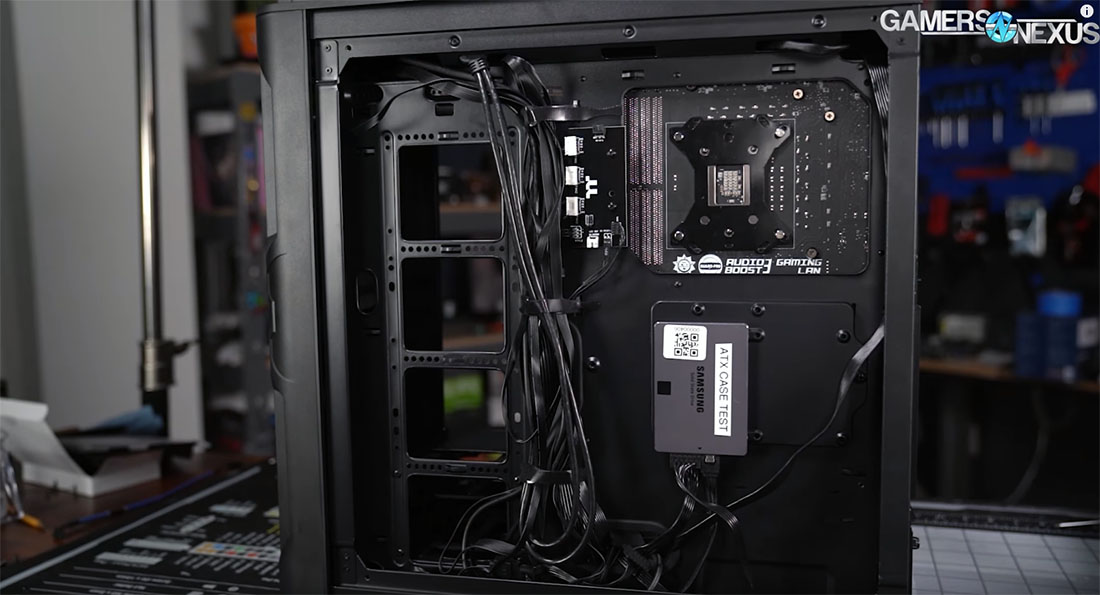
The partial PSU shroud that can’t really be used to store any cables and the flat motherboard tray that doesn’t bow out at the front for extra cable management room means that the vast majority of cables must be bundled up against the back of the motherboard tray. Space behind the tray is therefore relatively wide, almost 3.5cm across the entire case. This does have the unfortunate side effect of reducing the width available for the rear exhaust fan, so the rear mount can only support 120mm fans.
GN Case Testing Bench
| Component | Courtesy Of | |
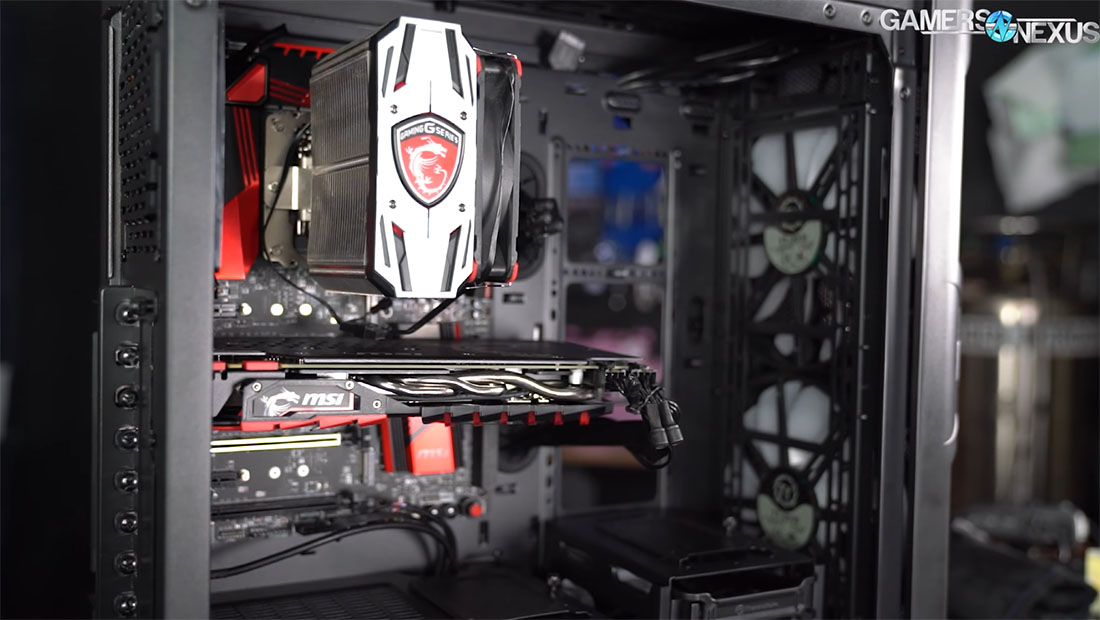
| Video Card | MSI GTX 1080 Gaming X (OC Mode) | MSI |
| CPU | Intel i7-6700K @ 4.4GHz | GamersNexus |
| CPU Cooler | MSI Core Frozr L | MSI |
| Motherboard | MSI Z170A Gaming M7 | MSI |
| Memory | Corsair Vengeance LED 32GB 3200MHz | Corsair |
| SSD | Samsung 850 EVO 120GB | Samsung |
| PSU | Corsair RM650x | Corsair |
| Cables | CableMod Pro Mesh Cables | CableMod |
| Case | This is what we're testing! | - |
The video card is configured to run at 55% fan speed at all times.
Prior to load testing, we collect idle temperature results for ten minutes to determine the unloaded cooling performance of a case's fans and air channels. Thermal benchmarking is conducted for 1400 seconds (23 minutes), a period we've determined sufficient for achieving equilibrium. The over-time data is aggregated and will occasionally be compiled into charts, if interesting or relevant. The equilibrium performance is averaged to create the below charts.
Load testing is conducted using Prime95 LFFTs and Kombustor “FurMark” stress testing simultaneously. Testing is completely automated using in-house scripting, and executes with perfect accuracy on every run.
Find our noise normalized & fan normalized testing methodology here: https://www.gamersnexus.net/guides/3477-case-fan-standardization-tests-noise-normalized-thermals
THERMALS & NOISE
The Level 20 RS comes with a preinstalled vertical GPU bracket above the power supply shroud, which we removed for testing. Generally we try to leave cases completely stock for baseline testing, but this bracket is in the path of airflow and serves no purpose unless there are vertical GPUs mounted in the case, so we removed it for all tests since that’s what a real user would do. The only additional test we added on top of the usual set was a pass with one layer of mesh removed from the front panel. It’s not difficult to get this filter layer out, and it doesn’t alter the appearance of the case, but it does require disassembling the front panel and bending and unbending fragile metal tabs that aren’t designed to be reusable. It’s difficult to decide how much credit to give to Thermaltake for the results achieved with this mesh removed: it’s an easy mod, but it’s not part of the intended functionality of the case.
CPU TORTURE
We’ll start with our torture benchmark and just the Thermaltake Level 20 RS compared against itself and the other recent Level 20 product, the MT. We’ll look at comparative charts versus competitors in a moment.
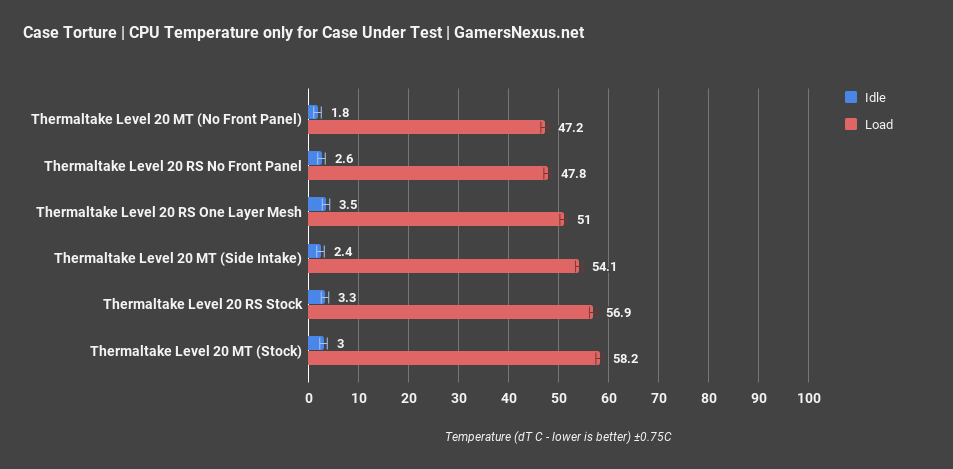
The Level 20 RS averaged 57 degrees Celsius dT over ambient with the stock layout, with a drop down to 48C dT average with the front panel removed. We use the test with no front panel as an indicator of what the best possible performance could be with no obstructions to the front fans whatsoever, and huge temperature drops like this aren’t uncommon. The real indicator of a problem is the test we did with the extra layer of mesh removed, which averaged 51C CPU dT. That’s about a six degree drop just from removing a filter that we don’t believe needs to be there at all, bringing it fairly close to the temperature that could have been achieved with no front panel whatsoever. The 200mm, 600RPM front fans can’t effectively pull air through two layers of mesh, and again, there’s no way to control the speed of these fans.
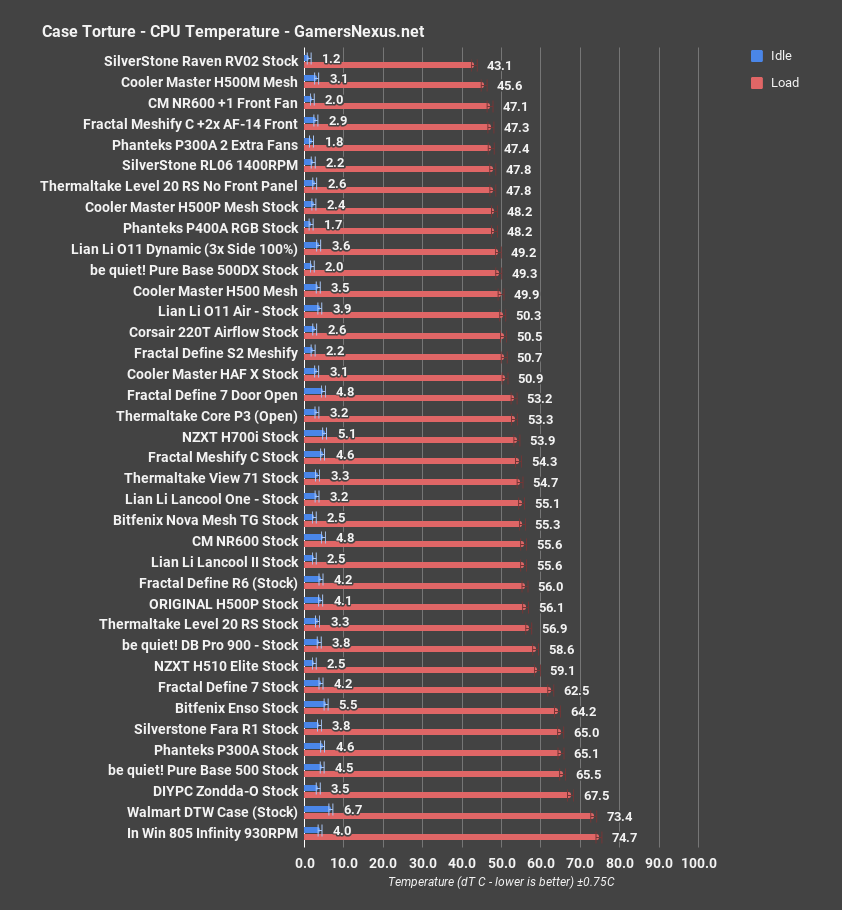
For a mesh-fronted case with two 200mm fans, 57C dT is just plain bad. The obvious point of comparison is Cooler Master’s line of “fixed” H500 cases that followed the original H500P, which was not only offensively bad in thermals, but also assembly.
Compared to the Level 20 RS, even the H500P original case averaged a degree cooler than the TT case in this test, at 56C dT. The H500 [blank] managed 50 degrees delta T over ambient, and the H500M with a mesh front panel applied is one of the best results on the chart at 46C dT. Of these, the H500 [blank] is the closest to the Level 20 RS in price, and it handily outperforms Thermaltake’s case. The 51C dT result with a single layer of mesh removed would put the Level 20 RS in competition with Cooler Master’s cases and some of the other airflow-focused cases on the chart, but again, that’s not the way the ships and we’re reluctant to say the case performs well based on a mod (again, like we noticed for the Thermaltake G21).
GPU TORTURE
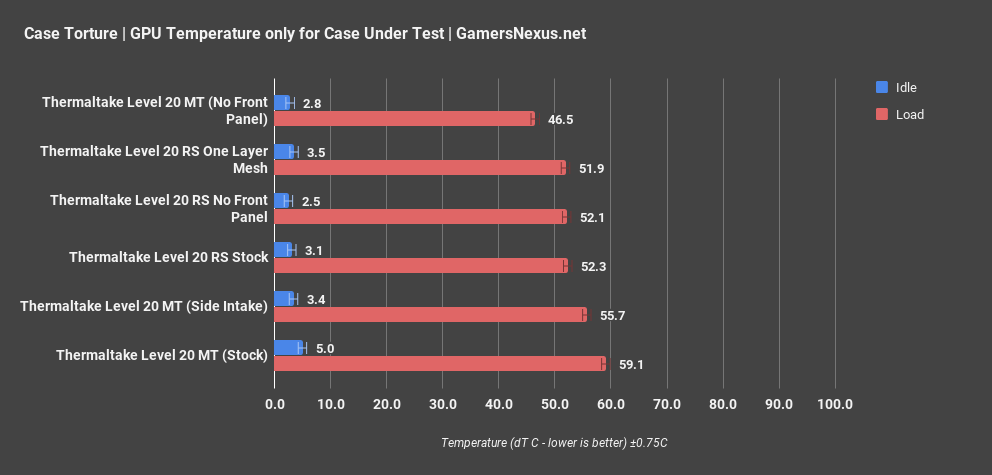
GPU temperature over ambient during the same torture test was 52C average, which was unchanged by either removing the single layer of mesh or the entire front panel. A combination of factors led to this, like the fact that the GPU increases clocks when it has thermal headroom, changing air patterns with the front panel removed, and the fact that the bottom intake fan may have a little more air available to it due to the hole at the bottom of the front panel. In any case, the result was a consistent 52C dT average across the board.
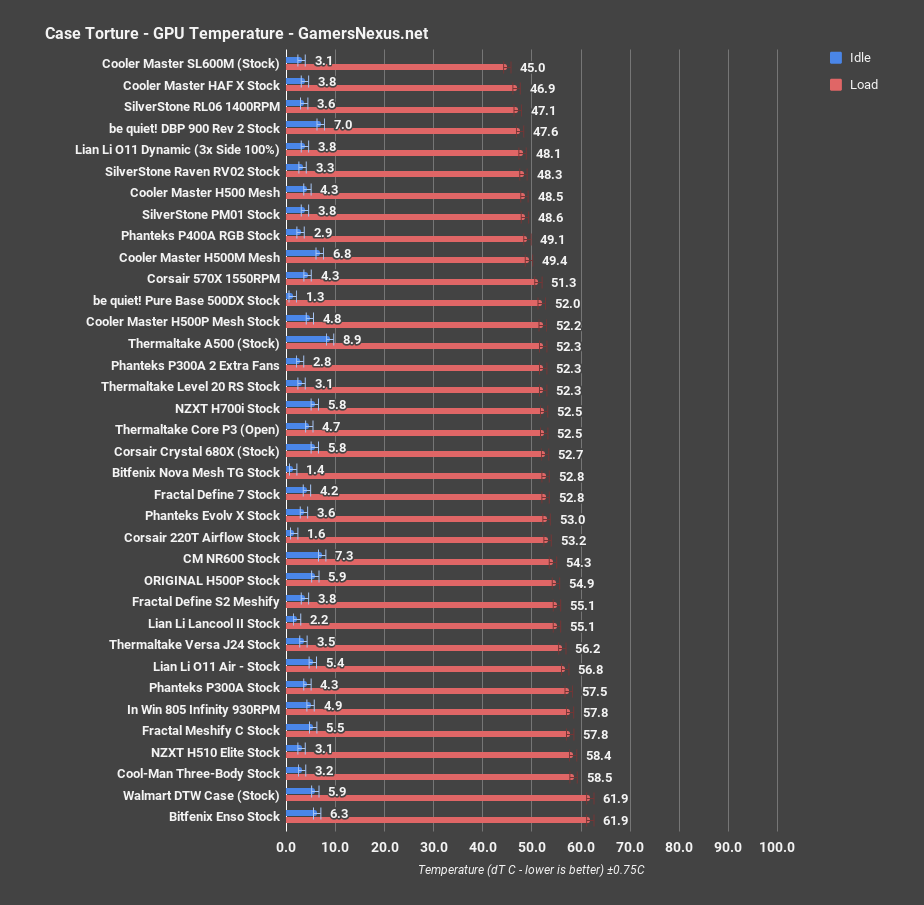
Comparatively, the Level 20 RS places much better versus other cases with GPU temperatures than it does with average CPU temperatures. 52C GPU dT is still a couple degrees warmer than the H500 and H500M’s 49C dT, but the original H500P averaged 55C dT here, so at least Thermaltake’s model outperforms a case that we explicitly criticized for dragging down Cooler Master’s “High AirFlow” line. It’s appropriately near other mesh-fronted cases, like the be quiet! 500DX and the Phanteks P400A, although the latter still beats it by a couple degrees. With one less layer of mesh in the front panel, the Level 20 RS would be a decently-cooled case, although even then we’d miss the ability to control the speed of the case fans.
FIRESTRIKE
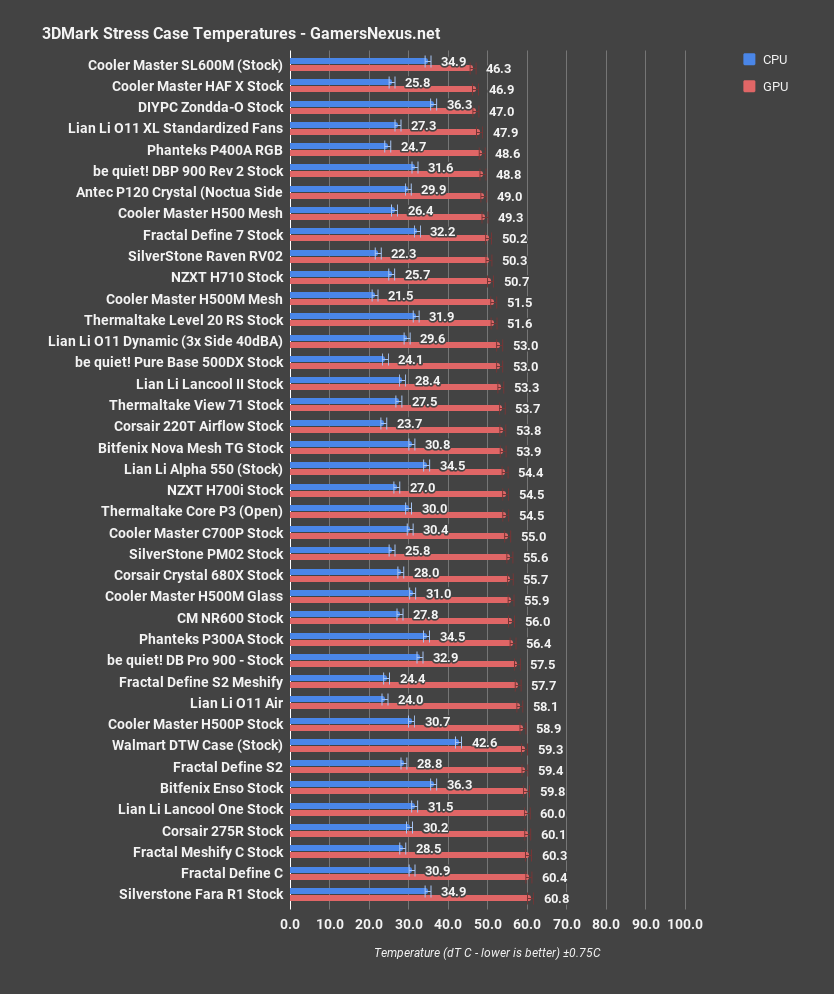
Our Firestrike test is next, showing what a gaming workload looks like. Yet again, the average GPU dT in this test was 52C dT. If nothing else, the Level 20 RS is consistent. The Firestrike GPU deltas are usually fairly close to the torture test GPU deltas, so this 52C average is comparatively better than its CPU performance here as well. Cooler Master’s H500 averaged 49C dT, while the H500M with a mesh front averaged 52C. These results confirm what we found in the torture test: Thermaltake has done fair-to-well on GPU cooling. The shortened, well-ventilated PSU shroud and the ventilation cut into the bottom of the case itself mean that the bottom of the case isn’t a sealed-off chamber.
BLENDER
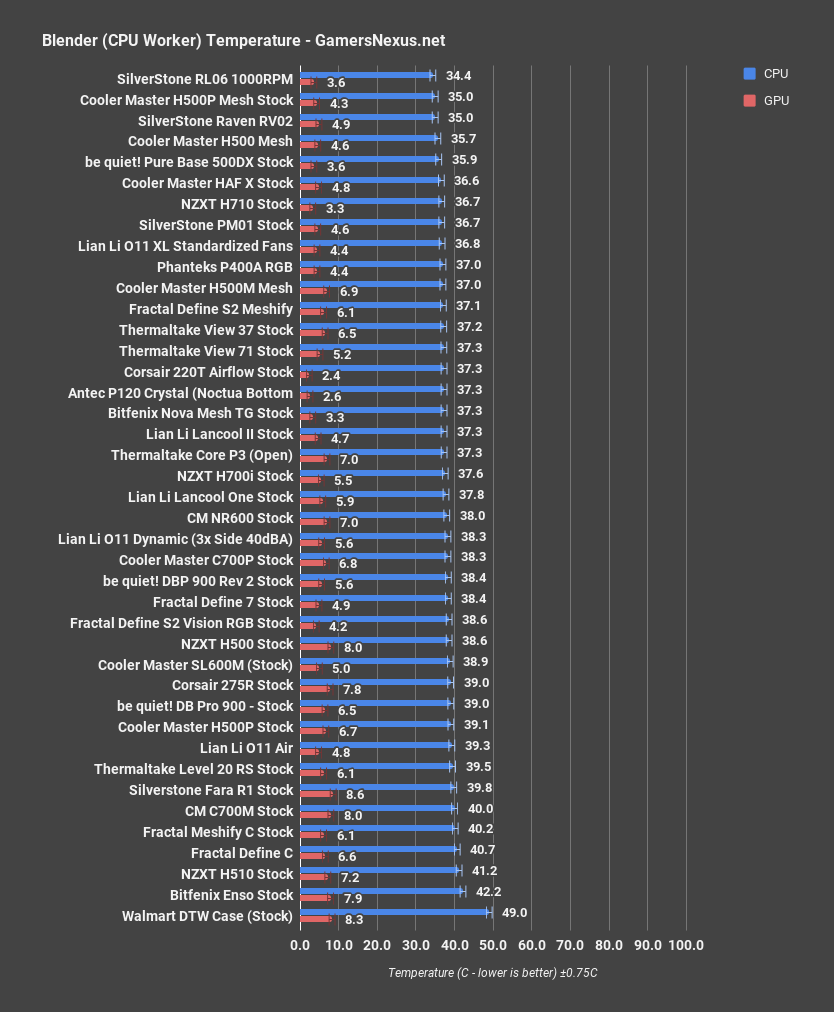
Blender provides an example of a real-world heavy workload that’s gentler than Prime95, which we use for the torture test. CPU dT during the CPU-only render was 40C dT, putting the Level 20 RS again among the warmest cases below the threshold where thermals are completely out of control. For context, the Bitfenix Enso, one of the most poorly-ventilated cases we’ve reviewed, averaged only a couple degrees warmer at 42C dT. Those two degrees are more significant in this test than in the torture test due to the relatively narrow range of results, but the Level 20 RS is still absolutely at the warm end of the chart. The Cooler Master H500 did particularly well in this test with an average CPU dT of 36C, among the best results we’ve recorded.
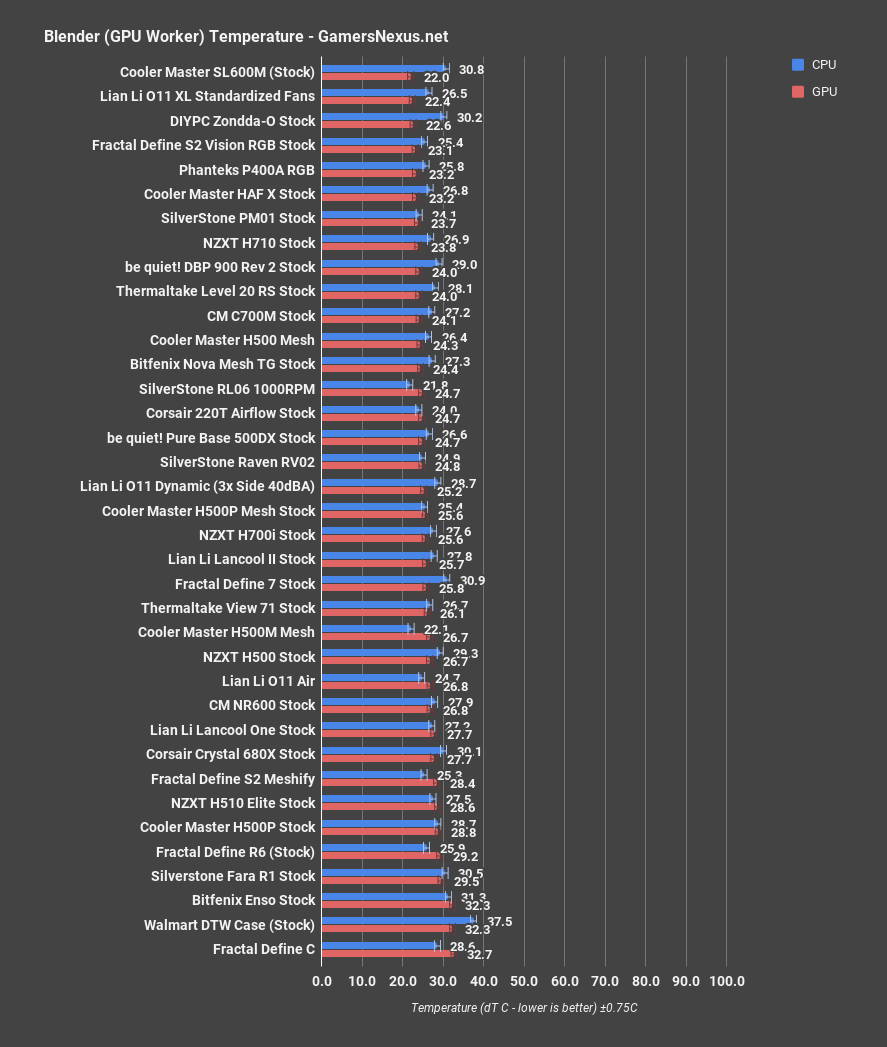
GPU thermals in Blender look actually very strong for the Level 20 RS, positioning it at 24 degrees dT over ambient, or in the top third of results on this truncated chart. That’s next to some other high performers on the chart. When the case isn’t under as much CPU thermal strain, it’s much more competitive.
NOISE & NOISE NORMALIZED
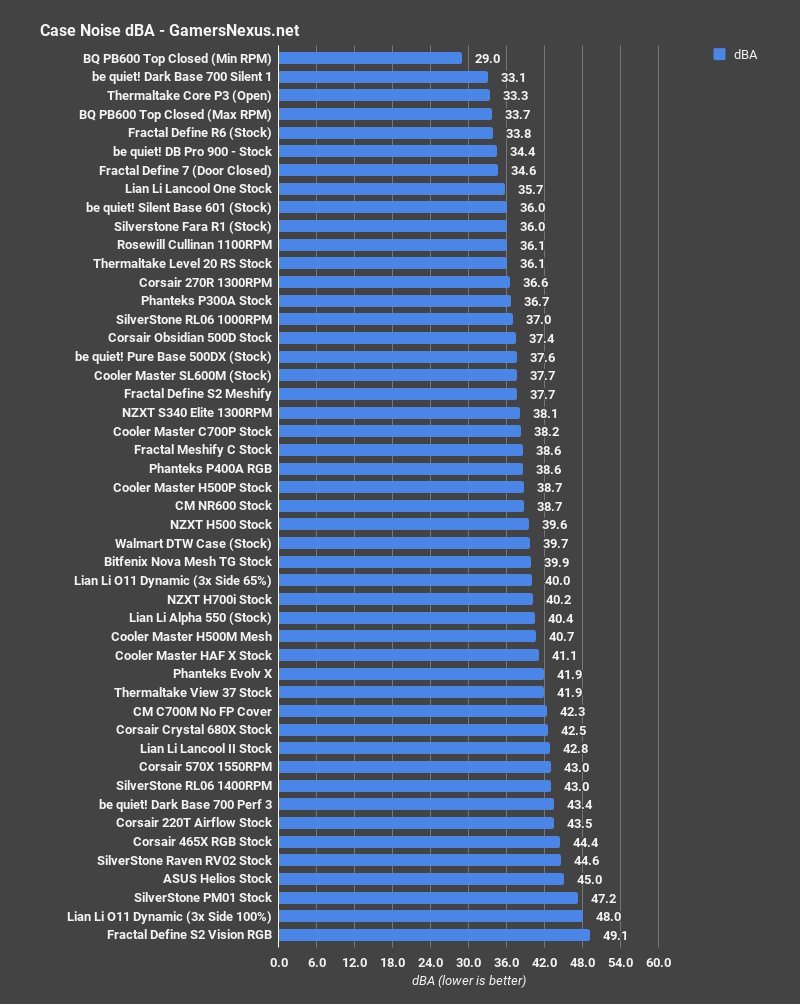
Our next chart is for noise. There are three fans in the Level 20 RS. Two of them are 200mm fans that are eternally locked to 600RPM, and one of them is a 120mm rear exhaust fan that maxes out at 1000RPM (ours reported approximately 1060RPM). We plugged the rear exhaust fan into the motherboard for manual control as we always do, but the case ships with the fan plugged into the same hub as the front fans, where it too will be locked to 100% speed at all times. For the first time in a long time, we’re in a position where the noise levels we log at 100% fan speed are the actual noise levels that should be expected from the case at all times. We measured it to be 36.1dBA, which is so close to the 36dBA noise-normalized threshold for our testing that we can take treat the stock torture results as comparable on the noise normalized chart.

The original 57C CPU dT result from the torture test stacks up much better against the noise-normalized cases, although that still only pushes it to about the middle of the chart. The Fractal Meshify C scored similarly, and the stock-configured Meshify C isn’t thermally impressive without those extra fans. Removing a layer of mesh from the Level 20 RS wouldn’t have a major impact on noise levels, and the 51C CPU dT average from that test would be one of the best noise-normalized results recorded thus far. Thermaltake was that close to having a chart-topping performer.
The GPU temperature from the torture test is exceptional compared against this chart. Among the cases using entirely stock layouts (we used our own fans for the O11 XL), the Level 20 RS is tied with the P400A for second-best GPU temperature on the chart. First place still goes to the ancient DIYPC Zondda-O, which has an old-school side intake fan aimed directly at the GPU.
STANDARDIZED FANS

Our next chart is for standardized fan testing, which is something that our viewers always ask for. Please note that there are several flaws to this approach to testing, which is why we resisted adding it for so long; that said, it can also be useful in building the full picture. To learn why that is, check our description links for our methodology post on the new standardized fan testing.
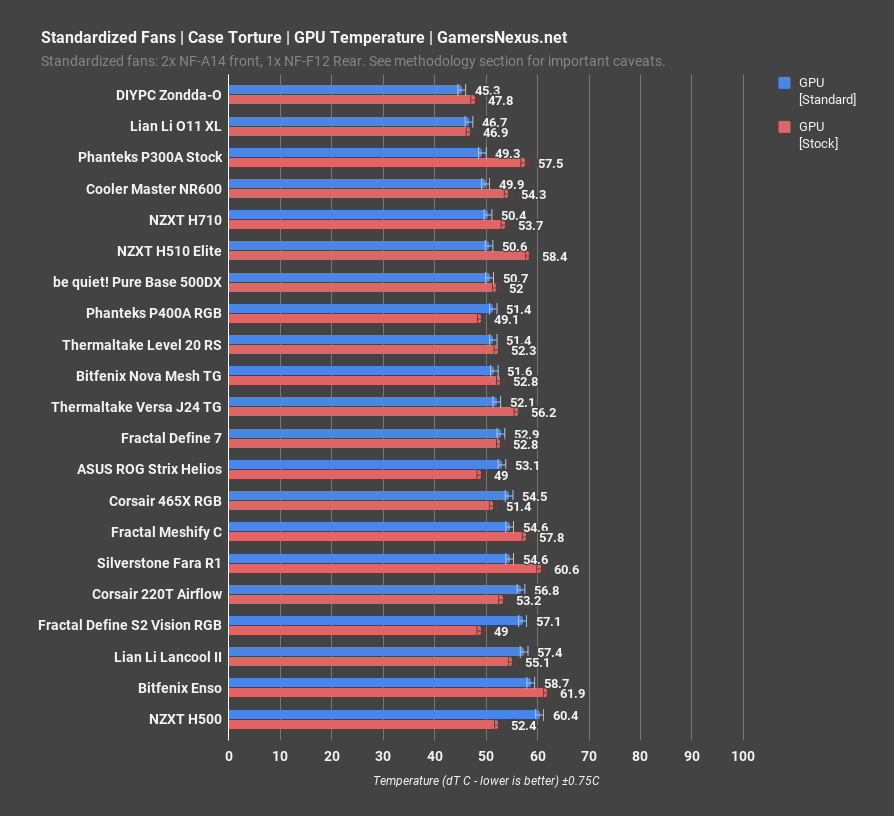
For the standardized fan test, we replaced the two 200mm front intake fans with our usual Noctua 140mm fans and the rear exhaust fan with a Noctua 120mm. We mounted the front intake fans on the outside of the chassis, since that’s the way Thermaltake mounts their stock 200mm fans. No mesh or filters were removed for this test. CPU dT averaged 53C, another unimpressive result for a case with an airflow-focused front panel. Other mesh-fronted cases like the Pure Base 500DX and P400A averaged 46C dT and 44C dT respectively, while the Level 20 RS lands closer to the Lian Li Lancool II and ROG Strix Helios. This confirms that the relatively slow front fans aren’t the problem: even with smaller, higher RPM fans, the dual mesh layers of the front panel prove too restrictive.
GPU dT averaged 51C dT in this test, the only deviation we saw from the 52C average in other tests, although even this is within margin of error of the original torture test. It’s tied with the Pure Base 500DX and the Phanteks P400A, two very good cases that regularly outperform it in CPU thermals, which is a good place to be.
CONCLUSION
By designing a case like this, Thermaltake's Level 20 RS is inviting direct comparisons to Cooler Master’s cases. Cooler Master isn’t the only company making cases with 200mm RGB intake fans, but they’re the ones at the front of everyone’s mind. They’ve been putting out H500-whatever cases for three years at this point, so availability and prices are constantly fluctuating, but there’s usually a member of the H500 family available for around the $150 price of a Level 20 RS. The H500P Mesh, for example, is available at a similar price at the time of this writing. We absolutely don’t recommend any case from this line with an acrylic front, but the mesh-fronted ones exceed the performance of Thermaltake’s case in CPU thermals.
With a single layer of mesh like the P400A, or a less-restrictive filter layer like the H500P Mesh, the Level 20 RS would have decent performance. It’s fairly easy to take the filter out, but the other cases we’ve mentioned don’t require modding to perform well. The most compelling reason to buy this case versus a Cooler Master one is that it may be a good bit cheaper depending on sales, and the mesh top with a relatively large top radiator mount compatible with a variety of rad sizes--there’s no point in paying for a case with flashy 200mm intake fans and then swapping them for a radiator, so top mounting is an important concern. As mentioned earlier in this review, though, this top mount could be less restrictive than it is.
Host, Test Lead: Steve Burke
Editorial, Testing: Patrick Lathan
Video: Keegan Gallick, Andrew Coleman