Phanteks Enthoo Pro 2 Case Review vs. Lian Li O11 XL (& Radiator Compatibility)
Posted on
The Phanteks Enthoo Pro 2 is a case that we last saw at CES 2020, back in January. It’s a giant liquid cooling-focused enclosure built on the existing P600S chassis and, as such, it differs from our usual case reviews in much the same way that the O11 Dynamic XL review did. Incidentally, the Phanteks reviewer’s guide suggests that this case is intended to directly compete with the XL, as well as Fractal’s Define 7 XL, be quiet!’s Dark Base Pro 900, and Corsair’s Obsidian Series 1000D. Today, we’ll be discussing the airflow and some unusual features of the Enthoo Pro 2, including our first hands-on testing of Phanteks’ self-dubbed “High Performance Fabric.”
The Build
Building in the Enthoo Pro 2 got off to a rough start as no accessories were packed with the case--no screws, no zip ties, no hard drive cages, nothing. Luckily we have a full list of the items that are supposed to be included, including: four modular 3.5” HDD brackets, a vertical GPU mount (without riser cable), and a dual-system cover to be used when installing a secondary mini-ITX board in the case, a GPU anti-sag bracket, and various screws sorted into a plastic organizer. We can assume that this was just an oversight in an early review sample, but it’s a good reminder to check accessories carefully to make sure everything was included. We’ve gotten reports lately of some CLCs coming without the proper mounting hardware, for example, and the companies will basically always send out the parts if you let them know -- it’s just inconvenient.
Type | Full Tower |
D-RGB (ARGB) Lighting | Yes |
Software-Free D-RGB Controller | Yes |
Fan Support (120/140) | 15/8 Front: 4/3 Side: 4/0 Top: 3/3 Rear: 1/1 Bottom: 3/1 |
Included Fans | 0 |
Radiator Support | Front: 480/420 Side: 480 Top: 360 Rear: 120/140 Bottom: 360 |
Storage | 3.5"/2.5": 12 (4 incl.) Dedicated 2.5": 11 (11 incl.) |
Vertical GPU | Yes, 3-slots (opt. Riser Cable required) |
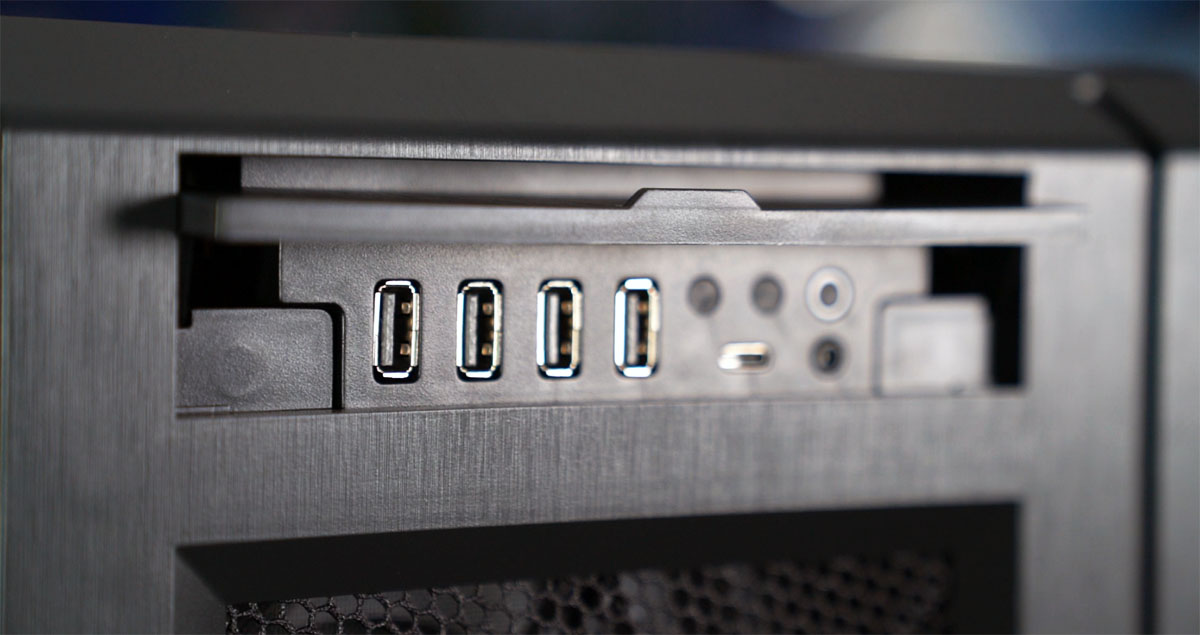
I/O | USB-C Gen 2, 4x USB 3.0 Microphone/Headphone Reset & power button |
Motherboard | SSI-EEB, E-ATX, ATX, micro-ATX, mini-ITX |
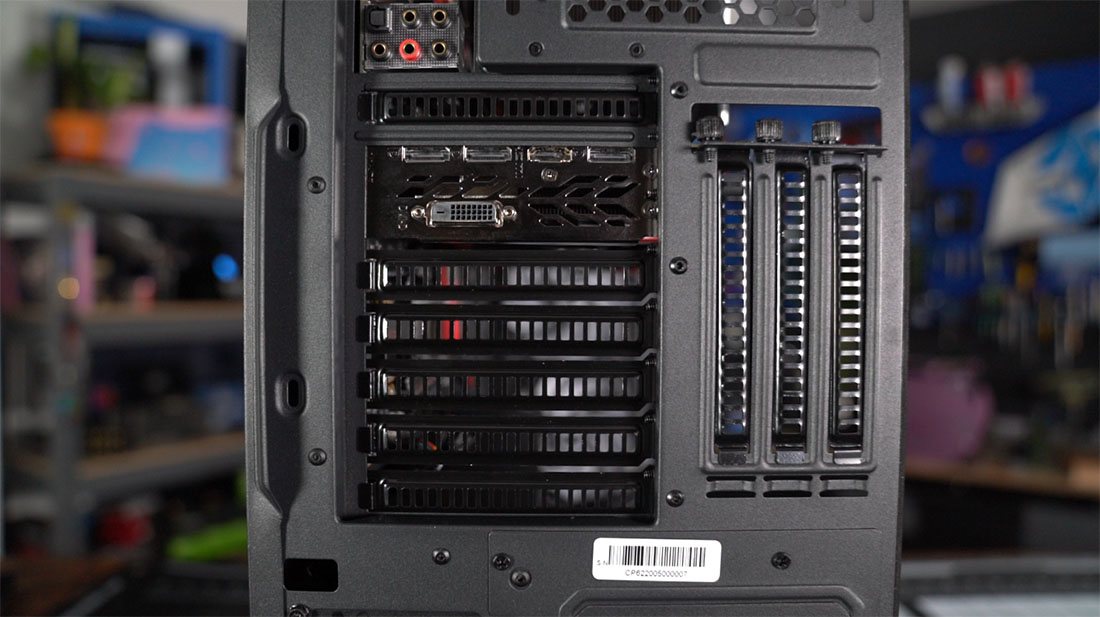
PCI | 8+3 vertical |
Dimensions (WxHxD) | 240 x 580 x 560mm |
MSRP | $140 |
NOTE: We only had about 24-36 hours to turn this entire review around, so the team worked literally around the clock to get it done. This means that, if you want a lot of visuals of the case, you’ll need to check the video. We simply need to sleep and won’t be pulling a bunch of images for the article, especially since the video does that well. Secondly, if you’d like to support our dedication to what we do, you can grab a GN PC component wireframe mouse mat, our anti-static and critically acclaimed PC building Modmat, or one of our shirts at the GN store. Thank you for your support.
In that list of missing parts, one omission was deliberate: case fans. Like the O11 Dynamic and O11 XL, the Enthoo Pro 2 does not come with any fans whatsoever. This is a decision that makes a little more sense in a case geared towards liquid cooling, as most CLCs come with their own fans and most open loop builders would prefer to supply their own. At least, that’s the most common response we received to our CES coverage when we asked our audience whether they’d prefer to buy their own fans for high-end cases. For mid towers, we prefer to see a good set of stock fans included, but the Enthoo Pro 2 is a different beast. This causes some difficulties for stock testing, but we’ll get to that in the thermal section later on.
Moving to the case itself: the Enthoo Pro 2 is a monster. Phanteks specifically states that this case supports 13 inch wide SSI-EEB motherboards. It’s approximately as large as the Anidees AI Crystal that Intel sent us with the Xeon W-3175X, and our assumption at the time was that Intel picked the AI Crystal because it was the biggest case Intel could find for a reasonable price. They certainly didn’t pick it for quality reasons. Back to the Enthoo, though--it’s large, but there are some inconsistencies in how efficiently the space is used. Starting behind the motherboard tray, there are three main sections. Looking into the case from this side, the upper right is the motherboard tray itself, a relatively empty area with 3x 2.5” drive sleds and about 2.5cm of clearance for cable routing. The bottom right is the PSU “shroud” area, with the PSU oriented on its side so that the intake fan can pull air in through the side of the case. This design should allow more airflow to the PSU than a typical configuration, but the main purpose is to free up space in the interior of the case for reasons we’ll discuss in a moment.
Since the shroud is entirely enclosed and only extends about two-thirds of the length of the case, there’s not really any more space inside than there would be in a typical mid-tower. The shroud is closed-up with a hinged metal cable cover designed to take some stress off of the steel side panel. This cable cover is necessary, but we found it annoying to work with: cables must be split up into small groups to fit through the cutouts in the cover, or else the edges of the cover will bite into cables and potentially cause damage. This problem was worse than it would usually be for our review system because we didn’t connect any of the front panel USB cables, and therefore had to route all that cable clutter behind the cover as well. In trying to arrange cables around the cutouts and mash the cover down into place, it’s easy to accidentally slide the cover off of its hinges and be forced to start all over again. The cable cover can also be ignored completely, but if someone is having difficulty putting the cover on, then they probably need the cover. It’s a frustrating experience having to carefully choose where to place cables in a case this gargantuan to begin with.
Still examining this side of the case, the left portion is dedicated to cable management and various mounting locations. The rails that run from top to bottom can be used for 120mm fans and radiators thanks to a side intake vent cut into the side panel, or for the modular 3.5” drive bays, or the plastic covers can just be left in place and used for mounting SSDs. Phanteks has opted not to use the weird sliding guillotine covers here that we criticized in the P500A and the Enthoo Evolv X, which we can appreciate. Instead, they’ve used pop-out plastic blanks similar in function to the ones included with the Dark Base Pro 900 v2. These blanks have big plastic fins on the back that are ostensibly useful for routing cables through. We’d argue that empty space is even easier to route cables through, and ask that Phanteks please chill out and stop making this more complicated than it needs to be. A better-handled location for cable management is in the center of the case, where (again, like the P500A) there are extra-large velcro straps that loop over hooks punched out of the case. These are great to work with, they cover a wide area, and they made it possible to spread our power cables out enough to fit under the cable management cover. Our one complaint with these straps is that one of them conflicts with one of the SSD sleds, such that it’s difficult to use the strap when an SSD is installed and plugged in.

Moving to the case interior, it becomes clear why the PSU is oriented in such a strange way. Phanteks has again made it possible to install a secondary system in this case, with the use of an included alternate backplate for the case. Unlike other Phanteks dual-system cases, the Pro 2 does not require a separately-purchased bracket to install a mini-ITX motherboard--it just mounts directly to the PSU shroud. There’s no space for a horizontal GPU, so secondary systems with discrete GPUs will require a separately-purchased riser cable for vertical mounting. This space can be used for a secondary power supply instead, but a secondary system and a secondary power supply can’t be installed at the same time, so a secondary system also requires a PSU that can supply two systems. Conveniently, Phanteks sells a power supply like this, the Revolt X. They also sell a PSU called the Revolt Pro that can be hooked up to a secondary PSU to combine their power, hence the option to mount two PSUs. We can’t speak to how well the Revolt Pro works, but it’s an interesting idea at least. Keep in mind that anything installed in this area of the case will have limited airflow, and PSUs especially will be mounted directly against the unventilated glass side panel. If not used for a secondary system or a secondary PSU, this area can also be used for fans or modular hard drive cages. The PSU shroud is not removable.
The major negative consequence of rotating the PSU is that vertical space is bizarrely limited given the size of the case. The O11 Dynamic cases deal with this problem by moving the PSU behind the motherboard, but the Enthoo Pro II must fit the full height of an ATX motherboard and the full width of an ATX PSU and shroud into a body approximately 55cm tall (minus legs), leaving whatever’s left over for fans, radiators, and cables. There’s only 3cm between the top edge of the motherboard and the roof of the case, and about 1.5cm from the bottom edge of the motherboard to the PSU shroud. Fan mounts at the top of the case are offset away from the motherboard to mitigate the problem, but it’s a jarring limitation to hit in one of the largest cases we’ve ever reviewed. Routing CPU power cables and fan connections to the top edge of the board isn’t any harder than it would be in a mid tower, but it’s a far cry from the huge wide-open space above the motherboard in the O11 Dynamic cases and even the Anidees AI Crystal. Conversely, space at the front of the case is wide open from top to bottom. For once, the full advertised length of the front radiator mount can be used easily, up to 480mm.
Phanteks has left this space open in part because it hasn’t fully given up on optical drives: there is an optional (separately purchased) ODD bracket that can be attached in the usual location. Bizarrely, this kit mounts the drives facing sideways towards the glass side panel, meaning that the side panel must be removed in order to eject or insert discs. It does not replace the front I/O, despite the fact that every GN employee independently mistook the front I/O door for an optical drive bay. Still, it’s an option, which is more than can be said for many cases.
Front I/O is mostly what we’d hope for from a case this big and functional-looking: four USB 3.0 type-A ports, and one USB 3.2 type-C port. Finally we get to see a case that includes a USB-C port without eliminating half the type-A ports. There are also separate buttons for LED color, LED mode, and reset, without resorting to the usual method of repurposing the reset button into an LED control button. Phanteks has clearly made a point of having a full suite of I/O ports, which makes it odd that the audio jack is a single combined headphone/mic jack. Using any of the front I/O other than the power button requires opening the little plastic door on the front of the case, though, so users will probably prefer rear panel audio jacks for long-term usage.
Side panel attachment is simplistic, which is one area where Phanteks could have added some value. Both side panels slide on and attach with two captive thumbscrews at the back. It’s fine, but it’s a less expensive solution than the hinged doors of the P500A, for example. The extremely large steel side panel is prone to warping, which is the reason that the cable cover is required--any unmanaged cables have the potential to bow out the side panel. At a glance, the ventilation holes cut into this steel panel appear to be less restrictive than the pattern cut into the O11 XL’s side panel.
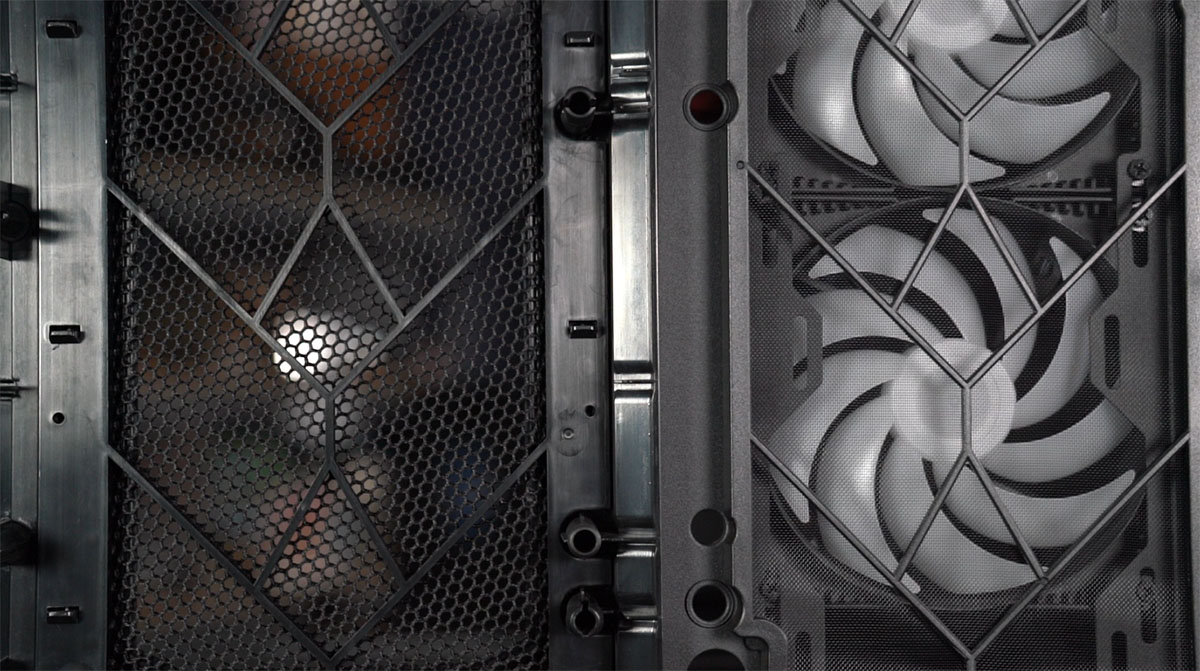
The front panel is a major focus for Phanteks’ marketing, with a covering that they describe as High-Performance Fabric, all capitalized. The idea is that this mesh is extremely breathable, much more so than even the metal mesh front panels of the P-blank-hundred-A cases. That may be true, but an open hole is even more breathable than their high performance fabric--there’s a reason not everyone has ascended to using open-air test benches, and that reason is dust. The case ships with a normal dust filter installed behind the fabric mesh, so it doesn’t matter how breathable the fabric is, since it’s essentially a decorative covering for the real dust filter. Phanteks has addressed this by saying the following: “The dust filter behind the Enthoo Pro 2 frontpanel can be removed for maximum airflow performance. Larger dust particles will still be filtered out thanks to the Fabric mesh structure.” We haven’t had our hands on the case nearly long enough to test that claim, but we can be fairly confident in saying that using the fabric panel with no additional filter will not capture as much dust as the P400A’s front panel would. The fabric is cool, and we’ll cover airflow testing in a moment, but take the performance claims with a grain of salt. The fabric itself is taut and a little stretchy, making it more resistant to sagging than it appears. We wouldn’t recommend giving it a solid poke, but it should stand up to daily use.
The top filter is just a generic rectangle of mesh with magnetic borders, but the front and bottom filters have more thought put into them. The front filter intentionally has some thickness to keep it out of contact with front fans, and the border has been carefully shaped to avoid holes on the chassis. There’s also a tiny handle at the top to help pop the filter out. This isn’t groundbreaking, but it’s good to see effort being invested here when another generic filter would have worked. The fan mounting rails support both 120mm and 140mm fans, but the 120mm mounts have been shaped to obstruct 140mm fans as little as possible while remaining structurally sound. Removing either the bottom filter or the front filter requires entirely removing the front panel, which unfortunately doesn’t use the ball-and-cup snaps we’ve seen in other Phanteks cases but is still easy to get off. The bottom filter covers the entire length of the case and slides out from the front. Since there’s no way for a PSU to draw air from the bottom of the case, this filter exists to support bottom-mounted fans and radiators.
For bottom-mounted intake fans, there’s just under 3.5cm distance from the surface the case stands on to the floor of the case, with a few extra millimeters of clearance added by the removable fan/radiator tray. It’s a good tray, held in by a single captive thumbscrew which was torqued down so hard it warped the bottom of the case. The O11 XL has a similar amount of clearance, although the plastic trim along the bottom of the Enthoo Pro 2 makes it appear to be much less. Interference from the PSU shroud means that the tray can only fit a single 140mm fan, and there’s no room to spare on either side of 120mm fans. The section of the tray adjacent to the PSU shroud will not fit anything wider than 125mm at the very most.
GN Case Testing Bench
| Component | Courtesy Of | |
| Video Card | MSI GTX 1080 Gaming X (OC Mode) | MSI |
| CPU | Intel i7-6700K @ 4.4GHz | GamersNexus |
| CPU Cooler | MSI Core Frozr L | MSI |
| Motherboard | MSI Z170A Gaming M7 | MSI |
| Memory | Corsair Vengeance LED 32GB 3200MHz | Corsair |
| SSD | Samsung 850 EVO 120GB | Samsung |
| PSU | Gigabyte 800W PSU | Gigabyte |
| Cables | CableMod Pro Mesh Cables | CableMod |
| Case | This is what we're testing! | - |
The video card is configured to run at 55% fan speed at all times.
Prior to load testing, we collect idle temperature results for ten minutes to determine the unloaded cooling performance of a case's fans and air channels. Thermal benchmarking is conducted for 1400 seconds (23 minutes), a period we've determined sufficient for achieving equilibrium. The over-time data is aggregated and will occasionally be compiled into charts, if interesting or relevant. The equilibrium performance is averaged to create the below charts.
Load testing is conducted using Prime95 LFFTs and Kombustor “FurMark” stress testing simultaneously. Testing is completely automated using in-house scripting, and executes with perfect accuracy on every run.
Find our noise normalized & fan normalized testing methodology here: https://www.gamersnexus.net/guides/3477-case-fan-standardization-tests-noise-normalized-thermals
Thermals & Noise
Thermals are up next, but since our thermal test bench uses air cooling and the Enthoo Pro 2 is clearly competing with the O11 XL for the large liquid-focused case market, let’s take a moment and compare them on those terms.
Lian Li O11 XL vs. Enthoo Pro 2 Radiator Show-Down
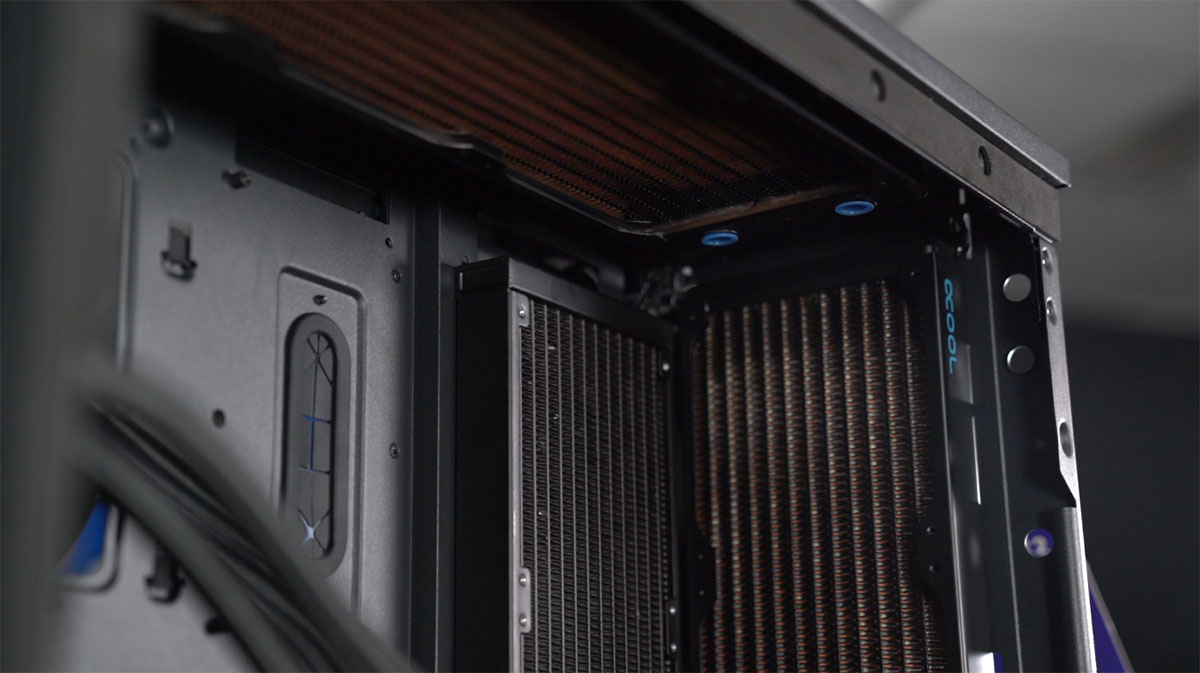
The Enthoo Pro 2 makes much of its fan support, allegedly fitting up to 15x 120mm fans or 8x 140mm fans, but the radiator support that really matters. The Phanteks case has an unobstructed 480mm front radiator mount, as well as a 480mm side mount--but they can’t be used at the same time. There’s enough room to fit a rad and fans on one mount and fans on the other, for example, but two rads side-by-side will not fit. There is actually enough space for a full 480mm radiator, including the reservoirs at the top and bottom. There’s not much reason to use the side mount in the Pro 2 in our opinion, since the front mount will work better for anything less than 480mm long. The O11 XL lacks a front mount and supports a maximum of 360mm on its side mount. We consider top mounting in Lian Li’s case superior since the entire thickness of a radiator with fans installed can fit above the top edge of the motherboard, and both cases are tied at 360mm max radiator length for this location. At the bottom of the case, the O11 XL can support 280mm or 360mm radiators, while the Pro 2 can only support up to 360mm rads since the mount is too narrow for multiple 140mm fans. Using a max-length radiator in the bottom of the Pro 2 also has the potential to conflict with max-length front-mounted radiators or side-mounted radiators with tubes at the bottom, while the O11 XL’s greater width allows side-mounted radiators to be positioned well clear of the bottom mount. The Enthoo Pro 2 is the winner in terms of maximum individual radiator size, but the O11 XL can squeeze in three 360mm radiators simultaneously. Both cases have their own strengths. Related points in the Pro 2’s favor are a drain port at the bottom of the front panel and the potential for using the side fan mounts to attach a reservoir while using the front mount for a radiator.
For our thermal tests, we decided to focus on the front panel that Phanteks is so proud of. Since there were no fans included with the case, we used three of Phanteks’ own 140mm SK series PWM fans as front intake for baseline testing. We consider that a normal starting point for the target audience of this case. Again, we recognize that most users will install some form of liquid cooling in this case, so we’re primarily comparing the case against itself to test the front panel and various airflow configurations. Even with liquid cooling, air still flows the same way.
Other than the standard test suite, we did two more tests with the three 140mm intake fans: one without the filter, and one without the front panel or the filter. We tried doing these tests with the fans at full speed initially, but Phanteks’ 1500RPM SK fans pushed so much air that they erased any scaling, so that results with no front panel or filter were only one degree from baseline. That’s a promising result in itself, but we need to see some scaling, so we reran these tests with the fans set to the speed we used for noise normalized testing (45%).
CPU Torture
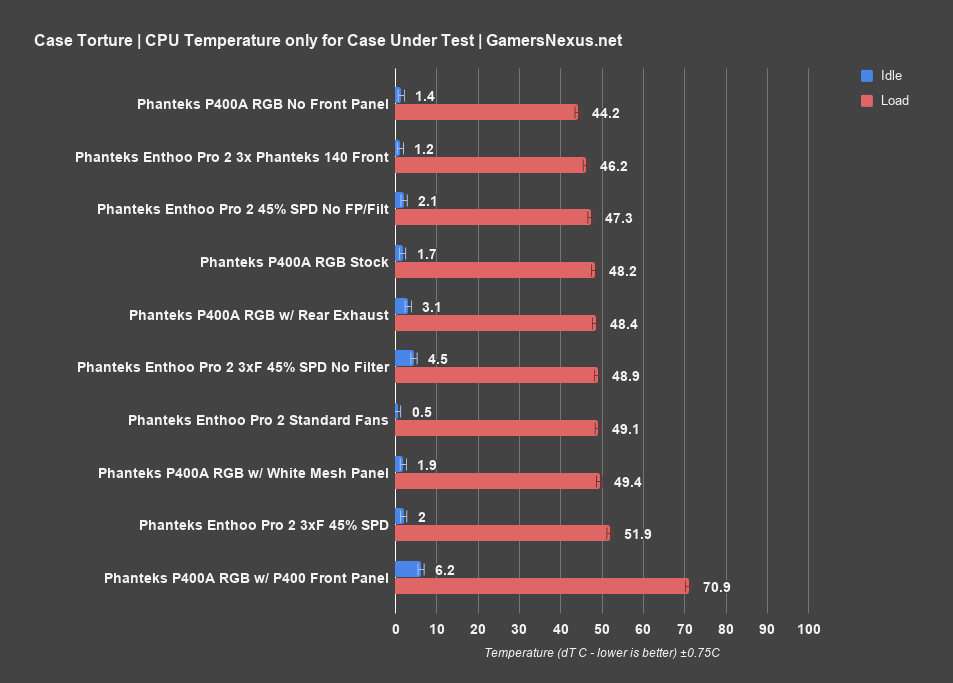
Our original “stock” result for the CPU torture test was 46 degrees Celsius above ambient with the case fans at 100% speed, but as we just explained, we decided to use the noise-normalized result as our basis for testing with the fans reduced to 45% speed. We’ll discuss the noise normalized chart on its own later on, but the average in that test was 52 degrees. Removing the front filter reduced that delta to 49 degrees, and removing both the front panel and the filter resulted in an average of 47 degrees. We can deduce a few things from these results: the high-airflow fabric does obstruct airflow a little, but not as much as the actual filter, but the front panel and the filter combined don’t hurt thermals much more than the P400A’s mesh panel does. This is a promising start.
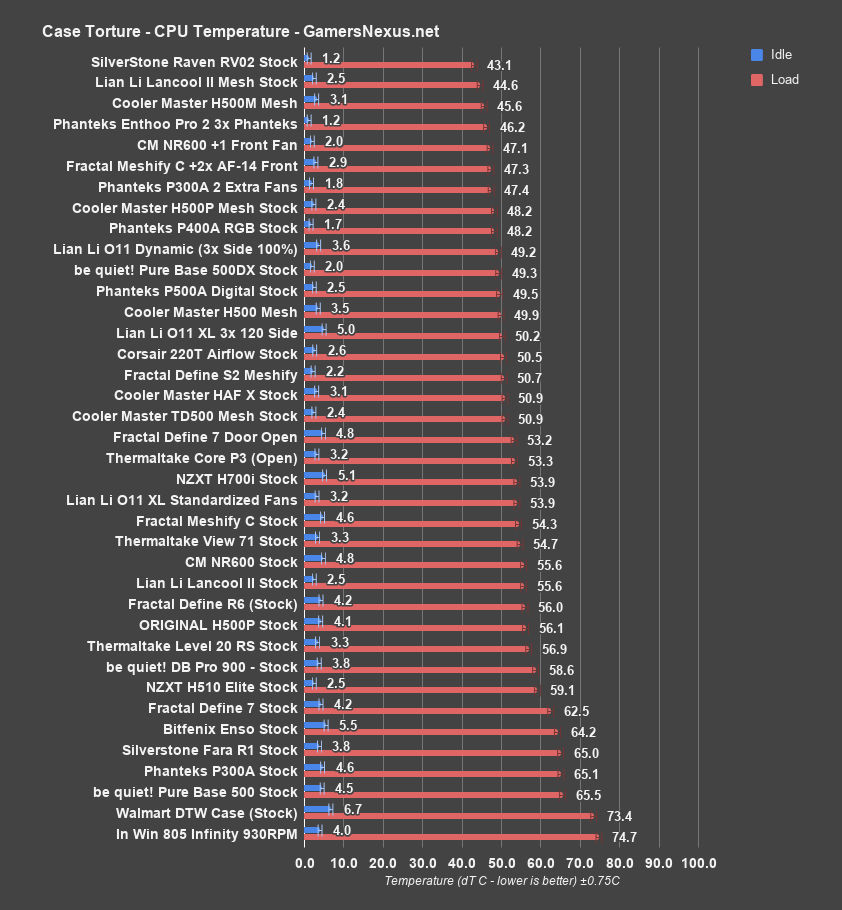
Sticking three fans in the Pro 2 isn’t stock, so we won’t spend too much time comparing it to past stock cases on our chart. The 46 degree delta we measured with 100% fan speed would tie the Pro 2 with the H500M Mesh as one of the best-cooled cases on the chart so far, while the 52 degree delta with reduced fan speed places it at about the performance level of the TD500 Mesh. The O11 XL averaged 54 degrees using our standardized set of fans in this test, but that’s with the intake fans positioned at the bottom of the case, far away from the CPU cooler. Another test had it closer to 50C, while some of the unshown feature tests were closer to 48. The noise normalized and standardized fan tests coming up in a moment are better for comparative testing, so keep watching.
GPU Torture
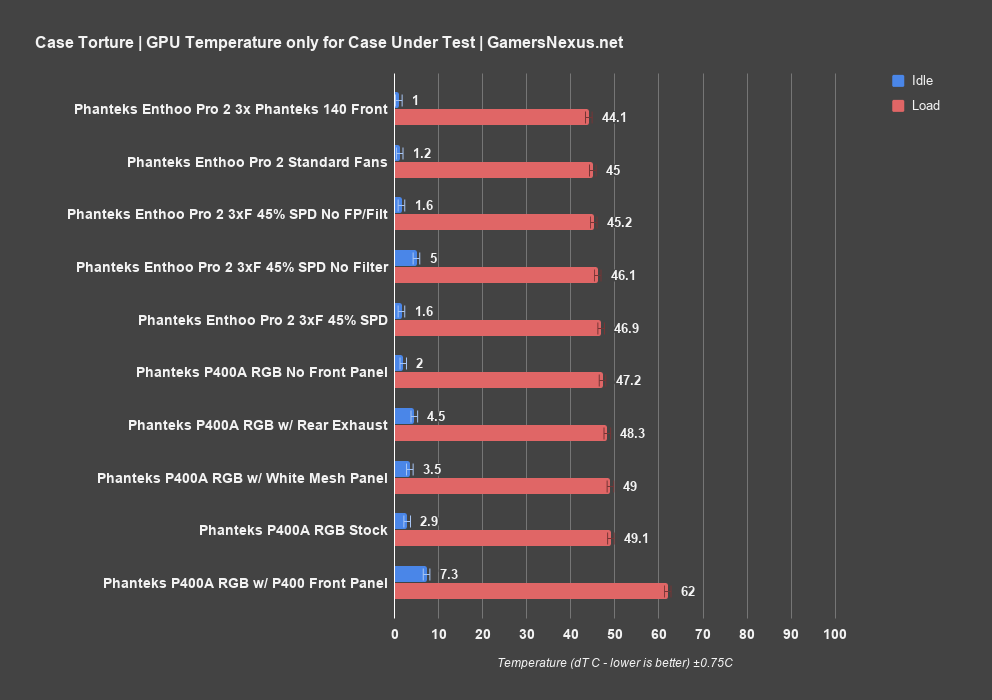
The GPU temperature with 100% case fan speed averaged 44 degrees Celsius over ambient, and lowering fan speed to 45% only raised that delta to 47 degrees. Removing just the filter lowered it to 46 degrees, and removing both the filter and the front panel lowered it further to 45 degrees. We rarely have numbers that line up so neatly. A difference of only two degrees between having the front panel and filter on versus taking them off completely is an achievement, and it appears that the front panel really might be as breathable as advertised. Keep in mind that this is dependent on static pressure performance, and so we tested with the lower speeds to create a bigger challenge for the fans. If anything, this indicates that Phanteks doesn’t need to include the line about taking the filter out, since its impact on thermals is minimal.
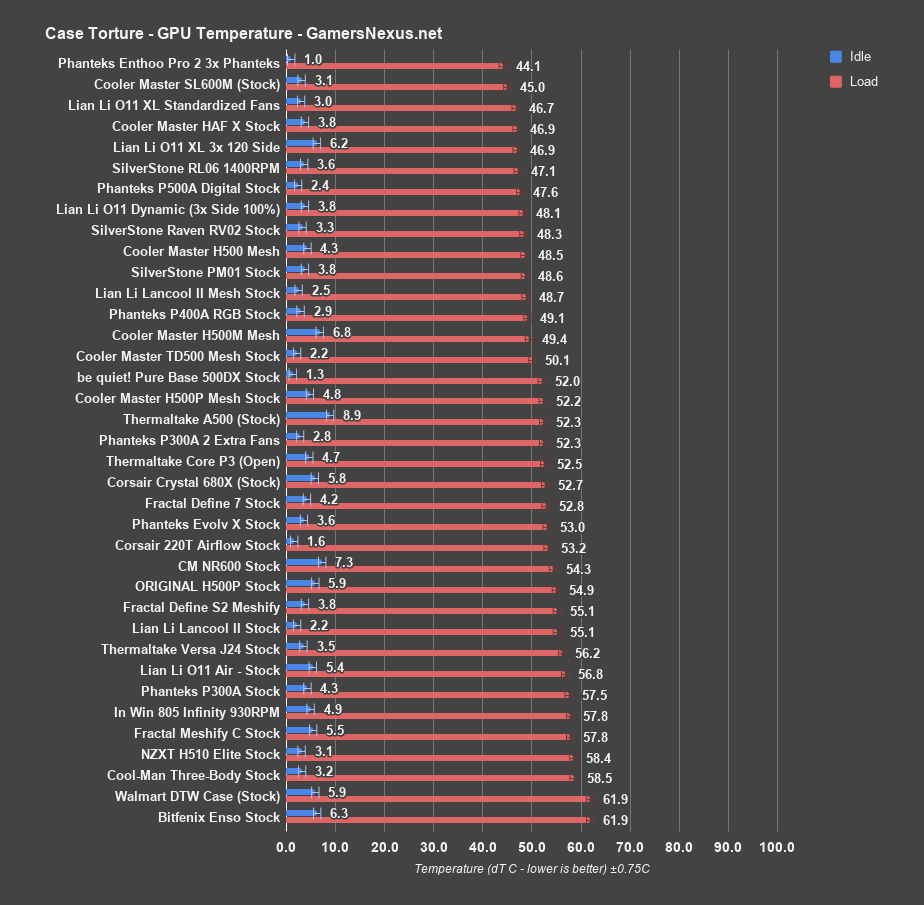
Glancing at our chart of stock case results, an average of 44 degrees would make the Pro 2 the best performing case on the chart so far, while an average of 47 degrees would tie it with the RL06 and HAF X, with only the SL600M significantly past it at 45 degrees. Compare that to the O11 Dynamic with three side intake fans at 100% which averaged 48 degrees, or the O11 Dynamic XL with the standardized set of Noctua fans pointed directly into the GPU at 47 degrees.
Standardized Fans

For standardized fan testing, we used the same kit of Noctua fans we always do in the same configuration: two 140mm front intake and one 120mm rear exhaust. We chose the upper two slots for the intake fans. The average CPU temperature with this arrangement was 49 degrees Celsius over ambient, the first instance we’ve seen where the Pro 2’s thermal performance falters slightly. Taking one look at this fan arrangement makes the problem obvious: even though these 140mm fans would take up most of the front panel of a mid tower, they only cover a fraction of the cavernous interior of the Pro 2, and they’re far away from the CPU cooler. That said, performance isn’t that far behind the 46 degree baseline result, and it’s good-to-average relative to the rest of the standardized fan chart. The glass-fronted Corsair 465X RGB is tied at 49 Celsius, and the O11 XL is actually several degrees warmer at 54 Celsius thanks to the bottom-intake layout we had to use in that case. If going with an air cooler in this case, you’ll either want top intake or fans that can push a tunnel of air.
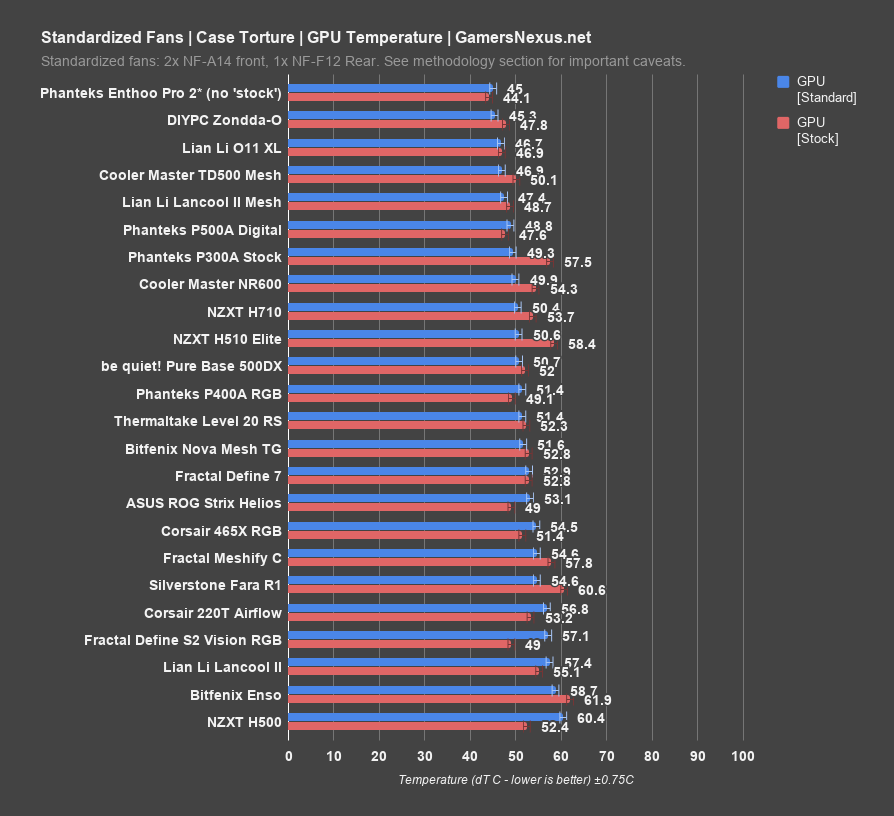
In contrast, average GPU temperature was 45 degrees Celsius above ambient, tied for the best result we’ve seen so far in this test. While the CPU suffered mildly from the wide-open space preventing a strong, funneled front-to-back airflow pattern with just two intake fans, the GPU benefited from the huge empty chamber below it. This average is one degree warmer than baseline, but it’s still even better than the O11 XL’s average of 47 degrees, even though it had direct active GPU cooling in this test. This advantage will diminish if the space at the bottom of the Pro 2 is used for anything, especially a secondary system, but between the size of the interior, the mesh front panel, and the bottom intake slots, the potential for GPU cooling in this case is undeniably strong.
Noise Normalized
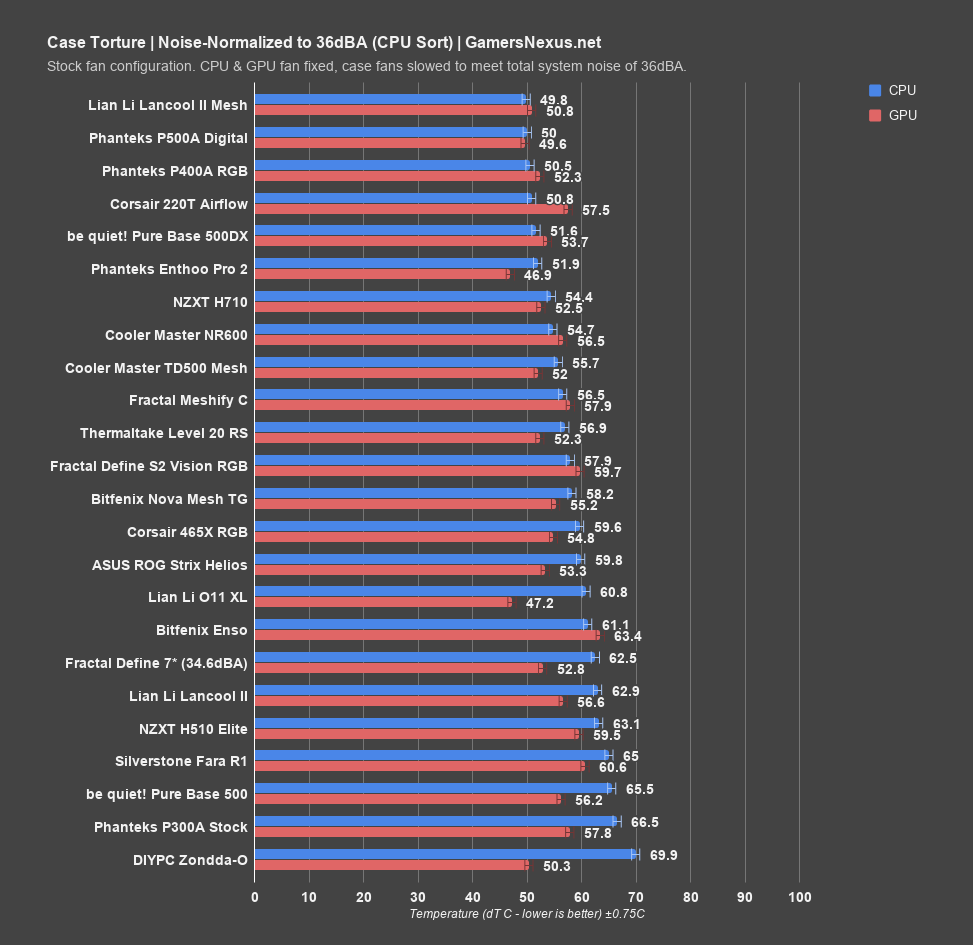
We can’t reasonably measure the noise level of this case when it depends entirely on which fans the user installs. Noise normalized testing is still fair game, though. The Phanteks 140mm fans we used for baseline testing were pretty loud at 1500RPM, and hitting the 36dBA threshold we’ve set for noise normalized testing required setting them to 45% speed in BIOS, approximately 900RPM. Having all of the fans installed in the front of the case is a disadvantage for noise, but it’s the same layout that other Phanteks airflow cases use, and they still manage to score well in this category. The CPU temperature averaged 52 degrees Celsius above ambient at this speed, right in line with the other mesh-fronted cases we’ve tested. The P500A and P400A were a little cooler at 50 degrees and 51 degrees respectively, while the 500DX tied at 52 degrees.
Average GPU temperature for this test was 47 degrees Celsius above ambient, impressively close to the 44 degree result at 100% RPM given how drastically reduced the fan speed was. Again, GPU thermals are a strong point of this case, especially without anything installed in the lower portion of the enclosure. Relative to other noise normalized cases, the Pro 2 is tied with the O11 XL for best overall, both of them a significant step beyond the runner-up P500A’s average of 50 degrees Celsius above ambient. We used the standardized Noctua set of fans for this test in the O11 XL, so it may have a slight disadvantage compared to the three 140mm fans we chose for the Pro 2, but keep in mind that the intake fans in the O11 XL were positioned directly below the GPU and pointed into the cooler. The fact that the Pro 2 has tied it with a front-to-back airflow pattern under any circumstances is impressive.
Conclusion
One thing we haven’t touched on at all in this review so far is aesthetics. The Enthoo Pro 2 isn’t a sleek case, and the only obvious attempt to dress it up is the streak of ARGB lighting along the PSU shroud (as well as the power button). The cases Phanteks has positioned itself against, like the O11 Dynamic XL, Define 7 XL, and Dark Base Pro 900 all try at least a little harder in the looks department. The Obsidian 1000D tries as well, even if the end result looks like a dishwasher -- it’s an appliance. This is a case intended to appeal to the former Caselabs audience, for customers who want a big industrial-looking box to put their expensive water cooling equipment into. For those who want something more conventional, Phanteks makes the P500A. For those who want something even less fancy, Phanteks offers a “closed” version of the Pro 2 without tempered glass or RGB for $10 less. Thermal performance of this version should be exactly the same.
Don’t bother buying an Enthoo Pro 2 for a system that will fit in a smaller case. That’s not what this is for. The Pro 2 is for systems with big radiators and big reservoirs and big fans, and there are more economical options for smaller air-cooled systems. We did a roundup of them a few days ago, in fact. For those aforementioned big systems, though, the Pro 2 is a good option. We encourage you to read our O11 Dynamic XL review to weigh the pros and cons (and find the O11 Dynamic XL on Amazon here), but the Enthoo has its share of pros, including larger maximum radiator size and excellent airflow. We may revisit this front panel for more definitive airflow testing if interest is high enough, but Phanteks has created a very breathable design, even if that is more a property of the filter behind the front panel than of the front panel itself.
Editorial, Testing: Patrick Lathan
Host, Test Lead: Steve Burke
Video: Keegan Gallick, Andrew Coleman