Manufacturers apparently read our Dark Base Pro 900 review and took our “truly massive” description as a challenge: the case Thermaltake has sent us is fully plated in 5mm panes of glass, weighing 18.9kg (41.66 lbs) altogether, and we’ve got even heavier ones waiting in line. The Thermaltake View 71 TG is not the Core V71, it’s a whole new product more related to the Corsair 570X that we reviewed: a high-end case designed to push the limits of just how much glass a chassis can hold.
We’re reviewing the Thermaltake View 71 TG with the Corsair 570X alternative in mind, along with the freshly reviewed Be Quiet! Dark Base Pro 900 white edition. As usual, we’re looking at thermals and noise, with some additional testing done on optimal fan configuration with the View 71.
Thermaltake View 71 Specs
Form Factor | Full Tower |
Motherboard Support | 6.7” x 6.7” (Mini ITX) |
Dimensions | 592 x 274 x 577 mm |
Weight | 18.9 kg / 41.66 lb |
I/O | USB 3.0 x 2, USB 2.0 x 2, HD Audio x 1 |
Expansion/Bays | 8 PCIe (+2 for mounting GPU sideways) 2.5” x 4 or 3.5”x4 (HDD Rack) |
Cooling | Fans: Radiators: Front: 1 x 360mm , 1 x 420mm |
MSRP | $170 ($200 for the RGB Edition) |
Thermaltake View 71 Cable Management & Build Process
Like the Thermaltake Core P3 (reviewed here), this is a case that many customers will be buying based on looks alone, and in that regard the View 71 does very well. Every pane covers a fan mounting location, and the two Thermaltake Riing blue fans that ship with the basic model look great behind tinted glass--but the stock “one intake/one exhaust” setup isn’t visually impressive. Our thermal tests at the end of this review include a couple cooler-looking configurations that users might try. Potential buyers should keep in mind that this case can fit three 120mm fans in front, but not three 140mm, which is the size that’s included. The full three-Riing experience requires buying three new fans. Positioning of the front fans is extremely flexible thanks to the amount of mounting holes.
The interior of the case is spacious, even behind the motherboard. There are plenty of places to route cables, and that’s vital: like the G21, both side panels are translucent, and the View 71 doesn’t even have a PSU shroud to hide loose ends. Some negative user reviews also point out that although this case is technically capable of holding EATX boards, such boards make the cable cutouts and rubber grommets inaccessible.
Special features include the ability to mount the GPU vertically and mount a radiator sideways, inside the case. The vertical GPU mount is undercut by the fact that a Thermaltake PCIe riser cable is necessary but is not included with any version of the case. Our generic riser cable didn’t fit the mounting holes, so we had to make do with a hand-me-down from the Core P3. Even then, it’s best used with a liquid cooled CPU--our GPU didn’t quite fit with our air cooler (vertically, as it’s a taller Gaming X card), and we were only able to perform tests with the judicious use of twist-ties. The radiator mount works in much the same way that it does in the Core P3: the hard drive cages can be removed and up to a 420mm radiator can be mounted in their place, making the fans fully visible from the side of the case. That’s not optimal for airflow, but it’s possible thanks to the gaps left between the chassis and side panels.

Other glass panels we’ve seen leave little room for ventilation, especially when they use a protective foam pad around the edges. Thermaltake got around this by leaving a gap about a centimeter wide on every edge, similar to another 4-glass-panel case we’ve reviewed, the Corsair 570X. There are still filters on the top and front, and they should be functional enough for positive pressure setups (negative pressure will just suck air in through the unfiltered cracks), but they’re finnicky--they stick magnetically to the inside of the chassis and are held in place by plastic tabs, and they’re difficult to get in and easy to knock out of place. The bottom filter is a more standard plastic-and-mesh type.
A problem that every glass-sided case needs to address is how to keep users from promptly breaking it. 5mm thick glass is heavy and slippery, and right now it’s also expensive. We praised Thermaltake’s Core G21 TG for its oddly angled feet which double as supports, but the View 71 goes a step further with heavy-duty hinges on both side panels. They’re still easy to remove, but there’s no danger of undoing all the screws and having a panel belly-flop onto the table. That’s good, since removing all the panels makes it way easier to build in: again, this case weighs more than 40 pounds. It’s hard to pick up, it’s hard to flip over, and it’s hard to ship. It’s made to be a static display case, and it is the polar opposite of portable.
The only real trouble with construction was that somehow nearly every screw--side panels, top, and front--seemed to be cross-threaded or at least crooked after a couple days of assembly and disassembly. Users building in this case for the first time: the rubber PSU supports are in the bag of accessories, and they need to be stuck in the case before the PSU is installed. Additionally, the rubber feet on the bottom of the case left light stains on our ESD mat, so be careful with where it’s placed.
Case Testing Methodology
We tested using our new Skylake case test bench, detailed in the table below. This particular configuration is brand new with the launch of the 570X & 270R. Results on this test platform cannot be compared to previous case benchmark results, as the platform has completely changed.
Conducting thermal tests requires careful measurement of temperatures in the surrounding environment. We control for ambient by constantly measuring temperatures with thermocouples and laser readers. We then produce charts using a Delta T(emperature) over Ambient value. This value subtracts the thermo-logged ambient value from the measured diode temperatures, producing a delta report of thermals. AIDA64 is used for logging thermals of silicon components, including the GPU diode.
All case fans are manually configured to their maximum throughput using BIOS, then we configure to an RPM closer to 1050 for a universal "quiet" testing. If a fan controller is present, we opt-in and test on multiple settings. This forces testing of case fan performance in addition to the case's air channeling and airstream design. This also ensures minimal variance when testing, as automatically controlled fan speeds can reduce reliability of benchmarking. The CPU fan is set to 1100RPM (constant) for consistency, and the CPU is overclocked to 4.4GHz with a vCore of 1.272V (constant). C-States and power saving states are disabled.
| Component | Courtesy Of | Price | |
| Video Card | MSI GTX 1080 Gaming X (OC Mode) | MSI | $640 |
| CPU | Intel i7-6700K @ 4.4GHz | GamersNexus | $300 |
| CPU Cooler | MSI Core Frozr L | MSI | TBD |
| Motherboard | MSI Z170A Gaming M7 | MSI | $180 |
| Memory | Corsair Vengeance LED 32GB 3200MHz | Corsair | $200 |
| SSD | Samsung 850 EVO 120GB | Samsung | N/A |
| PSU | Corsair RM650x | Corsair | $100 |
| Case | This is what we're testing! | - | - |
The video card is configured to run at 55% fan speed at all times.
Prior to load testing, we collect idle temperature results for ten minutes to determine the unloaded cooling performance of a case's fans and air channels. Thermal benchmarking is conducted for 1400 seconds (23 minutes), a period we've determined sufficient for achieving equilibrium. The over-time data is aggregated and will occasionally be compiled into charts, if interesting or relevant. The equilibrium performance is averaged to create the below charts.
Load testing is conducted using Prime95 LFFTs and Kombustor “FurMark” stress testing simultaneously. Testing is completely automated using in-house scripting, and executes with perfect accuracy on every run.
We recently validated our test methodology using a thermal chamber, finding our approach to be nearly perfectly accurate. Learn more here.
Thermals
As always, we first ran our basic thermal tests with the stock fan configuration. We then added tests for the vertical GPU layout, moving the rear Riing fan to the front because it looks cooler, and finally adding a 140mm Noctua fan to the rear to hopefully balance literal and figurative cool-ness.
Some test results might seem strange at first, but keep in mind that the View 71 doesn’t have the airflow of a normal case. Air does generally come in the front and go out the back, but it’s also free to flow through the open edges of the case and equalize pressure -- the gaps on the sides allow air to draft in and out based on pressure, and that’s harder to predict than a closed off in/out setup..
Thermaltake View 71 Temperature Torture Test (CPU)

CPU dT was 54.7C with the stock fan setup. The rear exhaust fan was directly behind the CPU, pulling out hot air, but the intake fan was at the very bottom of the case directing air under the GPU. For a two-fan setup, this is a reasonable compromise.
Moving the exhaust fan to the front actually raised the CPU temperature a bit to 56.2C over ambient. The exhaust slot is adjacent to the CPU cooler and directly benefits it, whereas the top intake slot is farther away and obstructed by the HDD cages. Air is also free to exit anywhere in the case, not just through the back, and lack of exhaust for the radiative heat off the GPU backplate doesn’t help, either. Adding a third fan in the vacant exhaust slot while keeping the two Riings in front was predictably cooler than either of the first two options, with a 54C delta T. Moving the GPU vertically with just the two stock fans did best of all: 49.6C dT. Incoming air was no longer trapped under the GPU and the backplate moved farther from the CPU tower cooler.

Comparatively, 54.7 dT is decent, especially for a glass-plated case with only two fans. Much of this is due to their quality: we keep case fans at 100% during testing, and the Riings consistently ran between 1400 and 1500RPM. Installing the 1500-1600RPM Noctua fan in the rear placed the View 71 between the stock Meshify C and the Core P3, both of which are significantly more open-air. The 570X is a direct competitor for the “tons of glass” niche, but it does ship with three 120mm fans to the View 71’s two, and placement reflects that.
Thermaltake View 71 Torture Test (GPU)
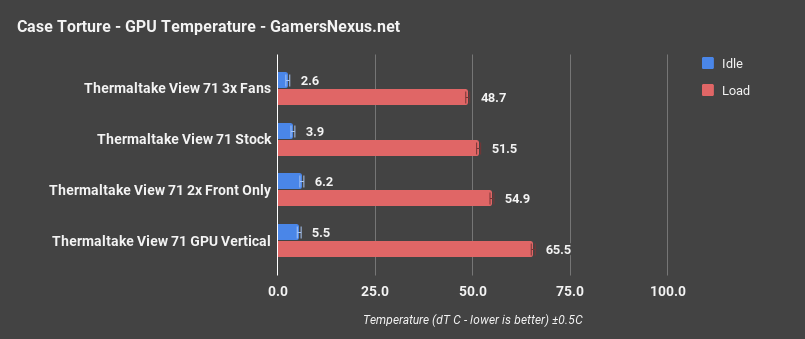
With an intake fan pushing cool air directly along the bottom of the case and no PSU shroud to block it, the GPU temperature delta was 51.5C.
A single Riing fan in the bottom intake slot looks really weird, though. Moving the exhaust fan forwards raised the GPU dT just as it did for the CPU, primarily because we lose the ability to exhaust the heat coming off of the GPU. The extra Noctua fan in the rear scored the lowest delta of 48.7C. A case with airflow this complex requires some experimentation to find the best fan configuration. The worst one, though, was easily the vertical GPU mount, at 65.5C dT. This setup would work much better with liquid cooling, but with a fully air-cooled system horizontal GPU mounting is the way to go, at least in this enclosure.
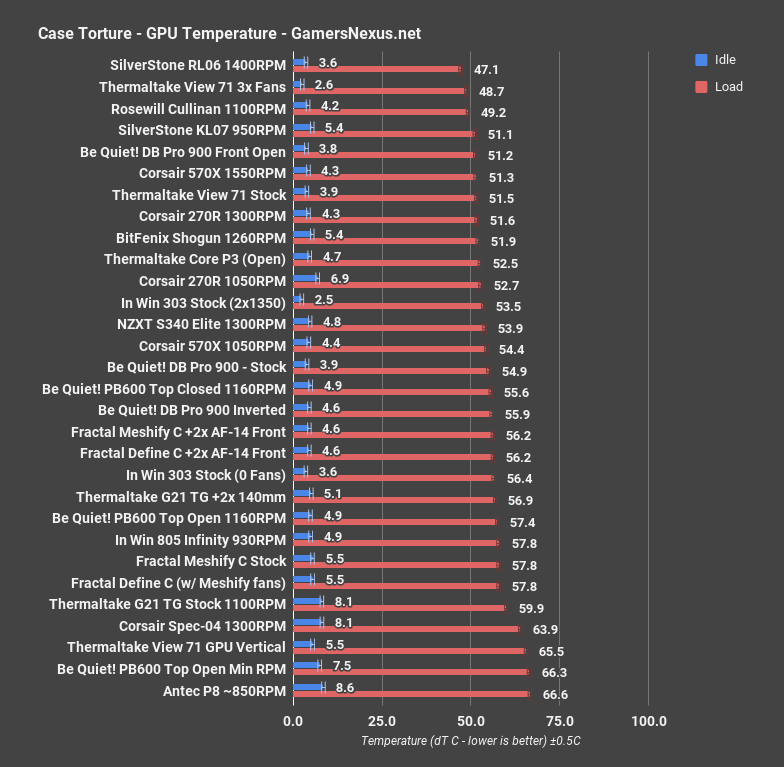
51.5C is already a very respectable GPU temperature delta, comparable to the Corsair 570X and 270R, and 48.7dT is better than anything on our chart except the RL06. Ventilation holes everywhere combined with the Riing fans allowed the GPU to breathe in a way that many other cases have struggled with.
Thermaltake View 71 3DMark
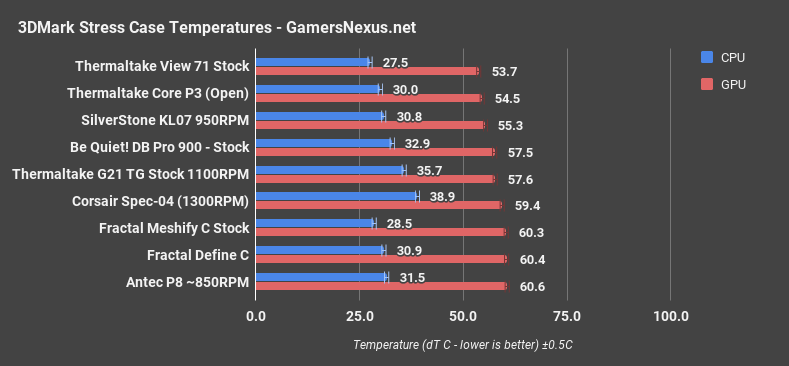
The View 71 did well with GPU cooling with the stock fan configuration, and 3DMark’s Firestrike Extreme stress test primarily hits the GPU. 53.7C dT is lower than the rest of the cases we’ve tested this way, including the completely open Core P3. Cases without PSU shrouds generally allow more air to circulate in the bottom of the case.
Thermaltake View 71 Blender

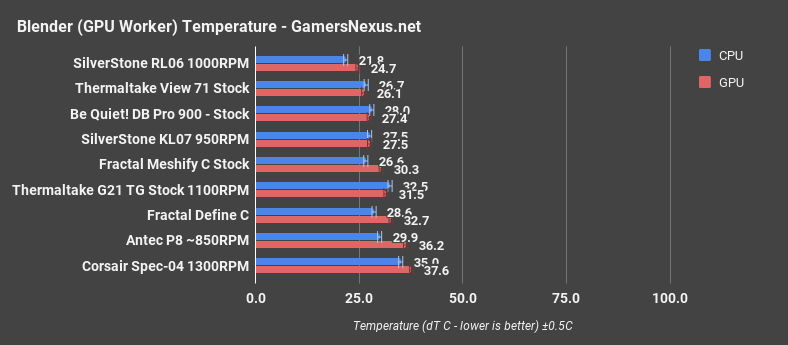
In a more real-world test using Blender, both the CPU and GPU did decently. 37.3C CPU dT (rendering on the CPU) is again exactly the same as the Core P3, and 26.1 GPU dT (rendering on the GPU) is below most cases besides the RL06. The View 71 doesn’t have any trouble coping with a normal workload, even without extra fans.
Thermaltake View 71 Noise
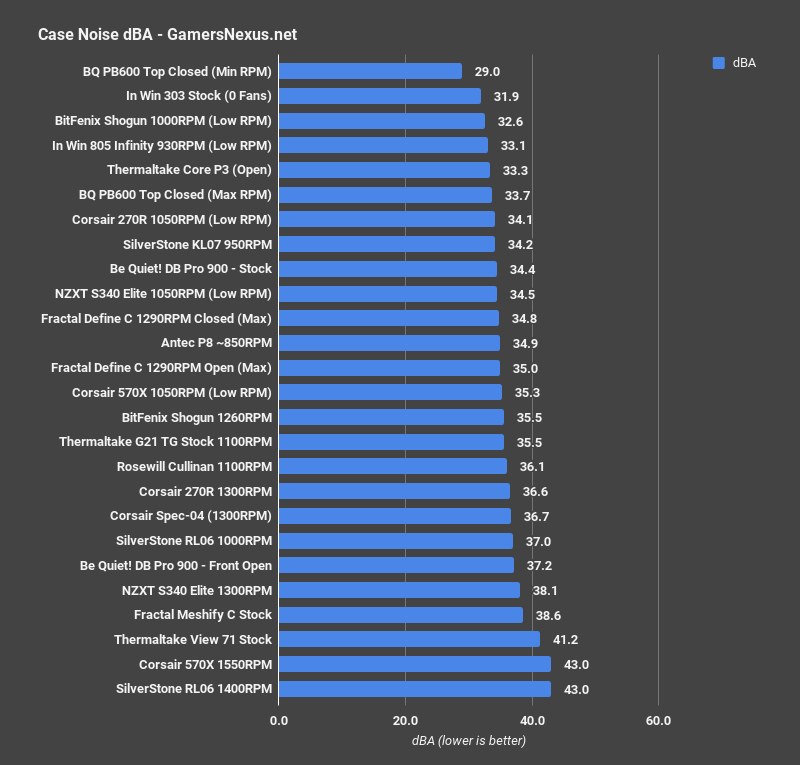
The downside to running the Riing fans at their full speed and with open glass paneling is the noise, and the View 71 is full of holes for sound to escape. In fact, the RL06 and 570X are the only other cases on our chart that have broken 40dBA, and both have more fans than the View 71. For a quieter case, the fan speed can be turned down, but the priority in our tests is performance.
Conclusion: Thermaltake View 71 vs. Corsair 570X

The View 71 TG is a case that some people will buy just for the glass. For those people, it doesn’t need to be well-constructed or have good airflow, it just needs to look good and cost less than the Corsair 570X. And it does, sort of. As of this writing, the 570X is $170 on Newegg counting a sale and a $10 rebate, while the non-RGB View 71 TG is $170 from the start. Thermaltake has priced its case competitively.
As for performance, the View 71 does a lot better than might be expected: with one additional fan, it outperforms the 570X (but now costs more). The two stock Riing fans do their job well and are worth keeping, but an additional fan is worth the cost. Paying an extra $30 for the RGB version of the case that includes three RGB Riing fans isn’t really worth it; but buying a single extra blue Riing fan instead would cost $18 on Newegg.
As with all expensive cases that have a novel feature, like noise suppression or an invertible motherboard tray, there are more “normal” cases of the same quality that cost less (Bitfenix Shogun) or potentially higher quality for the same price (IN WIN 805). Buying this case is all about the four glass panels. This would be a great showcase for an open loop, or really any build with a bunch of LED fans. The ideal customers for the View 71 fall into two categories: ones that have been looking for a way to show off their system and are willing to spend some extra cash on a riser cable, liquid cooling, and maybe some extra Riing fans, or ones that have already been considering the Corsair 570X.
Editorial: Patrick Lathan
Host: Steve Burke
Video: Andrew Coleman