The Cooler Master MasterCase H500P is the newest in the modular MasterCase series, but is inspired by the old high airflow (“HAF”) line of cases, mainly in the form of monster 200mm intake fans and a general “rugged and futuristic design.” We covered the H500P along with the Cosmos series refresh C700P at Computex back in June, and now the time for reviewing has finally come.
Cooler Master’s H500P exhibited significant and plentiful quality control concerns, questionable design decisions, and limited semblance to the meaning behind “High Airflow” in the “HAF” naming. The case has its ups, too, primarily in the looks and cable management deparatments -- but we’ll go through all of that in this review. For Steve’s (rather animated) take on this case, check the video.
Cooler Master H500P Specs
Colors | Gun Metal / Black |
Materials | Outlook: Plastic, Steel Mesh |
Dimensions (LxWxH) | 544 x 242 x 542mm / 21.4 x 9.5 x 21.3 inch |
Motherboard Support | Mini-ITX, Micro-ATX, ATX, E-ATX (support up to 12" x 10.7") |
Expansion Slots | 7 + 2 (Support vertical graphics card installation) |
Drive Bays | 5.25” x 0 (2 optional via bracket) 2.5” SSD x 2 |
I/O Port | USB 3.0 x 2, USB 2.0 x 2, Audio In & Out (supports HD Audio) |
Preinstalled Fans | Front: 200 x 25mm RGB fan x 2, 800RPM Rear: 140 x 25mm fan x 1, 1200RPM |
Fan Support | Top: 120/140mm fan x 3 or 200mm fan x 2 Front: 120/140mm fan x 3 or 200mm fan x 2 Rear: 120/140mm fan x 1 |
Radiator Support | Top: 120mm, 140mm, 240mm, 280mm, 360mm (maximum thickness clearance 55mm) |
Clearances | CPU Cooler: 190mm/7.5 inch |
PSU Support | Bottom Mount, ATX PS2 |
MSRP | $150 |
Cooler Master H500P Build Quality & Appearance
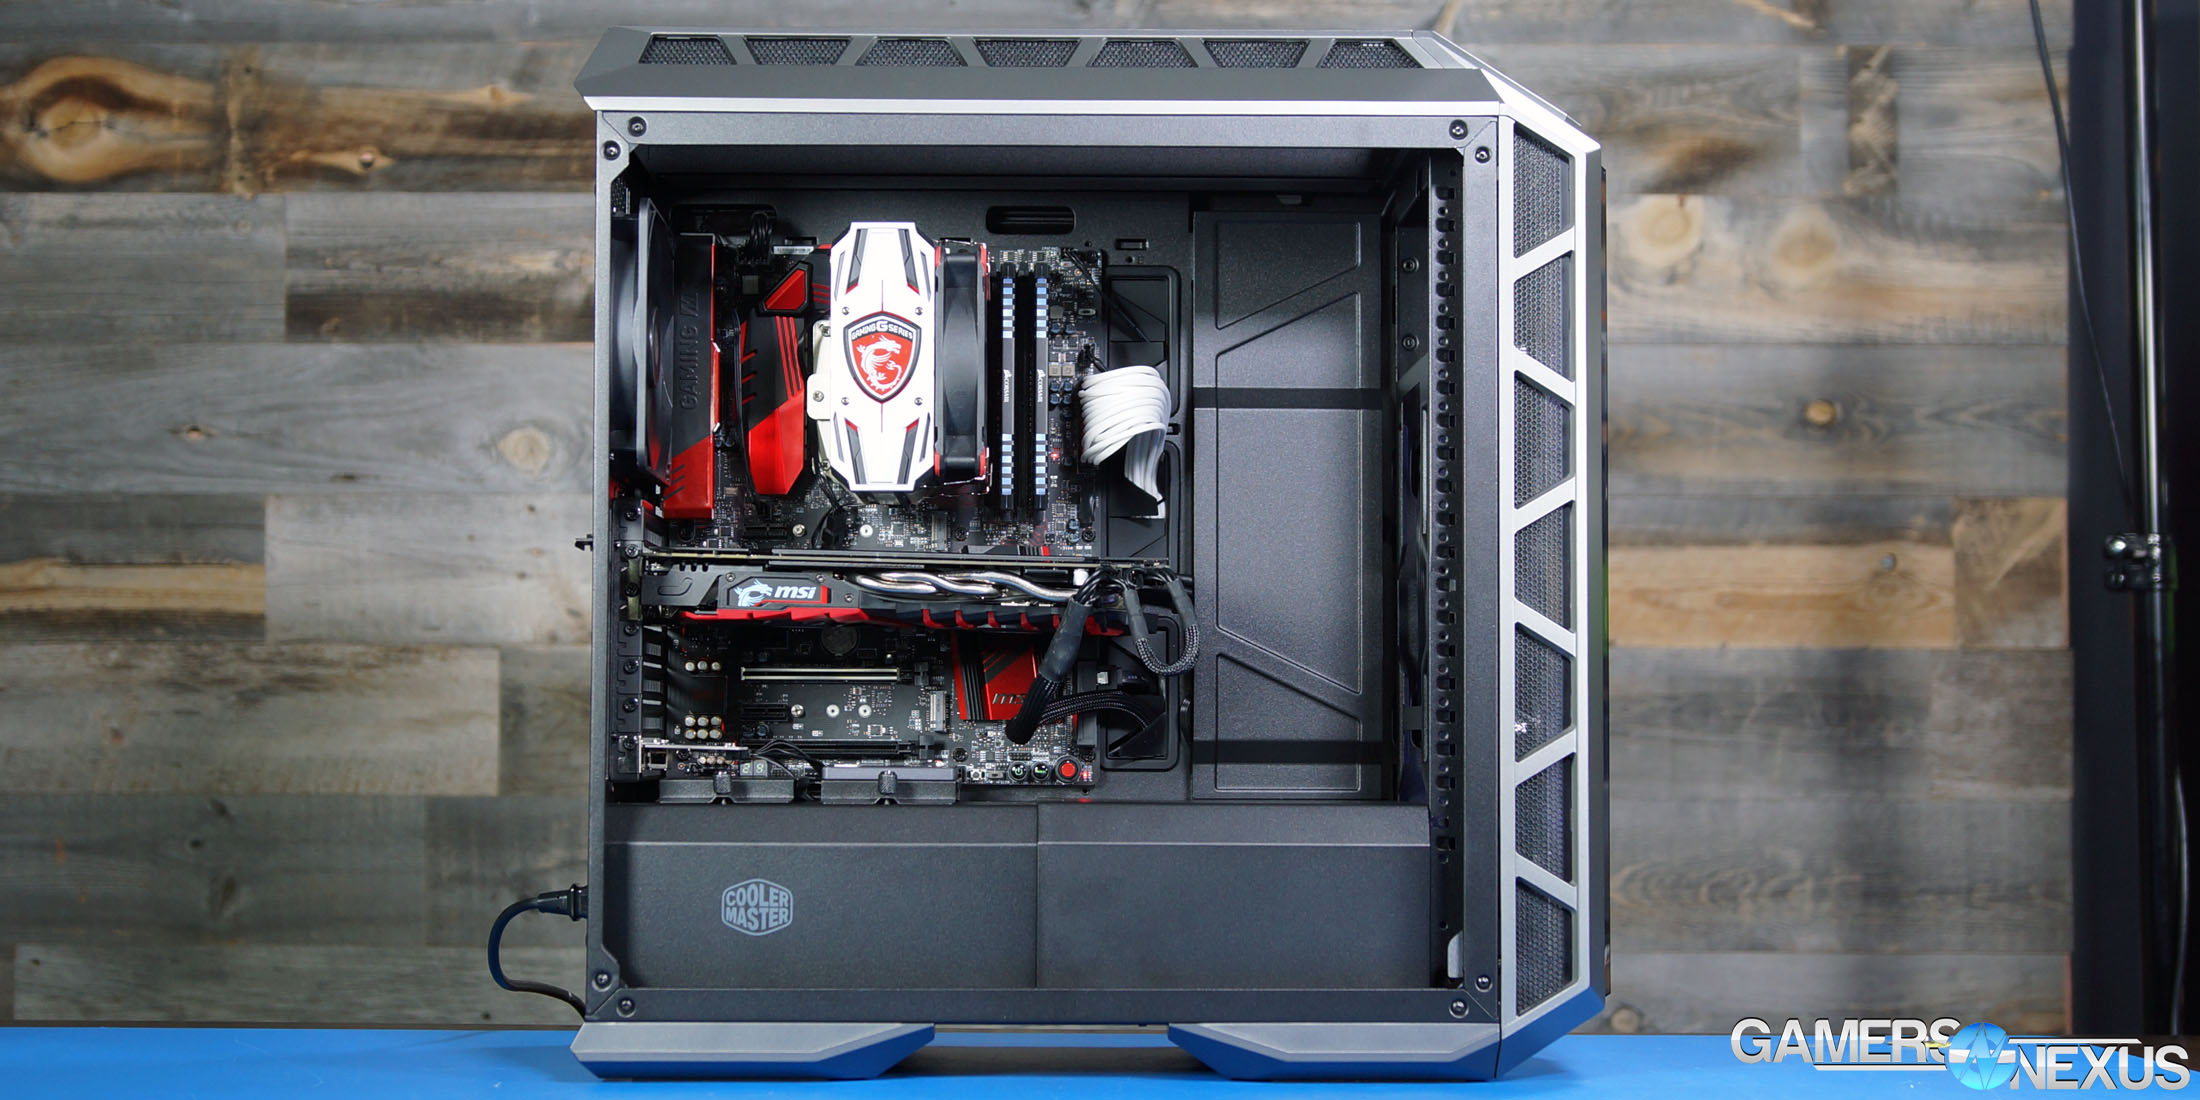
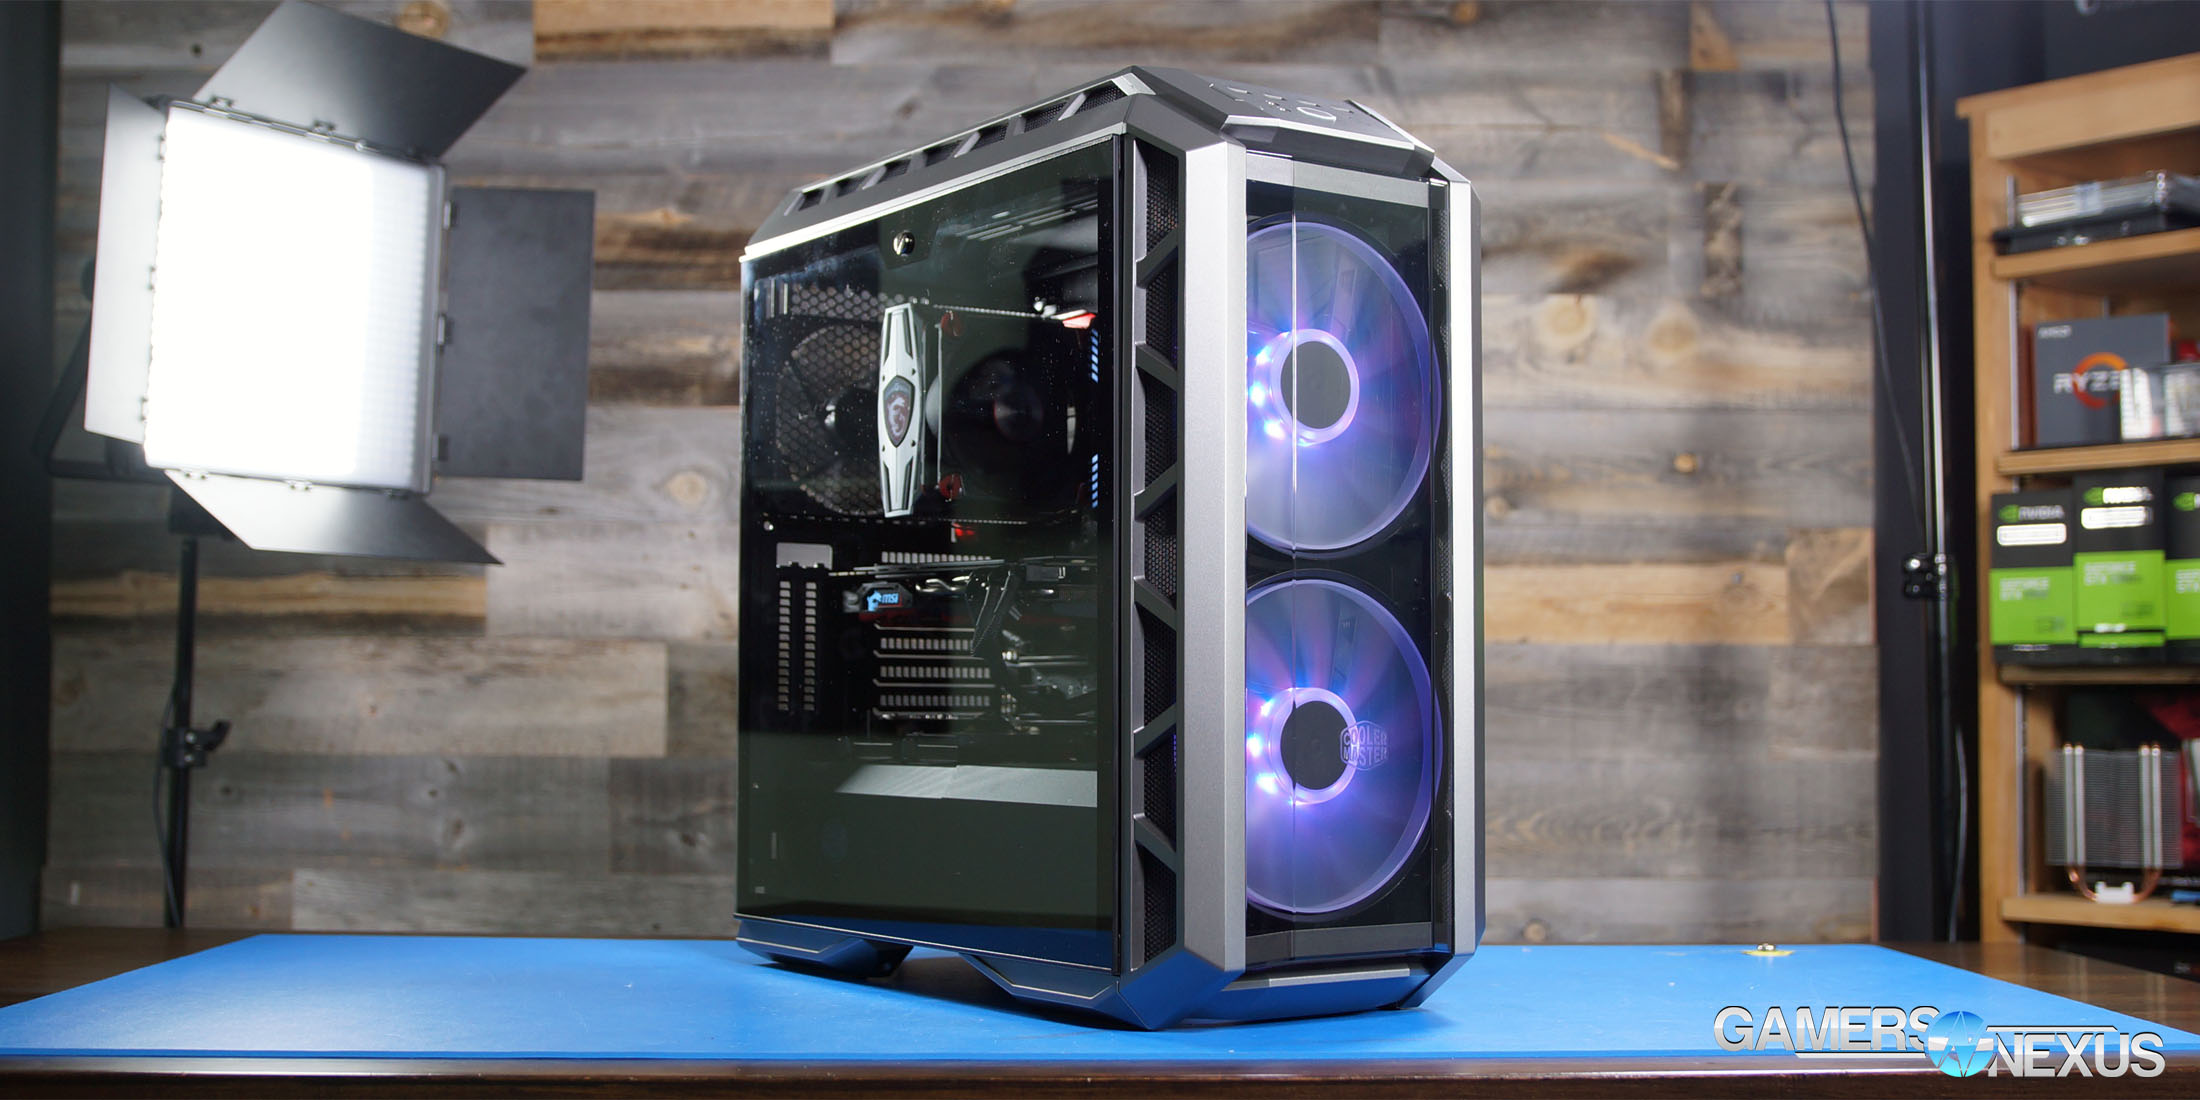
Many people have already fallen in love with the appearance of the H500P. Two gigantic 200mm RGB fans are the most distinctive features, fully visible through the angled front panel, with an additional window on top of the case and a full tempered glass side panel. The trim is angular and skeletal, like the EVGA FTW3, backed with mesh that still allows the LEDs to shine through. The front I/O panel is similar in style to the C700P we just reviewed, a nice indication that Cooler Master is going for a unified look in their new cases.
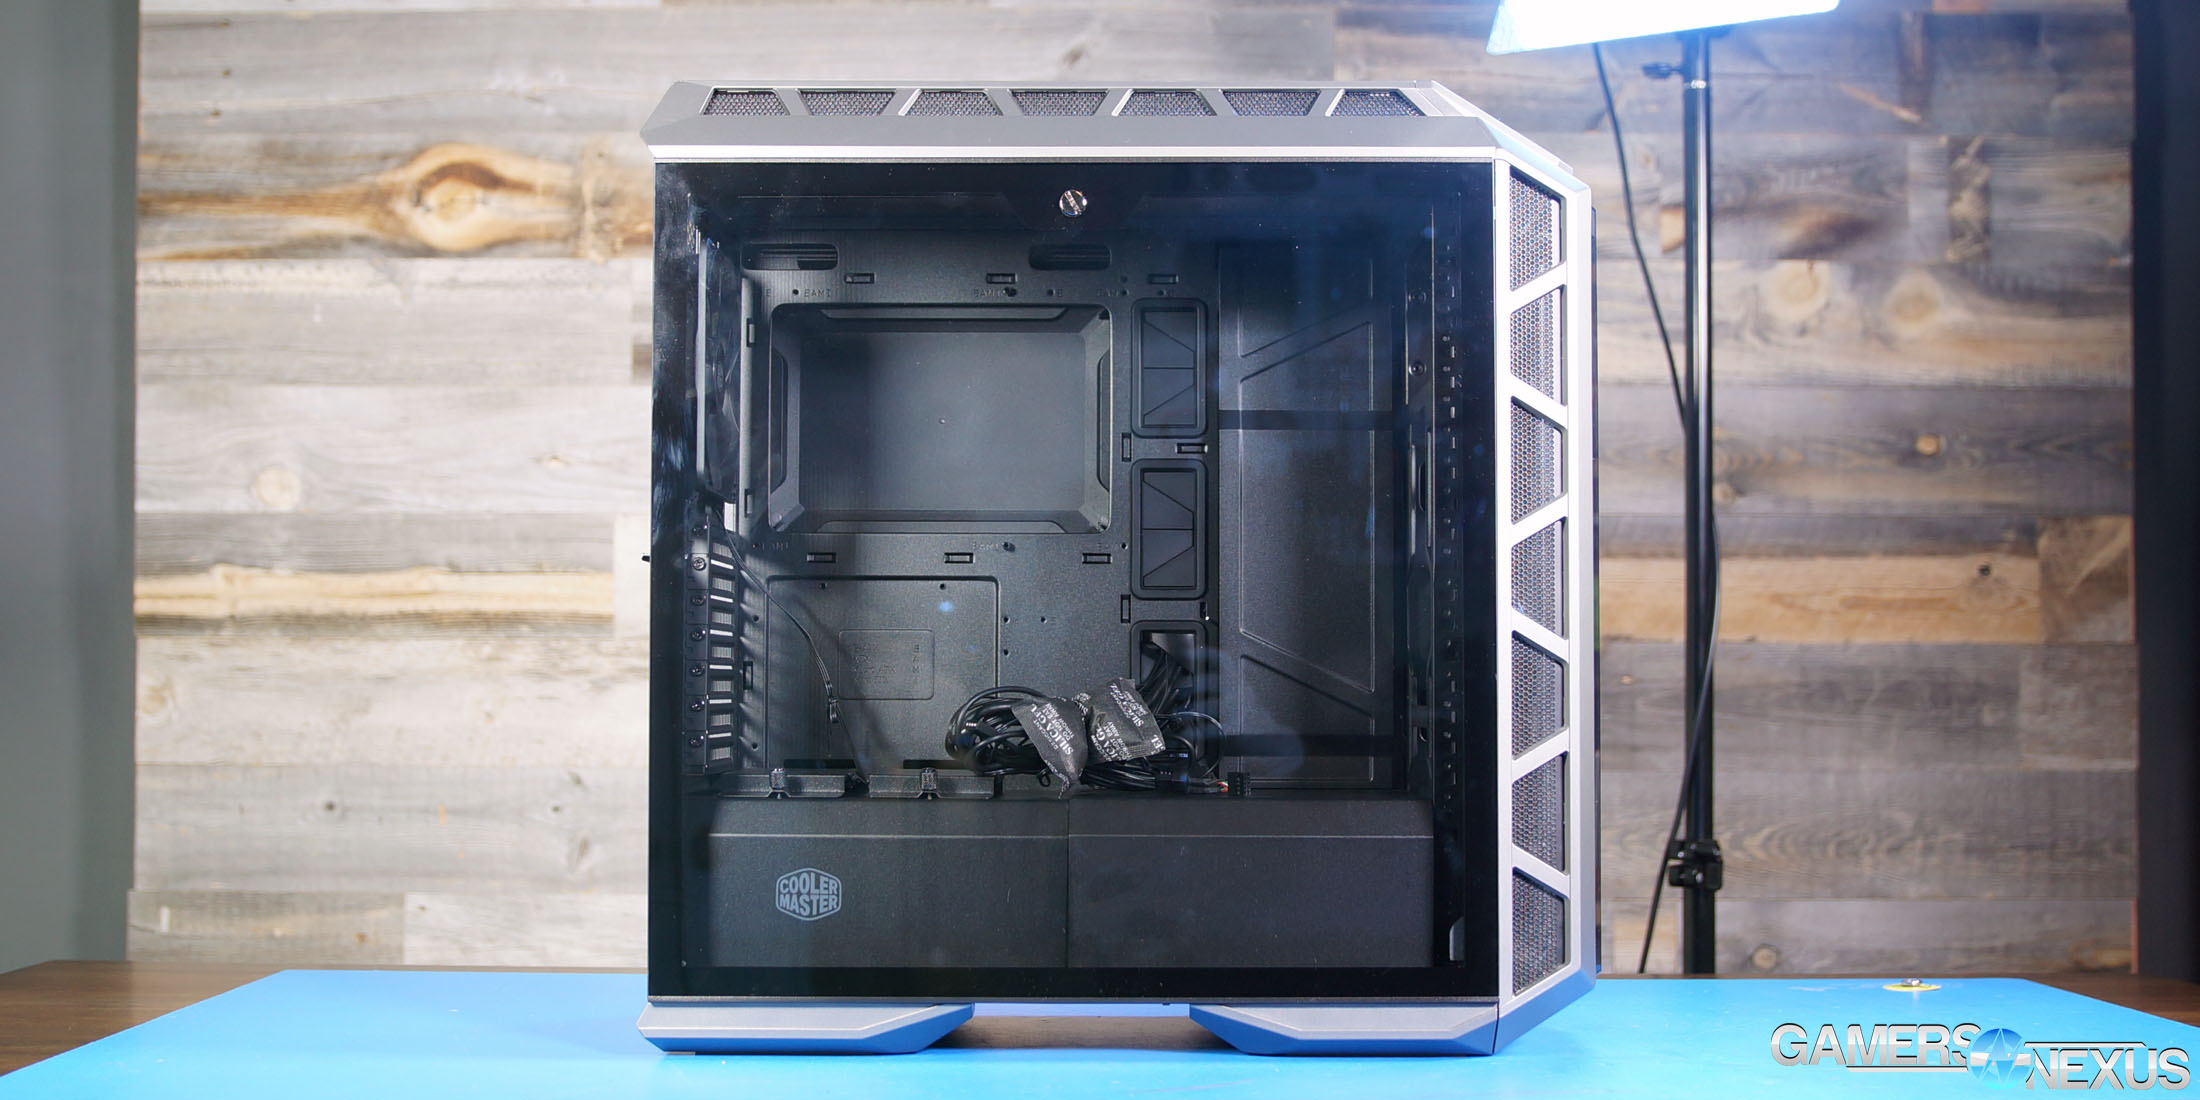
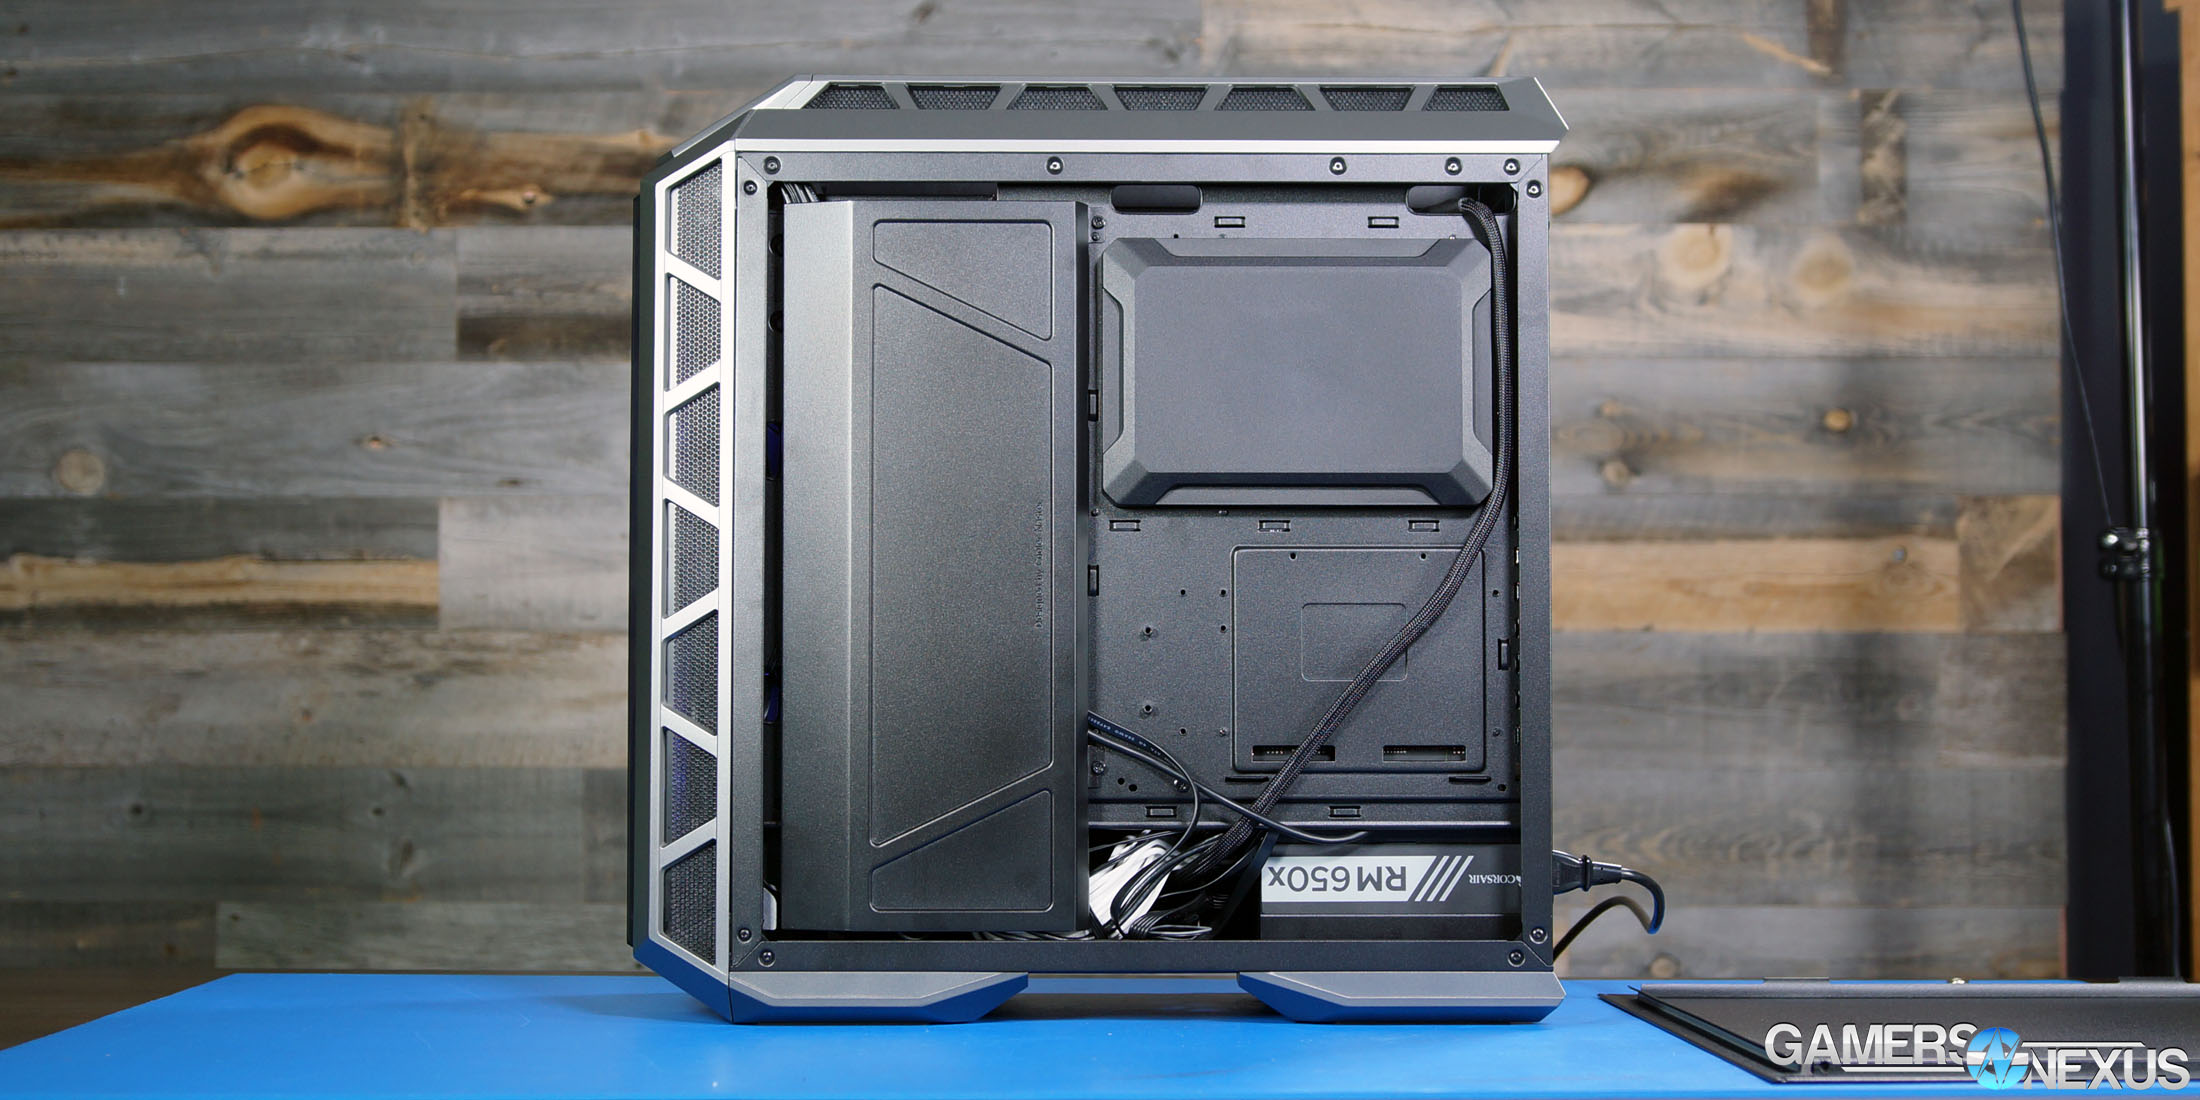
Cable management was easy thanks to the PSU shroud and plenty of tie points. Cooler Master includes a steel cover for cables at the front of the case and a plastic cap for the hole in the motherboard tray to make things look as tidy as possible, and it really does work to keep everything hidden for serious neat freaks. Nobody will ever be able see that tidiness outside of a trade show, though, and taking them both out is a great way to make the case roomier and easier to build in.
One of the most difficult parts of disassembling a case is often trying to pry off the front panel, and it seems Cooler Master has deliberately made that process easier by using plastic tabs that loosely socket into place instead of the usual stiff alligator clips or latches. They may have gone too far in the other direction, though. Carrying the H500P requires special care as the top and front panels will not support any weight at all without popping off, as we show in the first few seconds of the video. Most users won’t be picking their cases up on a regular basis, but most users also won’t be taking those panels off on a regular basis: it’s a strange compromise that could be solved with a couple well-placed thumbscrews or an alligator clip, and the compromise is the potential to drop a ca se -- or minimally increase difficulty of transport.
After so much tempered glass and steel in our case reviews recently, the plastic panels of the H500P feel unpleasantly flimsy. The distinctive front and top windows look good on camera, but they feel destined to get scratched. There’s not an easy solution to this (glass is expensive and easier to work with in flat panes), but a sturdier frame for the plastic might help the perceived quality. The chassis is made of sturdy steel, and thin flexible plastic is a stark contrast. It doesn’t help that the plastic creaks when it’s prodded or moved around, and that the paneling flexes and bows at the slightest of presses.
There’s no RGB controller included with this case, despite front I/O dummy buttons that clearly are placeholders for a future case (and could offer RGB control). Software control via a motherboard header is superior to external hardware in a few ways, but older boards and boards that haven’t succumbed to the RGB craze won’t have RGB headers. We installed a cheap third-party RGB controller (from an unpublished review) for filming purposes. The H500P is fairly expensive case and it could be argued that customers will either have a compatible mobo or a HUE+, but then it seems backwards that an ultra expensive case like the C700P would include external RGB controls. The controller included with the C700P has both baked-in color presets and a “motherboard control” mode, which would be great here. A splitter is included so that up to three RGB fans can be controlled from one jack, but only two of the three stock fans are RGB. There’s also a three-way fan power splitter included that we didn’t make use of.
Users can optionally buy a VGA support from Cooler Master for vertical installation, but it’s not vital: the full weight of the card can be supported by the PCIe cover. For thermal testing, we zip tied things in place again, because--like the View 71 TG--the GPU mount was too high for our Twin Frozr GPU cooler to fit under our air cooler. When using a riser cable (purchased separately), the SSD trays on top of the PSU shroud must be moved elsewhere.
In our initial Computex coverage of the H500P, we reported that it would be possible to add additional hard drive cages for more 3.5” drive capacity. There is a slot and screw hole on the top of the stock HDD cage that indicates additional ones could be stacked there, if compatible HDD cages are made available for sale. For now, the stock case includes two 3.5” bays.
The PSU shroud is divided into two parts, so that the front section can be slid backwards to accommodate liquid cooling. The front section must be removed to deal with HDDs, and the full shroud must be removed to install a PSU. The front section in our review sample was bent out of place by a rivet, but removing and reinstalling it fixed this. The adjustable shroud is a clever alternative to the pop-out shroud sections we’ve seen in cases like the Meshify C.
The tempered glass side panel is secured by metal tabs at the bottom (always a positive feature when working with glass) and a latch at the top, similar to the In Win 303. Unlike the 303, though, the glass isn’t set into the chassis, it’s just pressed against the side by a simple rotating latch. It keeps the glass from falling outwards, but (at least in our review sample) it didn’t hold it tightly enough to prevent it from sliding a couple millimeters side-to-side. The latch was also too stiff to be turned by hand and required a screwdriver or a coin, eliminating the “tool-less” aspect of it. The entire glass side panel feels like an afterthought, and doesn’t convey high quality design.
Radiator placement is flexible, but takes some explaining. The included 200mm intake fans are actually outside of the chassis in front of the normal fan mounts, and theoretically a radiator could be installed in the empty mounts, flush against the 200mm fans. Cooler Master doesn’t show this configuration in the case manual, presumably because big, slow fans have relatively poor static pressure (as we noted at Computex), making them a poor choice for forcing air through radiators. Instead, they suggest placing the radiator inside the case and installing some appropriately sized fans into the fan mounts for pushing air through. If that’s confusing, don’t worry--we’re planning to publish more H500P content in the near future.
Continue to Page 2 for thermal & noise results.
Case Testing Methodology
We tested using our new Skylake case test bench, detailed in the table below. This particular configuration is brand new with the launch of the 570X & 270R. Results on this test platform cannot be compared to previous case benchmark results, as the platform has completely changed.
Conducting thermal tests requires careful measurement of temperatures in the surrounding environment. We control for ambient by constantly measuring temperatures with thermocouples and laser readers. We then produce charts using a Delta T(emperature) over Ambient value. This value subtracts the thermo-logged ambient value from the measured diode temperatures, producing a delta report of thermals. AIDA64 is used for logging thermals of silicon components, including the GPU diode.
All case fans are manually configured to their maximum throughput using BIOS, then we configure to an RPM closer to 1050 for a universal "quiet" testing. If a fan controller is present, we opt-in and test on multiple settings. This forces testing of case fan performance in addition to the case's air channeling and airstream design. This also ensures minimal variance when testing, as automatically controlled fan speeds can reduce reliability of benchmarking. The CPU fan is set to 1100RPM (constant) for consistency, and the CPU is overclocked to 4.4GHz with a vCore of 1.272V (constant). C-States and power saving states are disabled.
| Component | Courtesy Of | Price | |
| Video Card | MSI GTX 1080 Gaming X (OC Mode) | MSI | $640 |
| CPU | Intel i7-6700K @ 4.4GHz | GamersNexus | $300 |
| CPU Cooler | MSI Core Frozr L | MSI | TBD |
| Motherboard | MSI Z170A Gaming M7 | MSI | $180 |
| Memory | Corsair Vengeance LED 32GB 3200MHz | Corsair | $200 |
| SSD | Samsung 850 EVO 120GB | Samsung | N/A |
| PSU | Corsair RM650x | Corsair | $100 |
| Case | This is what we're testing! | - | - |
The video card is configured to run at 55% fan speed at all times.
Prior to load testing, we collect idle temperature results for ten minutes to determine the unloaded cooling performance of a case's fans and air channels. Thermal benchmarking is conducted for 1400 seconds (23 minutes), a period we've determined sufficient for achieving equilibrium. The over-time data is aggregated and will occasionally be compiled into charts, if interesting or relevant. The equilibrium performance is averaged to create the below charts.
Load testing is conducted using Prime95 LFFTs and Kombustor “FurMark” stress testing simultaneously. Testing is completely automated using in-house scripting, and executes with perfect accuracy on every run.
We recently validated our test methodology using a thermal chamber, finding our approach to be nearly perfectly accurate. Learn more here.
Cooler Master H500P Temperature Testing
The only removable filter in the case is beneath the PSU, and elsewhere intakes are covered with strips of mesh built into the panels. The 200mm fans are mounted outside the chassis due to their size, with two results: the fans are too far forward to take full advantage of the side vents, and they’re closer to the unventilated front panel than smaller fans would be. For a case that’s supposed to be connected to the HAF (High Air Flow) lineup, this is an unfortunate arrangement. In the stock configuration, much of the incoming air is directed through the top and bottom of the front panel (both filtered).
We didn’t do anything fancy for additional testing this time, just our sort-of-functional vertical GPU mount and taking the front panel off to see how much it limits cooling potential. There’s not much point in testing additional fans: the intake fans are a selling point of the case (200mm, 700-800RPM), the exhaust fan is pretty good (140mm, 1200-1300RPM), and together they fill all the fan slots we typically test. We plan to do more testing in the future.
CPU Torture – H500P only
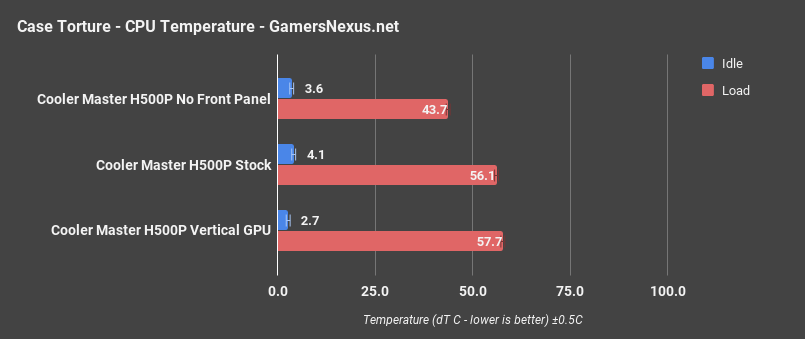
We’ll add comparative data next, as always, but we’re first starting with only the H500P. This will give us a better understanding as to how the case performs under various conditions. With the stock configuration and under a torture workload, the H500P manages a CPU delta temperature of 56.1C over ambient, with idle at around 4 degrees Celsius. Removing the front panel entirely drops us down to 43.7 degrees, constituting the largest drop we’ve ever seen from this simple panel removal test. This tells us that the 200mm fans have a lot more cooling potential than they’re being afforded, particularly noticeable as the resistance caused by the front panel is quite high, dropping fan RPM by about 50 revolutions per minute. Ignoring that aspect, though, we can highlight that the front panel mesh, despite being about an inch wide, actually only exposes less than a half-inch of mesh to the fans. The fans choke on this limited space, and are already challenged in the static pressure department, as fans often are.
Installing the GPU vertically drives us up a bit more than 1C in our CPU measurements, which is partly because of the collision course between the CPU tower cooler and the video card. We’d expect this to be better under conditions of a reference-sized PCB.
CPU Torture – Comparative
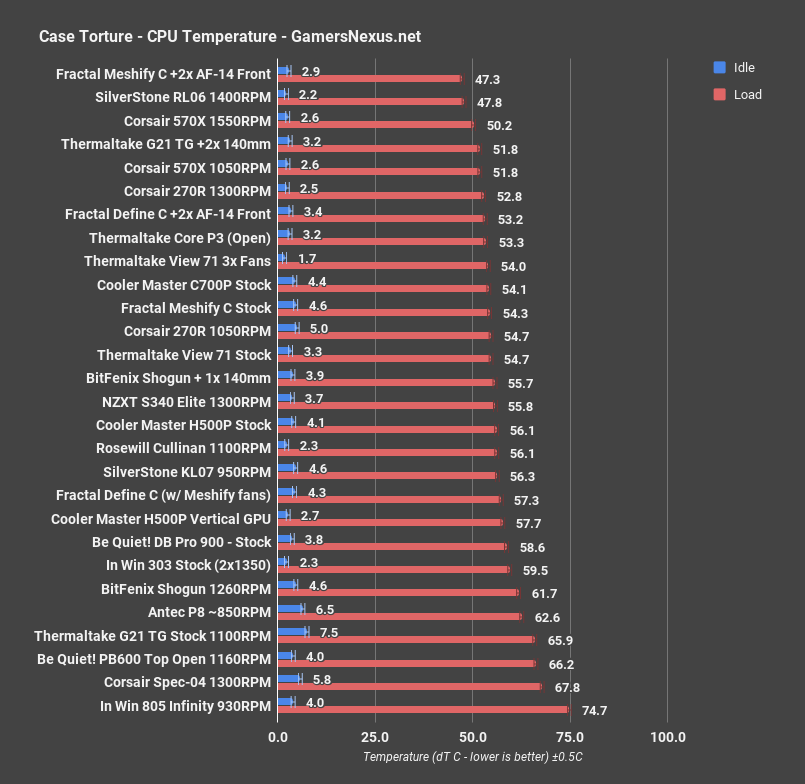
Comparatively, the Cooler Master H500P stock configuration lands at about 56.1C CPU load temperature over ambient, positioning it between the Cullinan enclosure and NZXT S340 Elite, a case which we previously knocked for mediocre ventilation. Despite numerous references to “High Air Flow” in the case’s review guide, the enclosure offers decidedly less airflow than the $70 SilverStone RL06, positioned at 48C over ambient, or the Corsair 570X at a slower 1050RPM fan speed, or even the Thermaltake View 71 at 54.7C over ambient. The H500P doesn’t impress in the slightest, but also isn’t dismal. It’s just kind of OK. For any other case, that’d be, well, OK, but it’s a bit disingenuous on a case marketed as high airflow.
GPU Torture – H500P Only
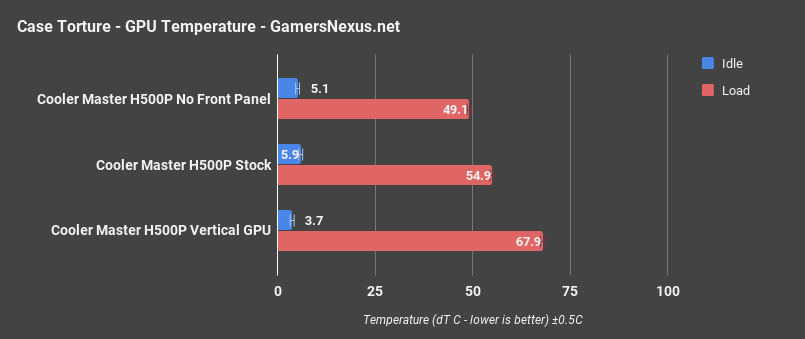
Moving on to GPU torture temperatures, the Twin Frozr card manages 54.9C over ambient in the stock configuration, keeping it a couple degrees away from throttling, so it’s actually not too bad when stock. Removing the front panel expectedly improves thermals, though only by 5C for the GPU – the CPU impact was much greater. A vertical GPU mount suffocates our dual axial cooler on the card, which is pressed up against the glass and now has to deal with radiative heat trapped between the GPU backside and CPU cooler. This results in a 68C over ambient temperature, pushing us well past thermal throttle territory and into frequency decay. Now, of course, this could be accounted for by blasting GPU fan RPM, but then the noise argument goes out the window. You’d be best off with an open loop GPU cooler, a Hybrid card, or a reference card.
GPU Torture – Comparative
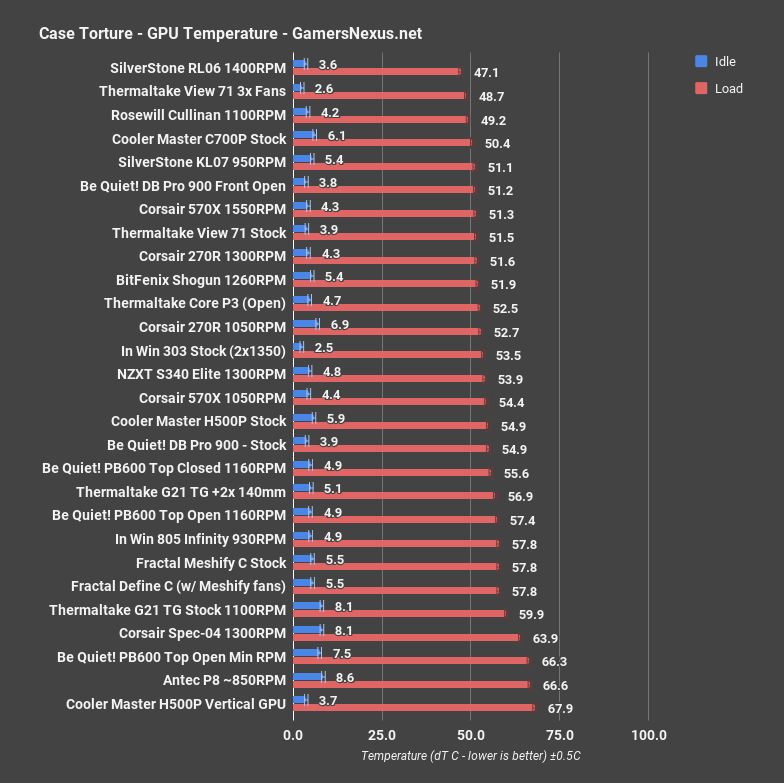
Comparatively, GPU torture testing lands the Cooler Master H500P stock configuration at 54.9C, just between the 570X at a lowered 1050RPM (its stock 1550RPM lands at 51C) and the Be Quiet Dark Base Pro 900. The H500P is cooling the GPU about as well as cases that are targeted at silence. At least, it is in these torture workloads, and a lot of that is the PSU shroud.
3DMark Stress Test
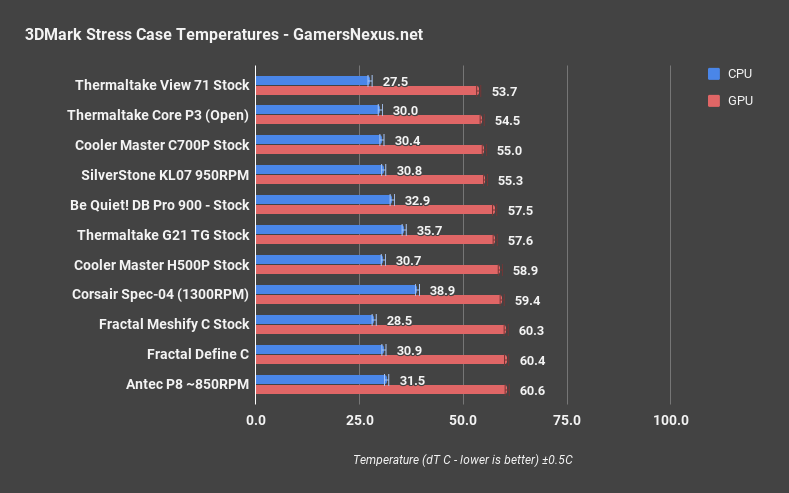
Moving on to 3DMark stress testing, which represents a realistic gaming workload, we encounter GPU thermals of about 58.9C on the H500P, right alongside the $50 Spec-04 and Thermaltake G21. To its credit, CPU thermals are a lot better, here, at 30.7C versus 36 and 39C on the two aforementioned cases. This is because of the GPU being butted against Cooler Master’s PSU shroud, with limited airflow over the GPU area directly; in fact, the GPU aligns somewhat with the deadzone on the 200mm fans, though it’s far enough away that this issue should minimize. CPU thermals position the case between the KL07 and C700P.
Blender – CPU Worker
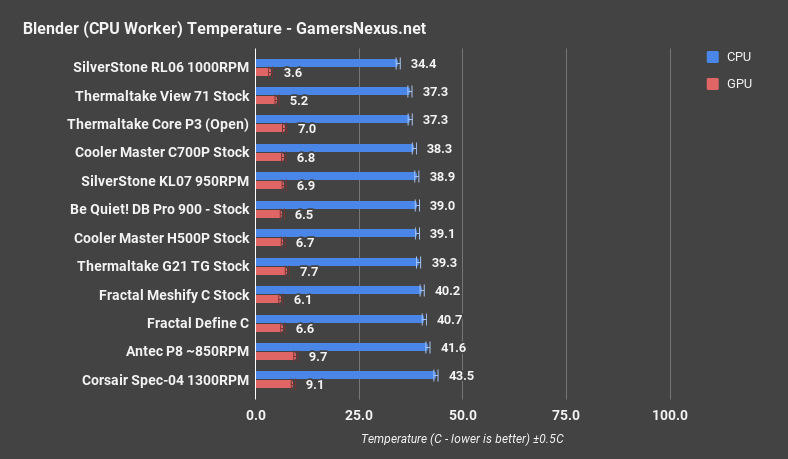
Testing Blender for a realistic production application, our CPU worker rendering test positions the H500P CPU thermals as acceptable, at about 39C delta T over ambient, because this test generates less heat than some of the gaming workloads. That’s down to GPU utilization, which is 0% in a CPU worker Blender test. The H500P still isn’t impressive, though, and lands middle of the pack.
Blender – GPU Worker
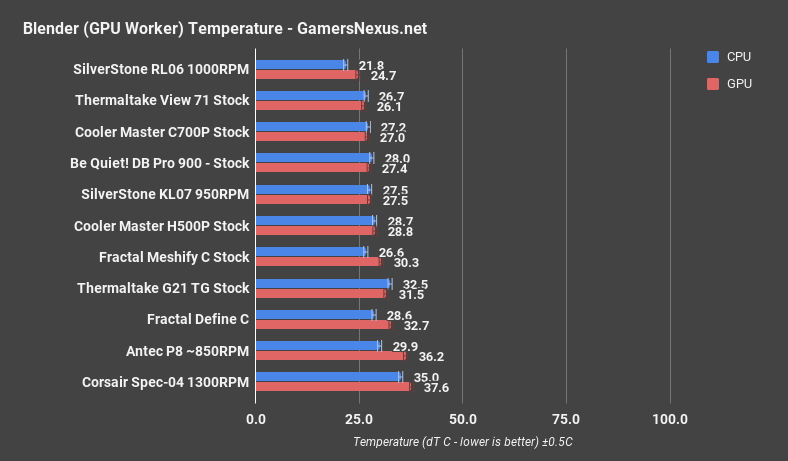
As for GPU workers in Blender, where the CPU load is minimized, we’re again objectively in non-thermally-threatened territory, but still mid-pack. The H500P lands between the DB Pro 900, once again, and the Meshify C.
Noise – H500P
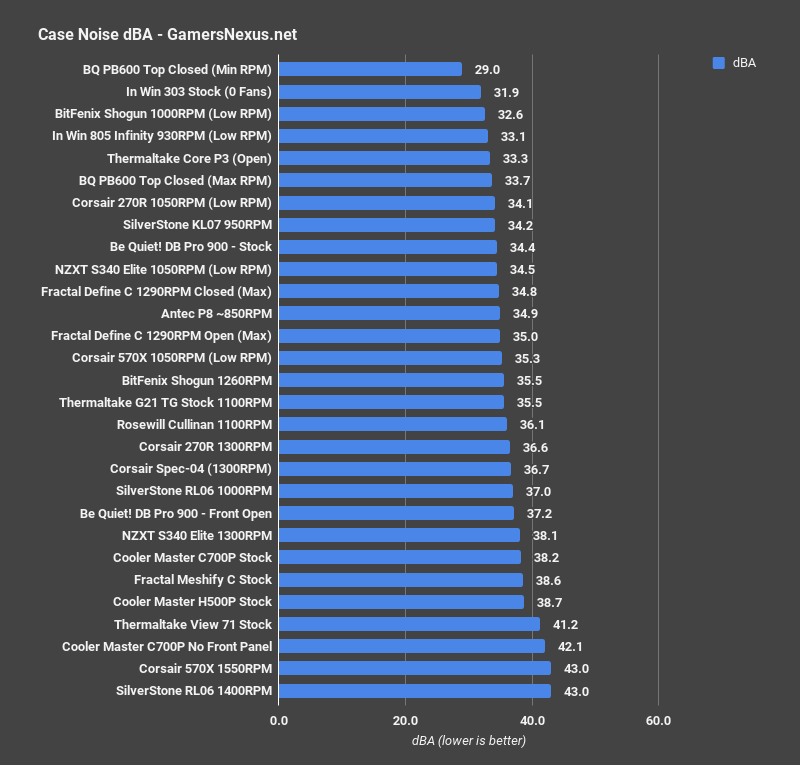
Surely, then, the noise should be better in this case, as its larger fans do spin slower than the whinier fans of 120mm and 140mm sizes. In our standardized noise testing, the Cooler Master H500P lands at 38.7dBA system noise, so just before the jump into truly higher airflow configurations that generate 40+ dBA of noise. That makes the H500P about the same in acoustic performance as the Meshify C, given our configuration and with the same test system. Not impressive, but not awful.
Cooler Master H500P Review Conclusion
The H500P is a visually distinctive case that’s inspired an unusual amount of excitement, and some of that excitement is due to the fact that it’s a nominal refresh of Cooler Master’s much loved HAF cases. Somewhere along the line, though, the literal meaning of the “high airflow” acronym has been lost, and the H500P doesn’t live up to its dusty-but-well-ventilated forerunners. Although this is not a HAF case in the proper noun sense, Cooler Master does claim that it’s a case with high airflow, and that just isn’t true in the stock layout--not as much as it could be with a different front panel, at least.
The H500P looks just as good as it did at Computex, and buyers won’t be visually disappointed by the eye-catching chunky RGB fans and tempered glass. They might instead be disappointed by the priority that modularity has taken over functionality: the H500P comes across as a chassis that’s going to be sold as a few different SKUs with different external panels. Build quality overall is poor, creaky, and flexing, coupled with poorly designed mounting joints for both the front and TG side panel.
In terms of performance and build quality, this isn’t a case that merits its price, but it’s also not a case that has easy alternatives to recommend: the bowed-out front window and oversized fans make it unique. The Thermaltake Core 71 TG we reviewed recently wasn’t our favorite case, but it did include four tempered glass panels for only $20 more than the H500P. A case like the Meshify C offers glass and better potential cooling for a fraction of the price. Those who have a deep need for the H500P’s appearance, though, must either shell out the $150 for a case that’s middling in performance or wait for another company to rip off Cooler Master’s design.
Editorial, Testing: Patrick Lathan
Video Editorial, Test Lead: Steve Burke
Video Production: Andrew Coleman