The DIYPC Zondda-O is a Newegg sort-by-lowest-price staple. It currently costs $34, falling in a price bracket that’s almost entirely occupied by other cases from DIYPC, but the price fluctuates constantly by $1-$2 in a way that suggests it exists on the razor’s edge of profitability. The most expensive enclosure they have for sale directly from Newegg is only $80, for an obviously HAF-inspired “full tower” called the Skyline 06. We’ve never mentioned DIYPC before this month, but over the years we’ve watched them quietly refining the art of selling cases that look twenty years out of date for alarmingly low prices.
We should note that we copied the below spec sheet directly from DIYPC’s website, so we can’t vouch for the “radiation protection design, safe and environmental.” Use with radioactive material at your own risk.
DIYPC Zondda-O Specs
Brand | DIYPC |
Model | Zondda-O |
Type | ATX Mid Tower |
Color | Black |
Case Material | SPCC |
With Power Supply | No |
Power Supply Mounted | Bottom |
Motherboard Compatibility | Micro ATX / ATX |
Side Panel Window | Yes |
LED | Orange |
External 5.25" Drive Bays | 1 |
Internal 3.5" Drive Bays | 4 |
Internal 2.5" Drive Bays | 2 (SSD) |
Expansion Slots | 7 |
Front Ports | 1 x USB 3.0 / 2 x USB 2.0 / Audio |
Fan Options | Front: 1 x 120mm LED Orange Fan (pre-installed) Rear: 1 x 120mm Orange Fan (pre-installed) Side: 1 x 120mm LED Orange Fan (pre-installed) [Also supports 140mm] |
Max GPU Length Allowance | 420mm |
Weight | 14 lbs. |
Features | Full black interior Advanced cable management design: 27mm Advanced Bottom-Mounted PSU Design Top Mounted IO ports - USB for up-to-date high speed data transfer Screw-less design for 5.25" Devices Front panel dust-proof mesh design Build in 3 x fans provide great cooling performance Easy-clean PSU dust filter at bottom 7 PCI slots provide flexibility for multiple graphics card solutions Radiation protection design, safe and environmental |
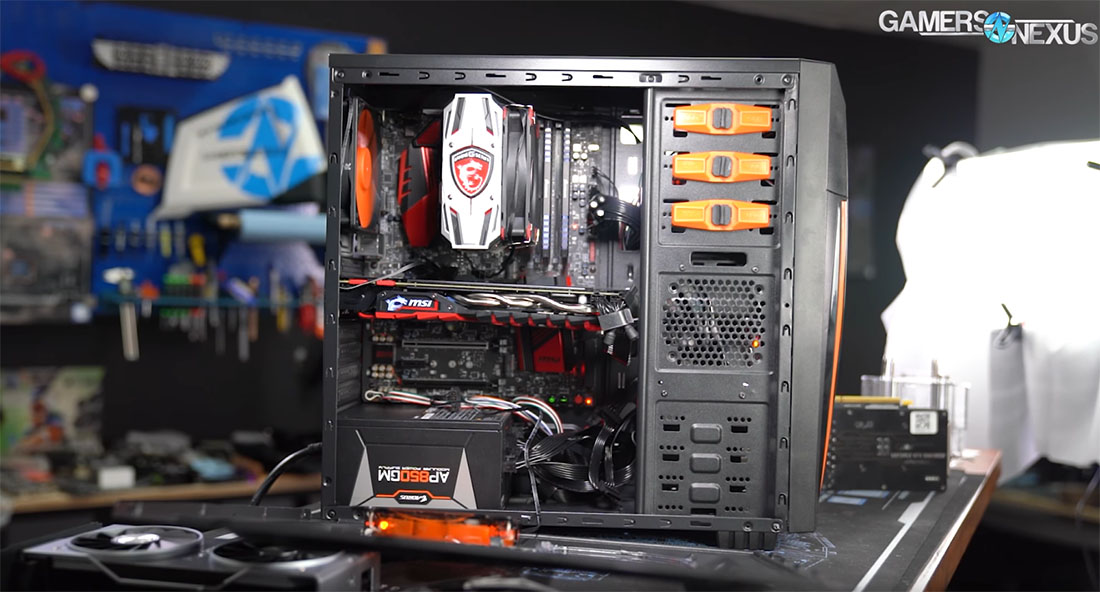
THE BUILD
We should say up front that we’re not just here to dunk on the Zondda. It has its place: we’ve actually recommended it as part of an ultra-budget system build recently, which is why we happen to have one in the office for testing. That said, it’s a relief to take a look at an old fashioned bargain-basement case once in a while and see how far we’ve come. If we ever start feeling like one case is just as good as the next, we can take a look at the Zondda and give our lives purpose again.
The Zondda is presumably named after the sports car; the extra D stands for “don’t sue us for copyright infringement.” The idea of modelling PC hardware after fast cars is so played out that it wraps back around into being charmingly quaint, and the 2000s-ish case design with swooshing lines and translucent orange LED illuminated fans has a retro look that might make up for how incredibly cheap it looks. Or not.
The lowest bar we could possibly set for the Zondda is being able to physically fit all of our components, and it passed that test. Both side panels are bellied out for a little bit of extra clearance for cables and coolers, and it works. The Zondda is officially more functional than the Coolman Threebody, which required some gentle persuasion with pliers and tin snips to fit our GPU.
Even though the convex sides of the case provide some room, it doesn’t make it any easier to decide where to tie loose cables down. The motherboard tray has zero space other than what’s scooped out of the side panel, there is no PSU shroud, and the front of the case is full of unremovable drive cages. Since our test system requires relatively few cables, we were able to bundle them up against the side of the drive cages without too much fuss. The much larger issuer was the lack of an EPS 12V cutout. We haven’t had to complain about insufficient cutouts above the motherboard for years now, but the Zondda blew right past “insufficient” to “none at all.” For plugs at the top and rear edge of the motherboard, cables must be routed through the interior of the case. Though some other shortcomings of the case can be excused as old fashioned, this particular one is just cheap. The chassis is as short as it could possibly be in its current configuration, and putting cutouts at the top would require more height, more materials, and more tooling.
The other reason for pressing an indent into the side panels is to provide stability against warping, which sort of works: the entire case is constructed of tissue-thin 0.6mm steel, with various foldings and rollings and indents throughout that reinforce it. As a result the case is extremely light (6.35kg, approximately half the weight of an NZXT H700) and mostly holds its shape, but the steel side panel was mashed in when we got it. The lightness is an important element of the price, both because minimal materials are used and it’s inexpensive to ship the completed product. Both side panels are the old school kind that take three arms to press down and slide on, but as far as that sort of panel goes, we’ve seen worse. As long as cables under the steel panel were bundled up tightly, it never put up much of a fight.
The other side panel has a window in it, a throwback to a time when every case window was acrylic and tiny and pointless. As with many older designs, the side window has to fight for space with the side intake fan and the storage bays at the front of the case, with the dim black interior shadowing anything that might still peek through. The Zondda isn’t here to coddle you. The Zondda says, “Oh, baby wants some RGB? Here are some dim orange LEDs. A side window? Fine, now you can see the side of the hard drive mounts. Enjoy.”
The side fan is one of the best features of the case. Side fans had fallen out of favor even before we started doing regular case reviews, but the cases from that era that we’ve revisited handily beat almost every modern case on the charts in GPU thermals. Having a fan on the side of the case makes it impossible to have a full glass pane, they’re hard to plug into the motherboard, and they make taking the side panel off harder, but there’s no arguing with the thermal results. We’re fully ready for the day the tempered glass trend dies down and side fans return. When that day comes, hopefully it will be with better stock fans than DIYPC’s incredibly flimsy offering--the frames of the two LED fans bend whenever their screws are twisted to tighten them down.
It sucks that modern cases have so little support for 3.5” or 5.25” drives, but the Zondda is a good reminder of why. The whole front half of the case is a mess, since the drive cages take up most of the height of the case and are riveted into place. There are 5.25” bays, but only one of them is accessible externally, so the other two are almost totally useless, as is the floppy bay. It’s very obvious that this chassis wasn’t originally designed with this front panel. Because there’s only a small gap between the top of the hard drive cage and the bottom of the floppy drive slot, there’s only one front fan mount wedged in the gap with a single 120mm fan installed. The mount is riveted in place, even though there are rails with mounting holes along the front of the chassis so that it could be repositioned if screws had been used instead. We assume this chassis is used in multiple cases, with fan rails riveted in different positions depending on the model. There are multiple holes on the rails themselves, but they only fit one 120mm fan, although they’re thick enough that they could hold a 140mm fan if holes had been drilled for it. It wouldn’t help much, because the front panel itself only has a tiny decoratively shaped piece of mesh in front of the fan, with some needlessly obstructive plastic decoration on top of that for good measure.
On the subject of the front panel, the Zondda one-ups the Lancool II’s empty USB port by having an entire SD card reader missing. The holes for SD cards are there, with labels molded into the plastic, but they’re covered up by an “HD Audio” sticker. The case’s box was marked “Not Card Reader Ready,” so perhaps there’s another SKU out there somewhere that includes it. Testing front I/O ports isn’t part of our case review process, but we’d put minimal faith in the quality of the USB 3.0 and audio ports.
Fan support throughout the case is bad. The side vent supports 120mm or 140mm fans, which is nice considering that DIYPC had to nobly sacrifice window space to support better cooling, but also frustrating since the stock fans are all 120mm and the space was sacrificed for nothing. The rear mount only supports a 120mm fan, as does the front. Radiator support is therefore technically limited to 140mm, although in practical terms it’s 120mm since nobody in their right mind would try to put a radiator on the door, or put a radiator in a $34 case at all for that matter. For those not in their right mind, there are tubing cutouts in the rear of the case.
DIYPC claims “Advanced Bottom-Mounted PSU Design” as a case feature, which is a little less revolutionary in 2020 than the wording might imply. Still, it means that the PSU pulls air from under the case rather than the interior, and they went to the trouble of putting a plastic-framed filter under the PSU vent. Unfortunately it ejects to the rear of the case and is hard to access with the case up against a wall, and there’s nothing to stop it from drooping down and away from the vent it’s supposed to be filtering, which is what happened to ours.
One interesting aspect of all the crowding up front is that DIYPC took the opportunity to cut an 80(?)mm fan mount into the metal between the drive cages, pointed sideways in the gap between optical drives and hard drives. As such, it’s pulling air from nowhere and pushing it towards nothing, but it adds flexibility and it doesn’t hurt anything, so we’ll count it as a positive.
Building in the Zondda wasn’t terrible. Despite the pervasive cheapness and ancient layout, the only real roadblocks were how small the case is and the lack of a CPU power cutout. Nothing was broken, nothing didn’t fit. If we could change the design, we’d eliminate all the unusable optical drive bays, allow additional fan rails to be screwed onto the existing mounting holes on the front, and pick a more breathable front panel design. It’s a good thing we can’t change the design, then--we suspect that DIYPC is able to keep its prices so low by avoiding retooling for as long as possible, for example by putting a sticker over an unused I/O port rather than making a new mold. Flawed as it is, the fact that the Zondda costs $34 is the most compelling thing about it. Never change, DIYPC.
GN Case Testing Bench
| Component | Courtesy Of | |
| Video Card | MSI GTX 1080 Gaming X (OC Mode) | MSI |
| CPU | Intel i7-6700K @ 4.4GHz | GamersNexus |
| CPU Cooler | MSI Core Frozr L | MSI |
| Motherboard | MSI Z170A Gaming M7 | MSI |
| Memory | Corsair Vengeance LED 32GB 3200MHz | Corsair |
| SSD | Samsung 850 EVO 120GB | Samsung |
| PSU | Corsair RM650x | Corsair |
| Cables | CableMod Pro Mesh Cables | CableMod |
| Case | This is what we're testing! | - |
The video card is configured to run at 55% fan speed at all times.
Prior to load testing, we collect idle temperature results for ten minutes to determine the unloaded cooling performance of a case's fans and air channels. Thermal benchmarking is conducted for 1400 seconds (23 minutes), a period we've determined sufficient for achieving equilibrium. The over-time data is aggregated and will occasionally be compiled into charts, if interesting or relevant. The equilibrium performance is averaged to create the below charts.
Load testing is conducted using Prime95 LFFTs and Kombustor “FurMark” stress testing simultaneously. Testing is completely automated using in-house scripting, and executes with perfect accuracy on every run.
Thermals
For the first time in a while, we limited ourselves to just our basic lineup of case configurations. The extremely limited cooling support in the Zondda makes our job easier, since nobody who buys this case is going to be setting it up much differently than the stock configuration. The one major deviation from our usual tests was the standardized fan test. We were forced to get creative there because our standardized set of fans is two 140mm intakes and one 120mm exhaust, which we chose because it works with minimal alteration in almost any modern mid tower. The Zondda only has one front intake slot, however, and it’s 120mm. We compromised by zip typing a 140mm fan onto the 120mm rails at the front of the case and sticking the other 140mm fan in the side intake slot, so the Zondda ended up benefiting from its limitations. Before we get ahead of ourselves, though, on to the torture test results.
CPU Torture

CPU torture thermals are first. CPU load temperature measured at 68 degrees Celsius delta T over ambient, with an uncharacteristically small temperature reduction resulting from removing the front panel, down to only 66 degrees. Normally, we’d say that such a small reduction is proof that the front panel isn’t obstructing airflow, and in a way that’s true here as well -- because there isn’t any airflow to obstruct in the first place. The anemic front fan is obstructed by the drive cages inside the case and isn’t well-placed for CPU cooling in the first place, so it doesn’t make much difference whether it’s actually able to pull air or not. For what it’s worth, DIYPC has avoided putting two layers of mesh over the fan, but the plastic decoration in front of the mesh is just as bad.
Perhaps unsurprisingly, the CPU temperatures relative to the rest of the chart are as bad as they could possibly be. It avoided throttling, but if it had gotten any hotter, the CPU would have clocked down for safety as it has in some other especially bad cases we’ve reviewed in the past. We had higher hopes for the Zondda based on the fact that there was SOME ventilation in the front, but 68 degrees over ambient is Corsair Spec-04 or Walmart DTW tier performance.
GPU Torture

The GPU torture temperature was 48 degrees Celsius over ambient, which remained unchanged with the removal of the front panel. Although it had even less effect here than in the CPU torture test, that has less to do with how bad the front panel is and more to do with how good the side panel is. The 120mm side fan isn’t any higher-quality than the fans elsewhere in the case, but side intake vents are hugely beneficial to GPU temperatures, and any benefits that might result from taking the front panel off are completely overshadowed by the cool air being pumped in through the side of the case.
To demonstrate this point, the Zondda is among the best-performing cases for GPU temperatures on our chart even as it’s one of the absolute worst for CPU temperatures. 48 degrees C dT is at the performance level of the Silverstone RV02 or the O11 Dynamic in an especially favorable fan configuration. It’s near the HAF X with its side intake. Performance is helped by the fact that there’s no filter over the side intake, which could cause some problems down the line, but it’s worth the dust to get such good cooling in a dirt-cheap enclosure. At some point, a high-end case manufacturer is going to (re)discover that slapping a $2 fan on the side of a case will make it cool as well as a $500 C700M, and they’ll charge hundreds of dollars for the privilege of swapping out a tempered glass panel for one that has a fan mounted on it.
3DMark
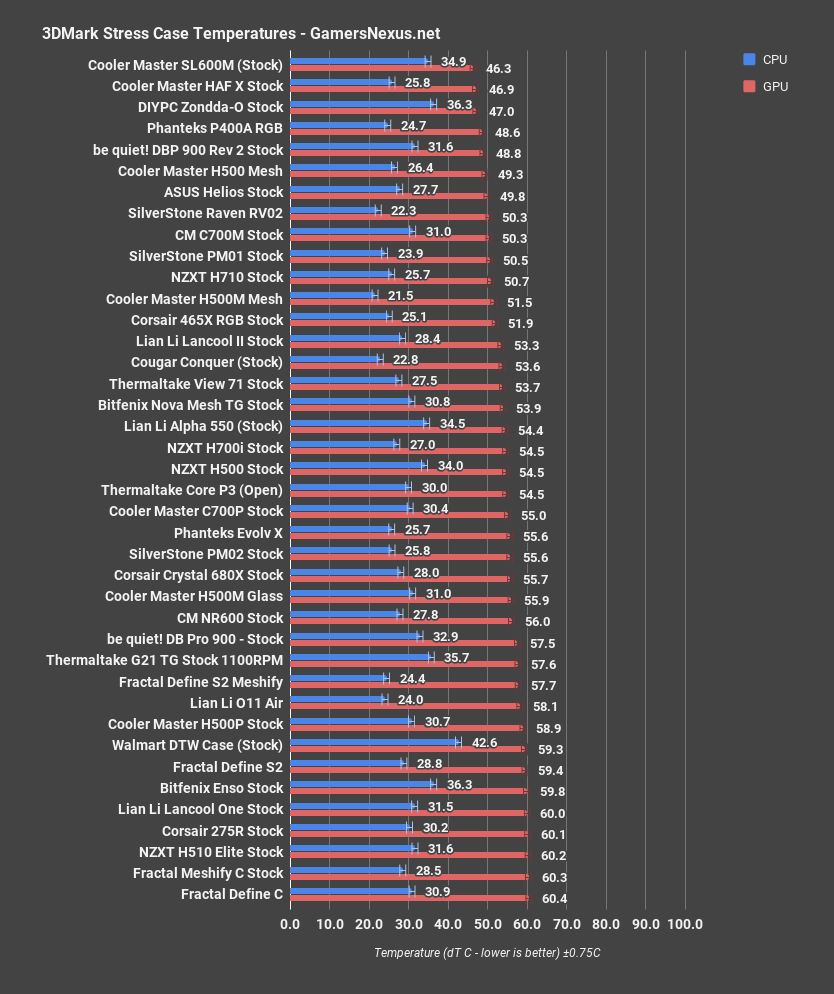
The 3DMark result functions as confirmation of the GPU torture result, with an average of 47C dT on the GPU making it one of the highest performing cases on this chart as well. The HAF X performed similarly, another case with a side-mounted intake fan pointed directly into the GPU. There’s a direct correlation between the rise of tempered glass and the elimination of side intake fans, which has trickled down even into the budget market. The Zondda’s 120mm intake fan fits perfectly below the level of our GPU’s cooler, providing the optimal path for incoming air, although there’s no great direction for exhaust.
Blender

The Blender CPU render averaged 40 degrees CPU dT over ambient, a good bit lower than the torture test but far beyond the temperatures we normally see for this particular test. The Walmart DTW’s case and the Bitfenix Enso performed measurably worse, but pretty much any other option is at least as good as the Zondda, and most are significantly better. This test shows how CPU temperatures fare when it’s loaded in isolation and without any risk of throttling, or in other words it can show how much bad CPU cooling is due to the cooler pulling GPU exhaust in other tests. We can see that it’s not the GPU’s fault that the CPU got so hot in the torture test: it’s just a bad case for CPU cooling period.
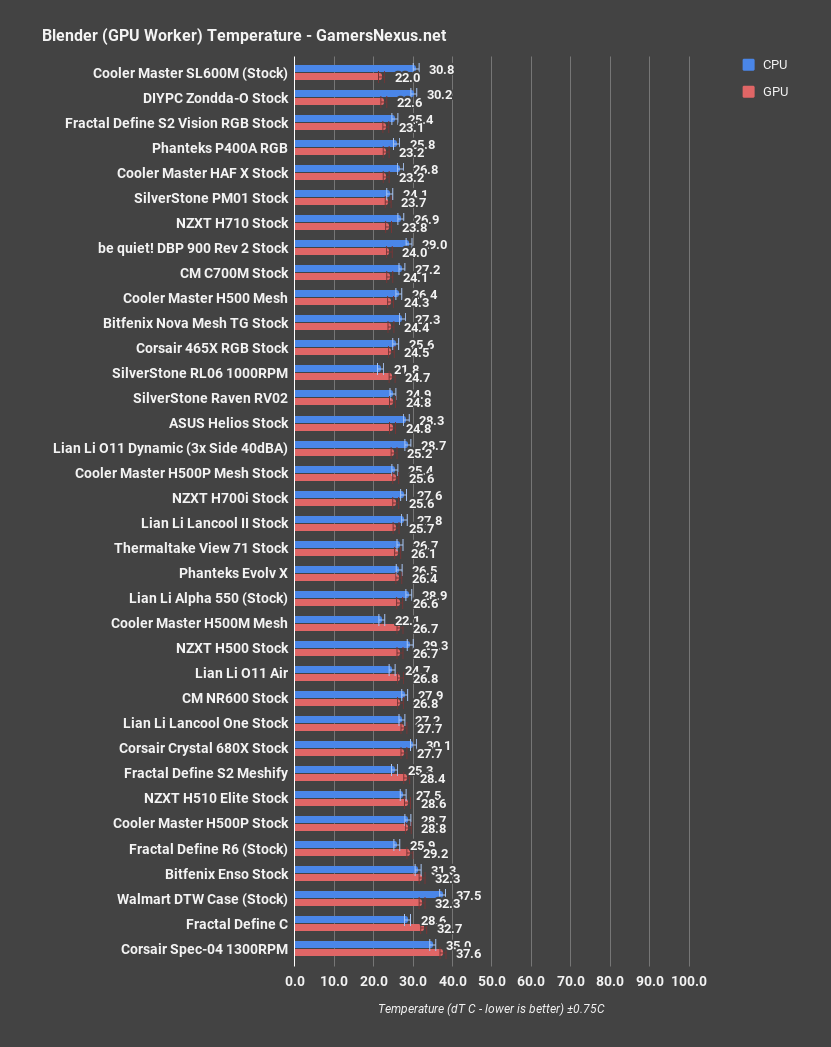
The same render with GPU acceleration enabled resulted in a 23-degree Celsius GPU dT, again cementing the Zondda’s place as one of the best cases on the chart for GPU cooling in spite of its CPU cooling performance. From a moderate load like this all the way up to the Furmark torture workload, the side intake fan is capable of keeping up.
Standardized Fans
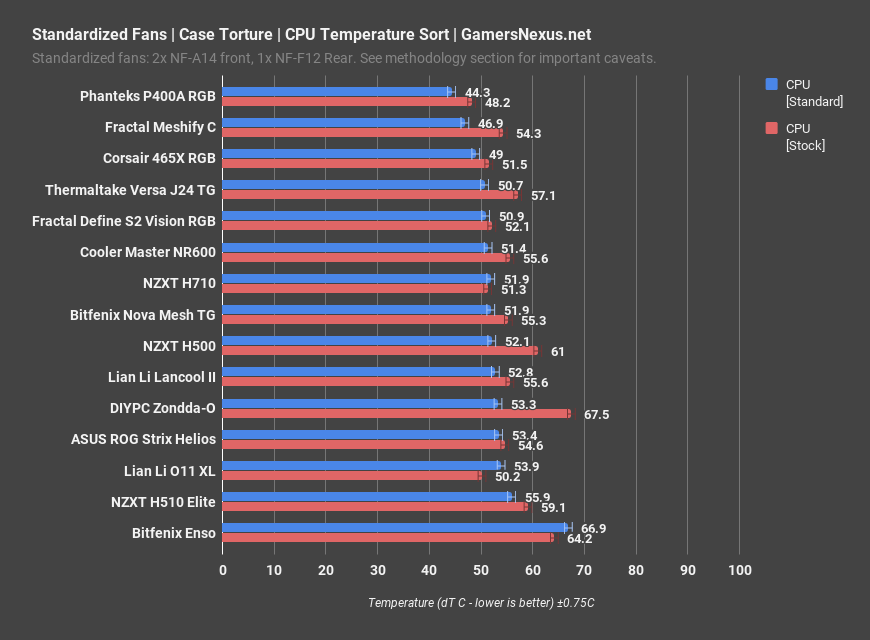
As mentioned at the beginning of the thermal section, this standardized fan test was a little less standard than usual. We don’t really count this, but it’ll show you an optional upgrade pathway that’s imperfect. One of the 140mm fans was strapped to the 120mm mount at the front, the other was mounted in the side intake slot, and the 120mm exhaust fan was placed in the rear exhaust slot as usual. CPU dT was 53 degrees Celsius under these conditions, much improved from the original 68C torture result thanks to the much higher quality fans. This still isn’t an incredible result compared to the other cases we’ve tested with standardized fans, but it’s much more competitive than it was in the torture test, now beating the ROG Helios and the H510 Elite, as well as the O11 XL in a configuration that wasn’t especially favorable for CPU temperatures. This is the kind of difference a good fan can make, but it doesn’t matter--there are three fan slots in the Zondda, and all three come with fans preinstalled. Paying to replace even one of the fans makes it no longer one of the cheapest cases on the market, and there’s no space to just add an additional fan.

GPU temperatures with the standardized fans also benefit, with an average of 45C dT versus the original 48C. That’s not as dramatic a reduction, but there wasn’t a lot of room for improvement in the first place. None of the other cases we’ve tested with the standardized fan set have side intake slots, and even if they did we’d try to stick with the usual 2 front/1 back fan configuration, so the Zondda absolutely trounces every other result on the chart thus far other than the Lian Li O11 XL. We placed the two 140mm fans directly under the GPU for that case test, so it had a similar advantage in the GPU cooling department, although the Zondda was still a couple degrees cooler.
Noise & Noise Normalization
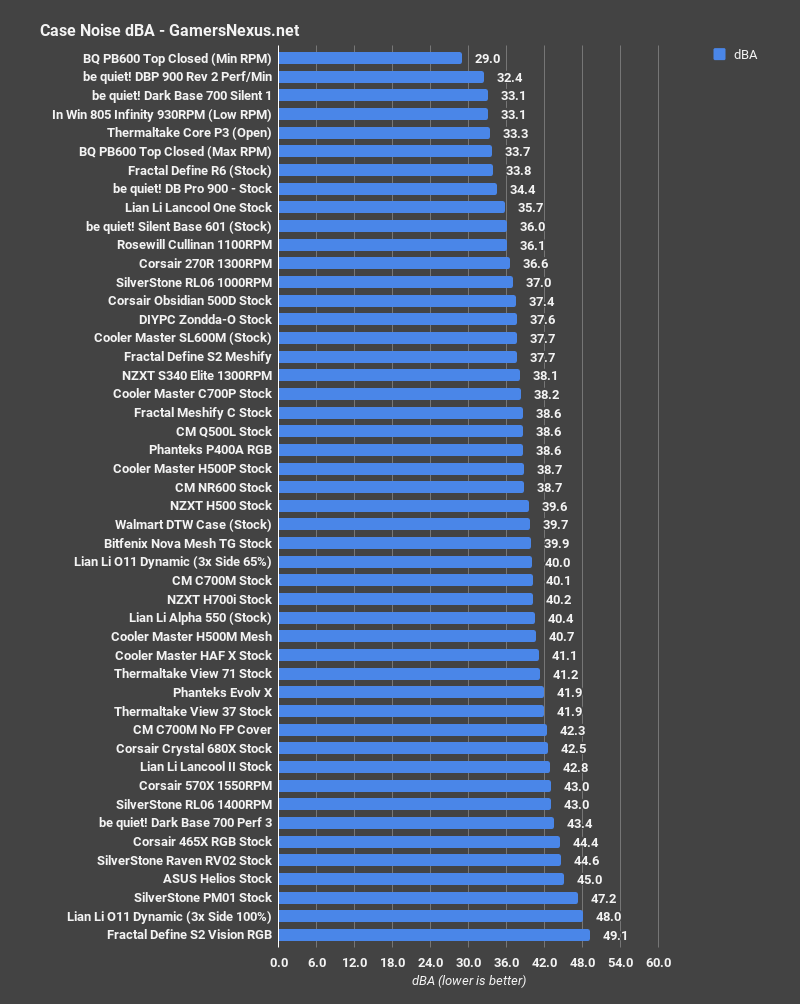
The stock noise level with all the case fans at 100% was 38dBA, fairly quiet thanks to the case fans’ embarrassing top speed of 1000RPM. Each of them would cycle between accurately reporting their own speed and then claiming to be running at about 2000RPM, but we used a physical laser tachometer to confirm that the lower number was the correct one. The S340 Elite and stock Meshify C are in the same ballpark, two cases that are fairly quiet thanks to a solid front panel and a lack of stock fans respectively.
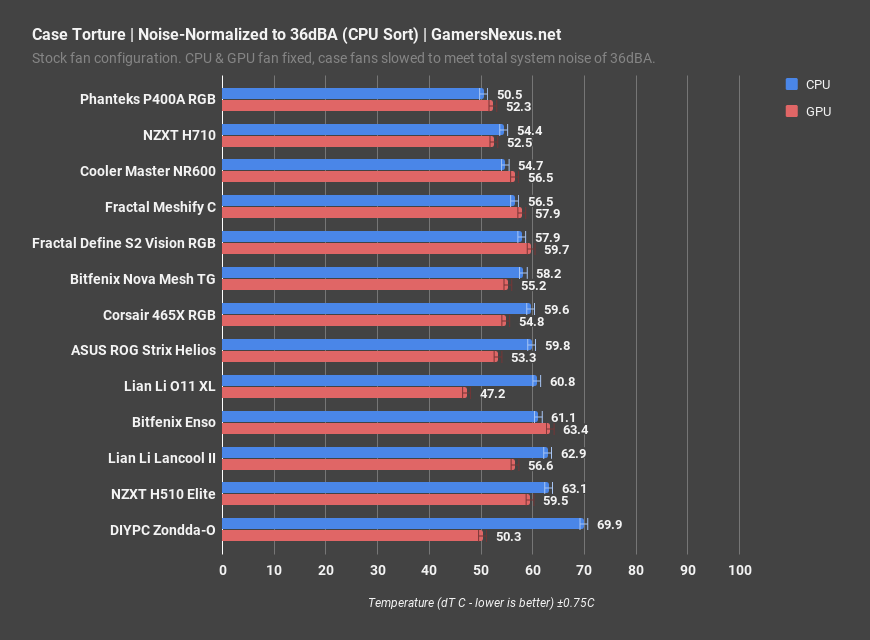
38dBA isn’t much beyond our noise-normalized threshold of 36dBA, but it still required lowering the case fan speed to 75% (800-900RPM in reality) to achieve that noise level. GPU and CPU fans remain controlled, as always. The CPU temperature was even worse than stock, up to a hellish 70C dT, while the GPU temperature only suffered a little with an average of 50C dT. The CPU temperature was worse than the Enso here, worse than the H510 Elite, worse than any other case we’ve done a noise-normalized test on. GPU temperatures, on the other hand, were better than every other result except the O11 XL, which again had the advantage of our two aftermarket Noctua fans mounted under the GPU since the case comes with no fans.
Conclusion
To reiterate what we said at the end of the build section, we have plenty of changes we can suggest for the Zondda, but any changes would come with a monetary cost that would make it no longer one of the cheapest cases available. A better option is to just adapt the build to the case. The weak point of the Zondda is CPU cooling, so a low-TDP Athlon or Pentium is a price- and temperature-appropriate choice for the case. Another possibility would be a CLC with a 120mm radiator for the CPU, but there’s a serious imbalance of priorities if someone is putting a CLC in a $30-ish case.
By the same token, we can say that the case’s airflow isn’t that bad with some better fans installed, but it’s completely pointless to spend extra money replacing fans in the Zondda which comes with a full complement of fans just to make it perform like a moderately more expensive case. It’s doubly pointless because the front intake slot doesn’t even officially support 140mm fans.
To be clear, nobody should buy this case because they think it’s some 1600AF-style hidden gem of GPU cooling that’s going to beat everything else on the market. Yes, the GPU thermals are good for such a cheap case, but they aren’t better than other cases like the O11 Dynamic and Silverstone PM01 that also have significantly better CPU temperatures and build quality, or for that matter a cardboard box with a 120mm fan mount drilled into the side of it. This is a cheap case for cheap builds, and it’s adequate for that purpose. This is the ideal case for the tier of computer that belongs inside a $30 box.
Editorial, Testing: Patrick Lathan
Test Lead, Host: Steve Burke
Video: Keegan Gallick, Andrew Coleman, Josh Svoboda