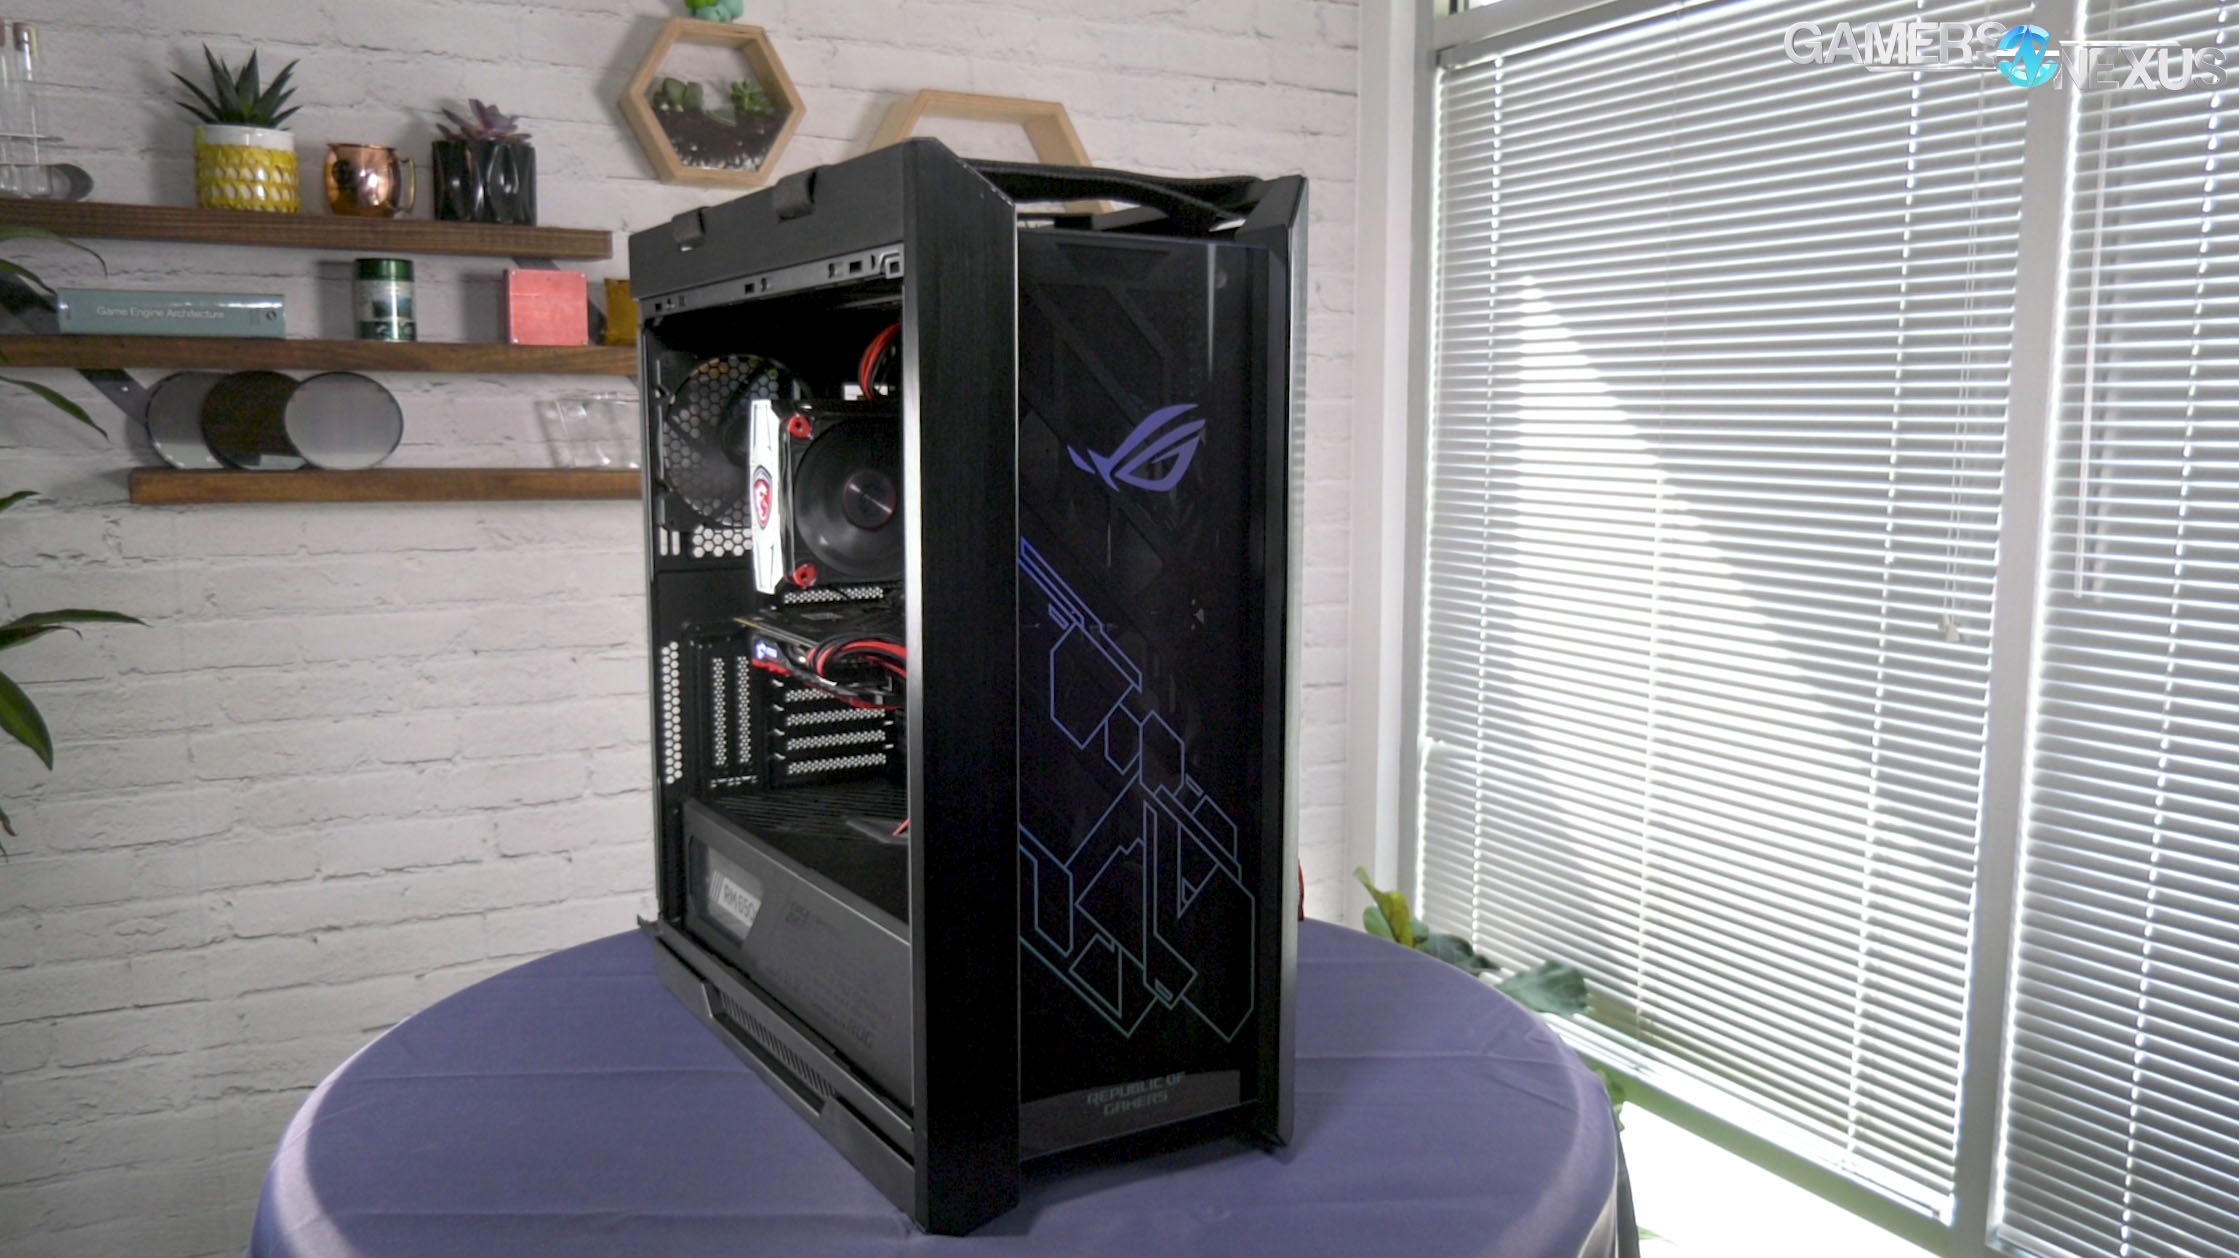
We saw the yet-unnamed ASUS ROG Strix Helios at Computex 2018, where it landed a spot on our Most Room For Improvement list alongside the other two cases ASUS showed. ASUS doesn’t make cases--the company’s been around for 30 years, so we won’t say it’s never happened, but it’s definitely a rare occurrence. They worked with In Win to create the concept shown off at Computex, but the ASUS x In Win branding has disappeared from the production version and it’s our understanding that In Win is not involved in manufacturing. The Helios has to stand up to extra scrutiny as part of ASUS’ first foray into the case market. The ROG line has a reputation for solid hardware despite the over-the-top gamer branding, so it has big shoes to fill.The case is packed with as many features as possible, necessary or otherwise. The most distinctive is the velcro strap laced over the top panel, ostensibly an “ergonomic and stylish” handle for carrying the system to LAN parties. It helps a little for hoisting the case up on to a table, but this is not the enclosure to bring to a LAN party, even for the rare person that attends more than one per decade. Most of the case’s surface is glass and it weighs 18kg empty. At least the straps and the rails that they’re looped through are massive overkill, tested up to 50kg according to ASUS, so the most likely point of failure is the person lugging it around. The strap is fastened with velcro and can easily be removed before it gets dusty and gross, and we’d recommend doing so, since the case looks perfectly normal without it.
When we first received our sample, the “multifunction cover” over the cutouts to the side of the motherboard was knocked sideways in a way that looked like serious damage, but it was just loose. There was also a mysterious loose screw wedged into it, which we later discovered was from the front panel. The cover slides backwards and forwards to allow room for E-ATX motherboards, and it contains a 2.5” drive mount and built-in GPU braces. The braces are of limited usefulness since they mostly support the edge of the GPU closest to the motherboard, which is already held up by the PCIe slot. The rails for the supports are unpainted to allow the supports to slide up and down and stand out harshly against the black interior. GPU sag is a problem, but one without an elegant solution. The cover functions normally otherwise but offers very little clearance for plugs on the edge of the motherboard, and connecting the SATA cable for our boot drive was difficult.
ASUS ROG Strix Helios Case Specs
Dimensions | 250 x 565 x 591 (WxDxH) |
Case Size | ATX Mid Tower |
Form Factor | ATX/micro ATX/Mini ITX/EATX (12”x10.9”) |
Drive Bays | 2 x Int x 2.5”/3.5” Combo Bay 4 x Int x 2.5” Bay |
Expansion Slots | 8+2 (additional vertical) |
Weight | N.W. 18 kg |
Color | Black |
Front I/O Ports | 1 x USB 3.1 Gen 2 (Type-C) 4 x USB 3.1 Gen 1 1 x Headphone 1 x Microphone LED & Fan Control Buttons |
Power Supply | ATX |
Cooling Support | Front: 3 x 140mm/ 3 x 120mm (Radiator + Fan Thickness: Max. 90mm) Top: 2 x 140mm/ 3 x 120mm (Radiator + Fan Thickness: Max. 60mm) Rear: 1 x 140mm/120mm |
Pre-installed Fans | Front: 3 x 140mm Rear: 1 x 140mm |
Radiator Support | Front: 120, 140, 240, 280, 360, 420 mm Top 120, 140, 240, 280, 360 mm Rear: 120, 140mm |
Clearance | Maximum GPU Length: 450 mm Maximum CPU Cooler Height: 190 mm Maximum PSU Length: 220 mm Cable Routing: Max. 33 mm |
Drive Bays | 3.5”/2.5” Drive Bays: Up to 4pcs (Pre-install 2pcs) 2.5” Drive Bays: Up to 9pcs (Pre-install 4+1pcs) |
Removable Dust Filters | Front: Slide-Out / Top: Slide-Out / Bottom: Slide-Out |
The Cooler Master-style rear cable cover is made of translucent plastic. That’s a deliberate decision to allow lighting from RGB SSDs to shine through while still obscuring cables, but it removes even more purpose from a component that we already aren’t wild about. Cable covers are good for hiding cables behind clear glass, and they’re okay for mashing down bundles of cables so that they don’t push the side panel off. A clear plastic cover is worse at both of these things than a metal one. Another case feature familiar to us from Cooler Master’s H500 cases is the PSU shroud, which is full-length but can be removed in two sections. The front section slides back a little to loosen it and then it lifts out, but ASUS missed a trick here by not drilling a couple more holes and allowing users to screw the shroud down with it pushed backwards. The rear section of the shroud has a plastic window for viewing fancy power supplies, i.e. ASUS ROG power supplies. Underneath is an HDD cage that can be moved forwards or backwards for extra cable storage space.
The side panels are both removable with push buttons, which we’ve praised on other cases in the past. The panels swing out a few degrees and support their own weight, and can then be lifted up and off. It’s a good system, but it’s strange that ASUS chose not to use true hinges, which is a go-to for cases trying to prove how premium they are like the C700M or Evolv X. Each of the two side panels are tinted, while the front panel is clear glass with a tinted plastic film over the back. It’s possible that clear glass is necessary for the LED lighting, which shines through the panel from one side and illuminates the painted ROG design, which is cleverly biased towards the side closer to the LEDs. The stock case fans don’t have any lighting, but that’s probably to avoid clashing with the front panel illumination. We didn’t go into any depth with the lighting effects, but they’re smooth and even and can be controlled with a button on the front I/O panel. There’s also a fan control button, but we almost never use fan controllers for case benchmarks.
The front panel is intended to never be removed and the manual goes so far as to give instructions for cleaning the glass from inside the case, but it wasn’t overly difficult to take off in spite of this. Taking out six screws and unplugging the RGB cable releases the two pillars that hold the glass pane in place, and that’s all it takes. The only ventilation for the front panel is at the top and bottom, with 2.5cm between the filter and the glass. Obviously that’s not as good as it would be with a mesh panel, but maybe three intake fans is enough to brute force airflow--check the thermal section below. The filters are nice; the bottom one ejects from the front of the case and the top one lifts straight up if the velcro carry strap is removed, which it should be most of the time.
The number of cables in the case before anything has been installed is above average: the front I/O panel includes four USB 3.0 plugs, one USB type C, and LED and fan controls as well as the normal audio plugs and power/reset buttons. The lighting and fans require SATA power, and there are three fans at the front of the case with their own cables. Preinstalled velcro straps behind the motherboard make cable management fairly easy anyway, although we had to cut through quite a few factory-installed zip ties to get things arranged the way we wanted them.
The front and top of the case feature removable radiator mounts, a feature we always like, but the front mount became hard to work with when we installed Noctua fans for our standardized fan test. Noctua’s fans use sleeved cables that are thicker than normal, and using 140mm fans leaves almost no space along the side of the fan mount for cables and makes it very difficult to slide the cage down into place. However, since ASUS has fully populated the front mounts with three 1400RPM 140mm fans, most users will probably never replace them.
GPU installation is made slightly more complicated by the vertical GPU mount, which is inset and obstructs the screws for the expansion slot covers. Two slot covers are held on with thumbscrews and the rest with normal case screws, since there’s not enough room between them and the vertical mount. To install a GPU horizontally, the vertical mount needs to be removed completely and then replaced afterwards. The inconvenience is mostly made up for with a replacement vertical mount included in the accessory kit, which is adjustable in height for different CPU/GPU cooler sizes and mounts the GPU much closer to the motherboard for better air cooling. Unfortunately there isn’t any riser cable included, which is at odds with the amount of bells and whistles ASUS has packed in elsewhere.
GN Case Testing Bench (Sponsored by CableMod)
| Component | Courtesy Of | |
| Video Card | MSI GTX 1080 Gaming X (OC Mode) | MSI |
| CPU | Intel i7-6700K @ 4.4GHz | GamersNexus |
| CPU Cooler | MSI Core Frozr L | MSI |
| Motherboard | MSI Z170A Gaming M7 | MSI |
| Memory | Corsair Vengeance LED 32GB 3200MHz | Corsair |
| SSD | Samsung 850 EVO 120GB | Samsung |
| PSU | Corsair RM650x | Corsair |
| Cables | CableMod Pro Mesh Cables | CableMod |
| Case | This is what we're testing! | - |
The video card is configured to run at 55% fan speed at all times.
Prior to load testing, we collect idle temperature results for ten minutes to determine the unloaded cooling performance of a case's fans and air channels. Thermal benchmarking is conducted for 1400 seconds (23 minutes), a period we've determined sufficient for achieving equilibrium. The over-time data is aggregated and will occasionally be compiled into charts, if interesting or relevant. The equilibrium performance is averaged to create the below charts.
Load testing is conducted using Prime95 LFFTs and Kombustor “FurMark” stress testing simultaneously. Testing is completely automated using in-house scripting, and executes with perfect accuracy on every run.
We recently validated our test methodology using a thermal chamber, finding our approach to be nearly perfectly accurate. Learn more here.
Noise & Thermals
We did our usual thermal testing in the Helios, including our new standardized fans and noise normalized tests, but we also did a vertical GPU test for the first time in a while. Most of the time vertical GPU mounts are practically flush with the side of the case and therefore awful for air-cooled GPUs, which is true of the Helios, but it also ships with an optional second vertical GPU bracket that can be positioned much closer to the motherboard. We tested that one instead, since the primary bracket is guaranteed to roast our GPU.
CPU Torture
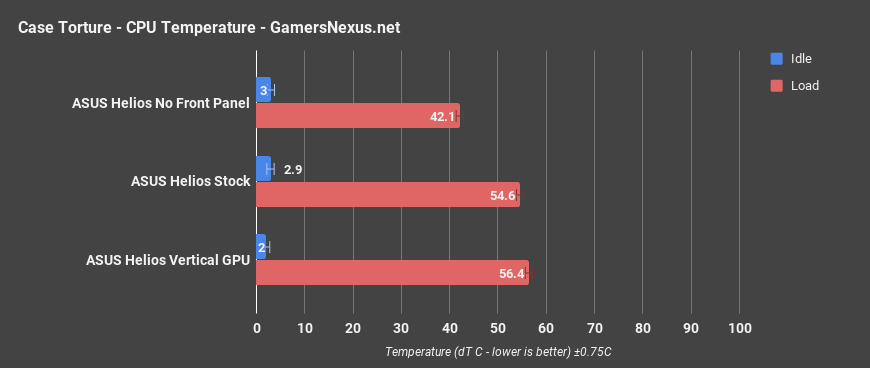
Thermals will start with just the ASUS Helios on the charts, then we’ll move on to the comparative benchmark. CPU temperature averaged 54.6 degrees over ambient in the stock torture test, but dropped to 42.1 degrees with the front panel removed. More front intake fans means a more dramatic difference when the glass panel in front of them is taken off. That’s an extreme drop in temperature, and there’s not a great way to improve on the stock temps other than liquid cooling--ASUS includes four 140mm 1400RPM fans, leaving little room for improvement with just fan changes. That’s both good and bad: The good is that ASUS sets you up with one of the best fan configurations out of the box, but the bad news is that it could be accompanied with better ventilation. The glass panel can stay, too -- vented chamfered edges would also work. The vertical GPU test was slightly worse at 56.4 degrees over ambient, but that’s a promising sign, since we sometimes see CPU temperature improve when a vertically-mounted GPU is really suffocated. More on this momentarily.
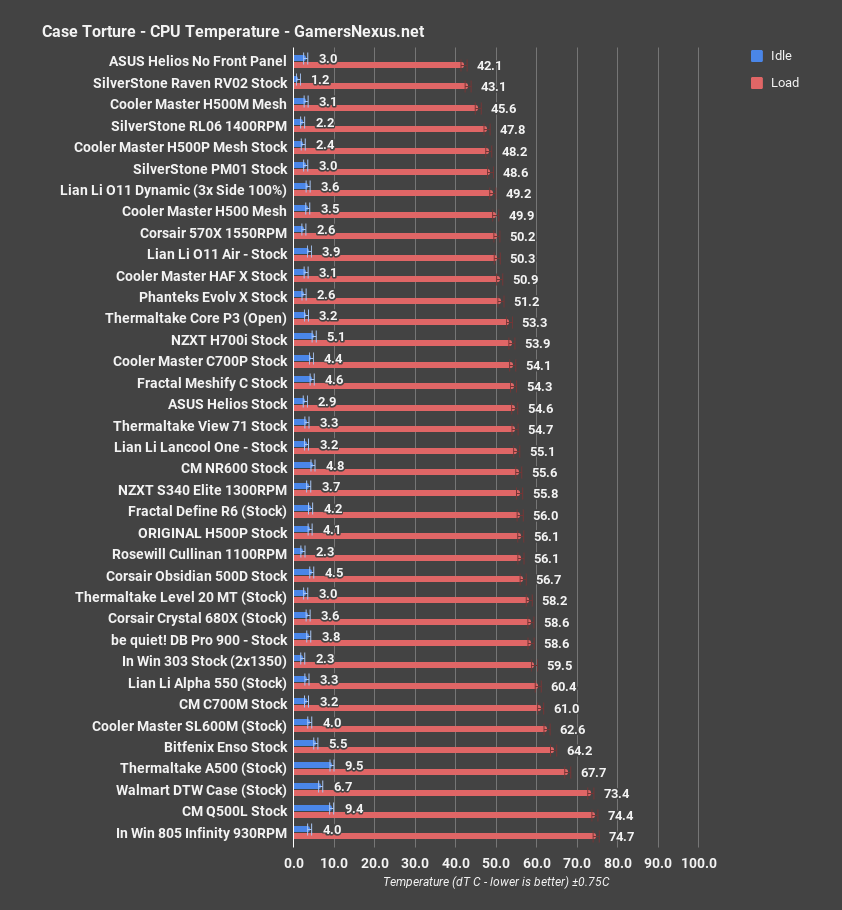
Comparatively, an average CPU temperature of 54.6 degrees over ambient puts the Helios alongside the View 71 and the stock Meshify C. It’s not a bad place to be in general, but it’s ridiculous for a case with this many fans, and even more ridiculous for the price. The 42.1 degree dT result with no front panel or filter is lower than anything on the chart, including the Raven 02, and this case configuration with a well-made mesh panel would still be in the very competitive 50C range thanks to all the fans. ASUS could have done a lot better here.
GPU Torture
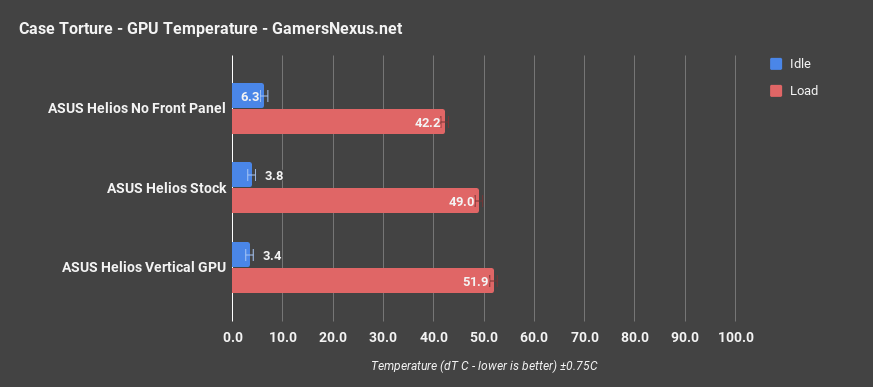
The Furmark portion of the torture test raised the average GPU temperature to 49 degrees Celsius over ambient when stock, which showed a less dramatic improvement at 42.2 degrees dT with no front panel. The vertical GPU result of 51.2 degrees delta T over ambient wasn’t much worse than stock, since we mounted the GPU as close to the motherboard as physically possible. Using the slot close to the glass would have abysmal results, as it always does.
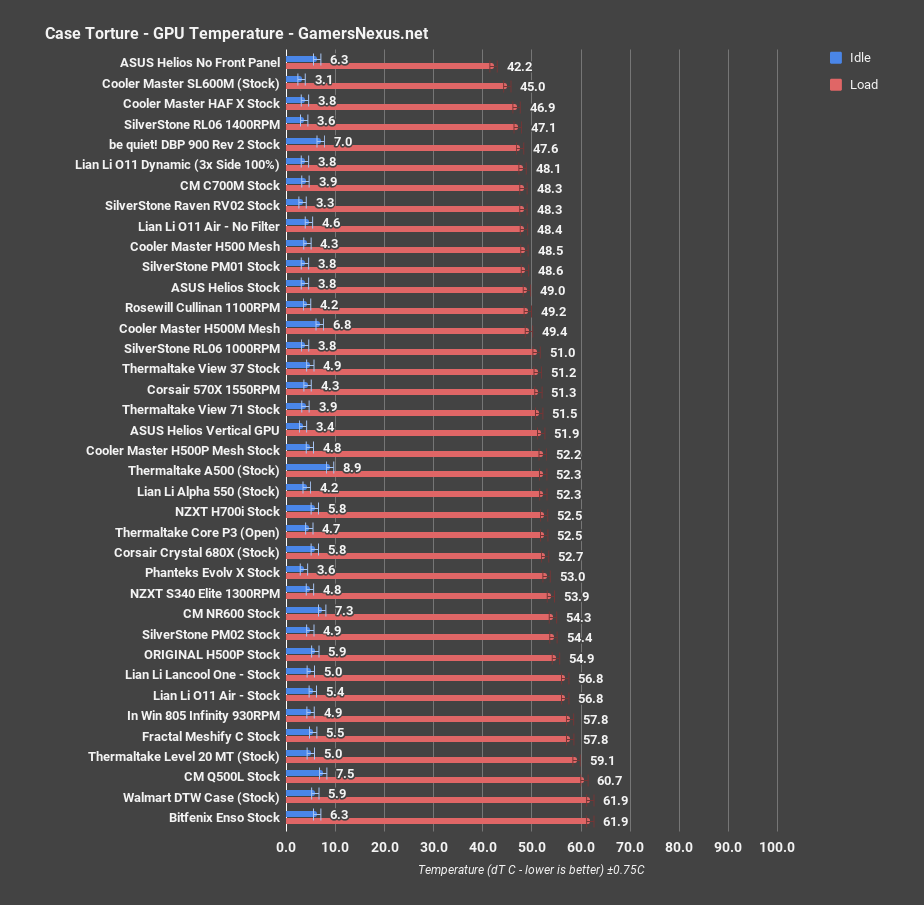
Comparatively, the stock GPU temperature is more competitive than the CPU was, since cases tend to fall down on GPU cooling. The wall of air pushed by the three intake fans puts the GPU result between the PM01 and the Rosewill Cullinan, both cases that we’ve recommended on multiple occasions. Vertical GPU mounting with an air cooled card isn’t out of the question either, which is rarely true, just make sure it’s close to the board.
3DMark
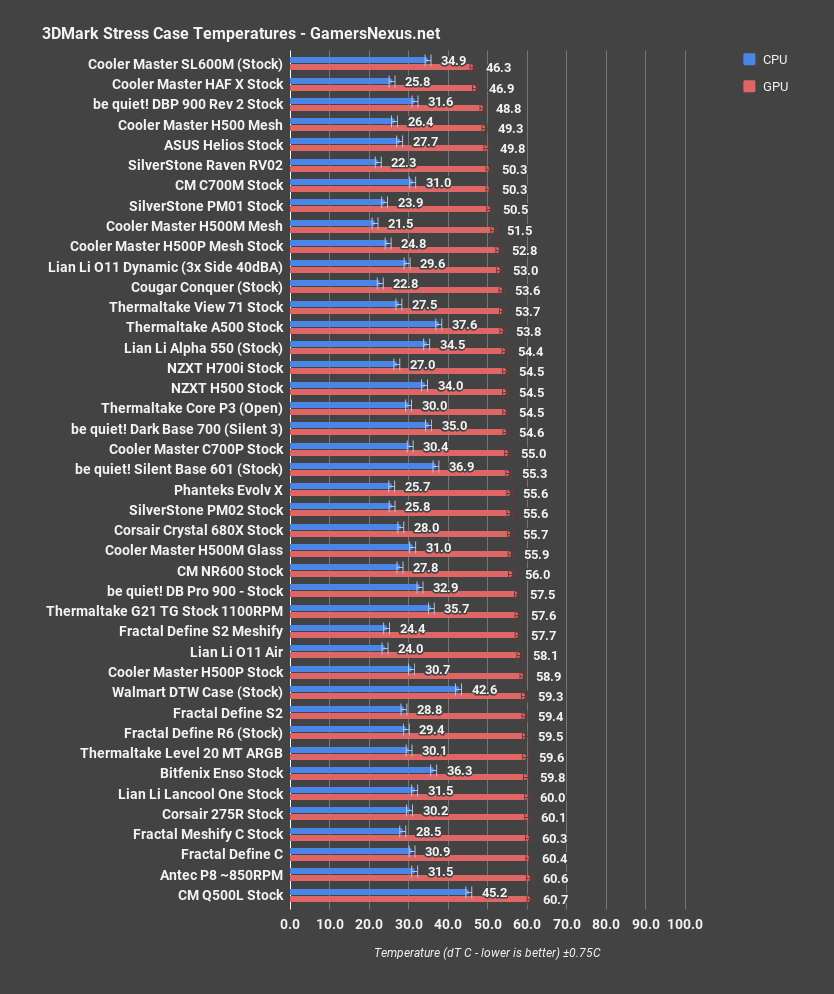
The GPU dT average during the 3DMark Firestrike Extreme stress test was less than one degree higher than the torture test, averaging 49.8C. There’s often an increase of a couple degrees between the two tests, so the Helios is even more competitive here, placed between the Cooler Master H500 Mesh and the RV02. Again, the sheer number of fans contributes more than anything to the performance.
Blender
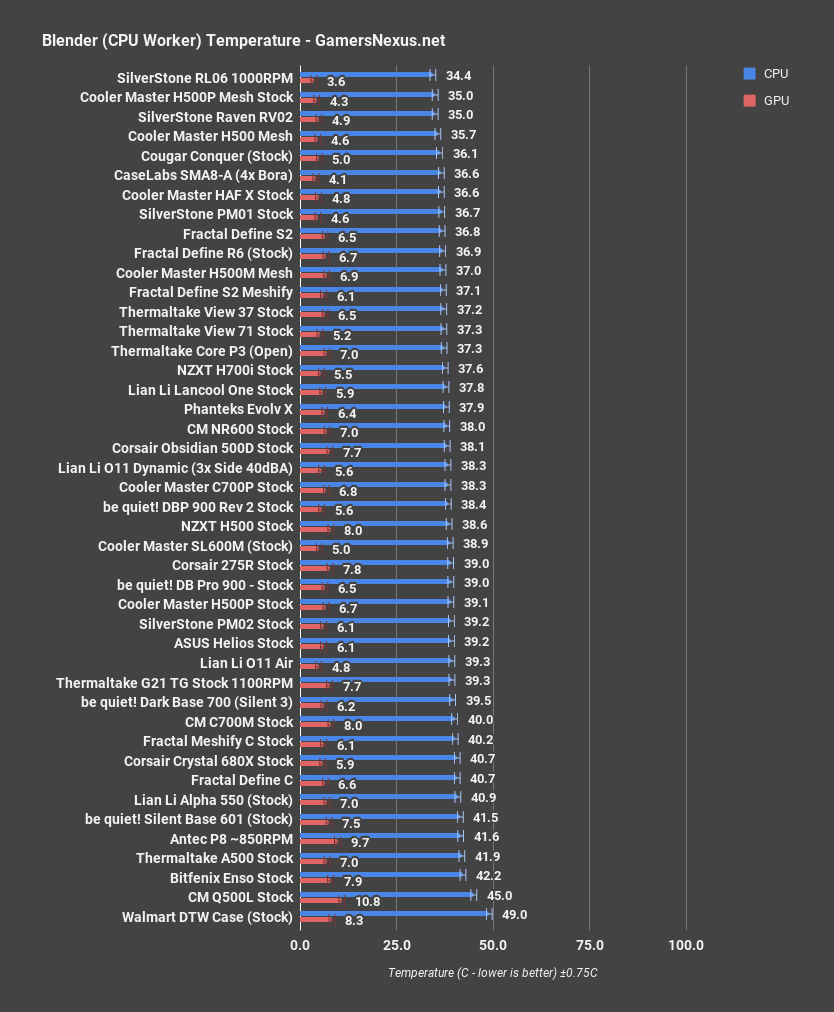
Blender CPU testing averaged a CPU dT of 39.2C, on the same level as the disappointing PM02 in our comparative chart. There’s a good front-to-back airflow pattern with the stock fans, but there just isn’t enough cool air coming in and through the CPU cooler, as demonstrated with the huge temperature drop when the front panel was removed. We’ve had cases do much worse, but the Helios should be better than that.
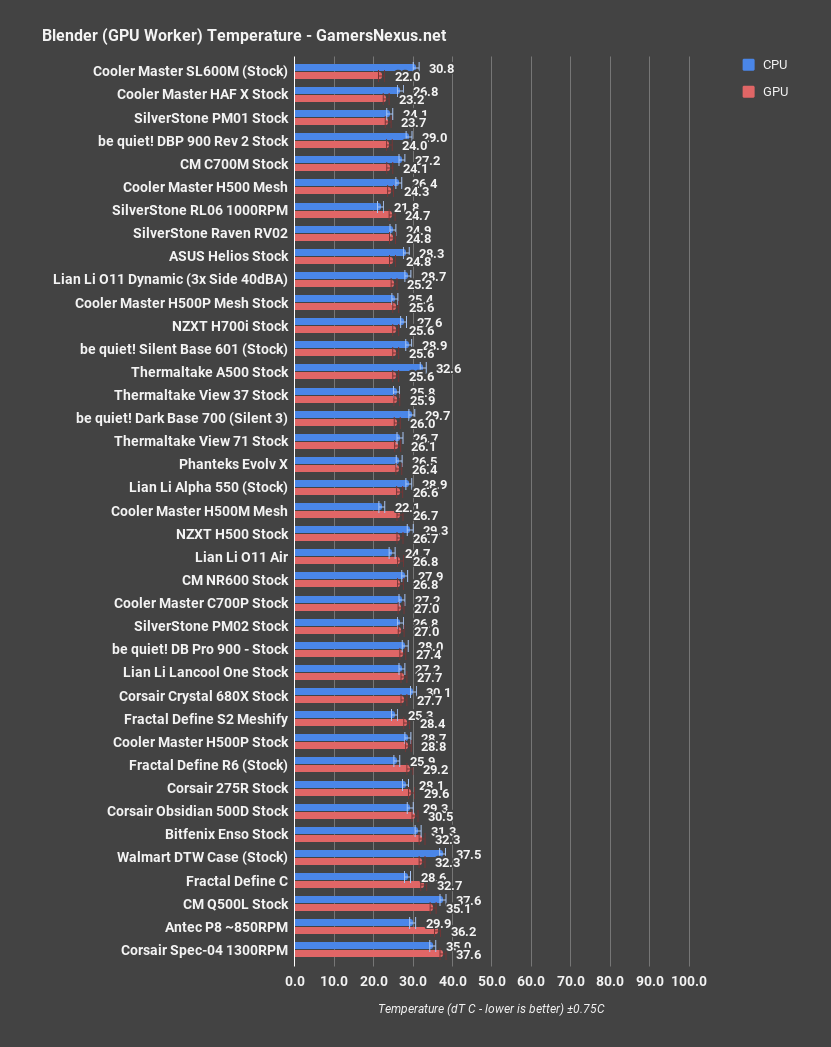
GPU dT in the Blender render averaged 24.8C, which again compares much more favorably to the other results. It’s tied with the RV02 and almost with the RL06, two of the overall best-cooled cases we’ve tested. The Helios holds its own in the category of GPU thermals by throwing fans at it, which is by extension throwing money at it.
Noise
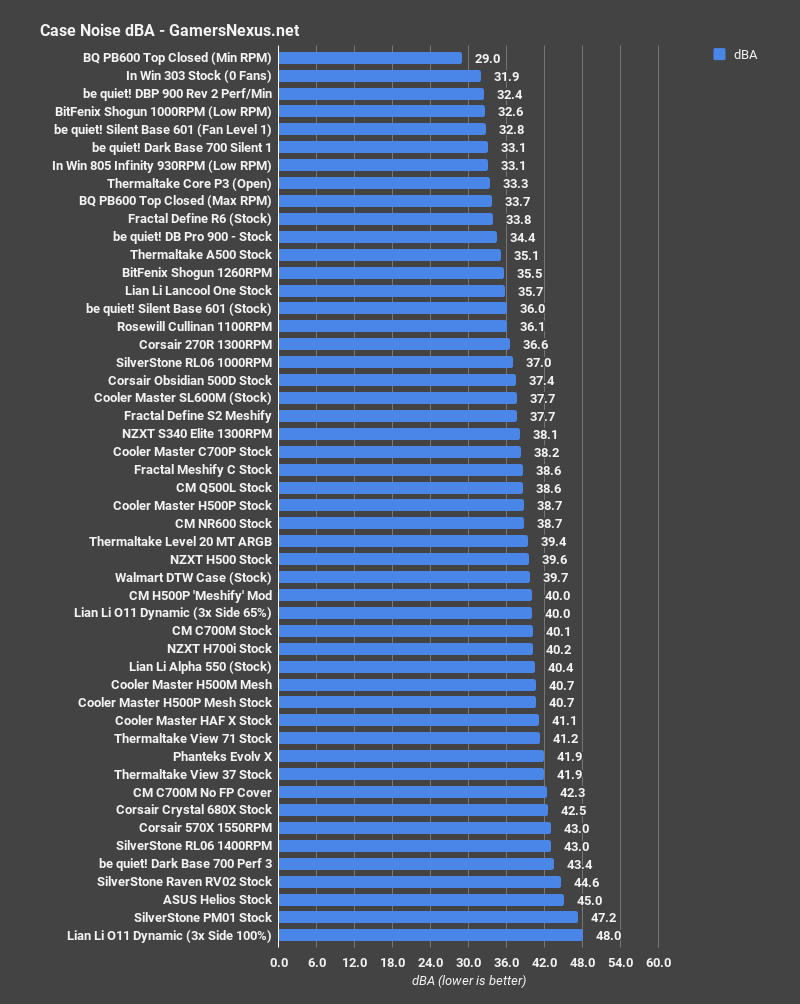
The Helios, running at max case fan speed as it was in the baseline torture test, measured 45dBA, or louder than almost anything stock configuration we’ve tested other than the PM01. There are a lot of big fans moving very fast, and although the glass panel restricts air, it isn’t sealed enough to restrict noise.
Conclusion: ASUS ROG Strix Helios Review
The ROG Helios is a case for customers who are invested in the ROG product line, who will buy every component with Asus Aura Sync and want a case to match. That’s fine, and the Helios is guaranteed to sell like hotcakes because of it, but we can’t review a case based on the logo.
It’s good in stock thermal performance, specifically in GPU thermals, but it’s carried by the four stock fans and doesn’t have much room for improvement. There are a ton of small pieces and parts in a way that makes it seem like they decided to tick as many boxes as possible: GPU supports, vertical GPU mount, fan control, LED control, cable cover, carry handle et cetera. It’s a $280 case, which is almost beyond the realm of normal value comparisons; it comes with four pretty good fans, but even generously assuming someone would pay $20 apiece for them that leaves $200 for the enclosure. Of the showy cases we’ve reviewed, we prefer ones like the Cooler Master H500P Mesh or the Thermaltake View 71 TG, both of which have distinctive RGB-heavy appearances for less than $200. Neither of them have giant aluminum rails on the top, though, so you might need some help carrying them to LAN parties.
Host, Test Lead: Steve Burke
Testing, Editorial: Patrick Lathan
Video: Andrew Coleman, Josh Svoboda